


前言
热修复是今年比较流行的话题,想要进阶高级工程师是必备的知识,其实他也要有一定的Android实力才能读懂源码,涉及到类加载机制,dex加载等等,不过想要进阶高级的你,是不可不学的一门技术哦
AndFix介绍
AndFix是阿里开源的一个Android热补丁框架,允许APP在不重新发布版本的情况下修复线上的bug,目前支持2.3-7.0,具体介绍可以查看github项目
其实现步骤
- 集成AndFix
- 生成解决完Bug的拆分包
- 下载拆分包
- 加载拆分包(Bug被修复)
AndFix优缺点
优点
- 集成快、使用简单
- BUG修复的即时性
- 补丁包同样采用差量技术,生成的PATCH体积小
- 对应用无侵入,几乎无性能损耗
缺点
- 只支持方法的替换来修复Bug,不支持新增字段,也不支持对资源的替换
- 由于AndFix基于Native实现的,需要适配虚拟机的稳定性与兼容性问题,更重要的是它无法实现类替换
具体可以引用Tinker的Wiki图

项目结构
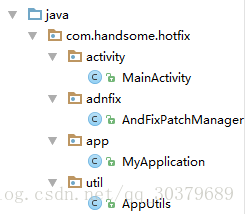
AndFix集成
在app的Gradle引入依赖
compile 'com.alipay.euler:andfix:0.5.0@aar'//AndFix这里为了方便调试,我们将签名文件放在项目目录下,然后配置debug签名
signingConfigs {
    debug {
        keyAlias 'hensen'
        keyPassword '123456'
        storeFile file("../Hensen.jks")
        storePassword '123456'
    }
    release {
        keyAlias 'hensen'
        keyPassword '123456'
        storeFile file("../Hensen.jks")
        storePassword '123456'
    }
}

buildTypes {
    release {
        minifyEnabled false
        proguardFiles getDefaultProguardFile('proguard-android.txt'), 'proguard-rules.pro'
        signingConfig signingConfigs.release
    }
    debug {
        minifyEnabled false
        signingConfig signingConfigs.debug
    }
}
这样我们可以直接在手机上运行debug应用也可以进行调试
AndFix封装
我们对即将要使用到的AndFix进行一层封装,方便我们的使用
public class AndFixPatchManager {

    private static AndFixPatchManager mInstance = null;
    private static PatchManager mPatchManager = null;

    public static AndFixPatchManager getInstance() {
        if (mInstance == null) {
            synchronized (AndFixManager.class) {
                if (mInstance == null) {
                    mInstance = new AndFixPatchManager();
                }
            }

        }
        return mInstance;
    }

    /**
     * 初始化
     *
     * @param context
     */
    public void init(Context context) {
        mPatchManager = new PatchManager(context);
        mPatchManager.init(AppUtils.getVersionName(context));
        mPatchManager.loadPatch();
    }

    /**
     * 加载拆分包
     *
     * @param path
     */
    public void addPatch(String path) {
        try {
            if (mPatchManager != null) {
                mPatchManager.addPatch(path);
            }
        } catch (Exception e) {
            e.printStackTrace();
        }
    }
}
这里涉及到获取版本号,如果版本号发生改变,那么AndFix会把缓存好的拆分包进行清除
public class AppUtils {

    /**
     * 获取应用程序versionname
     *
     * @param context
     * @return
     */
    public static String getVersionName(Context context) {
        String versionName = "1.0.0";
        try {
            PackageManager pm = context.getPackageManager();
            PackageInfo pi = pm.getPackageInfo(context.getPackageName(), 0);
            versionName = pi.versionName;
        } catch (Exception e) {
            e.printStackTrace();
        }
        return versionName;
    }
}
AndFix的使用
1、初始化
我们创建一个Application,初始化AndFix,记得在Manifest中声明Application
public class MyApplication extends Application {

    @Override
    public void onCreate() {
        super.onCreate();

        AndFixPatchManager.getInstance().init(this);
    }
}<application
android:name=".app.MyApplication"2、加载拆分包
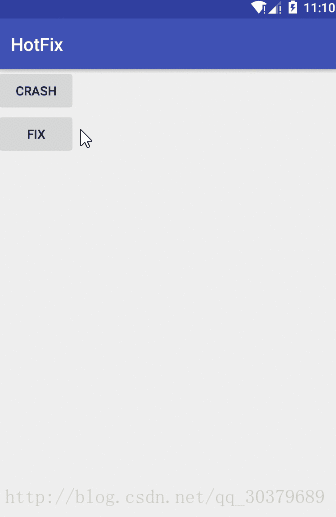
我们在项目界面中创建两个按钮和点击事件,分别是制造应用程序的奔溃和修复Bug
public class MainActivity extends AppCompatActivity {

    private String mPath;

    @Override
    protected void onCreate(Bundle savedInstanceState) {
        super.onCreate(savedInstanceState);
        setContentView(R.layout.activity_main);

        mPath = getExternalCacheDir().getAbsolutePath() + File.separatorChar;
        Toast.makeText(this, mPath, Toast.LENGTH_LONG).show();
    }

    /**
     * Crash按钮点击事件
     *
     * @param view
     */
    public void Crash(View view) {
        // 当我们传进去null的时候,程序会抛出异常,崩溃
        Log.e("TAG", null);
        Toast.makeText(this, "Hello", Toast.LENGTH_LONG).show();
    }

    /**
     * Fix按钮点击事件
     *
     * @param view
     */
    public void Fix(View view) {
        AndFixPatchManager.getInstance().addPatch(mPath.concat("new_patch").concat(".apatch"));
    }

}
这个时候我们的项目点击Crash按钮的时候出现Bug崩溃了,下面我们开始修复这个Bug
AndFix拆分包
1、我们修复一下刚才的Bug,然后生成新的apk文件,此时我们跑的程序还是旧的,还未修复Bug
public void Crash(View view) {
// 正常通过
Log.e("TAG", "");
Toast.makeText(this, "Hello", Toast.LENGTH_LONG).show();
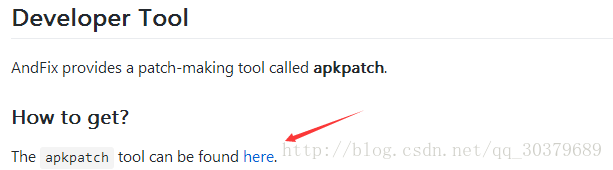
}2、生成拆分包之前,我们需要收集签名文件、老的apk文件、新的apk文件、下载AndFix提供的工具,工具在github上可以下载
3、下载下来只有图中的三个文件,而后面几个文件是我为了方便生成拆分包写的
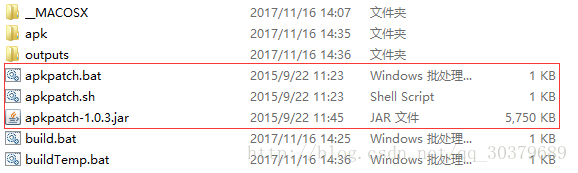
4、apk文件夹存放三个文件、Hensen.jks、old.apk、new.apk,而outputs文件夹存放的是待会生成的拆分包目录,build.bat是我写的生成拆分包的指令,而buildTemp是待会生成要执行的文件。我们通过指令apkpatch查看生成拆分包的命令
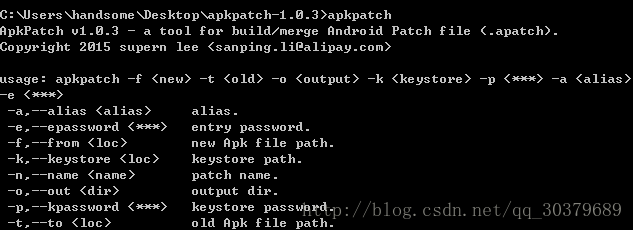
5、发现指令的后面都有对指令内容的解释,那么就根据指令内容写进build.bat中
@echo on
echo
echo ./apkpatch -f ./apk/new.apk -t ./apk/old.apk -o outputs/ -k ./apk/Hensen.jks -p 123456 -a hensen -e 123456 >> buildTemp.bat
START buildTemp.bat
6、运行build.bat就可以看到拆分包生成的apatch文件,重命名我们想要的new_patch.apatch,通过adb push将apatch文件放进我们的SD卡缓存目录下,如果不清楚目录,则可以通过打印查看
mPath = getExternalCacheDir().getAbsolutePath() + File.separatorChar;
Toast.makeText(this, mPath, Toast.LENGTH_LONG).show();
7、最后我们程序点击Fix修复按钮,然后点击Crash崩溃按钮,这个时候可以发现Bug不会出现了
AndFix源码分析
1、简单的流程
- 取出apatch包的dex文件和PATCH.MF文件中需要修复的类名
- 通过自定义的ClassLoader加载dex文件拿到字节码
- 通过字节码拿到MethodReplace注解,表示需要修复的方法
- 通过Native层将出现Bug的方法运行指针指向apatch包dex文件中修复好的方法
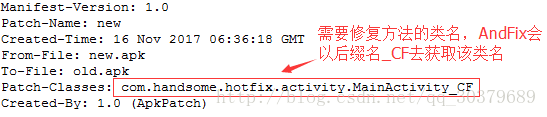
2、解压apatch包查看PATCH.MF文件的类名
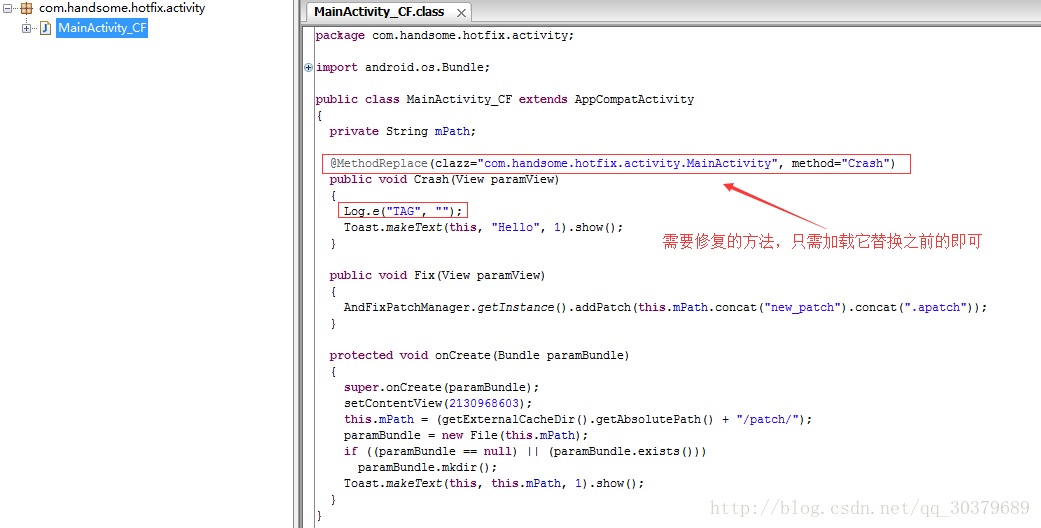
3、解压apatch包反编译classes.dex,查看替换的代码
4、代码分析
public void init(Context context) {
    mPatchManager = new PatchManager(context);
    mPatchManager.init(AppUtils.getVersionName(context));
    mPatchManager.loadPatch();
}
我们原先代码是这样调用的,带着我们的流程到源码去按顺序阅读
public PatchManager(Context context) {
    // 1、各种参数的初始化
    mContext = context;
    mAndFixManager = new AndFixManager(mContext);
    mPatchDir = new File(mContext.getFilesDir(), DIR);
    mPatchs = new ConcurrentSkipListSet<Patch>();
    mLoaders = new ConcurrentHashMap<String, ClassLoader>();
}

public void init(String appVersion) {
    if (!mPatchDir.exists() && !mPatchDir.mkdirs()) {// make directory fail
        Log.e(TAG, "patch dir create error.");
        return;
    } else if (!mPatchDir.isDirectory()) {// not directory
        mPatchDir.delete();
        return;
    }
    SharedPreferences sp = mContext.getSharedPreferences(SP_NAME,
            Context.MODE_PRIVATE);
    // 取出之前的版本号
    String ver = sp.getString(SP_VERSION, null);
    if (ver == null || !ver.equalsIgnoreCase(appVersion)) {
        // 2、如果是初次加载或者是版本号和上一次不同,则清空所有apatch文件,首次修复需要我们手动调用addPatch修复
        cleanPatch();
        sp.edit().putString(SP_VERSION, appVersion).commit();
    } else {
        // 2、如果版本号相同,则直接进行修复工作,当我们修复完成后,第二次开始可以不用点击修复按钮
        initPatchs();
    }
}

private void initPatchs() {
    File[] files = mPatchDir.listFiles();
    for (File file : files) {
        addPatch(file);
    }
}

public void loadPatch() {
    mLoaders.put("*", mContext.getClassLoader());// wildcard
    Set<String> patchNames;
    List<String> classes;
    for (Patch patch : mPatchs) {
        patchNames = patch.getPatchNames();
        for (String patchName : patchNames) {
            classes = patch.getClasses(patchName);
            // 3、遍历每个apatch文件,修复bug
            mAndFixManager.fix(patch.getFile(), mContext.getClassLoader(),
                    classes);
        }
    }
}

public synchronized void fix(File file, ClassLoader classLoader,
            List<String> classes) {
    if (!mSupport) {
        return;
    }

    if (!mSecurityChecker.verifyApk(file)) {// security check fail
        return;
    }

    try {
        File optfile = new File(mOptDir, file.getName());
        boolean saveFingerprint = true;
        if (optfile.exists()) {
            // need to verify fingerprint when the optimize file exist,
            // prevent someone attack on jailbreak device with
            // Vulnerability-Parasyte.
            // btw:exaggerated android Vulnerability-Parasyte
            // http://secauo.com/Exaggerated-Android-Vulnerability-Parasyte.html
            if (mSecurityChecker.verifyOpt(optfile)) {
                saveFingerprint = false;
            } else if (!optfile.delete()) {
                return;
            }
        }
        // 4、创建DexFile,加载dex文件
        final DexFile dexFile = DexFile.loadDex(file.getAbsolutePath(),
                optfile.getAbsolutePath(), Context.MODE_PRIVATE);

        if (saveFingerprint) {
            mSecurityChecker.saveOptSig(optfile);
        }
        // 5、创建自定义的ClassLoader过滤包名
        ClassLoader patchClassLoader = new ClassLoader(classLoader) {
            @Override
            protected Class<?> findClass(String className)
                    throws ClassNotFoundException {
                Class<?> clazz = dexFile.loadClass(className, this);
                if (clazz == null
                        && className.startsWith("com.alipay.euler.andfix")) {
                    return Class.forName(className);// annotation’s class
                                                    // not found
                }
                if (clazz == null) {
                    throw new ClassNotFoundException(className);
                }
                return clazz;
            }
        };
        Enumeration<String> entrys = dexFile.entries();
        Class<?> clazz = null;
        while (entrys.hasMoreElements()) {
            String entry = entrys.nextElement();
            if (classes != null && !classes.contains(entry)) {
                continue;// skip, not need fix
            }
            // 6、通过自定义ClassLoader加载dex拿到字节码
            clazz = dexFile.loadClass(entry, patchClassLoader);
            if (clazz != null) {
                // 7、通过字节码找到我们需要修复类的方法
                fixClass(clazz, classLoader);
            }
        }
    } catch (IOException e) {
        Log.e(TAG, "pacth", e);
    }
}

private void fixClass(Class<?> clazz, ClassLoader classLoader) {
    Method[] methods = clazz.getDeclaredMethods();
    MethodReplace methodReplace;
    String clz;
    String meth;
    for (Method method : methods) {
        // 8、在该类中拿到有MethodReplace注解的方法
        methodReplace = method.getAnnotation(MethodReplace.class);
        if (methodReplace == null)
            continue;
        clz = methodReplace.clazz();
        meth = methodReplace.method();
        if (!isEmpty(clz) && !isEmpty(meth)) {
            // 9、替换掉原来的方法
            replaceMethod(classLoader, clz, meth, method);
        }
    }
}

private void replaceMethod(ClassLoader classLoader, String clz,
        String meth, Method method) {
    try {
        String key = clz + "@" + classLoader.toString();
        Class<?> clazz = mFixedClass.get(key);
        if (clazz == null) {// class not load
            Class<?> clzz = classLoader.loadClass(clz);
            // initialize target class
            clazz = AndFix.initTargetClass(clzz);
        }
        if (clazz != null) {// initialize class OK
            mFixedClass.put(key, clazz);
            Method src = clazz.getDeclaredMethod(meth,
                    method.getParameterTypes());
            // 10、执行替换
            AndFix.addReplaceMethod(src, method);
        }
    } catch (Exception e) {
        Log.e(TAG, "replaceMethod", e);
    }
}

public static void addReplaceMethod(Method src, Method dest) {
    try {
        // 11、替换
        replaceMethod(src, dest);
        initFields(dest.getDeclaringClass());
    } catch (Throwable e) {
        Log.e(TAG, "addReplaceMethod", e);
    }
}

// 12、Native方法
private static native void replaceMethod(Method dest, Method src);
Native分析
Native层的方法需要去AndFix的源码的jni调用中阅读
// 需要对不同的虚拟机进行适配,因为不同虚拟机的类加载机制是有区别的
static void replaceMethod(JNIEnv* env, jclass clazz, jobject src,
        jobject dest) {
    if (isArt) {
        art_replaceMethod(env, src, dest);
    } else {
        dalvik_replaceMethod(env, src, dest);
    }
}
我们以Dalvik虚拟机为例,找到对应的替换方法,可以简单的理解为偷天换日的概念
extern void __attribute__ ((visibility ("hidden"))) dalvik_replaceMethod(
        JNIEnv* env, jobject src, jobject dest) {
    jobject clazz = env->CallObjectMethod(dest, jClassMethod);
    ClassObject* clz = (ClassObject*) dvmDecodeIndirectRef_fnPtr(
            dvmThreadSelf_fnPtr(), clazz);
    clz->status = CLASS_INITIALIZED;

    Method* meth = (Method*) env->FromReflectedMethod(src);
    Method* target = (Method*) env->FromReflectedMethod(dest);
    LOGD("dalvikMethod: %s", meth->name);

//  meth->clazz = target->clazz;
    meth->accessFlags |= ACC_PUBLIC;
    meth->methodIndex = target->methodIndex;
    meth->jniArgInfo = target->jniArgInfo;
    meth->registersSize = target->registersSize;
    meth->outsSize = target->outsSize;
    meth->insSize = target->insSize;

    meth->prototype = target->prototype;
    meth->insns = target->insns;
    // 这里进行偷天换日
    meth->nativeFunc = target->nativeFunc;
}


 455
455

 被折叠的 条评论
为什么被折叠?
被折叠的 条评论
为什么被折叠?
 到【灌水乐园】发言


