


个人主页:云纳星辰怀自在
座右铭:“所谓坚持,就是觉得还有希望!”
1.实现背景Implementation background
在CI/CD过程中需要实现远程执行脚本的功能。这里通过jenkins集中管理测试步骤。
In the CI/CD process, it is necessary to realize the function of remote execution of scripts. Here, Jenkins centrally manages the test steps.
2.实现测试案例Implement test cases
由于当前工作环境存在Windows和Linux两种操作系统,两者对权限的管理方式存在较大差异,这需要对这两种不同的系统进行讨论。
Since there are two operating systems, Windows and Linux, in the current working environment, there is a big difference in the way of managing permissions between the two, which requires discussion of these two different systems.
2.1服务器端需求 Server-side requirements
在服务器端需要安装完整的Jenkins,并且安装SSH相关的插件。
On the server side, you need to install the complete Jenkins and install the SSH-related plug-ins.
安装步骤如下:The installation steps are as follows:
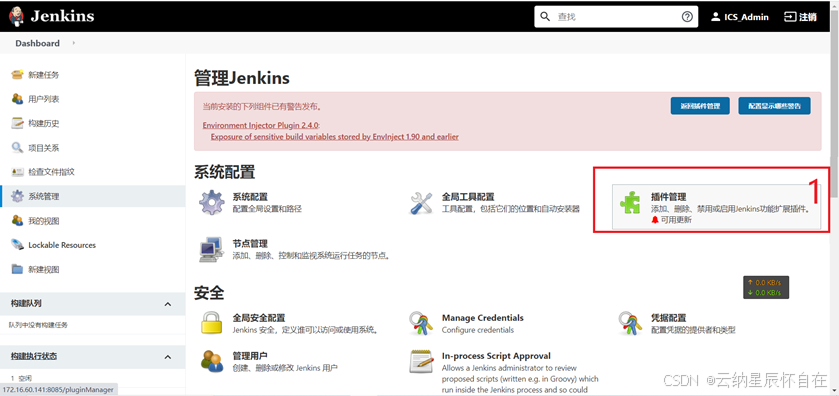 |
| (1)在“系统管理“页面,单击“插件管理“ On the "System Management" page, click "Plugin Management" |
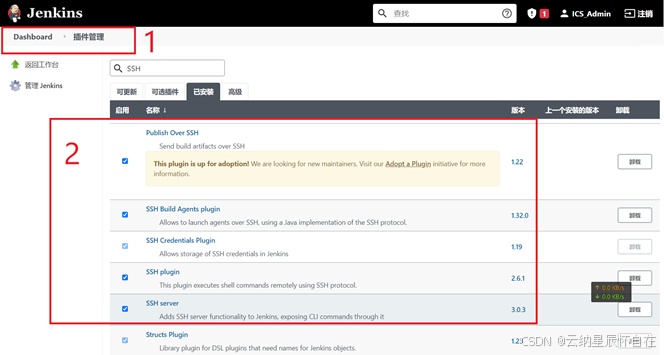 |
| (1)进入插件管理页面 Enter the plug-in management page (2)检查SSH的相关插件是否安装,上图已经安装完成,如果安装完成可以跳过本节内容 Check whether the relevant plug-ins of SSH are installed. The above picture has been installed. If the installation is complete, you can skip this section. |
 |
| (1)进入插件管理页面 Enter the plug-in management page (2)选择 “可选插件“选项 Select the "Optional Plug-in" option (3)搜索“SSH“ Search for "SSH" (4)钩选需要安装的插件 Check the plug-ins that need to be installed (5)选择“安装不重启“方式安装 Choose the "install without restarting" method to install |
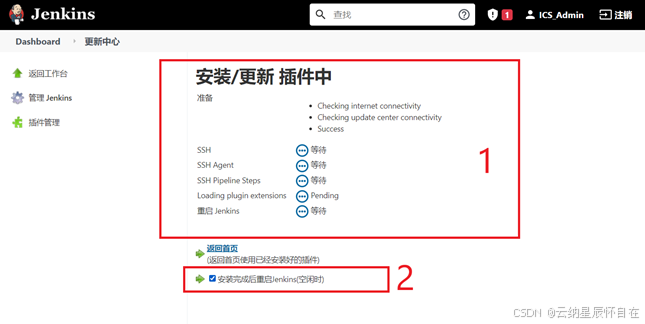 |
| (1)显示安装状态 Display installation status (2)选择“安装完成后重启“保证安装完成后自动重启 Select "Restart after installation is complete" to ensure automatic restart after installation is complete |
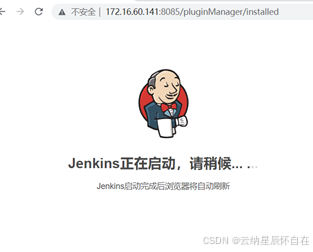 |
| 安装完成后弹出如上图的重启界面,SSH相关的服务插件安装完毕 After the installation is complete, the restart interface as shown above will pop up, and the SSH-related service plug-ins are installed. |
2.2Linux
Jenkin在linux上执行脚本在不通过其他辅助手段的情况下,比较简单且方式灵活的方案是:
Jenkin executes scripts on Linux without other auxiliary means. The simpler and flexible solution is:
将远程linux配置为Jenkin的一个节点,通过SSH服务实现远程执行命令行的方式直接使用Linux。实现复杂的系统指令控制,减少自定义协议的开发和实现难度。
Configure the remote linux as a node of Jenkin, and use Linux directly through the SSH service to realize the remote execution of the command line. Realize complex system command control and reduce the difficulty of developing and implementing custom protocols.
下面将以一个手动构建Linux端的Uboot编译实验来详细讲解Jenkins的配置。
The following will explain the configuration of Jenkins in detail with a manual Uboot compilation experiment on the Linux side.
2.2.1环境准备
下面将在jenkins中配置一个环境,主要内容是添加凭据->添加远程主机(添加主机时也可以新建凭据)。
The following will configure an environment in jenkins, the main content is to add credentials -> add remote host (you can also create new credentials when adding a host).
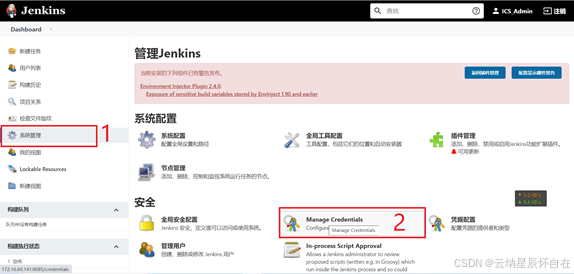 |
| (1)在“系统管理“页面,单击“系统配置“ In the "System Management" page, click "System Configuration" (2)单击“管理凭据“ Click "Manage Credentials" |
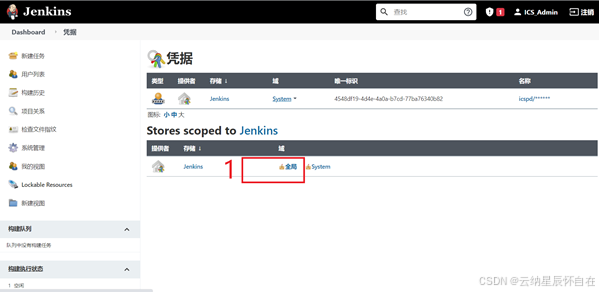 |
| (1)单击“全局“凭据域 Click "Global" credential domain |
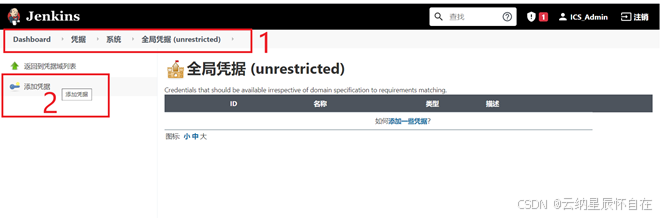 |
| (1)处于凭据管理页面 In the credential management page (2)单击“添加凭据“ Click "Add Credentials" |
 |
| (1)配置凭据的内容 Configure the content of credentials (2)保存凭据 Save credentials |
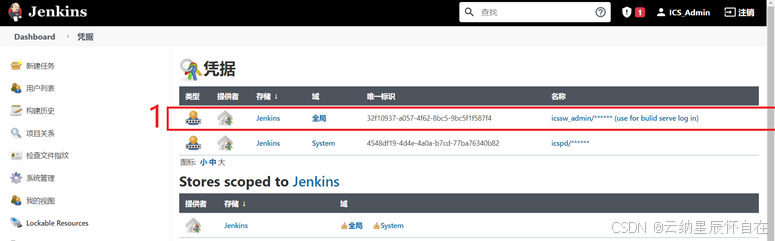 |
| (1)返回凭据管理,可以看到刚才新添加的凭据 Return to the credential management, you can see the newly added credential |
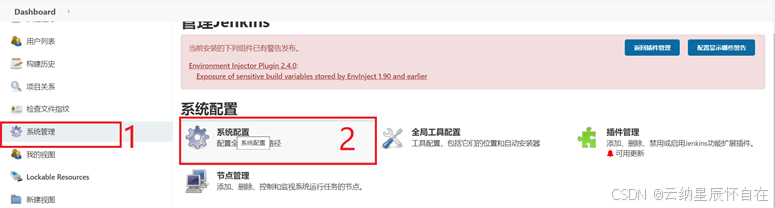 |
| (1)在“系统管理“页面,单击“系统配置“ In the "System Management" page, click "System Configuration" |
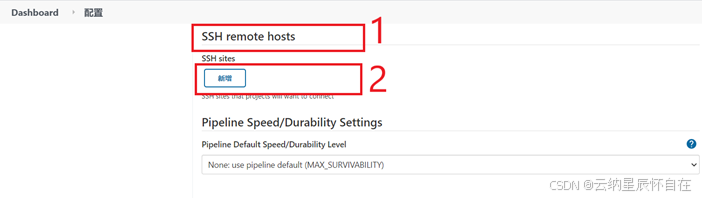 |
| (1)找到“远程主机“选项 Find the "Remote Host" option (2)单击”新增”添加一个远程主机 Click "Add" to add a remote host |
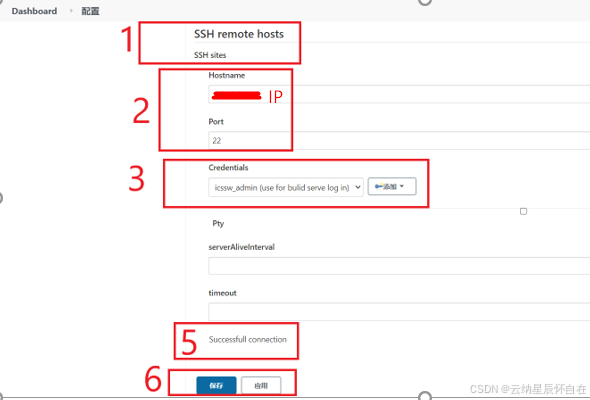 |
| (1)”远程主机”配置页面 "Remote host" configuration page (2)远程主机信息(SSH登录默认端口是22) Remote host information (the default port for SSH login is 22) (3)选择刚才这个远程主机的登录凭据 Select the login credentials of the remote host just now (4)单击“连接检查“ Click "Connection Check" (5)显示连接结果 Display the connection result (6)保存配置 Save configuration |
2.2.2测试一个手动构建工程
这里在已经准备好的uboot编译环境中测试远程环境配置和脚本调用。
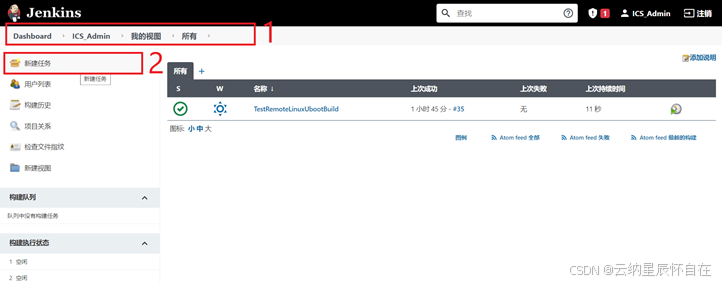 |
| (1)进入“我的视图“ (2)单击”新建任务” |
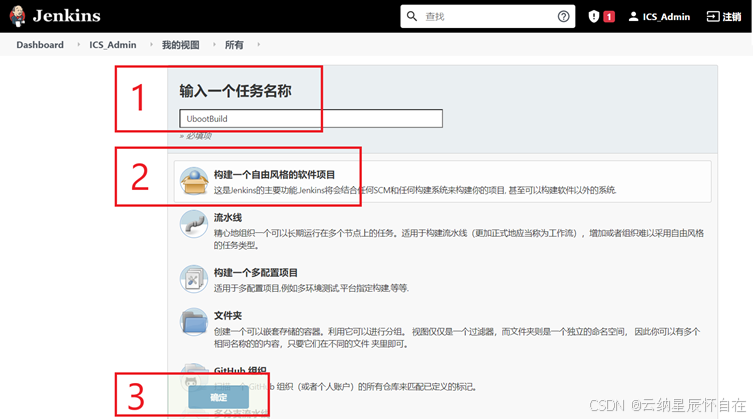 |
| (1)输入这个配置的名称 (2)选择“构建一个自由风格的软件项目“ (3)单击”确定”按钮,开始配置工程 |
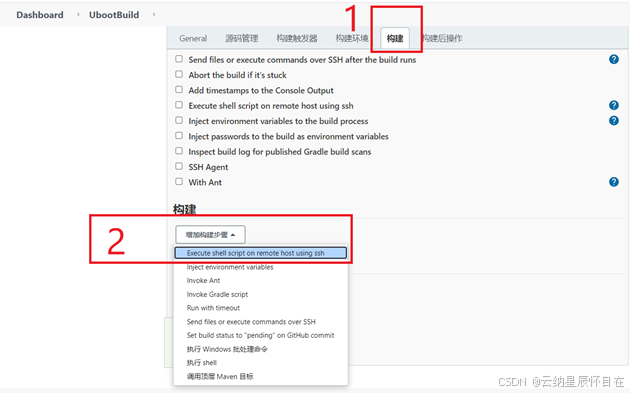 |
| (1)进入“构建“选项 (2)选择“在远程主机执行脚本“的构建方式 |
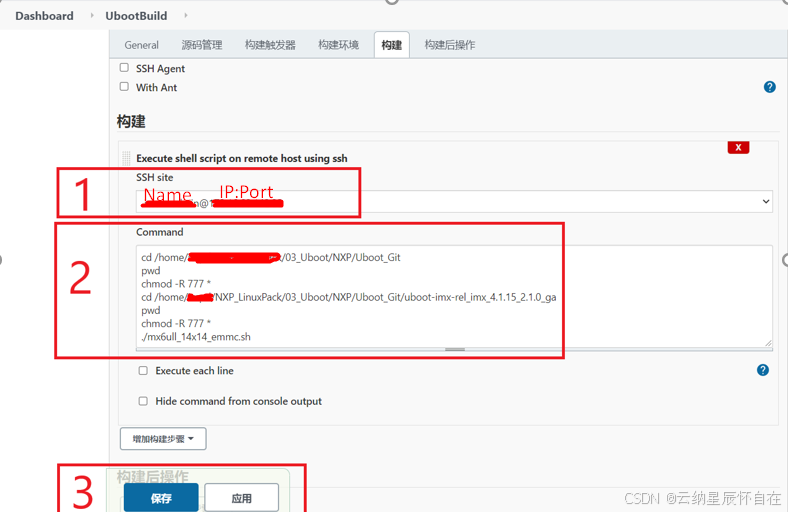 |
| (1)选择在远程主机的信息 (2)编写远程执行脚本[1] (3)单击”保存”按钮 |
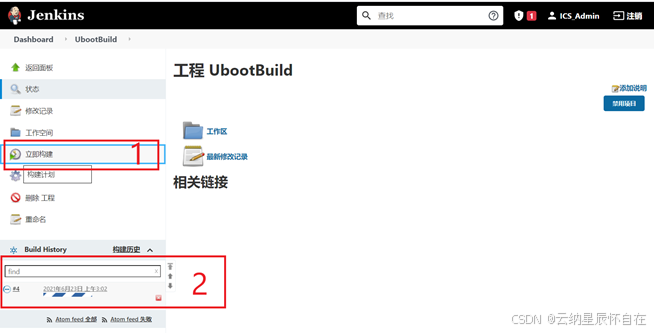 |
| (1)单击“立即构建“测试脚本和环境 (2)显示当前构建进度 |
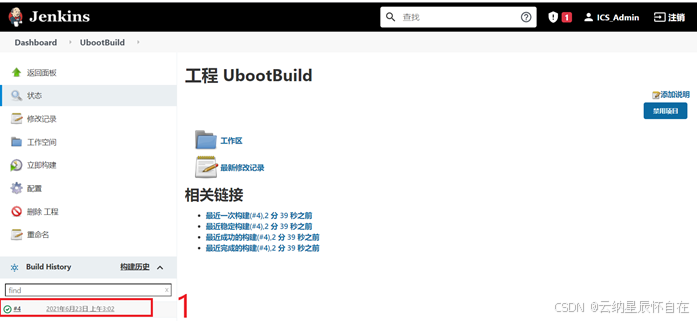 |
| (1)等待执行完成,单击查看编译日志 |
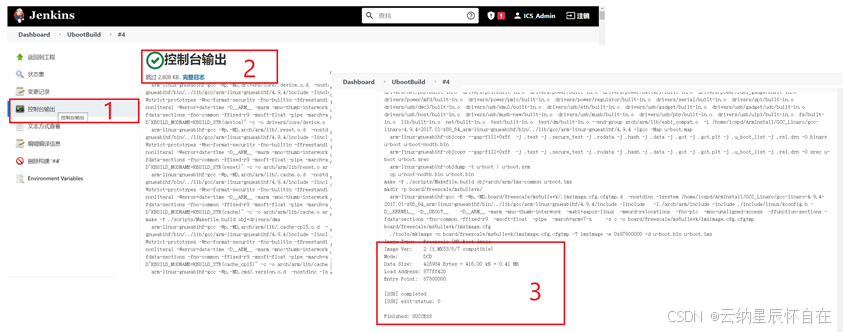 |
| (1)查看控制台输出 View the console output (2)控制台输出日志 Console output log (3)编译结果 Compilation result |
内部注释/ Internal notes:
| [1]—Jennkins指令/Command # Switch to the upper path of the compilation path cd /home/mypd/NXP_LinuxPack/03_Uboot/NXP/Uboot_Git # Print path, used to view debugging information Pwd # The permission to modify files and folders is for everyone sudo chmod -R 777 * cd /home/mypd/NXP_LinuxPack/03_Uboot/NXP/Uboot_Git/uboot-imx-rel_imx_4.1.15_2.1.0_ga pwd sudo chmod -R 777 * #Execute script ./mx6ull_14x14_emmc.sh |
2.3Windows
Windows 端采用TCP/Web Serve代理的方式进行命令运行,远程主机作为Jenkins的节点使用。
The Windows side uses TCP/Web Server proxy for command operation, and the remote host is used as a Jenkins node.
2.3.1Jenkins开启代理 Open proxy
开启Jenkins的WEB代理。
Start the Jenkins WEB proxy.
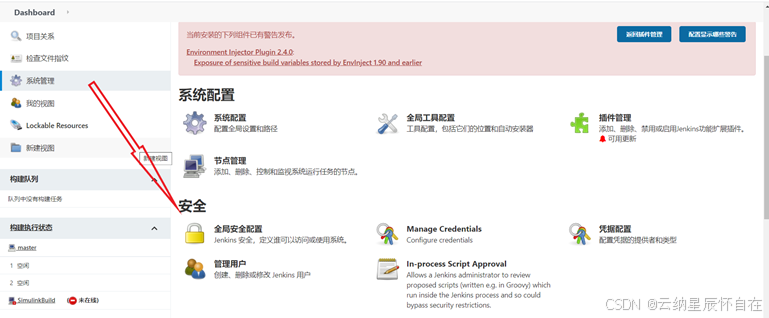 |
| 配置全局安全选项 |
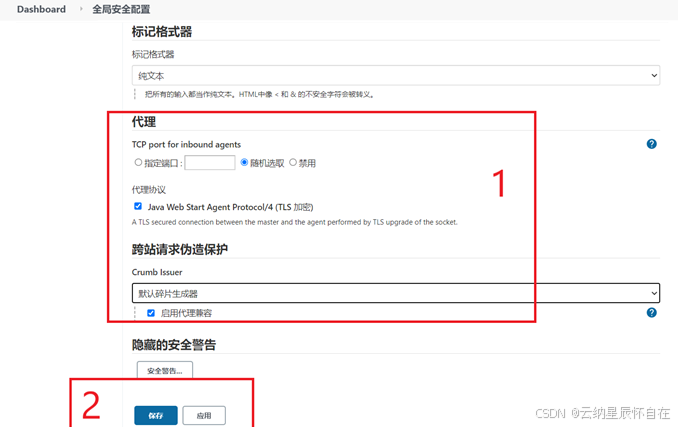 |
| (1)配置代理 Configure proxy (2)保存配置 Save the configuration |
2.3.2配置Jenkins的节点 Configure Jenkins nodes
Windows在这里作为Jenkin的一个节点来使用,Jenkins直接通过Web接口调用节点命令行。
Windows is used here as a node of Jenkin, and Jenkins directly invokes the node command line through the web interface.
 |
| 进入节点管理配置 Enter node management configuration |
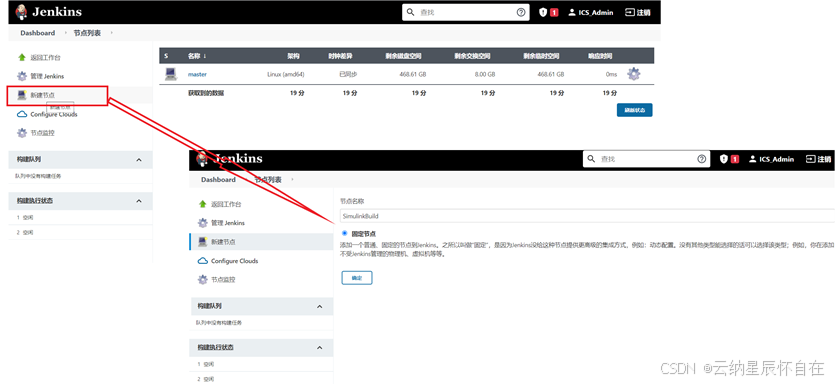 |
| 新建一个固定节点 Create a new fixed node |
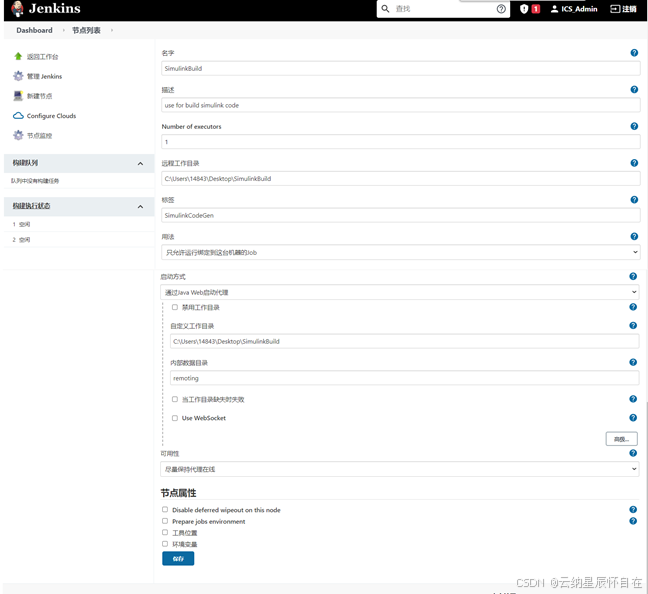 |
| 配置自定义属性并保存 Configure custom attributes and save *因为在windows中开启SSH服务的工具是收费的,这里选择采用Web来启动代理*Because the tool to open the SSH service in windows is chargeable, here we choose to use the Web to start the proxy |
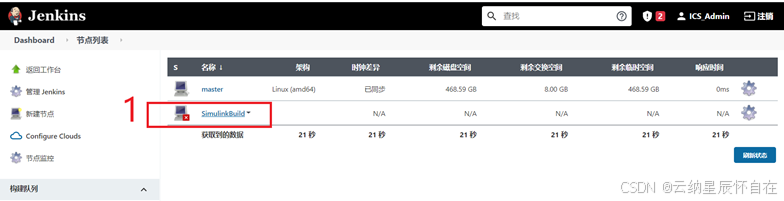 |
 |
| (1)单击”新建的节点”测试执行命令 Click "New Node" to test the execution command (2)由于Windows端服务并没有开启,将会弹出错误提示 Since the Windows service is not turned on, an error message will pop up |
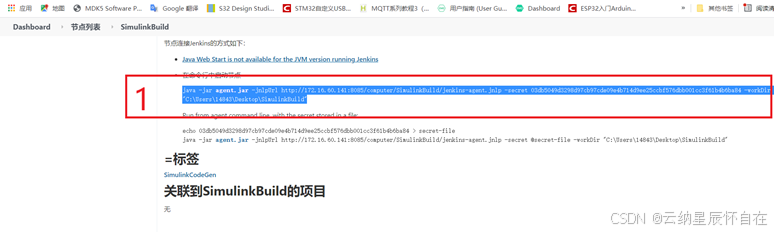
2.3.3Windows部署服务 Windows Deployment Service
在上一节中最后的测试是失败的,这里将在测试电脑上安装服务,开启windows端的服务。
The last test in the previous section failed. Here, the service will be installed on the test computer and the service on the windows side will be turned on.
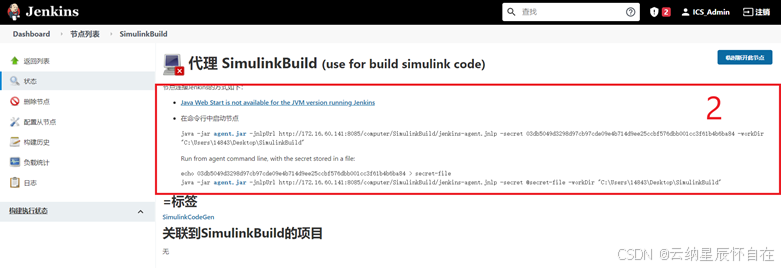
 |
| 单击错误提示中的jar文件,下载到上一节设定的工作目录 Click the jar file in the error message and download it to the working directory set in the previous section |
 |
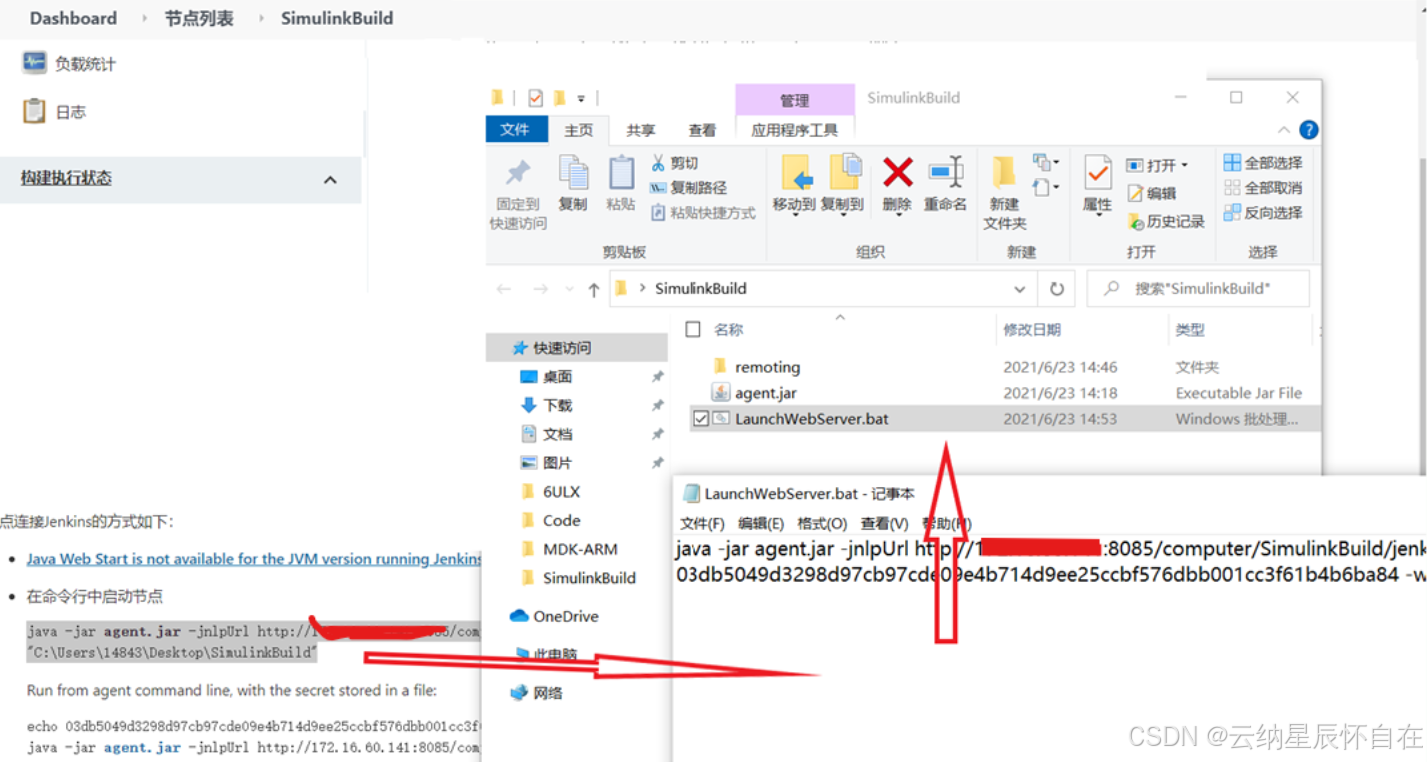 |
| (1)复制提示的内容到bat脚本中 Copy the content of the prompt to the bat script |
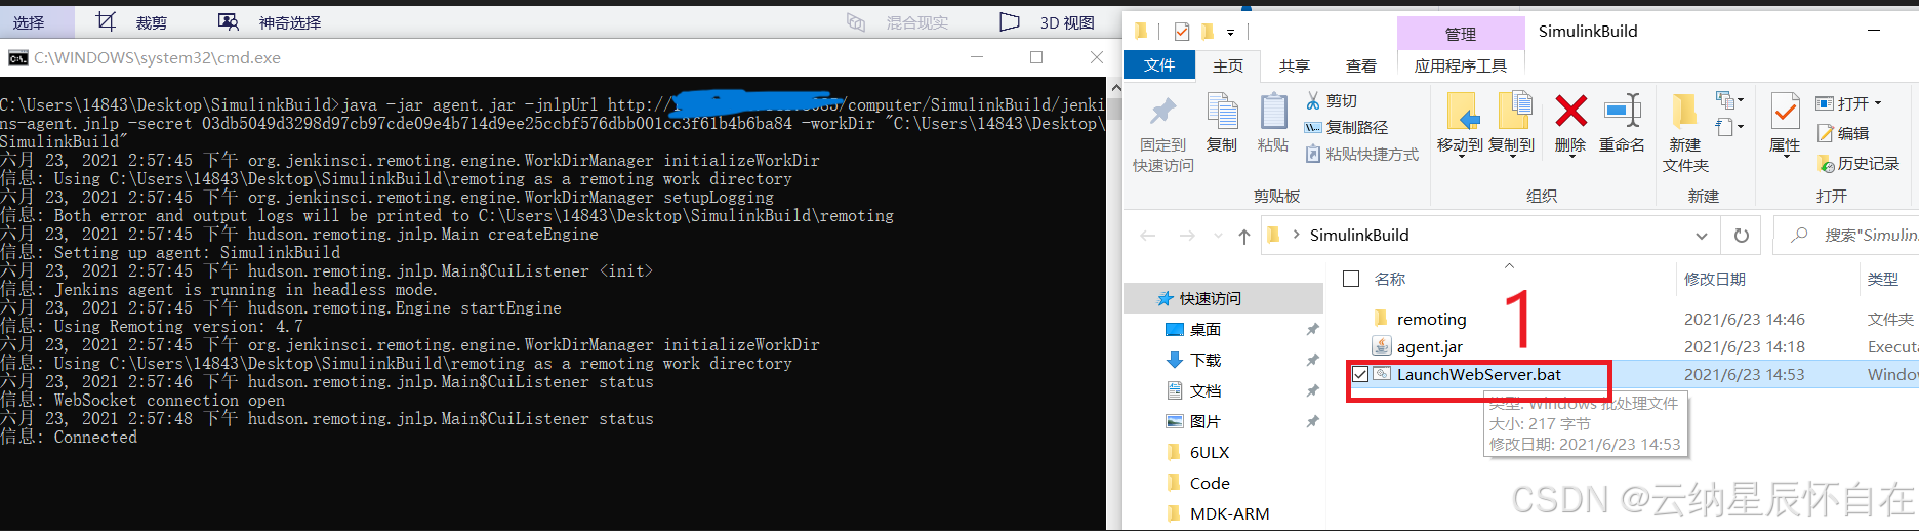 |
| 双击.bat文件,执行启动指令 Double-click the .bat file to execute the startup instruction |
 |
| 节点已经成功连接 The node has successfully connected |
2.3.4测试远程调用 Test remote control
(1)测试远程生成文本文件Test the remotely generated text file
这里将用远程生成一个测试文本作为联通性测试。
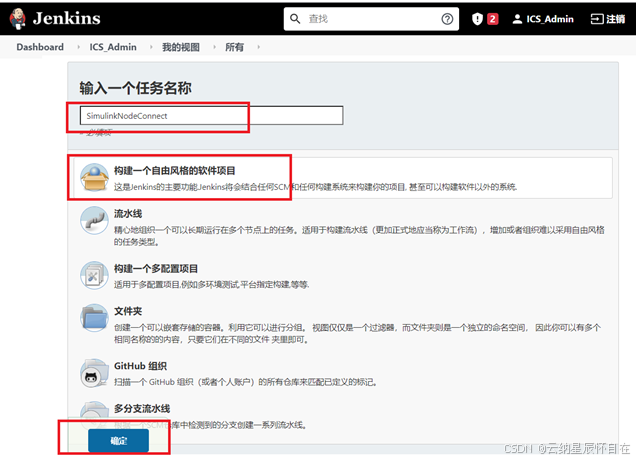 |
| 新建一个构建任务 Create a new build task |
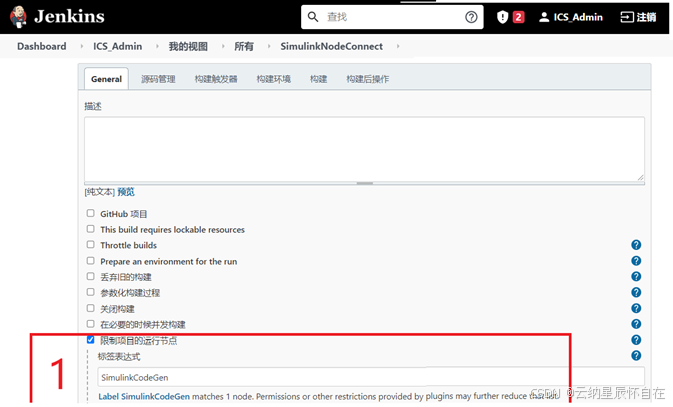 |
| 这里希望在具有指定标签的节点上执行这个任务,那么这里输入他的标签 Here I want to perform this task on the node with the specified label, then enter his label here *如果有多个节点都有这个标签(一个节点允许有多个不同的标签),那么这些节点都将响应这个构建工程 *If there are multiple nodes with this label (a node is allowed to have multiple different labels), then these nodes will all respond to this construction project |
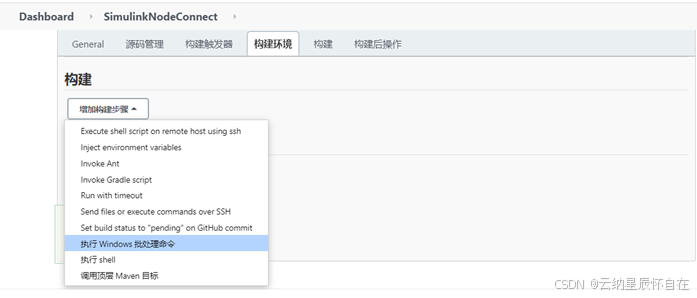 |
| 新建一个windows批处理命令 Create a new windows batch command *远程被控对象是windows,如果是linux需要使用shell *The remote controlled object is windows, if it is linux, you need to use shell |
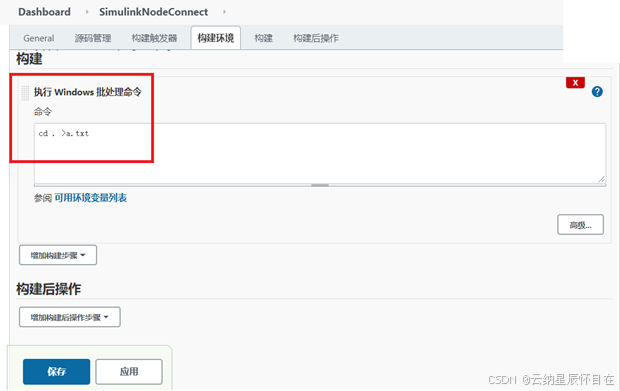 |
| 这里先初步测试生成一个txt文件,填写完成后保存 Here is a preliminary test to generate a txt file, and save it after filling in |
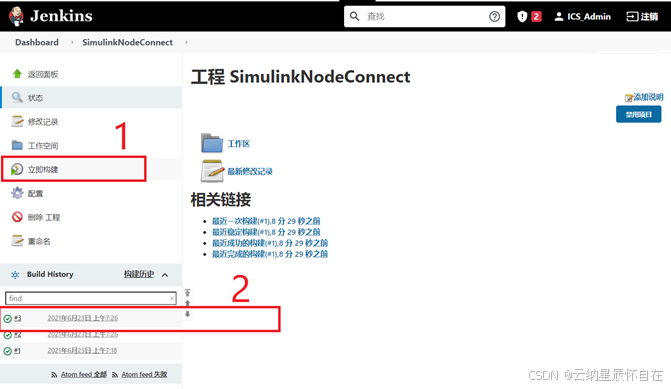 |
| (1)单击“立即构建“ Click "Build Now" (2)检查构建结果 Check the build result |
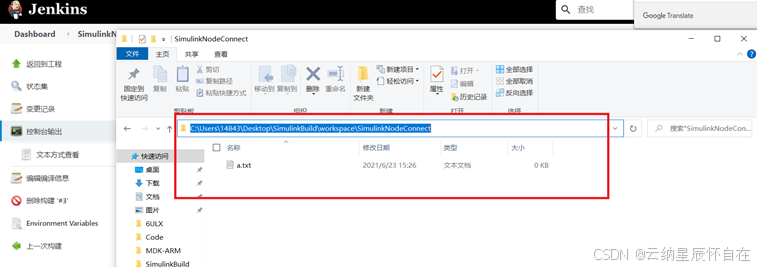 |
| 检查工作路径下,已经生成了txt文档 Check that the txt file has been generated under the working path |
(2)编译simulink 模型 Compile simulink model
在(1)的基础上进行simulink模型代码生成的测试。
On the basis of (1), the simulink model code generation test is carried out.
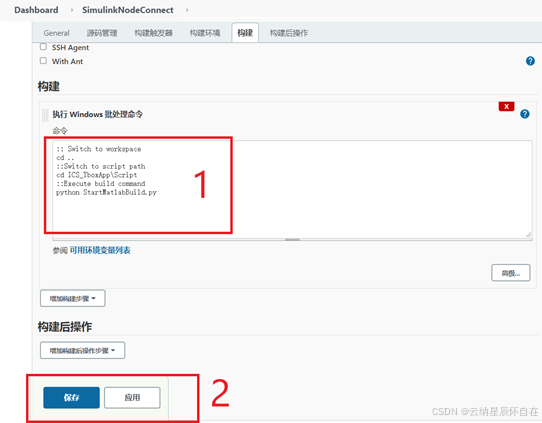 |
| (1)编写如图所示的脚本,调用Matlab的启动函数 Write the script as shown in the figure and call the startup function of Matlab (2)保存并应用代码 Save and apply the code |
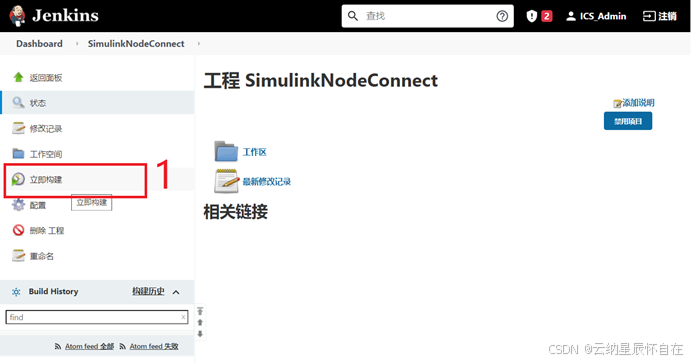 |
| (1)单击“立即构建”测试代码生成情况 (1) Click "Build Now" to test code generation |
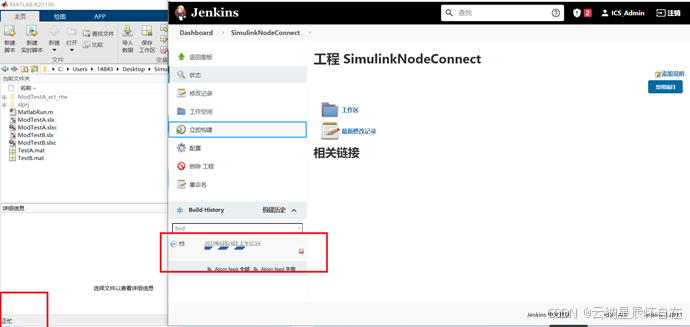 |
| 可以看到Matlab已经被调用起来,并执行 You can see that Matlab has been called up and executed |
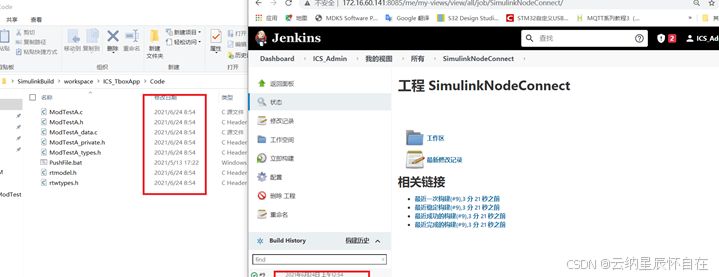 |
| 检查本地文件夹下的时间,可以发现是移植的,(注意,小时的差别是由于时区错误导致的) Check the time in the local folder, you can find that it is transplanted, (note that the difference in hours is caused by the time zone error) |
*注意Note:
服务启动脚本必须在启动的情况下才能保证测试的正确执行;
The service startup script must be started to ensure the correct execution of the test;
附录A 注意事项
Appendix A Notes
A.1 准备测试文件Prepare test files
测试文件请参考 “iMx6ULL的Ubuntu环境搭建”、“基于Jenkins和Git的代码版本管理和自动化编译方法可行性测试”。
Please refer to the test file“iMx6ULL的Ubuntu环境搭建”、“基于Jenkins和Git的代码版本管理和自动化编译方法可行性测试”。
参考文章
承上
启下


 被折叠的 条评论
为什么被折叠?
被折叠的 条评论
为什么被折叠?
 到【灌水乐园】发言


