本文要实现使用Mybatis+spring+MySQL实现一个Web项目的整目。在Spring中配置数据源和Mybatis的SqlSessionFactory,然后在Web中的JSP中取得Spring中的bean。通过这个bean来操作Mysql中的表。网上看了好多人有写,但是要么是图没表示清楚,要么是代码没贴完。本文是一个完整的教程,照着做你也可以自己整合!
使用的版本:Mybatis-3.2.8
Spring3.2.9
Mysql5.6
开发环境: Eclipse Java EE Kepler+Win7
本文工程免费下载
一、创建Web项目并导入包
Eclipse中创建一个Web项目,导入如下的包:

这里一定要注意不能少mybatis-spring-1.2.2.jar这个包,这个包是用来联系Spring和Mybatis的,很重要!!
整个工程目录如下:

二、创建库表映射类并配置MyBatis
1、首先在数据库中创建一张表 t_user
- use test;
- DROP TABLE IF EXISTS t_user;
- create table t_user
- (
- userId int primary key auto_increment,
- userName VARCHAR(50) not null,
- userAge int not null
- );
然后插入4条数据:
- insert into t_user values(1,'小王',10);
- insert into t_user values(2,'红红',11);
- insert into t_user values(3,'明明',12);
- insert into t_user values(4,'天天',13);
查看下结果:

2、表创建好之后便创建其映射类User,位于包com.mucfc.model中
- package com.mucfc.model;
-
-
-
-
-
- public class User {
- private Integer userId;
- private String userName;
- private int userAge;
- public Integer getUserId() {
- return userId;
- }
- public void setUserId(Integer userId) {
- this.userId = userId;
- }
- public String getUserName() {
- return userName;
- }
- public void setUserName(String userName) {
- this.userName = userName;
- }
- public int getUserAge() {
- return userAge;
- }
- public void setUserAge(int userAge) {
- this.userAge = userAge;
- }
- @Override
- public String toString() {
- return "User [userId=" + userId + ", userName=" + userName
- + ", userAge=" + userAge + "]";
- }
-
- }
2、映射类创建好之后便创建MyBatis映射文件(即Mapper文件),位于和src同级的conf的mapper包中,文件内容如下:
- <?xml version="1.0" encoding="UTF-8"?>
- <!DOCTYPE mapper PUBLIC "-//mybatis.org//DTD Mapper 3.0//EN"
- "http://mybatis.org/dtd/mybatis-3-mapper.dtd">
- <mapper namespace="com.mucfc.mapper.UserMapper">
-
- <select id="selectUserById" parameterType="int" resultType="User">
- select * from t_user where userId = #{userId}
- </select>
- </mapper>
3、创建映射UserMapper类如下,位于包com.mucfc.mapper中
- package com.mucfc.mapper;
-
- import com.mucfc.model.User;
-
-
-
-
-
- public interface UserMapper {
- public User selectUserById(int userId);
-
- }
4、创建操作数据的DAO层
- package com.mucfc.dao;
-
- import com.mucfc.model.User;
-
-
-
-
-
- public interface UserDao {
-
-
-
-
-
- public User findUserById(int id);
- }
然后是对应的实现层
- package com.mucfc.dao;
-
- import org.springframework.beans.factory.annotation.Autowired;
- import org.springframework.stereotype.Component;
- import com.mucfc.mapper.UserMapper;
- import com.mucfc.model.User;
-
-
-
-
-
- @Component
- public class UserDaoImpl implements UserDao{
- @Autowired
- private UserMapper userMapper;
- @Override
- public User findUserById(int id) {
- User user = userMapper.selectUserById(id);
- return user;
- }
-
- }
5、在conf里配置Mybatis的配置文件:
MyBatisConf.xmll放在conf里,注意路径
- <?xml version="1.0" encoding="UTF-8"?>
- <!DOCTYPE configuration PUBLIC "-//mybatis.org//DTD Config 3.0//EN"
- "http://mybatis.org/dtd/mybatis-3-config.dtd">
- <configuration>
-
- <typeAliases>
- <typeAlias alias="User" type="com.mucfc.model.User"/>
- </typeAliases>
-
- <mappers>
- <mapper resource="mapper/UserMapper.xml"/>
- </mappers>
- </configuration>
如果不与Spring进行整合的话,此配置文件还需要配置数据源信息,与Spring整合之后数据源就配置在Spring配置文件中,只需要配置映射文件的路径就可以了。
三、配置Spring
1、在WEB-INF里配置Spring的配置文件:
SpringConf.xml放在WEB-INF里,注意路径
- <?xml version="1.0" encoding="UTF-8"?>
- <beans xmlns="http://www.springframework.org/schema/beans"
- xmlns:xsi="http://www.w3.org/2001/XMLSchema-instance" xmlns:context="http://www.springframework.org/schema/context"
- xmlns:aop="http://www.springframework.org/schema/aop"
- xsi:schemaLocation="
- http://www.springframework.org/schema/beans
- http://www.springframework.org/schema/beans/spring-beans-3.0.xsd
- http://www.springframework.org/schema/aop
- http://www.springframework.org/schema/aop/spring-aop-3.0.xsd
- http://www.springframework.org/schema/context
- http://www.springframework.org/schema/context/spring-context-3.0.xsd">
-
- <bean id="dataSource"
- class="org.springframework.jdbc.datasource.DriverManagerDataSource">
- <property name="driverClassName" value="com.mysql.jdbc.Driver" />
- <property name="url" value="jdbc:mysql://localhost:3306/test" />
- <property name="username" value="root" />
- <property name="password" value="christmas258@" />
- </bean>
-
-
- <bean id="sqlSessionFactory" class="org.mybatis.spring.SqlSessionFactoryBean">
- <property name="dataSource" ref="dataSource" />
-
- <property name="configLocation" value="conf/MyBatisConf.xml" />
- <!-- <property name="typeAliasesPackage" value="com.tiantian.ckeditor.model"
- /> -->
- </bean>
-
- <bean id="userMapper" class="org.mybatis.spring.mapper.MapperFactoryBean">
- <property name="mapperInterface"
- value="com.mucfc.mapper.UserMapper" />
- <property name="sqlSessionFactory" ref="sqlSessionFactory" />
- </bean>
-
- <context:component-scan base-package="com.mucfc.dao" />
-
- </beans>
2、web.xml中启动Spring
web.xml放在WEB-INF里
- <?xml version="1.0" encoding="UTF-8"?>
- <web-app version="2.5" xmlns="http://java.sun.com/xml/ns/javaee"
- xmlns:xsi="http://www.w3.org/2001/XMLSchema-instance"
- xsi:schemaLocation="http://java.sun.com/xml/ns/javaee
- http://java.sun.com/xml/ns/javaee/web-app_2_5.xsd">
-
- <welcome-file-list>
- <welcome-file>index.html</welcome-file>
- <welcome-file>index.htm</welcome-file>
- <welcome-file>index.jsp</welcome-file>
- </welcome-file-list>
-
-
- <listener>
- <listener-class>org.springframework.web.context.ContextLoaderListener</listener-class>
- </listener>
- <context-param>
- <param-name>contextConfigLocation</param-name>
- <param-value>/WEB-INF/SpringConf.xml</param-value>
- </context-param>
-
- </web-app>
3、读取bean,进行查找
在index.jsp中设置如下:
index.jsp放置在WebContent中
- <%@ page import="com.mucfc.dao.UserDao"%>
- <%@page import="org.springframework.web.context.WebApplicationContext"%>
- <%@page
- import="org.springframework.web.context.support.WebApplicationContextUtils"%>
- <%@ page language="java" contentType="text/html" pageEncoding="UTF-8"%>
-
- <!DOCTYPE html PUBLIC "-//W3C//DTD HTML 4.01 Transitional//EN" "http://www.w3.org/TR/html4/loose.dtd">
- <html>
- <head>
- <title>Insert title here</title>
- </head>
- <body>
- <center>
- 欢迎<br/>
- <%
- WebApplicationContext wac = WebApplicationContextUtils
- .getWebApplicationContext(this.getServletContext());
- UserDao userDao = (UserDao) wac.getBean("userDaoImpl");
- %>
- <%=userDao.findUserById(1)%><br />
- <%=userDao.findUserById(2)%><br />
- <%=userDao.findUserById(3)%><br />
- <%=userDao.findUserById(4)%><br />
- </center>
- </body>
- </html>
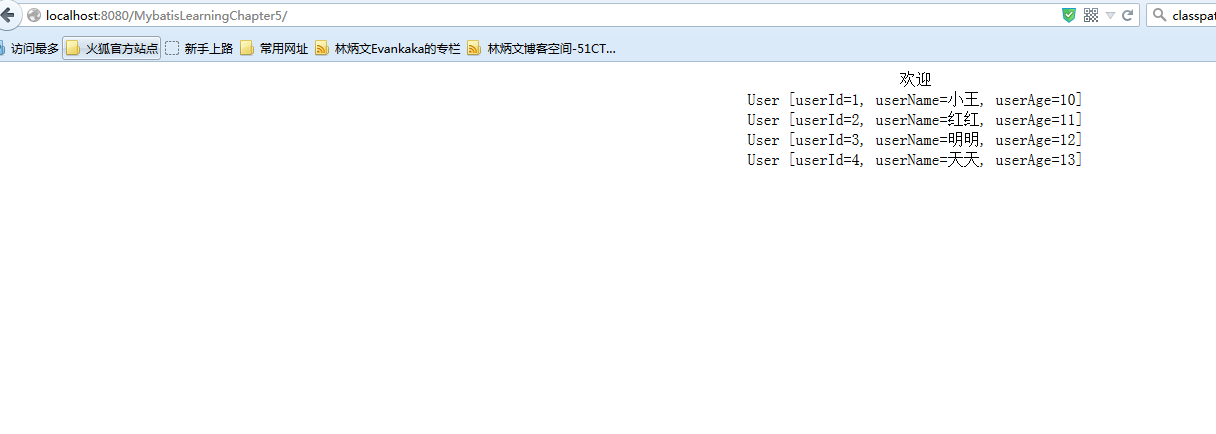
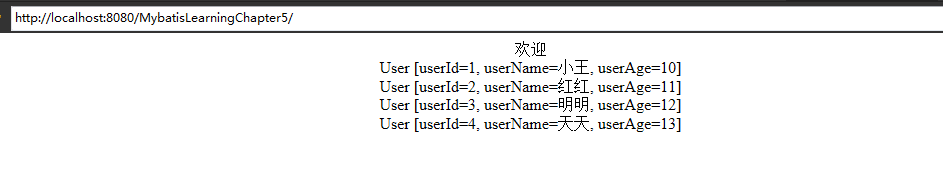
四、运行
1、以run on server运行
2、浏览器输入:http://localhost:8080/MybatisLearningChapter5/
结果如下:


 672
672

 被折叠的 条评论
为什么被折叠?
被折叠的 条评论
为什么被折叠?
 到【灌水乐园】发言


