


创建privacyPopup 组件
privacyPopup.js
Component({
    properties: {},
    data: {
        wxPrivacyName: '',
        showAgreement: false
    },
    lifetimes: {
    	attached() {
    		this.init();
    	}
    },
    methods: {
        async init() {
            if (isLogin()) {
                const userPrivacy = await this.getPrivacy();
                this.setData({
                    wxPrivacyName: userPrivacy.needAuthorization,
                    showAgreement: userPrivacy.needAuthorization
                })
            }

        },
        async getPrivacy() {
            return new Promise(resolve => {
                try {
                    wx.getPrivacySetting({
                        success: res => {
                            resolve(res)
                        },
                        fail: err => {
                        // 获取是否授权错误时,直接默认为不需要授权
                            resolve({needAuthorization: false, privacyContractName: ""})
                        }
                    })
                } catch(err) {
                	// 兼容2.32.2版本以下不支持wx.getPrivacySetting方法
                	// 不支持的版本,默认为不需要授权
                    resolve({needAuthorization: false, privacyContractName: ""})
                }
            })
        },
        handleOpenPrivacyContract() {
            // 打开隐私协议页面
            wx.openPrivacyContract()
        },
        reject() {
            let that = this
            wx.showModal({
                title: "提示",
                content: "拒绝后,可能会导致部分功能无法正常使用,你确定要拒绝吗?",
                confirmText: "确定",
                cancelText: "取消",
                success: res => {
                    if (res.confirm) {
                        that.setData({showAgreement: false})
                    }
                }
            })
        },
        handleAgreePrivacyAuthorization() {
            this.setData({showAgreement: false})
        },
    }
})
privacyPopup.json
{
  "component": true,
  "usingComponents": {
    "van-popup": "@vant/weapp/popup/index"
  }
}
privacyPopup.wxml
<van-popup
show="{{ showAgreement }}"
round>
<view class="wrap_agreement">
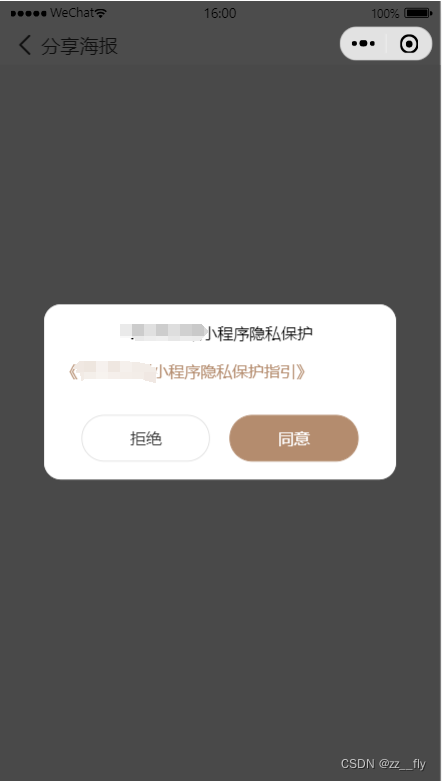
<view class="wrap_agreement_title">XXX小程序隐私保护授权</view>
<view class="wrap_agreement_items">
<view class="wrap_agreement_item" bindtap="handleOpenPrivacyContract" wx:if="{{wxPrivacyName.length > 0}}">
{{wxPrivacyName}}
</view>
</view>
<view class="wrap_agreement_btn">
<view class="btn_agreement reject" catchtap="reject">拒绝</view>
<button
open-type="agreePrivacyAuthorization"
class="btn_agreement agree"
bindagreeprivacyauthorization="handleAgreePrivacyAuthorization"
>同意
</button>
</view>
</view>
</van-popup>
privacyPopup.wxss
.wrap_agreement {
  width: 600rpx;
  min-height: 300rpx;
  padding: 32rpx;
  background: #fff;
  display: flex;
  flex-direction: column;
}
.wrap_agreement_title {
  color: #000;
  text-align: center;
  font-size: 28rpx;
}
.wrap_agreement_btn {
  display: flex;
  align-items: center;
  justify-content: space-evenly;
}
.btn_agreement {
  height: 80rpx;
  font-size: 28rpx;
  color: #333;
  display: flex;
  align-items: center;
  justify-content: center;
  width: 220rpx;
  border-radius: 50rpx;
  border: 1rpx solid #dedede;
}
.wrap_agreement_item {
  margin-top: 30rpx;
  color: #B48C6E;
}
.wrap_agreement_item:last-child {
  margin-bottom: 30rpx;
}
.agree {
  border-color: #B48C6E;
  background: #B48C6E;
  color: #fff;
}
.wrap_agreement_items {
  flex: 1;
  width: 100%;
}
效果如下:
注意:
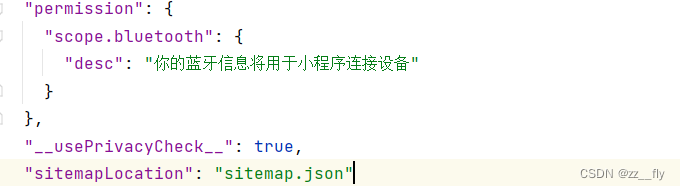
如果wx.getPrivacySetting中 needAuthorization始终返回的是false, 则需要在app.json中添加"usePrivacyCheck": true,,如图所示:
引入方式:
在需要使用的页面的wxml文件中,直接 ****即可,注意组件需要在对应的.json文件中引入


 7246
7246


 被折叠的 条评论
为什么被折叠?
被折叠的 条评论
为什么被折叠?
 到【灌水乐园】发言


