


ActivityManagerService是Android系统中一个特别重要的系统服务,也是我们上层APP打交道最多的系统服务之一,ActivityManagerService(以下简称AMS) 主要负责四大组件的启动、切换、调度以及应用进程的管理和调度工作。所有的APP应用都需要与AMS打交道
我这里将AMS相关的流程分为3个阶段:
- SystemServer启动AMS,AMS初始化
- startActivity的时候,从app到AMS,启动activity
- startActivity时候,APP进程不存在,从AMS到zygote fork完进程,再通过反射调用ActivityThread,启动APP
一、SystemServer启动AMS,AMS初始化
zygote启动之后,在zygote中会启动SystemServer,会通过反射进入SystemServer的main函数
//SystemServer.java
/**
     * The main entry point from zygote.
     */
    public static void main(String[] args) {
        new SystemServer().run();
    }

public SystemServer() {
        // Check for factory test mode.
        mFactoryTestMode = FactoryTest.getMode();
        // Remember if it's runtime restart(when sys.boot_completed is already set) or reboot
        mRuntimeRestart = "1".equals(SystemProperties.get("sys.boot_completed"));
    }

    private void run() {
        try {
            ......

            // Prepare the main looper thread (this thread).
            android.os.Process.setThreadPriority(
                android.os.Process.THREAD_PRIORITY_FOREGROUND);
            android.os.Process.setCanSelfBackground(false);
            Looper.prepareMainLooper();

            // Initialize native services.
            System.loadLibrary("android_servers");

            // Check whether we failed to shut down last time we tried.
            // This call may not return.
            performPendingShutdown();

            // Initialize the system context.
            createSystemContext();

            // Create the system service manager.
            mSystemServiceManager = new SystemServiceManager(mSystemContext);
            mSystemServiceManager.setRuntimeRestarted(mRuntimeRestart);
            LocalServices.addService(SystemServiceManager.class, mSystemServiceManager);
            // Prepare the thread pool for init tasks that can be parallelized
            SystemServerInitThreadPool.get();
        } finally {
            traceEnd();  // InitBeforeStartServices
        }

        // Start services.
        try {
            traceBeginAndSlog("StartServices");
            //启动系统各种服务
            startBootstrapServices();
            startCoreServices();
            startOtherServices();
            SystemServerInitThreadPool.shutdown();
        } catch (Throwable ex) {
            Slog.e("System", "******************************************");
            Slog.e("System", "************ Failure starting system services", ex);
            throw ex;
        } finally {
            traceEnd();
        }

        ......

        // Loop forever.
        Looper.loop();
        throw new RuntimeException("Main thread loop unexpectedly exited");
    }
这里需要注意一个方法:createSystemContext(),该方法主要是创建系统Context和SystemUIContext,并且加载系统相关资源
//SystemServer.java
private void createSystemContext() {
        //创建系统的Context,并设置系统默认主题
        ActivityThread activityThread = ActivityThread.systemMain();
        mSystemContext = activityThread.getSystemContext();
        mSystemContext.setTheme(DEFAULT_SYSTEM_THEME);

        //创建SystemUI(通知栏)的Context,并设置SystemUI默认主题
        final Context systemUiContext = activityThread.getSystemUiContext();
        systemUiContext.setTheme(DEFAULT_SYSTEM_THEME);
}

//ActivityThread.java
public ContextImpl getSystemContext() {
    synchronized (this) {
        if (mSystemContext == null) {
            mSystemContext = ContextImpl.createSystemContext(this);
        }
        return mSystemContext;
    }
}
public ContextImpl getSystemUiContext() {
    synchronized (this) {
        if (mSystemUiContext == null) {
            mSystemUiContext = ContextImpl.createSystemUiContext(getSystemContext());
        }
        return mSystemUiContext;
    }
}

//ContextImpl.java
static ContextImpl createSystemContext(ActivityThread mainThread) {
    LoadedApk packageInfo = new LoadedApk(mainThread);
    ContextImpl context = new ContextImpl(null, mainThread, packageInfo, null, null, null, 0,
            null);
    //加载系统资源
    context.setResources(packageInfo.getResources());

    context.mResources.updateConfiguration(context.mResourcesManager.getConfiguration(),
                context.mResourcesManager.getDisplayMetrics());
    return context;
}

/**
 * System Context to be used for UI. This Context has resources that can be themed.
 * Make sure that the created system UI context shares the same LoadedApk as the system context.
 */
static ContextImpl createSystemUiContext(ContextImpl systemContext) {
    final LoadedApk packageInfo = systemContext.mPackageInfo;
    ContextImpl context = new ContextImpl(null, systemContext.mMainThread, packageInfo, null,
            null, null, 0, null);
    //加载SystemUI的相关资源
    context.setResources(createResources(null, packageInfo, null, Display.DEFAULT_DISPLAY, null,
            packageInfo.getCompatibilityInfo()));
    return context;
}
系统Context创建完毕,系统资源加载完毕之后,就会去启动系统相关服务,AMS 就是在启动引导服务,startBootstrapServices()方法中调起的
//SystemServer.java
private void startBootstrapServices() {
    ......

    // Activity manager runs the show.
    traceBeginAndSlog("StartActivityManager");
    mActivityManagerService = mSystemServiceManager.startService(
            ActivityManagerService.Lifecycle.class).getService();
    mActivityManagerService.setSystemServiceManager(mSystemServiceManager);
    mActivityManagerService.setInstaller(installer);
    traceEnd();

    ......

    // Set up the Application instance for the system process and get started.
    traceBeginAndSlog("SetSystemProcess");
    mActivityManagerService.setSystemProcess();
    traceEnd();

    ......
}
//SystemServiceManager.java
public <T extends SystemService> T startService(Class<T> serviceClass) {
        try {
            final String name = serviceClass.getName();
            Slog.i(TAG, "Starting " + name);
            Trace.traceBegin(Trace.TRACE_TAG_SYSTEM_SERVER, "StartService " + name);

            // Create the service.
            if (!SystemService.class.isAssignableFrom(serviceClass)) {
                throw new RuntimeException("Failed to create " + name
                        + ": service must extend " + SystemService.class.getName());
            }
            final T service;
            try {
                Constructor<T> constructor = serviceClass.getConstructor(Context.class);
                service = constructor.newInstance(mContext);
            } catch (InstantiationException ex) {
                throw new RuntimeException("Failed to create service " + name
                        + ": service could not be instantiated", ex);
            } catch (IllegalAccessException ex) {
                throw new RuntimeException("Failed to create service " + name
                        + ": service must have a public constructor with a Context argument", ex);
            } catch (NoSuchMethodException ex) {
                throw new RuntimeException("Failed to create service " + name
                        + ": service must have a public constructor with a Context argument", ex);
            } catch (InvocationTargetException ex) {
                throw new RuntimeException("Failed to create service " + name
                        + ": service constructor threw an exception", ex);
            }

            startService(service);
            //这里会返回ActivityManagerService.LifeCycler的一个对象
            return service;
        } finally {
            Trace.traceEnd(Trace.TRACE_TAG_SYSTEM_SERVER);
        }
}

public void startService(@NonNull final SystemService service) {
        // Register it.
        mServices.add(service);
        // Start it.
        long time = SystemClock.elapsedRealtime();
        try {
            service.onStart();
        } catch (RuntimeException ex) {
            throw new RuntimeException("Failed to start service " + service.getClass().getName()
                    + ": onStart threw an exception", ex);
        }
        warnIfTooLong(SystemClock.elapsedRealtime() - time, service, "onStart");
}

//ActivityManagerService.java
public static final class Lifecycle extends SystemService {
        private final ActivityManagerService mService;

        public Lifecycle(Context context) {
            super(context);
            //创建AMS对象,初始化AMS
            mService = new ActivityManagerService(context);
        }

        //这里调用AMS start()方法
        @Override
        public void onStart() {
            mService.start();
        }

        @Override
        public void onCleanupUser(int userId) {
            mService.mBatteryStatsService.onCleanupUser(userId);
        }

        public ActivityManagerService getService() {
            return mService;
        }
    }

//接下来看看AMS初始化都干了些什么
// Note: This method is invoked on the main thread but may need to attach various
// handlers to other threads. So take care to be explicit about the looper.
public ActivityManagerService(Context systemContext) {
    LockGuard.installLock(this, LockGuard.INDEX_ACTIVITY);
    mInjector = new Injector();
    mContext = systemContext;//赋值mContext
    mFactoryTest = FactoryTest.getMode();
    mSystemThread = ActivityThread.currentActivityThread();//获取当前的ActivityThread
    mUiContext = mSystemThread.getSystemUiContext();//赋值mUiContext
    Slog.i(TAG, "Memory class: " + ActivityManager.staticGetMemoryClass());
    mPermissionReviewRequired =   mContext.getResources().getBoolean(com.android.internal.R.bool.config_permissionReviewRequired);
    //创建Handler线程,用来处理handler消息
    mHandlerThread = new ServiceThread(TAG,THREAD_PRIORITY_FOREGROUND, false/*allowIo*/);
    mHandlerThread.start();
    mHandler = new MainHandler(mHandlerThread.getLooper());
    mUiHandler = mInjector.getUiHandler(this);//处理ui相关msg的Handler
    mProcStartHandlerThread = new ServiceThread(TAG + ":procStart",THREAD_PRIORITY_FOREGROUND, false /* allowIo */);
    mProcStartHandlerThread.start();
    mProcStartHandler = new Handler(mProcStartHandlerThread.getLooper());
    //管理AMS的一些常量,厂商定制系统就可能修改此处
    mConstants = new ActivityManagerConstants(this, mHandler);
    /* static; one-time init here */
    if (sKillHandler == null) {
      sKillThread = new ServiceThread(TAG + ":kill",THREAD_PRIORITY_BACKGROUND, true /* allowIo */);
      sKillThread.start();
      sKillHandler = new KillHandler(sKillThread.getLooper());
    }
    //初始化管理前台、后台广播的队列, 系统会优先遍历发送前台广播
    mFgBroadcastQueue = new BroadcastQueue(this, mHandler,"foreground", BROADCAST_FG_TIMEOUT, false);
    mBgBroadcastQueue = new BroadcastQueue(this, mHandler,"background", BROADCAST_BG_TIMEOUT, true);
    mBroadcastQueues[0] = mFgBroadcastQueue;
    mBroadcastQueues[1] = mBgBroadcastQueue;
    //初始化管理Service的 ActiveServices对象
    mServices = new ActiveServices(this);
    mProviderMap = new ProviderMap(this);//初始化Provider的管理者
    mAppErrors = new AppErrors(mUiContext, this);//初始化APP错误日志的打印器
    //创建电池统计服务, 并输出到指定目录
    File dataDir = Environment.getDataDirectory();
    File systemDir = new File(dataDir, "system");
    systemDir.mkdirs();
    mAppWarnings = new AppWarnings(this, mUiContext, mHandler, mUiHandler,systemDir);
    // TODO: Move creation of battery stats service outside of activity manager service.
    mBatteryStatsService = new BatteryStatsService(systemContext, systemDir,mHandler);
    mBatteryStatsService.getActiveStatistics().readLocked();
    mBatteryStatsService.scheduleWriteToDisk();
    mOnBattery = DEBUG_POWER ? true:mBatteryStatsService.getActiveStatistics().getIsOnBattery();
    mBatteryStatsService.getActiveStatistics().setCallback(this);
    //创建进程统计分析服务,追踪统计哪些进程有滥用或不良行为
    mProcessStats = new ProcessStatsService(this, new File(systemDir,"procstats"));
    mAppOpsService = mInjector.getAppOpsService(new File(systemDir,"appops.xml"),mHandler);
    //加载Uri的授权文件
    mGrantFile = new AtomicFile(new File(systemDir, "urigrants.xml"), "uri-grants");
    //负责管理多用户
    mUserController = new UserController(this);
    //vr功能的控制器
     mVrController = new VrController(this);
    //初始化OpenGL版本号
    GL_ES_VERSION = SystemProperties.getInt("ro.opengles.version",ConfigurationInfo.GL_ES_VERSION_UNDEFINED);
    if (SystemProperties.getInt("sys.use_fifo_ui", 0) != 0) {
        mUseFifoUiScheduling = true;
    }
    mTrackingAssociations = "1".equals(SystemProperties.get("debug.track-associations"));
    mTempConfig.setToDefaults();
    mTempConfig.setLocales(LocaleList.getDefault());
    mConfigurationSeq = mTempConfig.seq = 1;
   //管理ActivityStack的重要类,这里面记录着activity状态信息,是AMS中的核心类
    mStackSupervisor = createStackSupervisor();
    mStackSupervisor.onConfigurationChanged(mTempConfig);
    //根据当前可见的Activity类型,控制Keyguard遮挡,关闭和转换。 Keyguard就是我们的锁屏相关页面
    mKeyguardController = mStackSupervisor.getKeyguardController();
    //管理APK的兼容性配置解析/data/system/packages-compat.xml文件,该文件用于存储那些需要考虑屏幕尺寸的APK信息
    mCompatModePackages = new CompatModePackages(this, systemDir, mHandler);
    //Intent防火墙,Google定义了一组规则,来过滤intent,如果触发了,则intent会被系统丢弃,且不会告知发送者
    mIntentFirewall = new IntentFirewall(new IntentFirewallInterface(),
mHandler);
    mTaskChangeNotificationController = new TaskChangeNotificationController(this,mStackSupervisor,mHandler);
    //这是activity启动的处理类,这里管理者activity启动中用到的intent信息和flag标识,也和stack和task有重要的联系
    mActivityStartController = new ActivityStartController(this);
    mRecentTasks = createRecentTasks();
    mStackSupervisor.setRecentTasks(mRecentTasks);
    mLockTaskController = new LockTaskController(mContext, mStackSupervisor,mHandler);
    mLifecycleManager = new ClientLifecycleManager();
    //启动一个线程专门跟进cpu当前状态信息,AMS对当前cpu状态了如指掌,可以更加高效的安排其他工作
    mProcessCpuThread = new Thread("CpuTracker") {
      @Override
      public void run() {
        synchronized (mProcessCpuTracker) {
          mProcessCpuInitLatch.countDown();
          mProcessCpuTracker.init();
       }
        while (true) {
          try {
            try {
              synchronized(this) {
                final long now = SystemClock.uptimeMillis();
                long nextCpuDelay =(mLastCpuTime.get()+MONITOR_CPU_MAX_TIME)-now;
                long nextWriteDelay =(mLastWriteTime+BATTERY_STATS_TIME)-now;
                //Slog.i(TAG, "Cpu delay=" + nextCpuDelay
                 //    + ", write delay=" + nextWriteDelay);
                if (nextWriteDelay < nextCpuDelay) {
                  nextCpuDelay = nextWriteDelay;
               }
                if (nextCpuDelay > 0) {
                  mProcessCpuMutexFree.set(true);
                  this.wait(nextCpuDelay);
               }
             }
           } catch (InterruptedException e) {
           }
            updateCpuStatsNow();
         } catch (Exception e) {
            Slog.e(TAG, "Unexpected exception collecting processstats", e);
         }
       }
     }
   };
    mHiddenApiBlacklist = new HiddenApiSettings(mHandler, mContext);
    //看门狗,监听进程。这个类每分钟调用一次监视器。 如果进程没有任何返回就杀掉
    Watchdog.getInstance().addMonitor(this);
    Watchdog.getInstance().addThread(mHandler);
    // bind background thread to little cores
    // this is expected to fail inside of framework tests because apps can't touch cpusets directly
    // make sure we've already adjusted system_server's internal view of itself first
    updateOomAdjLocked();
    try {

        Process.setThreadGroupAndCpuset(BackgroundThread.get().getThreadId(),
          Process.THREAD_GROUP_BG_NONINTERACTIVE);
    } catch (Exception e) {
        Slog.w(TAG, "Setting background thread cpuset failed");
    }
 }
现在返回SystemServer的startBootStrapService方法,AMS在初始化之后,还调用了setSystemProcess,如下:
//看看setSystemProcess都干了些什么
public void setSystemProcess() {
    try {
        ServiceManager.addService(Context.ACTIVITY_SERVICE, this, /*allowIsolated= */true,DUMP_FLAG_PRIORITY_CRITICAL | DUMP_FLAG_PRIORITY_NORMAL |DUMP_FLAG_PROTO);
        ServiceManager.addService(ProcessStats.SERVICE_NAME, mProcessStats);
        ServiceManager.addService("meminfo", new MemBinder(this), /*allowIsolated= */ false,DUMP_FLAG_PRIORITY_HIGH);
        ServiceManager.addService("gfxinfo", new GraphicsBinder(this));
        ServiceManager.addService("dbinfo", new DbBinder(this));
        if (MONITOR_CPU_USAGE) {
            ServiceManager.addService("cpuinfo", new CpuBinder(this),/* allowIsolated= */ false,DUMP_FLAG_PRIORITY_CRITICAL);
        }
        ServiceManager.addService("permission", new PermissionController(this));
        ServiceManager.addService("processinfo", new ProcessInfoService(this));
        ApplicationInfo info = mContext.getPackageManager().getApplicationInfo("android", STOCK_PM_FLAGS | MATCH_SYSTEM_ONLY);
        mSystemThread.installSystemApplicationInfo(info,getClass().getClassLoader());
        synchronized (this) {
            ProcessRecord app = newProcessRecordLocked(info,info.processName, false, 0);
            app.persistent = true;
            app.pid = MY_PID;
            app.maxAdj = ProcessList.SYSTEM_ADJ;
            app.makeActive(mSystemThread.getApplicationThread(),mProcessStats);
            synchronized (mPidsSelfLocked) {
                mPidsSelfLocked.put(app.pid, app);
         }
        updateLruProcessLocked(app, false, null);
        updateOomAdjLocked();
       }
   } catch (PackageManager.NameNotFoundException e) {
        throw new RuntimeException("Unable to find android system package", e);
   }
   // Start watching app ops after we and the package manager are up and running.
    mAppOpsService.startWatchingMode(AppOpsManager.OP_RUN_IN_BACKGROUND,null,
        new IAppOpsCallback.Stub() {
          @Override public void opChanged(int op, int uid, String packageName) {
            if (op == AppOpsManager.OP_RUN_IN_BACKGROUND && packageName != null) {
              if (mAppOpsService.checkOperation(op, uid,packageName) != AppOpsManager.MODE_ALLOWED) {
                runInBackgroundDisabled(uid);
             }
           }
         }
      });
 }
注册服务。首先将ActivityManagerService注册到ServiceManager中,其次将几个与系统性能调试相关的服务注册到ServiceManager。
- 查询并处理ApplicationInfo。首先调用PackageManagerService的接口,查询包名为android的应用程序的ApplicationInfo信息,对应于framework-res.apk。然后以该信息为参数调用ActivityThread上的installSystemApplicationInfo方法。
- 创建并处理ProcessRecord。调用ActivityManagerService上的newProcessRecordLocked,创建一个ProcessRecord类型的对象,并保存该对象的信息
小插曲,Launcher是在什么时候启动的
SystemServer的startOtherServices方法中,会调用mActivityManagerService.systemReady,在systemReady方法中会调用startHomeActivityLocked(currentUserId, "systemReady");在startHomeActivityLocked中会通过getHomeIntent查找带有Intent.CATEGORY_HOME这种CATEGORY的intent,其实就是Launcher应用,代码如下:
Intent getHomeIntent() {
        Intent intent = new Intent(mTopAction, mTopData != null ? Uri.parse(mTopData) : null);
        intent.setComponent(mTopComponent);
        intent.addFlags(Intent.FLAG_DEBUG_TRIAGED_MISSING);
        if (mFactoryTest != FactoryTest.FACTORY_TEST_LOW_LEVEL) {
            intent.addCategory(Intent.CATEGORY_HOME);
        }
        return intent;
    }
boolean startHomeActivityLocked(int userId, String reason) {
        if (mFactoryTest == FactoryTest.FACTORY_TEST_LOW_LEVEL
                && mTopAction == null) {
            // We are running in factory test mode, but unable to find
            // the factory test app, so just sit around displaying the
            // error message and don't try to start anything.
            return false;
        }
        Intent intent = getHomeIntent();
        ActivityInfo aInfo = resolveActivityInfo(intent, STOCK_PM_FLAGS, userId);
        if (aInfo != null) {
            intent.setComponent(new ComponentName(aInfo.applicationInfo.packageName, aInfo.name));
            // Don't do this if the home app is currently being
            // instrumented.
            aInfo = new ActivityInfo(aInfo);
            aInfo.applicationInfo = getAppInfoForUser(aInfo.applicationInfo, userId);
            ProcessRecord app = getProcessRecordLocked(aInfo.processName,
                    aInfo.applicationInfo.uid, true);
            if (app == null || app.instr == null) {
                intent.setFlags(intent.getFlags() | Intent.FLAG_ACTIVITY_NEW_TASK);
                final int resolvedUserId = UserHandle.getUserId(aInfo.applicationInfo.uid);
                // For ANR debugging to verify if the user activity is the one that actually
                // launched.
                final String myReason = reason + ":" + userId + ":" + resolvedUserId;
                mActivityStarter.startHomeActivityLocked(intent, aInfo, myReason);
            }
        } else {
            Slog.wtf(TAG, "No home screen found for " + intent, new Throwable());
        }

        return true;
    }
然后通过mActivityStarter.startHomeActivityLocked(intent, aInfo, myReason);启动Launcher的主Activity。
AMS初始化就完成
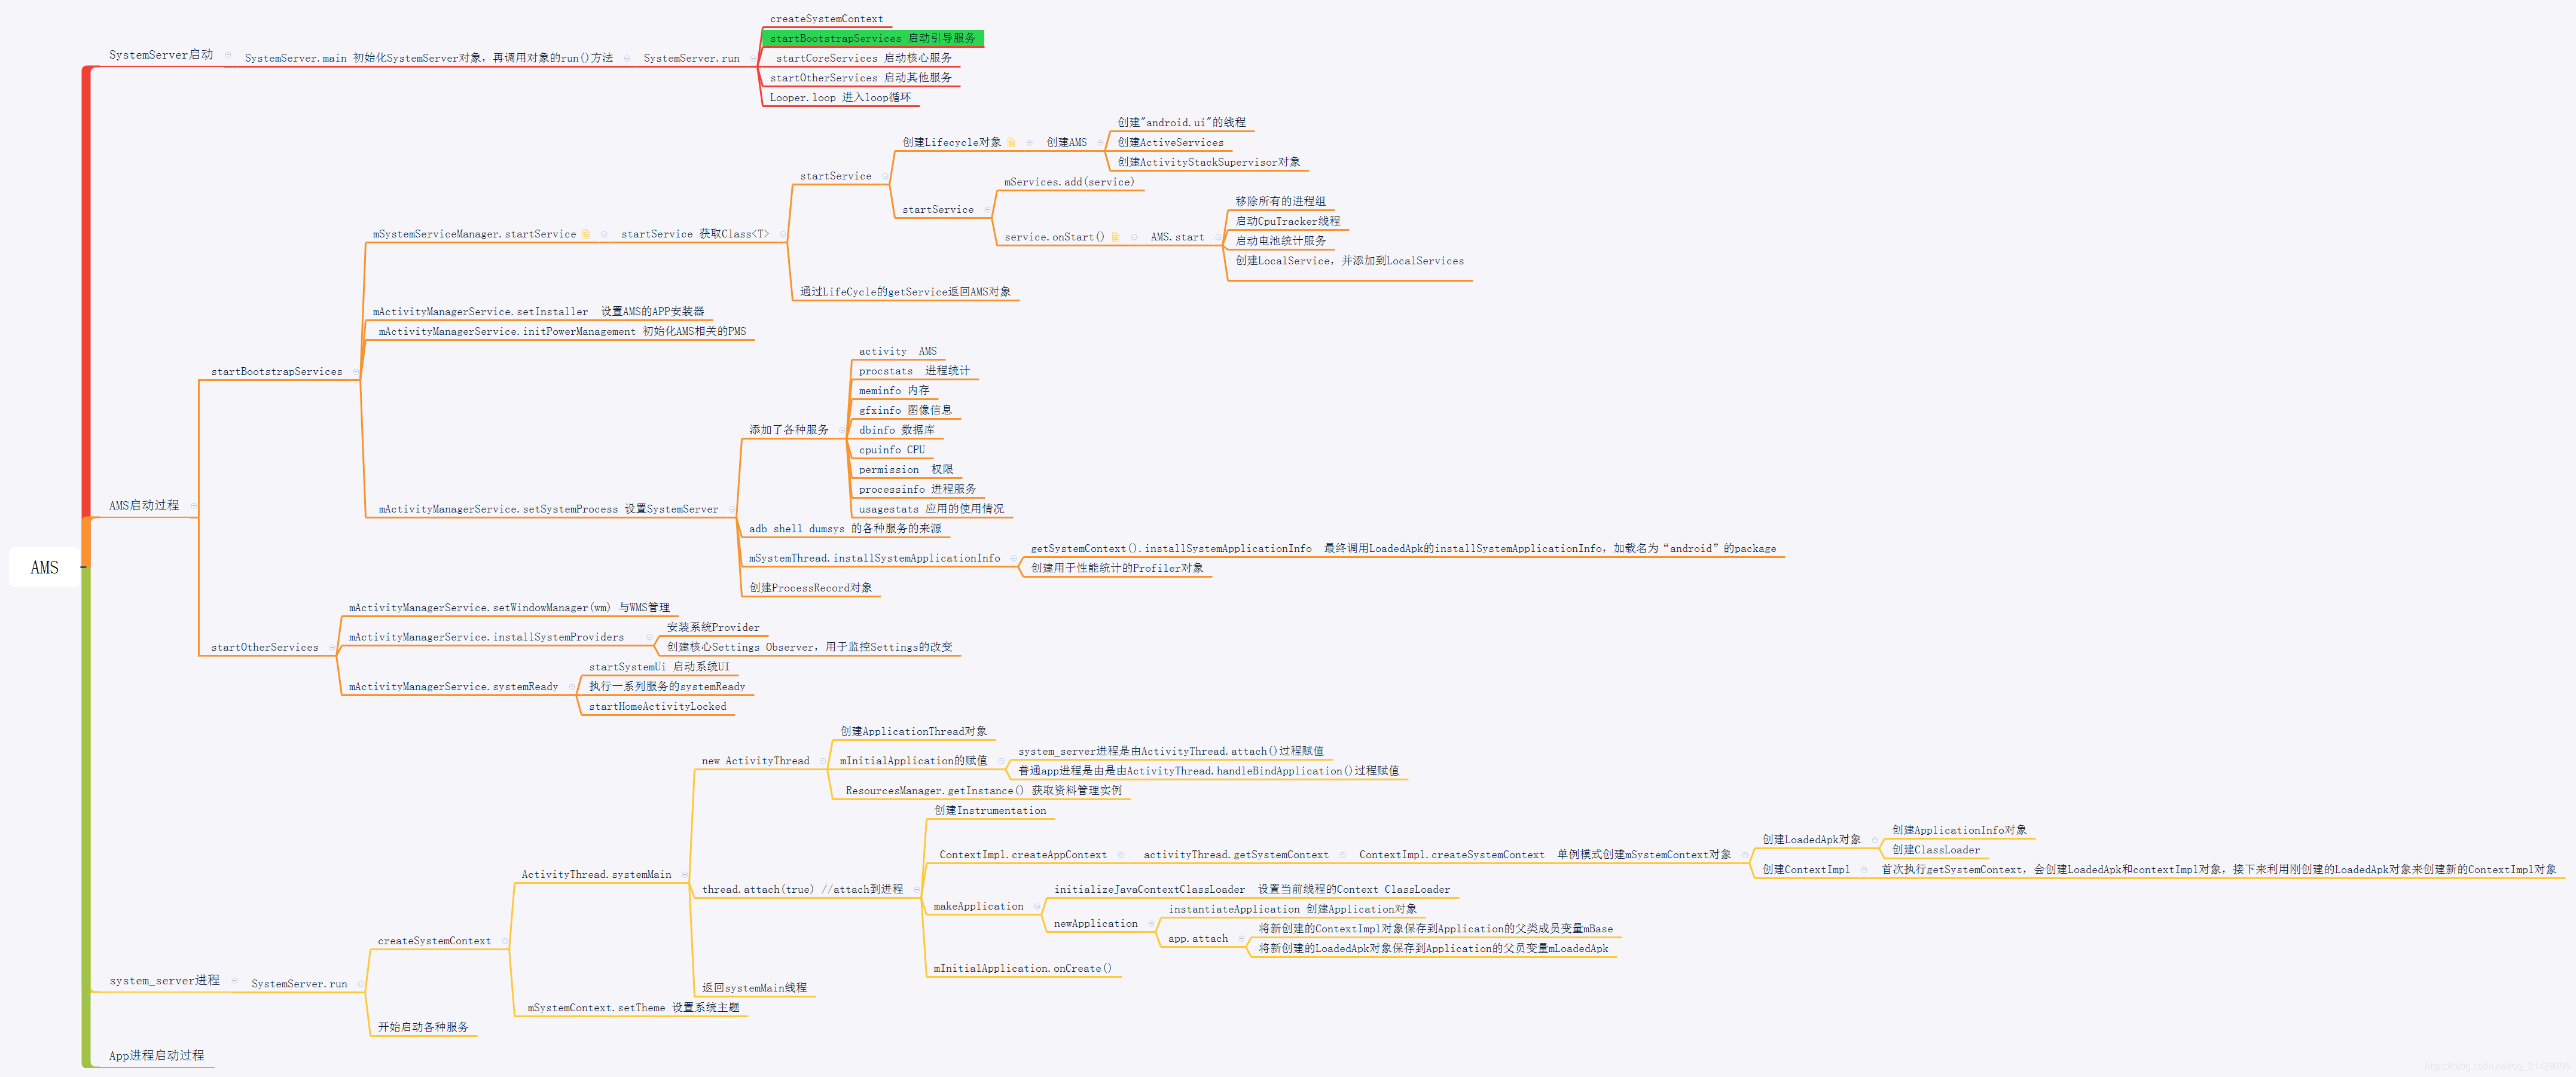
在SystemServer的run方法,以及startBootStrapService中,会初始化系统Context,加载系统资源,这些细节代码流程细节这里不做详细说明,以下面这个思维导图作为一个概括,去总结一下SystemServer启动过程中,系统都做了哪些处理:
二、startActivity的时候,从app到AMS,启动activity
首先介绍几个AMS相关的数据结构:
ProcessRecord:
主要负责进程相关信息,包括进程身份验证信息,uid,pid等;
进程中的组件信息,activities,services,receivers,conProviders等;
还有其他一些进程管控相关的信息,都包含在ProcessRecord这个类中。
Activity管理相关的数据结构:
ActivityRecord,TaskRecord,ActivityStarter,ActivityStack,ActivityStackSuperVisor
ActivityRecord
ActivityRecord,源码中的注释介绍:An entry in the history stack, representing an activity. 历史栈中的一个条目,代表一个activity。
/**
* An entry in the history stack, representing an activity.
*/
final class ActivityRecord extends ConfigurationContainer implements
AppWindowContainerListener {
final ActivityManagerService service; // owner
    final IApplicationToken.Stub appToken; // window manager token
    AppWindowContainerController mWindowContainerController;
    final ActivityInfo info; // all about me
    final ApplicationInfo appInfo; // information about activity's app

    //省略其他成员变量

    //ActivityRecord所在的TaskRecord
    private TaskRecord task;     // the task this is in.

    //构造方法,需要传递大量信息
    ActivityRecord(ActivityManagerService _service,
        ProcessRecord _caller,
        int _launchedFromPid,
        int _launchedFromUid,
        String _launchedFromPackage,
        Intent _intent,
        String _resolvedType,
        ActivityInfo aInfo,
        Configuration _configuration,
        com.android.server.am.ActivityRecord _resultTo,
        String _resultWho,
        int _reqCode,
        boolean _componentSpecified,
        boolean _rootVoiceInteraction,
        ActivityStackSupervisor supervisor,
        ActivityOptions options,
        com.android.server.am.ActivityRecord sourceRecord) {

   }
}
ActivityRecord中存在着大量的成员变量,包含了一个Activity的所有信息。 ActivityRecord中的成员变量task表示其所在的TaskRecord,由此可以看出:ActivityRecord与TaskRecord建立了联系
ActivityStarter
// \frameworks\base\services\core\java\com\android\server\am\ActivityStarter.java
private int startActivity(IApplicationThread caller, Intent intent, Intent ephemeralIntent,
      String resolvedType, ActivityInfo aInfo, ResolveInfo rInfo,
      IVoiceInteractionSession voiceSession, IVoiceInteractor voiceInteractor,
      IBinder resultTo, String resultWho, int requestCode, int callingPid,int callingUid,
      String callingPackage, int realCallingPid, int realCallingUid, int startFlags,
      SafeActivityOptions options,
      boolean ignoreTargetSecurity, boolean componentSpecified,
      ActivityRecord[] outActivity,
      TaskRecord inTask, boolean allowPendingRemoteAnimationRegistryLookup) {

        ActivityRecord r = new ActivityRecord(mService, callerApp, callingPid, callingUid,
            callingPackage, intent, resolvedType, aInfo,mService.getGlobalConfiguration(),
            resultRecord, resultWho, requestCode, componentSpecified,voiceSession != null,
            mSupervisor, checkedOptions, sourceRecord);

}
TaskRecord
TaskRecord,内部维护一个 ArrayList<ActivityRecord> 用来保存ActivityRecord。
// \frameworks\base\services\core\java\com\android\server\am\TaskRecord.java
class TaskRecord extends ConfigurationContainer implements TaskWindowContainerListener {
    final int taskId;    //任务ID
     //使用一个ArrayList来保存所有的ActivityRecord
    final ArrayList<ActivityRecord> mActivities;
    private ActivityStack mStack;

  TaskRecord(ActivityManagerService service, int _taskId, Intent _intent,
      Intent _affinityIntent, String _affinity, String _rootAffinity,
      ComponentName _realActivity, ComponentName _origActivity, boolean _rootWasReset,
      boolean _autoRemoveRecents, boolean _askedCompatMode, int _userId,
      int _effectiveUid, String _lastDescription,
      ArrayList<ActivityRecord> activities,
      long lastTimeMoved, boolean neverRelinquishIdentity,
      TaskDescription _lastTaskDescription, int taskAffiliation, int prevTaskId,
      int nextTaskId, int taskAffiliationColor, int callingUid, String callingPackage,
      int resizeMode, boolean supportsPictureInPicture, boolean _realActivitySuspended,
      boolean userSetupComplete, int minWidth, int minHeight) {

 }
    //添加Activity到顶部
    void addActivityToTop(com.android.server.am.ActivityRecord r) {
      addActivityAtIndex(mActivities.size(), r);
    }

    //添加Activity到指定的索引位置
    void addActivityAtIndex(int index, ActivityRecord r) {
      //...
      r.setTask(this);//为ActivityRecord设置TaskRecord,就是这里建立的联系
      //...

      index = Math.min(size, index);
      mActivities.add(index, r);//添加到mActivities

      //...
}
}
可以看到TaskRecord中使用了一个ArrayList来保存所有的ActivityRecord。 同样,TaskRecord中的mStack表示其所在的ActivityStack。 startActivity()时也会创建一个TaskRecord
ActivityStarter
//frameworks/base/services/core/java/com/android/server/am/ActivityStarter.java
class ActivityStarter {
    private int setTaskFromReuseOrCreateNewTask(TaskRecord taskToAffiliate,int preferredLaunchStackId, ActivityStack topStack) {
      mTargetStack = computeStackFocus(mStartActivity, true,mLaunchBounds, mLaunchFlags, mOptions);
      if (mReuseTask == null) {
//创建一个createTaskRecord,实际上是调用ActivityStack里面的createTaskRecord()方法,ActivityStack下面会讲到
        final TaskRecord task = mTargetStack.createTaskRecord(
              mSupervisor.getNextTaskIdForUserLocked(mStartActivity.userId),
              mNewTaskInfo != null ? mNewTaskInfo :mStartActivity.info,
              mNewTaskIntent != null ? mNewTaskIntent : mIntent,mVoiceSession,
            mVoiceInteractor, !mLaunchTaskBehind /* toTop */,mStartActivity.mActivityType);
           //其他代码略
     }
   }
 }
ActivityStack
ActivityStack,内部维护了一个 ArrayList<TaskRecord> ,用来管理TaskRecord
class ActivityStack<T extends StackWindowController> extends ConfigurationContainer
    implements StackWindowListener {
  /**
  * The back history of all previous (and possibly still
  * running) activities. It contains #TaskRecord objects.
  */
  //使用一个ArrayList来保存TaskRecord
  private final ArrayList<TaskRecord> mTaskHistory = new ArrayList<>();
  //持有一个ActivityStackSupervisor,所有的运行中的ActivityStacks都通过它来进行管
  protected final ActivityStackSupervisor mStackSupervisor;
  ActivityStack(ActivityDisplay display, int stackId, ActivityStackSupervisor supervisor,
      int windowingMode, int activityType, boolean onTop) {

 }
TaskRecord createTaskRecord(int taskId, ActivityInfo info, Intent intent,
                  IVoiceInteractionSession voiceSession,
                  IVoiceInteractor voiceInteractor,
                  boolean toTop, int type) {

      //创建一个task
      TaskRecord task = new TaskRecord(mService, taskId, info, intent,voiceSession,voiceInteractor, type);

      //将task添加到ActivityStack中去
      addTask(task, toTop, "createTaskRecord");
      //其他代码略
      return task;
 }

//添加Task
void addTask(final TaskRecord task, final boolean toTop, String reason)
{
      addTask(task, toTop ? MAX_VALUE : 0, true /*schedulePictureInPictureModeChange */, reason);
      //其他代码略
   }
    //添加Task到指定位置
    void addTask(final TaskRecord task, int position, boolean schedulePictureInPictureModeChange,String reason) {
      mTaskHistory.remove(task);//若存在,先移除

      //...

      mTaskHistory.add(position, task);//添加task到mTaskHistory
      task.setStack(this);//为TaskRecord设置ActivityStack
      //...
   }
}
可以看到ActivityStack使用了一个ArrayList来保存TaskRecord。 另外,ActivityStack中还持有ActivityStackSupervisor对象,这个是用来管理ActivityStacks的。 ActivityStack是由ActivityStackSupervisor来创建的,实际ActivityStackSupervisor就是用来管理ActivityStack的
ActivityStackSupervisor
ActivityStackSupervisor,顾名思义,就是用来管理ActivityStack的
//frameworks/base/services/core/java/com/android/server/am/ActivityStackSupervisor.java
public class ActivityStackSupervisor extends ConfigurationContainer implements DisplayListener {
    ActivityStack mHomeStack;//管理的是Launcher相关的任务
    ActivityStack mFocusedStack;//管理非Launcher相关的任务

    //创建ActivityStack
    ActivityStack createStack(int stackId,ActivityStackSupervisor.ActivityDisplay display,boolean onTop) {
      switch (stackId) {
          case PINNED_STACK_ID:
          //PinnedActivityStack是ActivityStack的子类
          return new PinnedActivityStack(display, stackId, this,mRecentTasks, onTop);
          default:
          //创建一个ActivityStack
          return new ActivityStack(display, stackId, this,mRecentTasks, onTop);
     }
   }
 }
ActivityStackSupervisor内部有两个不同的ActivityStack对象:mHomeStack、mFocusedStack,用来管理不同的任务。ActivityStackSupervisor内部包含了创建ActivityStack对象的方法。 AMS初始化时会创建一个ActivityStackSupervisor对象

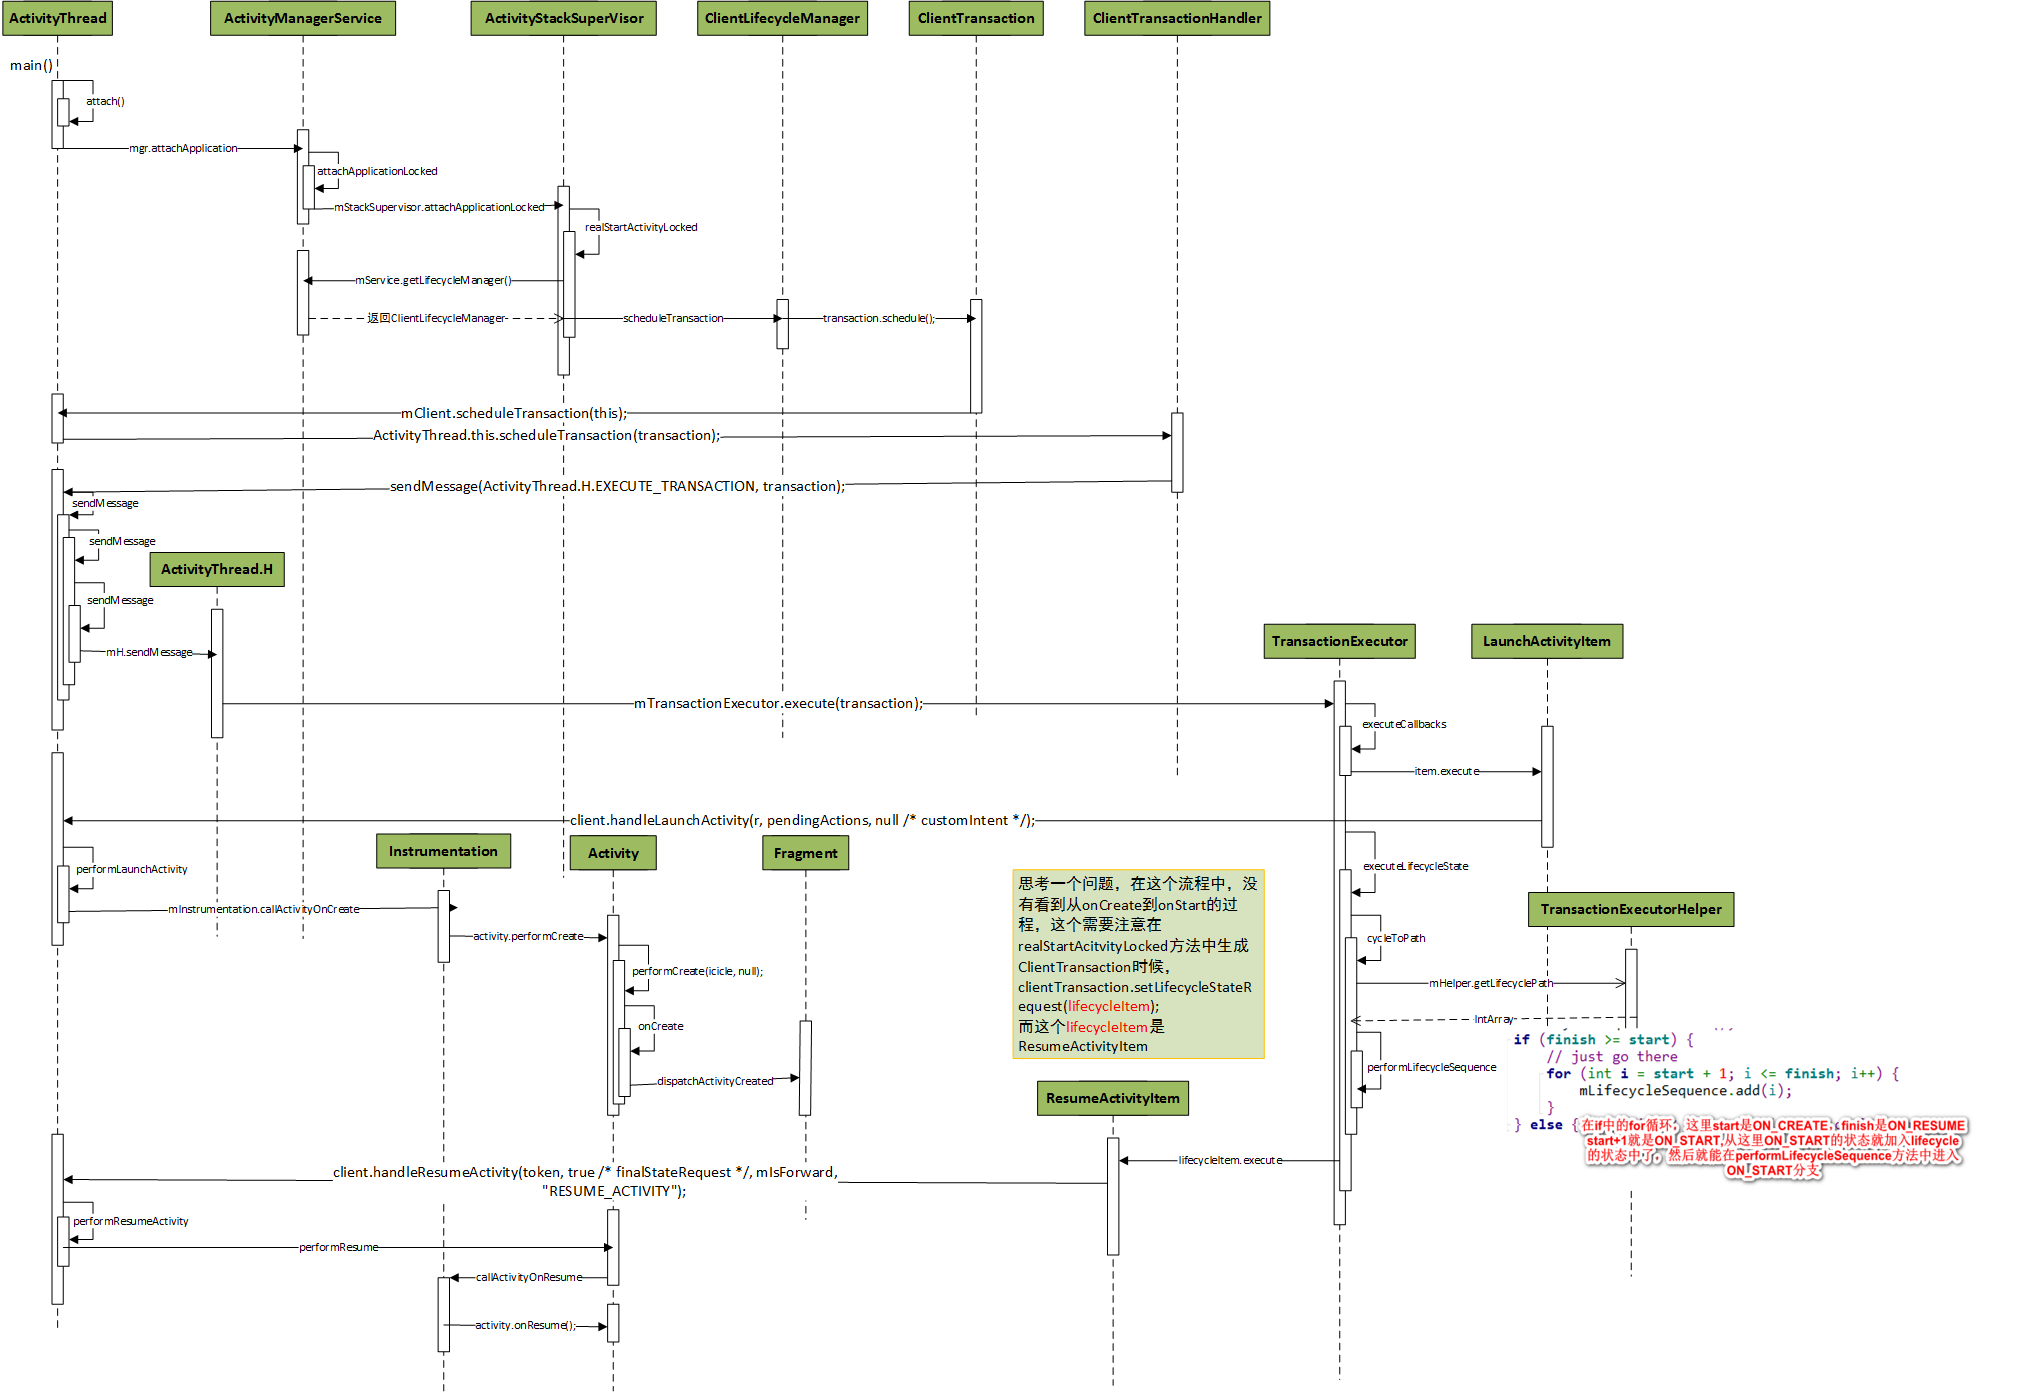
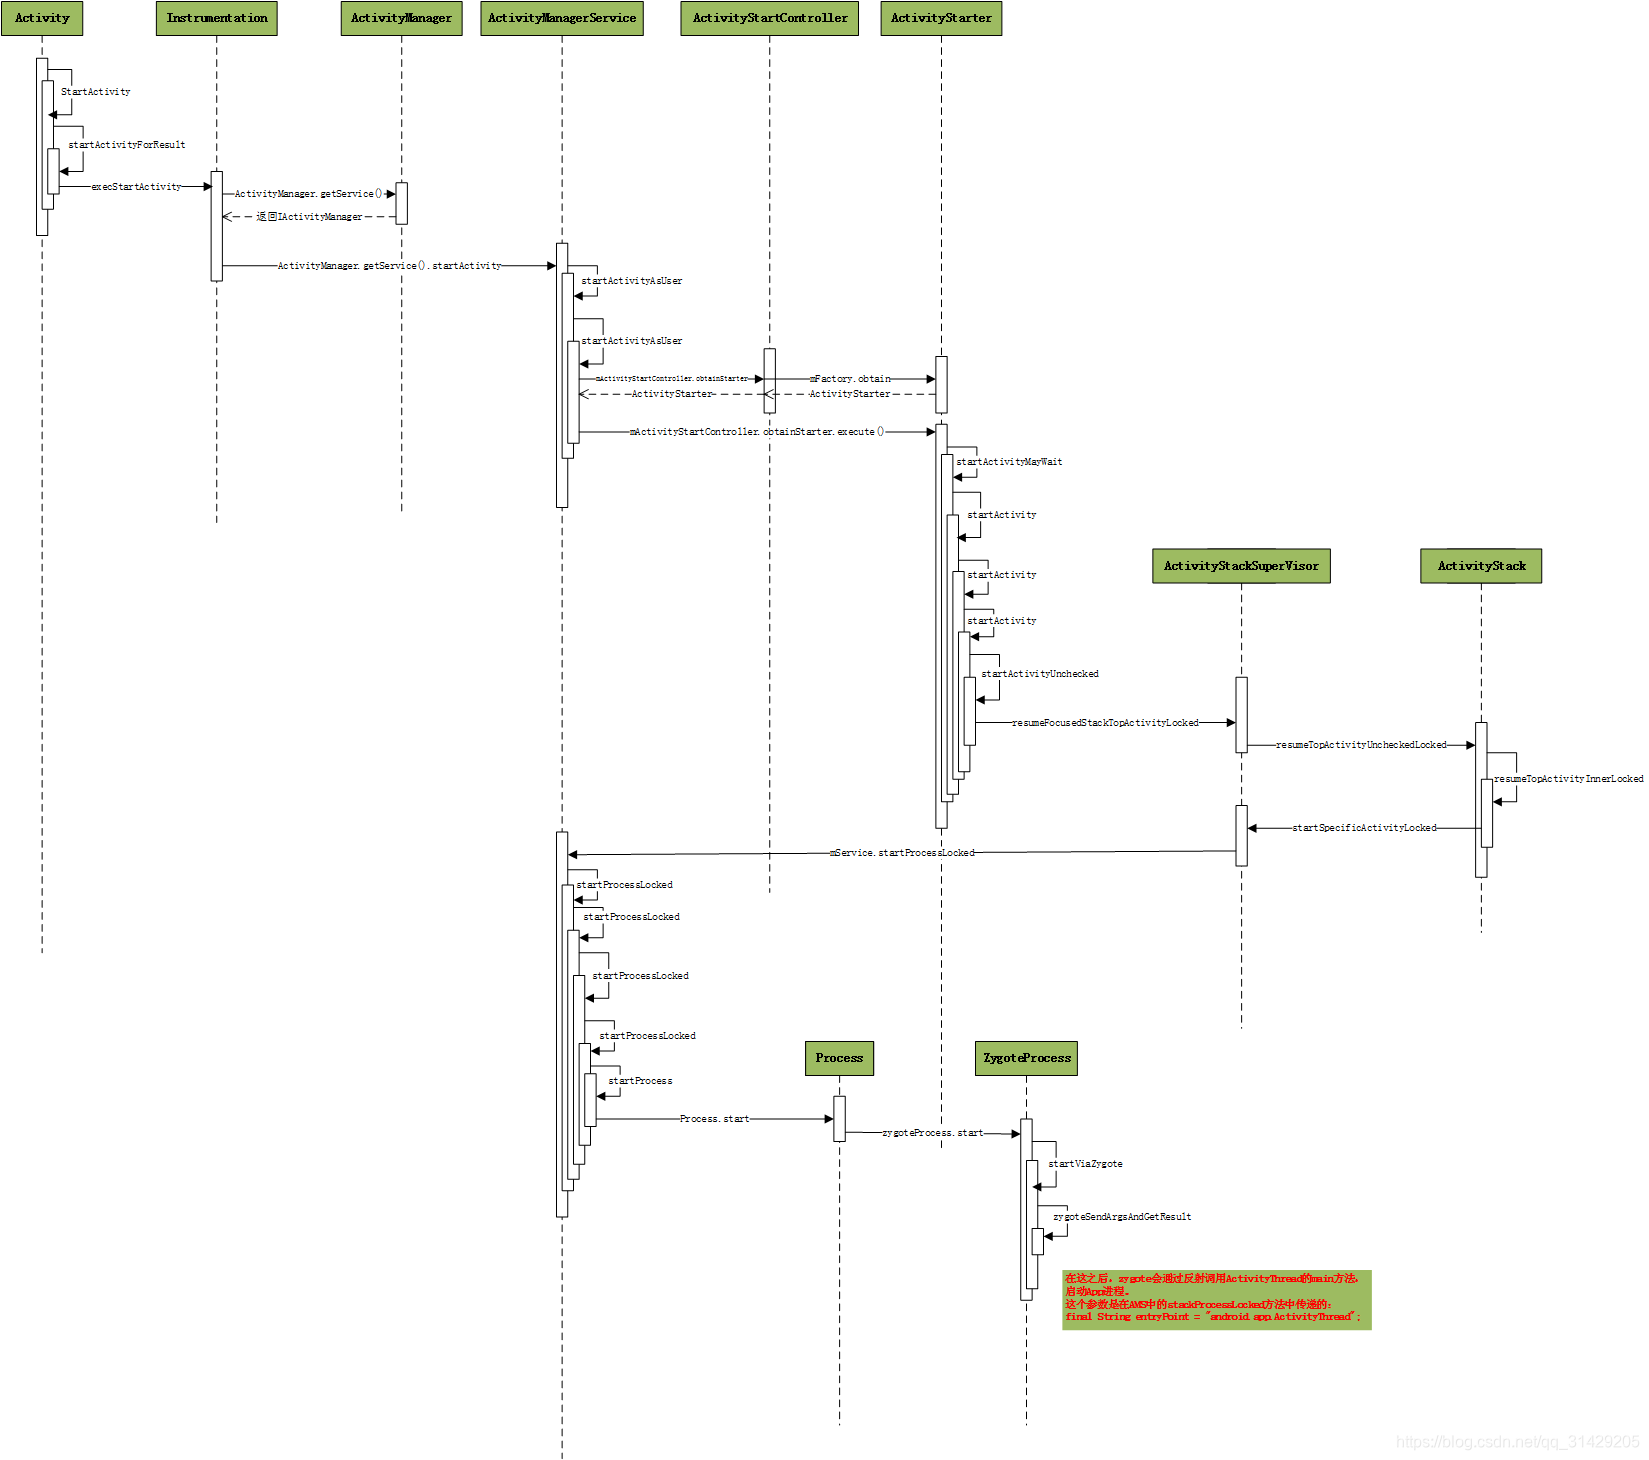
AMS相关的主要的几个数据结构类型,就这些,下面看AMS启动activity的流程,具体的代码就不在这儿贴了,看时序图:
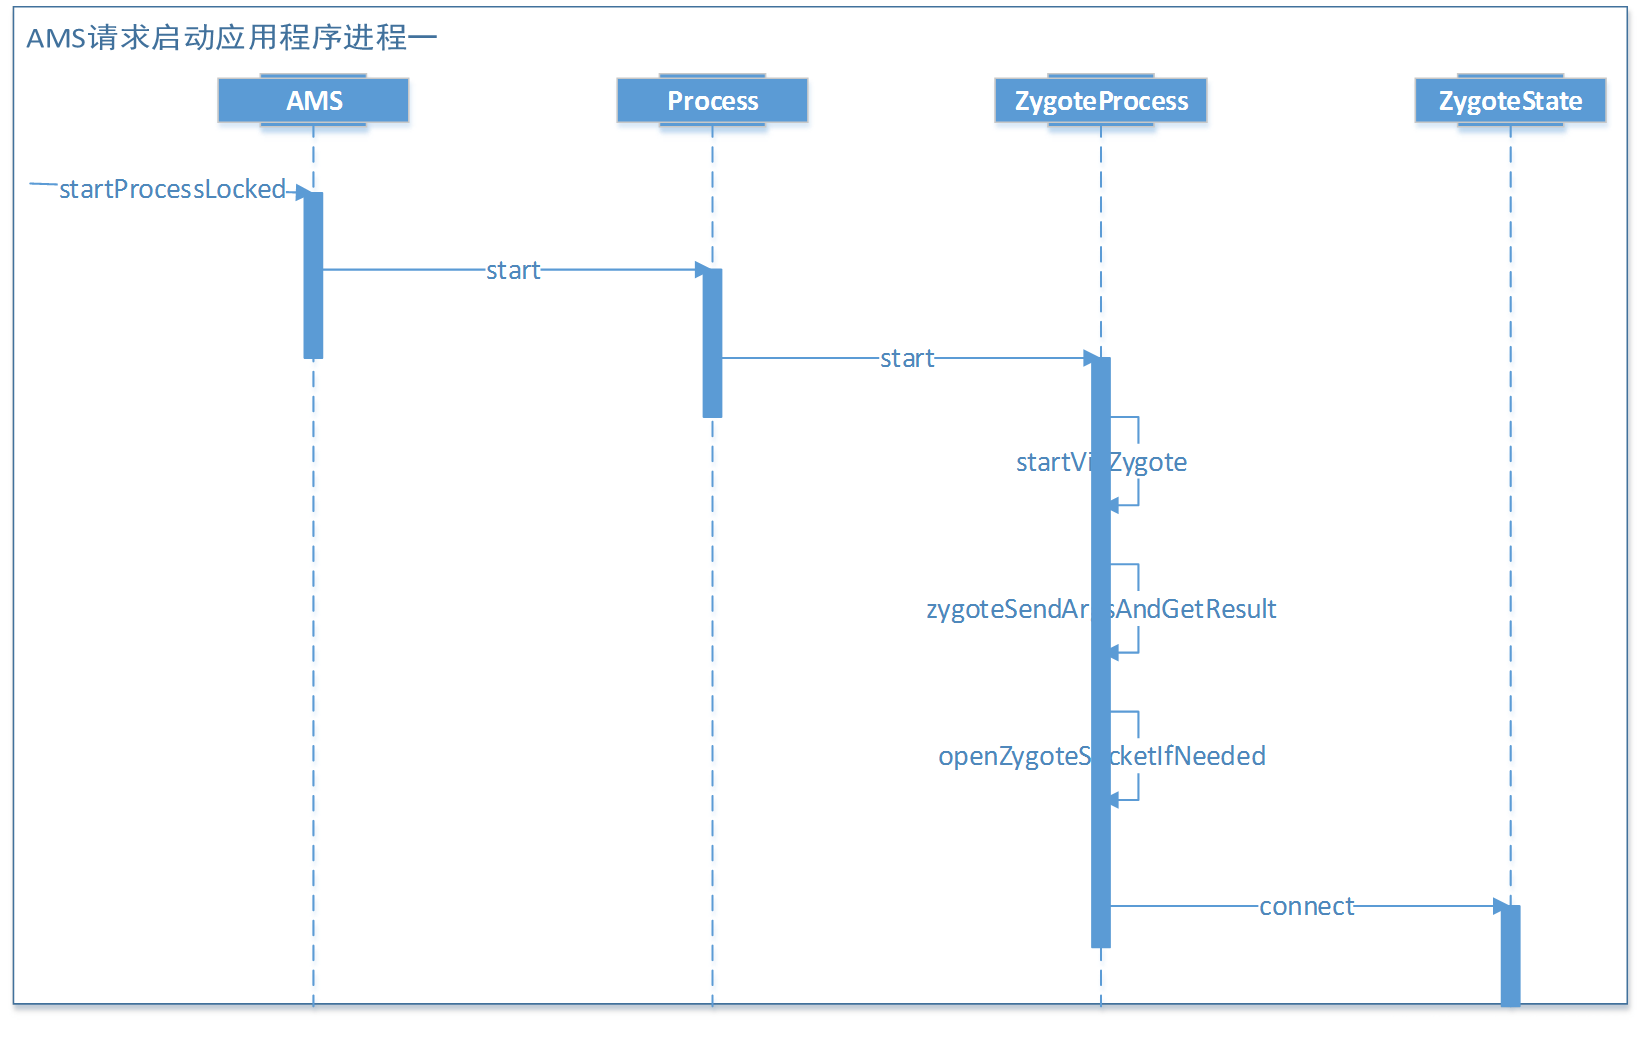
三、startActivity时候,APP进程不存在,从AMS到zygote fork完进程,再通过反射调用ActivityThread,启动APP
Zygote通过调用ActivityThread.main(),启动APP
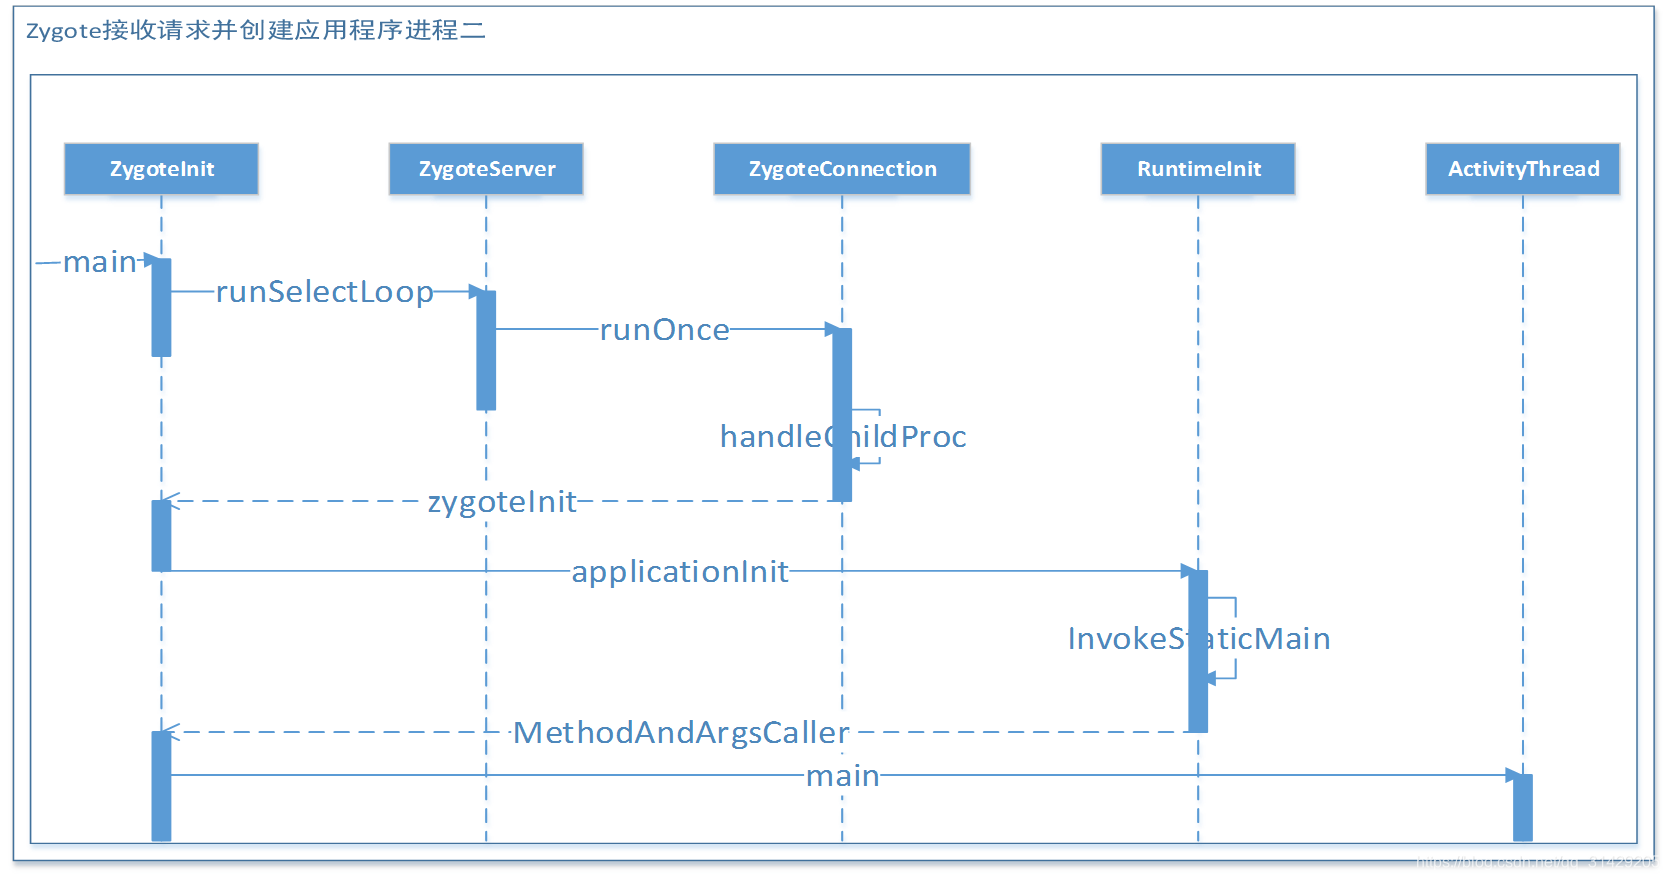
当zygote通过反射调用了ActivityThead.java的main方法之后,就返回到第二阶段的起始部分,然后启动Activity;AMS启动Activity的流程到这儿就结束了。


 1646
1646

 被折叠的 条评论
为什么被折叠?
被折叠的 条评论
为什么被折叠?
 到【灌水乐园】发言


