一、DragLayer布局
上一篇文章分析过Launcher的布局,它是最外层的布局
<!-- Full screen view projects under the status bar and contains the background -->
<FrameLayout xmlns:android="http://schemas.android.com/apk/res/android"
    xmlns:launcher="http://schemas.android.com/apk/res-auto/com.android.launcher3"
    android:id="@+id/launcher"
    android:layout_width="match_parent"
    android:layout_height="match_parent"
    android:background="@drawable/workspace_bg" >

    <com.android.launcher3.DragLayer
        android:id="@+id/drag_layer"
        android:layout_width="match_parent"
        android:layout_height="match_parent" >

<!-- The workspace contains 5 screens of cells -->二、DragLayer代码分析
官方解释为:A ViewGroup that coordinates dragging across its descendants.意思是说它是一个协调处理它的子view拖动的容器.那么很明显,我们需要关注它对屏幕触摸事件的处理.它有三个方法onTouchEvent,onInterceptTouchEvent和onInterceptHoverEvent.在分析这三个方法之前,先看下DragLayer的构造函数,它重写了FrameLayout的一些属性.
 public DragLayer(Context context, AttributeSet attrs) {
        super(context, attrs);

        // 禁止多点触控
        setMotionEventSplittingEnabled(false);
        // 按指定顺序渲染子控件
        setChildrenDrawingOrderEnabled(true);
        // 侦听子view的add和remove事件
        setOnHierarchyChangeListener(this);
        //拖动图标到屏幕左边缘的图片
        mLeftHoverDrawable = getResources().getDrawable(R.drawable.page_hover_left_holo);
        //拖动图标到屏幕右边缘的图片
        mRightHoverDrawable = getResources().getDrawable(R.drawable.page_hover_right_holo);
    }
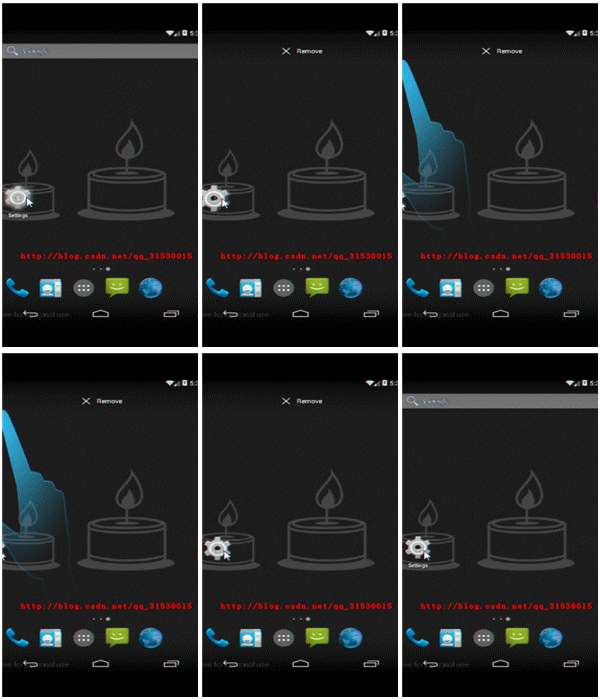
我已经在代码写上了注释,mLeftHoverDrawable是拖动桌面上的图标到屏幕左侧边缘时显示的图片,默认的图片实现的是高亮的效果,这里我把它替换为手指的图片,便于观看效果,如下图


 本文详细分析了Android 4.4 Launcher中的DragLayer布局,它是负责处理子view拖动的ViewGroup。文章探讨了DragLayer的构造函数、触摸事件处理的关键方法onTouchEvent、onInterceptTouchEvent和onInterceptHoverEvent,以及其在屏幕事件传递中的角色。特别提到了handleTouchDown方法与clearAllResizeFrames方法在拖动和调整Widget大小中的作用。

 最低0.47元/天 解锁文章


 469
469

 被折叠的 条评论
为什么被折叠?


