步骤1:配置服务的需要
步骤2:git
步骤3:先运行,看到效果,再学习
步骤4:模仿和排错
步骤5:创建子项目
步骤6:pom.xml
步骤7:ConfigServerApplication
步骤8:application.yml
步骤9:启动
步骤 1 : 配置服务的需要
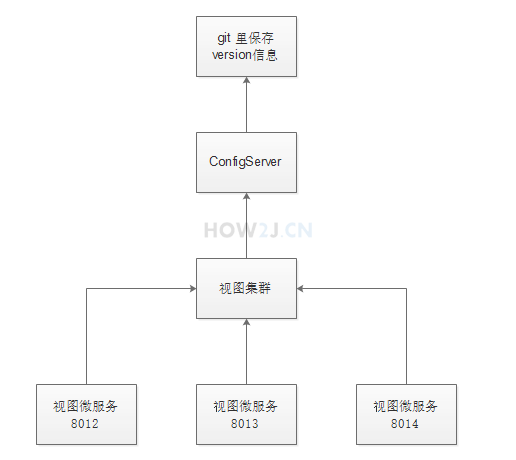
有时候,微服务要做集群,这就意味着,会有多个微服务实例。 在业务上有时候需要修改一些配置信息,比如说 版本信息吧~ 倘若没有配置服务, 那么就需要挨个修改微服务,挨个重新部署微服务,这样就比较麻烦。
为了偷懒, 这些配置信息就会放在一个公共的地方,比如git, 然后通过配置服务器把它获取下来,然后微服务再从配置服务器上取下来。
这样只要修改git上的信息,那么同一个集群里的所有微服务都立即获取相应信息了,这样就大大节约了开发,上线和重新部署的时间了。
如图所示,我们先在 git 里保存 version 信息, 然后通过 ConfigServer 去获取 version 信息, 接着不同的视图微服务实例再去 ConfigServer 里获取 version.
在本知识点会讲解如何创建 ConfigServer

步骤 2 : git
首先要准备git。
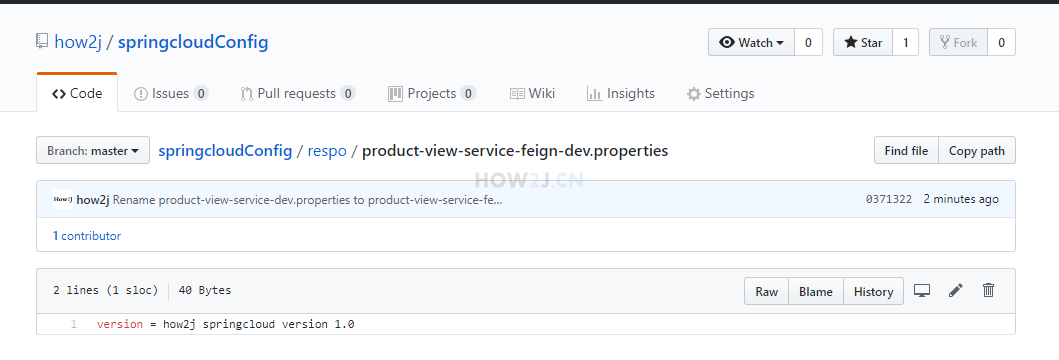
如下是已经准备好的 git:
https://github.com/how2j/springcloudConfig/blob/master/respo/product-view-service-feign-dev.properties
这里就准备了版本信息: version = how2j springcloud version 1.0
注:如果重来没有接触过 git ,可以通过本站的 git 教程学习: git 系列教程

步骤 3 : 先运行,看到效果,再学习
老规矩,先下载下载区(点击进入)的可运行项目,配置运行起来,确认可用之后,再学习做了哪些步骤以达到这样的效果。
先启动 EurekaServerApplication, 再启动 ConfigServerApplication, 然后访问
http://localhost:8030/version/dev
看到如图所示,就表示配置服务器准备好了

步骤 4 : 模仿和排错
在确保可运行项目能够正确无误地运行之后,再严格照着教程的步骤,对代码模仿一遍。
模仿过程难免代码有出入,导致无法得到期望的运行结果,此时此刻通过比较正确答案 ( 可运行项目 ) 和自己的代码,来定位问题所在。
采用这种方式,学习有效果,排错有效率,可以较为明显地提升学习速度,跨过学习路上的各个槛。
推荐使用diffmerge软件,进行文件夹比较。把你自己做的项目文件夹,和我的可运行项目文件夹进行比较。
这个软件很牛逼的,可以知道文件夹里哪两个文件不对,并且很明显地标记出来
这里提供了绿色安装和使用教程:diffmerge 下载和使用教程
步骤 5 : 创建子项目
创建子项目 config-server

步骤 6 : pom.xml
主要是 spring-cloud-config-server 这个 jar 包
| <project xmlns="http://maven.apache.org/POM/4.0.0"xmlns:xsi="http://www.w3.org/2001/XMLSchema-instance"xsi:schemaLocation="http://maven.apache.org/POM/4.0.0 http://maven.apache.org/xsd/maven-4.0.0.xsd">
<modelVersion>4.0.0</modelVersion>
<parent>
<groupId>cn.how2j.springcloud</groupId>
<artifactId>springcloud</artifactId>
<version>0.0.1-SNAPSHOT</version>
</parent>
<artifactId>configServer</artifactId>
<dependencies>
<dependency>
<groupId>org.springframework.cloud</groupId>
<artifactId>spring-cloud-starter-netflix-eureka-client</artifactId>
</dependency>
<dependency>
<groupId>org.springframework.boot</groupId>
<artifactId>spring-boot-starter-web</artifactId>
</dependency>
<dependency>
<groupId>org.springframework.cloud</groupId>
<artifactId>spring-cloud-config-server</artifactId>
</dependency>
</dependencies>
</project>
|
步骤 7 : ConfigServerApplication
主要是 @EnableConfigServer 这个注解表示本springboot 是个配置服务器。
使用的是 8030 端口
| package cn.how2j.springcloud;
import org.springframework.boot.autoconfigure.SpringBootApplication;
import org.springframework.boot.builder.SpringApplicationBuilder;
import org.springframework.cloud.client.discovery.EnableDiscoveryClient;
import org.springframework.cloud.config.server.EnableConfigServer;
import org.springframework.cloud.netflix.eureka.EnableEurekaClient;
import cn.hutool.core.util.NetUtil;
@SpringBootApplication
@EnableConfigServer
@EnableDiscoveryClient
@EnableEurekaClient
public class ConfigServerApplication {
public static void main(String[] args) {
int port = 8030;
if(!NetUtil.isUsableLocalPort(port)) {
System.err.printf("端口%d被占用了,无法启动%n", port );
System.exit(1);
}
new SpringApplicationBuilder(ConfigServerApplication.class).properties("server.port="+ port).run(args);
}
}
|
步骤 8 : application.yml
name和eureka 信息略过不表。
config 配置信息里
uri 表示 git 地址:
| https://github.com/how2j/springcloudConfig/
|
label 表示 分支:
searchPaths 表示目录:

| spring:
application:
name: config-server
cloud:
config:
label: master
server:
git:
uri: https://github.com/how2j/springcloudConfig/
searchPaths: respo
eureka:
client:
serviceUrl:
defaultZone: http://localhost:8761/eureka/
|
步骤 9 : 启动
先启动 EurekaServerApplication, 再启动 ConfigServerApplication, 然后访问
http://localhost:8030/version/dev
看到如图所示,就表示配置服务器准备好了

更多内容,点击了解: https://how2j.cn/k/springcloud/springcloud-config-server/2047.html


 427
427


 被折叠的 条评论
为什么被折叠?
被折叠的 条评论
为什么被折叠?
 到【灌水乐园】发言


