


文章目录
本页将介绍如何改变spring boot的上下文路径。
有很多方法可以改变默认的上下文路径。
在Spring Boot Web应用程序中,默认的上下文路径是("/")。
我们可以通过在属性文件中配置Spring Boot 2.x的server.servlet.context-path属性和Spring 1.x的server.contextPath属性,以及在命令行中作为java命令的参数来改变上下文路径。
我们还可以将Spring Boot 2.x的SERVER_SERVLET_CONTEXT_PATH和Spring Boot 1.x的SERVER_CONTEXT_PATH作为操作系统环境变量以及eclipse环境变量来改变上下文路径或上下文根。
Spring Boot还提供了API来以编程方式改变上下文路径。
在我们的例子中,我们将改变上下文路径为/spring-boot-app,服务器端口为8080。
在配置上下文路径名称时,我们应该注意在上下文路径名称前加上("/")。
使用属性文件(.properties/.yml)。
我们可以使用属性文件和yml文件来改变上下文根目录和服务器端口。假设我们想创建上下文根目录为/spring-boot-app,服务器端口为8585。我们将做如下操作。
a. 使用属性文件src\main\resources\application.properties
对于Spring Boot 2.x,使用server.servlet.context-path
server.servlet.context-path = /spring-boot-app
server.port = 8585
对于Spring Boot 1.x,使用server.contextPath
server.contextPath = /spring-boot-app
server.port = 8585
b. 使用yml文件src\main\resources\application.yml
Spring Boot 2.x
server:
  servlet:
    context-path: /spring-boot-app
  port: 8585
Spring Boot 1.x
server:
  contextPath: /spring-boot-app
  port: 8585
使用 java 命令
我们可以使用java命令改变spring boot web应用程序的上下文根。
构建项目,假设我们得到名为my-app.jar的可执行JAR。
假设我们想把默认的上下文根从("/")改为/spring-boot-app,端口为8585。
1. 对于Spring Boot 2.x
使用--server.servlet.context-path
java -jar my-app.jar --server.servlet.context-path=/spring-boot-app --server.port=8585
使用-Dserver.servlet.context-path
java -jar -Dserver.servlet.context-path=/spring-boot-app -Dserver.port=8585 my-app.jar
2. 对于Spring Boot 1.x
使用--server.contextPath
java -jar my-app.jar --server.contextPath=/spring-boot-app --server.port=8585
使用-Dserver.contextPath
java -jar -Dserver.contextPath=/spring-boot-app -Dserver.port=8585 my-app.jar
以编程方式更改上下文路径
SpringApplication有一个setDefaultProperties()方法,用于改变spring boot默认属性。
假设我们想改变上下文路径和默认端口,那么我们需要创建一个Map,并将server.servlet.context-path键与使用前缀("/")的所需上下文路径名称的值放在一起,这在Spring Boot 2.x中有效。
对于Spring Boot 1.x,使用server.contextPath来改变上下文路径。
要改变服务器端口,我们需要将server.port键与所需的端口值放在一起。查找Spring Boot 2.x的例子。
MyApplication.java
package com.concretepage;
import java.util.HashMap;
import java.util.Map;
import org.springframework.boot.SpringApplication;
import org.springframework.boot.autoconfigure.SpringBootApplication;
@SpringBootApplication
public class MyApplication {
	public static void main(String[] args) {
		SpringApplication application = new SpringApplication(MyApplication.class);
		Map<String, Object> map = new HashMap<>();
		map.put("server.servlet.context-path", "/spring-boot-app");
		map.put("server.port", "8585");
		application.setDefaultProperties(map);
		application.run(args);
        }
}
使用 EmbeddedServletContainerCustomizer
我们可以改变嵌入式Servlet容器的默认设置,注册一个实现EmbeddedServletContainerCustomizer接口的bean。我们需要重写其customize()方法。找到这个例子。
ContainerCustomizerBean.java
package com.concretepage.bean;
import org.springframework.boot.context.embedded.ConfigurableEmbeddedServletContainer;
import org.springframework.boot.context.embedded.EmbeddedServletContainerCustomizer;
import org.springframework.stereotype.Component;
@Component
public class ContainerCustomizerBean implements EmbeddedServletContainerCustomizer {
	@Override
	public void customize(ConfigurableEmbeddedServletContainer container) {
		container.setContextPath("/spring-boot-app");
		container.setPort(8585);
	}
}
使用操作系统环境变量
我们可以通过设置SERVER_CONTEXT_PATH(对于Spring Boot 1.x)和SERVER_PORT分别作为操作系统(如Windows和Linux)环境变量来改变Spring Boot上下文路径和默认服务器端口。
在Spring Boot 2.x中,使用SERVER_SERVLET_CONTEXT_PATH变量来改变上下文路径。我正在使用Windows 7。
找到为Spring Boot 1.x配置环境变量的步骤。
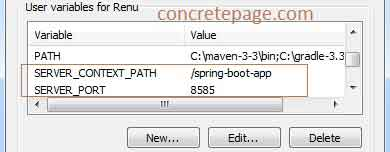
步骤1:右键单击计算机图标,然后转到属性->高级系统设置->环境变量,并按如下方式设置变量
SERVER_CONTEXT_PATH = /spring-boot-app
SERVER_PORT = 8585
如图所示
步骤2:打开命令提示符并构建项目。假设我们得到一个可执行的JAR,即my-app.jar,然后用java命令运行它,如下所示。
java -jar my-app.jar
如果我们想从eclipse控制台运行spring boot应用程序,首先重新启动eclipse,然后运行应用程序。
使用 Eclipse 运行配置
我们可以在eclipse中通过配置运行配置中的环境变量来改变spring boot的默认设置。
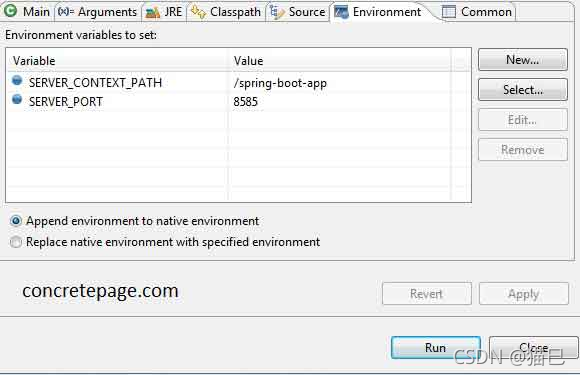
步骤1:右击该类,并进入 Run As -> Run Configurations。对于Spring Boot 1.x,使用SERVER_CONTEXT_PATH;对于Spring Boot 2.x,使用SERVER_SERVLET_CONTEXT_PATH。
步骤1:点击Environment选项卡,配置上下文路径和服务器端口,如下所示。
SERVER_CONTEXT_PATH = /spring-boot-app
SERVER_PORT = 8585
如图所示
步骤3:从eclipse控制台运行该应用程序。服务器将以spring-boot-app的上下文路径和8585端口启动。找到控制台的输出。
  .   ____          _            __ _ _
 /\\ / ___'_ __ _ _(_)_ __  __ _ \ \ \ \
( ( )\___ | '_ | '_| | '_ \/ _` | \ \ \ \
 \\/  ___)| |_)| | | | | || (_| |  ) ) ) )
  '  |____| .__|_| |_|_| |_\__, | / / / /
 =========|_|==============|___/=/_/_/_/
 :: Spring Boot ::        (v1.5.2.RELEASE)

2017-03-21 15:17:36.931  INFO 2212 --- [           main] com.concretepage.MyApplication           : Starting MyApplication on Renu-PC with PID 2212 (F:\arvind\PROJECT\mars\spring-boot\spring-boot-demo\target\classes started by Renu in F:\arvind\PROJECT\mars\spring-boot\spring-boot-demo)
2017-03-21 15:17:36.936  INFO 2212 --- [           main] com.concretepage.MyApplication           : No active profile set, falling back to default profiles: default
2017-03-21 15:17:37.043  INFO 2212 --- [           main] ationConfigEmbeddedWebApplicationContext : Refreshing org.springframework.boot.context.embedded.AnnotationConfigEmbeddedWebApplicationContext@57f23557: startup date [Tue Mar 21 15:17:37 IST 2017]; root of context hierarchy
2017-03-21 15:17:39.049  INFO 2212 --- [           main] s.b.c.e.t.TomcatEmbeddedServletContainer : Tomcat initialized with port(s): 8585 (http)
2017-03-21 15:17:39.071  INFO 2212 --- [           main] o.apache.catalina.core.StandardService   : Starting service Tomcat
2017-03-21 15:17:39.073  INFO 2212 --- [           main] org.apache.catalina.core.StandardEngine  : Starting Servlet Engine: Apache Tomcat/8.5.11
2017-03-21 15:17:39.303  INFO 2212 --- [ost-startStop-1] o.a.c.c.C.[.[.[/spring-boot-app]         : Initializing Spring embedded WebApplicationContext
参考文献
【1】Spring Boot Reference Guide
【2】Spring Boot Change Context Path


 1867
1867

 被折叠的 条评论
为什么被折叠?
被折叠的 条评论
为什么被折叠?
 到【灌水乐园】发言


