


security
springsecurity所谓的全局上下文实现
采用ThreadLocal实现
spring security相关组件
AuthenticationManagerBuilder
@Configuration
@EnableWebSecurity
public class WebSecurityConfig extends WebSecurityConfigurerAdapter {

    @Override
    protected void configure(AuthenticationManagerBuilder auth) throws Exception {
        auth
            .inMemoryAuthentication()
            .withUser("admin").password("admin").roles("USER");
    }
}
想要在WebSecurityConfigurerAdapter中进行认证相关的配置,可以使用configure(AuthenticationManagerBuilder auth)暴露一个AuthenticationManager的建造器:AuthenticationManagerBuilder 。如上所示,我们便完成了内存中用户的配置。
@Configuration
@EnableWebSecurity
public class WebSecurityConfig extends WebSecurityConfigurerAdapter {

    @Autowired
    public void configureGlobal(AuthenticationManagerBuilder auth) throws Exception {
        auth
            .inMemoryAuthentication()
                .withUser("admin").password("admin").roles("USER");
    }
}
如果你的应用只有唯一一个WebSecurityConfigurerAdapter,那么他们之间的差距可以被忽略,从方法名可以看出两者的区别:使用@Autowired注入的AuthenticationManagerBuilder是全局的身份认证器,作用域可以跨越多个WebSecurityConfigurerAdapter,以及影响到基于Method的安全控制;而 protected configure()的方式则类似于一个匿名内部类,它的作用域局限于一个WebSecurityConfigurerAdapter内部。官方文档中,也给出了配置多个WebSecurityConfigurerAdapter的场景以及demo。
SecurityContextHolder
SecurityContextHolder用于存储安全上下文(security context)的信息。当前操作的用户是谁,该用户是否已经被认证,他拥有哪些角色权限…这些都被保存在SecurityContextHolder中。SecurityContextHolder默认使用ThreadLocal 策略来存储认证信息。看到ThreadLocal 也就意味着,这是一种与线程绑定的策略。Spring Security在用户登录时自动绑定认证信息到当前线程,在用户退出时,自动清除当前线程的认证信息。但这一切的前提,是你在web场景下使用Spring Security,而如果是Swing界面,Spring也提供了支持,SecurityContextHolder的策略则需要被替换。
获取当前用户的信息 因为身份信息是与线程绑定的,所以可以在程序的任何地方使用静态方法获取用户信息。一个典型的获取当前登录用户的姓名的例子如下所示:
Object principal = SecurityContextHolder.getContext().getAuthentication().getPrincipal();

if (principal instanceof UserDetails) {
    String username = ((UserDetails)principal).getUsername();
} else {
    String username = principal.toString();
}
getAuthentication()返回了认证信息,再次getPrincipal()返回了身份信息,UserDetails便是Spring对身份信息封装的一个接口。
Authentication
package org.springframework.security.core;// <1>
//Authentication是spring security包中的接口
//,直接继承自Principal类,而Principal是位于java.security包中的。
//可以见得,Authentication在spring security中是最高级别的身份/认证的抽象
public interface Authentication extends Principal, Serializable { // <1>
    Collection<? extends GrantedAuthority> getAuthorities(); // <2>

    Object getCredentials();// <2>

    Object getDetails();// <2>

    Object getPrincipal();// <2>

    boolean isAuthenticated();// <2>

    void setAuthenticated(boolean var1) throws IllegalArgumentException;
}
getAuthorities(),权限信息列表,默认是GrantedAuthority接口的一些实现类,通常是代表权限信息的一系列字符串。
getCredentials(),密码信息,用户输入的密码字符串,在认证过后通常会被移除,用于保障安全。
getDetails(),细节信息,web应用中的实现接口通常为 WebAuthenticationDetails,它记录了访问者的ip地址和sessionId的值。
getPrincipal(),最重要的身份信息,大部分情况下返回的是UserDetails接口的实现类,也是框架中的常用接口之一
AuthenticationManager
初次接触Spring Security的朋友相信会被AuthenticationManager,ProviderManager ,AuthenticationProvider …这么多相似的Spring认证类搞得晕头转向,但只要稍微梳理一下就可以理解清楚它们的联系和设计者的用意。AuthenticationManager(接口)是认证相关的核心接口,也是发起认证的出发点,因为在实际需求中,我们可能会允许用户使用用户名+密码登录,同时允许用户使用邮箱+密码,手机号码+密码登录,甚至,可能允许用户使用指纹登录(还有这样的操作?没想到吧),所以说AuthenticationManager一般不直接认证,AuthenticationManager接口的常用实现类ProviderManager 内部会维护一个List列表,存放多种认证方式,实际上这是委托者模式的应用(Delegate)。也就是说,核心的认证入口始终只有一个:AuthenticationManager,不同的认证方式:用户名+密码(UsernamePasswordAuthenticationToken),邮箱+密码,手机号码+密码登录则对应了三个AuthenticationProvider。这样一来四不四就好理解多了?熟悉shiro的朋友可以把AuthenticationProvider理解成Realm。在默认策略下,只需要通过一个AuthenticationProvider的认证,即可被认为是登录成功。
public class ProviderManager implements AuthenticationManager, MessageSourceAware,
        InitializingBean {

    // 维护一个AuthenticationProvider列表
    private List<AuthenticationProvider> providers = Collections.emptyList();

    public Authentication authenticate(Authentication authentication)
          throws AuthenticationException {
       Class<? extends Authentication> toTest = authentication.getClass();
       AuthenticationException lastException = null;
       Authentication result = null;

       // 依次认证
       for (AuthenticationProvider provider : getProviders()) {
          if (!provider.supports(toTest)) {
             continue;
          }
          try {
             result = provider.authenticate(authentication);

             if (result != null) {
                copyDetails(authentication, result);
                break;
             }
          }
          ...
          catch (AuthenticationException e) {
             lastException = e;
          }
       }
       // 如果有Authentication信息,则直接返回
       if (result != null) {
            if (eraseCredentialsAfterAuthentication
                    && (result instanceof CredentialsContainer)) {
                   //移除密码
                ((CredentialsContainer) result).eraseCredentials();
            }
             //发布登录成功事件
            eventPublisher.publishAuthenticationSuccess(result);
            return result;
       }
       ...
       //执行到此,说明没有认证成功,包装异常信息
       if (lastException == null) {
          lastException = new ProviderNotFoundException(messages.getMessage(
                "ProviderManager.providerNotFound",
                new Object[] { toTest.getName() },
                "No AuthenticationProvider found for {0}"));
       }
       prepareException(lastException, authentication);
       throw lastException;
    }
}
ProviderManager 中的List,会依照次序去认证,认证成功则立即返回,若认证失败则返回null,下一个AuthenticationProvider会继续尝试认证,如果所有认证器都无法认证成功,则ProviderManager 会抛出一个ProviderNotFoundException异常。
UserDetails与UserDetailsService
UserDetails这个接口,它代表了最详细的用户信息,这个接口涵盖了一些必要的用户信息字段,具体的实现类对它进行了扩展
public interface UserDetails extends Serializable {

   Collection<? extends GrantedAuthority> getAuthorities();

   String getPassword();

   String getUsername();

   boolean isAccountNonExpired();

   boolean isAccountNonLocked();

   boolean isCredentialsNonExpired();

   boolean isEnabled();
}
它和Authentication接口很类似,比如它们都拥有username,authorities,区分他们也是本文的重点内容之一。Authentication的getCredentials()与UserDetails中的getPassword()需要被区分对待,前者是用户提交的密码凭证,后者是用户正确的密码,认证器其实就是对这两者的比对。Authentication中的getAuthorities()实际是由UserDetails的getAuthorities()传递而形成的。还记得Authentication接口中的getUserDetails()方法吗?其中的UserDetails用户详细信息便是经过了AuthenticationProvider之后被填充的。
public interface UserDetailsService {
UserDetails loadUserByUsername(String username) throws UsernameNotFoundException;
}
UserDetailsService和AuthenticationProvider两者的职责常常被人们搞混,关于他们的问题在文档的FAQ和issues中屡见不鲜。记住一点即可,敲黑板!!!UserDetailsService只负责从特定的地方(通常是数据库)加载用户信息,仅此而已,记住这一点,可以避免走很多弯路。UserDetailsService常见的实现类有JdbcDaoImpl,InMemoryUserDetailsManager,前者从数据库加载用户,后者从内存中加载用户,也可以自己实现UserDetailsService,通常这更加灵活。
DaoAuthenticationProvider
AuthenticationProvider最最最常用的一个实现便是DaoAuthenticationProvider。顾名思义,Dao正是数据访问层的缩写,也暗示了这个身份认证器的实现思路。
按照我们最直观的思路,怎么去认证一个用户呢?用户前台提交了用户名和密码,而数据库中保存了用户名和密码,认证便是负责比对同一个用户名,提交的密码和保存的密码是否相同便是了。在Spring Security中。提交的用户名和密码,被封装成了UsernamePasswordAuthenticationToken,而根据用户名加载用户的任务则是交给了UserDetailsService,在DaoAuthenticationProvider中,对应的方法便是retrieveUser,虽然有两个参数,但是retrieveUser只有第一个参数起主要作用,返回一个UserDetails。还需要完成UsernamePasswordAuthenticationToken和UserDetails密码的比对,这便是交给additionalAuthenticationChecks方法完成的,如果这个void方法没有抛异常,则认为比对成功。比对密码的过程,用到了PasswordEncoder和SaltSource,密码加密和盐的概念相信不用我赘述了,它们为保障安全而设计,都是比较基础的概念。
如果你已经被这些概念搞得晕头转向了,不妨这么理解DaoAuthenticationProvider:它获取用户提交的用户名和密码,比对其正确性,如果正确,返回一个数据库中的用户信息(假设用户信息被保存在数据库中)。
spring security拦截链
SecurityContextPersistenceFilter
是第一个执行的过滤器,有两个用途:
1.判断用的sission是否已经存在在SecurityContext,如果存在就取出来放到Security上下文中的SecurityContextHolder中,供其他部分使用,不存在就创建一个在存入SecurityContextHolder中
2.在所有过滤器执行完毕之后,清空SecurityContextHolder,因为SecurityContextHolder是基于ThreadLocal的,如果最后没有清空ThreadLocal会受到服务器机制的影响
LogoutFilter
只处理注销请求,在发生注销请求时,销毁注销用户的sission,清空SecurityContextHolder,然后重定向到注销成功页面, 可以和关闭功能结合,在关闭时清空用户的cooike
AbstractAuthenticationProcessingFilter
处理form登录的过滤器,与form登录有关的所有操作都是在这里进行的,登陆时判断用户名密码是否有效,有效的话就跳转到成功页面
DefaultLoginPageGeneratingFilter
用于生成一个默认的登录页面,虽然有一些功能,但是太难看了,不能在实际项目中使用
BasicAuthenticationFilter
用于Basic验证,与AbstractAuthenticationProcessingFilter类似但是验证方式不同
SecurityAuthenticationFilter
用来包装客户的请求,目的实在原来请求的基础上对后续程序提供额外的数据,比如在remove user时直接提供当前登录的用户名之类的
RememberMeAuthenticationFilter
实现RememberMe功能,当用户cookie中存在RememberMe标记时,会根据标记实现自动创建SecurityContext,授予相应权限 ,spring Security 中的RememberMe依赖cookie实现,当用户登录时选择使用RememberMe,就再用户登录后为用户生成一个唯一的标识,并将标识保存在cookie中
AnonymousAuthenticationFilter
用于保证用户没有登录时,为用户分配匿名用户的权限,当然了,许多项目也会关闭掉匿名用户
ExceptionTeanslationFilter
为了处理filterSecurityException抛出的异常,请求重定向到对应页面,或者返回对应的响应错误代码
SessionManagementFilter
只要是为了防御会话伪造攻击,只要登录成功后销毁当前用户的当前sission,并从新生成一个sission就可以了
FilterSecurityInterceptor
用户的权限控制都包含在这个过滤器中,功能是:
1.如果用户尚未登陆就抛出尚未登录的异常
2.如果用户已经登录但是没有访问当前资源的权限,那么会抛出拒绝访问的异常
3.用户已登录也具有访问当前资源的权限就放行
这十一个拦截器是如何按照顺序执行的呢?
FilterChainProxy:这个类会按照顺序调用一组filter既能使用各自相应的工作,又能实现springioc得到其他依赖的资源
Spring Security是如何完成身份认证的?
1 用户名和密码被过滤器获取到,封装成Authentication,通常情况下是UsernamePasswordAuthenticationToken这个实现类。
2 AuthenticationManager 身份管理器负责验证这个Authentication
3 认证成功后,AuthenticationManager身份管理器返回一个被填充满了信息的(包括上面提到的权限信息,身份信息,细节信息,但密码通常会被移除)Authentication实例。
4 SecurityContextHolder安全上下文容器将第3步填充了信息的Authentication,通过SecurityContextHolder.getContext().setAuthentication(…)方法,设置到其中。
这是一个抽象的认证流程,而整个过程中,如果不纠结于细节,其实只剩下一个AuthenticationManager 是我们没有接触过的了,这个身份管理器我们在后面的小节介绍。将上述的流程转换成代码,便是如下的流程:
public class AuthenticationExample {
private static AuthenticationManager am = new SampleAuthenticationManager();

public static void main(String[] args) throws Exception {
    BufferedReader in = new BufferedReader(new InputStreamReader(System.in));

    while(true) {
    System.out.println("Please enter your username:");
    String name = in.readLine();
    System.out.println("Please enter your password:");
    String password = in.readLine();
    try {
        Authentication request = new UsernamePasswordAuthenticationToken(name, password);
        Authentication result = am.authenticate(request);
        SecurityContextHolder.getContext().setAuthentication(result);
        break;
    } catch(AuthenticationException e) {
        System.out.println("Authentication failed: " + e.getMessage());
    }
    }
    System.out.println("Successfully authenticated. Security context contains: " +
            SecurityContextHolder.getContext().getAuthentication());
}
}

class SampleAuthenticationManager implements AuthenticationManager {
static final List<GrantedAuthority> AUTHORITIES = new ArrayList<GrantedAuthority>();

static {
    AUTHORITIES.add(new SimpleGrantedAuthority("ROLE_USER"));
}

public Authentication authenticate(Authentication auth) throws AuthenticationException {
    if (auth.getName().equals(auth.getCredentials())) {
    return new UsernamePasswordAuthenticationToken(auth.getName(),
        auth.getCredentials(), AUTHORITIES);
    }
    throw new BadCredentialsException("Bad Credentials");
    }
}
简述一下spring security核心过滤器
SecurityContextPersistenceFilter 两个主要职责:请求来临时,创建SecurityContext安全上下文信息,请求结束时清空SecurityContextHolder。
HeaderWriterFilter (文档中并未介绍,非核心过滤器) 用来给http响应添加一些Header,比如X-Frame-Options, X-XSS-Protection*,X-Content-Type-Options.
CsrfFilter 在spring4这个版本中被默认开启的一个过滤器,用于防止csrf攻击,了解前后端分离的人一定不会对这个攻击方式感到陌生,前后端使用json交互需要注意的一个问题。
LogoutFilter 顾名思义,处理注销的过滤器
UsernamePasswordAuthenticationFilter 这个会重点分析,表单提交了username和password,被封装成token进行一系列的认证,便是主要通过这个过滤器完成的,在表单认证的方法中,这是最最关键的过滤器。
RequestCacheAwareFilter (文档中并未介绍,非核心过滤器) 内部维护了一个RequestCache,用于缓存request请求
SecurityContextHolderAwareRequestFilter 此过滤器对ServletRequest进行了一次包装,使得request具有更加丰富的API
AnonymousAuthenticationFilter 匿名身份过滤器,这个过滤器个人认为很重要,需要将它与UsernamePasswordAuthenticationFilter 放在一起比较理解,spring security为了兼容未登录的访问,也走了一套认证流程,只不过是一个匿名的身份。
SessionManagementFilter 和session相关的过滤器,内部维护了一个SessionAuthenticationStrategy,两者组合使用,常用来防止session-fixation protection attack,以及限制同一用户开启多个会话的数量
ExceptionTranslationFilter 直译成异常翻译过滤器,还是比较形象的,这个过滤器本身不处理异常,而是将认证过程中出现的异常交给内部维护的一些类去处理,具体是那些类后面会详细介绍,可在主页的顶置或分栏里找到相应的链接。
FilterSecurityInterceptor 这个过滤器决定了访问特定路径应该具备的权限,访问的用户的角色,权限是什么?访问的路径需要什么样的角色和权限?这些判断和处理都是由该类进行的。
能说一下spring security配置类中permitAll的原理么
permitAll是可以直接放过相应的条件的,在spring security内部会有一个超级管理员的用户赋予permitAll,这个超级管理员用户拥有超级权限,可以通过所有过滤链。
介绍一下SecurityContextPersistenceFilter
试想一下,如果我们不使用Spring Security,如果保存用户信息呢,大多数情况下会考虑使用Session对吧?在Spring Security中也是如此,用户在登录过一次之后,后续的访问便是通过sessionId来识别,从而认为用户已经被认证。SecurityContextHolder存放用户信息,认证相关的信息是如何被存放到其中的,便是通过SecurityContextPersistenceFilter。SecurityContextPersistenceFilter的两个主要作用便是请求来临时,创建SecurityContext安全上下文信息和请求结束时清空SecurityContextHolder。微服务的一个设计理念需要实现服务通信的无状态,而http协议中的无状态意味着不允许存在session,这可以通过setAllowSessionCreation(false) 实现,这并不意味着SecurityContextPersistenceFilter变得无用,因为它还需要负责清除用户信息。在Spring Security中,虽然安全上下文信息被存储于Session中,但我们在实际使用中不应该直接操作Session,而应当使用SecurityContextHolder。
org.springframework.security.web.context.SecurityContextPersistenceFilter

public class SecurityContextPersistenceFilter extends GenericFilterBean {

   static final String FILTER_APPLIED = "__spring_security_scpf_applied";
   //安全上下文存储的仓库
   private SecurityContextRepository repo;

   public SecurityContextPersistenceFilter() {
      //HttpSessionSecurityContextRepository是SecurityContextRepository接口的一个实现类
      //使用HttpSession来存储SecurityContext
      this(new HttpSessionSecurityContextRepository());
   }

   public void doFilter(ServletRequest req, ServletResponse res, FilterChain chain)
         throws IOException, ServletException {
      HttpServletRequest request = (HttpServletRequest) req;
      HttpServletResponse response = (HttpServletResponse) res;

      if (request.getAttribute(FILTER_APPLIED) != null) {
         // ensure that filter is only applied once per request
         chain.doFilter(request, response);
         return;
      }
      request.setAttribute(FILTER_APPLIED, Boolean.TRUE);
      //包装request,response
      HttpRequestResponseHolder holder = new HttpRequestResponseHolder(request,
            response);
      //从Session中获取安全上下文信息
      SecurityContext contextBeforeChainExecution = repo.loadContext(holder);
      try {
         //请求开始时,设置安全上下文信息,这样就避免了用户直接从Session中获取安全上下文信息
         SecurityContextHolder.setContext(contextBeforeChainExecution);
         chain.doFilter(holder.getRequest(), holder.getResponse());
      }
      finally {
         //请求结束后,清空安全上下文信息
         SecurityContext contextAfterChainExecution = SecurityContextHolder
               .getContext();
         SecurityContextHolder.clearContext();
         repo.saveContext(contextAfterChainExecution, holder.getRequest(),
               holder.getResponse());
         request.removeAttribute(FILTER_APPLIED);
         if (debug) {
            logger.debug("SecurityContextHolder now cleared, as request processing completed");
         }
      }
   }

}
过滤器一般负责核心的处理流程,而具体的业务实现,通常交给其中聚合的其他实体类,这在Filter的设计中很常见,同时也符合职责分离模式。例如存储安全上下文和读取安全上下文的工作完全委托给了HttpSessionSecurityContextRepository去处理,而这个类中也有几个方法可以稍微解读下,方便我们理解内部的工作流程
org.springframework.security.web.context.HttpSessionSecurityContextRepository

public class HttpSessionSecurityContextRepository implements SecurityContextRepository {
   // 'SPRING_SECURITY_CONTEXT'是安全上下文默认存储在Session中的键值
   public static final String SPRING_SECURITY_CONTEXT_KEY = "SPRING_SECURITY_CONTEXT";
   ...
   private final Object contextObject = SecurityContextHolder.createEmptyContext();
   private boolean allowSessionCreation = true;
   private boolean disableUrlRewriting = false;
   private String springSecurityContextKey = SPRING_SECURITY_CONTEXT_KEY;

   private AuthenticationTrustResolver trustResolver = new AuthenticationTrustResolverImpl();

   //从当前request中取出安全上下文,如果session为空,则会返回一个新的安全上下文
   public SecurityContext loadContext(HttpRequestResponseHolder requestResponseHolder) {
      HttpServletRequest request = requestResponseHolder.getRequest();
      HttpServletResponse response = requestResponseHolder.getResponse();
      HttpSession httpSession = request.getSession(false);
      SecurityContext context = readSecurityContextFromSession(httpSession);
      if (context == null) {
         context = generateNewContext();
      }
      ...
      return context;
   }

   ...

   public boolean containsContext(HttpServletRequest request) {
      HttpSession session = request.getSession(false);
      if (session == null) {
         return false;
      }
      return session.getAttribute(springSecurityContextKey) != null;
   }

   private SecurityContext readSecurityContextFromSession(HttpSession httpSession) {
      if (httpSession == null) {
         return null;
      }
      ...
      // Session存在的情况下,尝试获取其中的SecurityContext
      Object contextFromSession = httpSession.getAttribute(springSecurityContextKey);
      if (contextFromSession == null) {
         return null;
      }
      ...
      return (SecurityContext) contextFromSession;
   }

   //初次请求时创建一个新的SecurityContext实例
   protected SecurityContext generateNewContext() {
      return SecurityContextHolder.createEmptyContext();
   }

}
SecurityContextPersistenceFilter和HttpSessionSecurityContextRepository配合使用,构成了Spring Security整个调用链路的入口,为什么将它放在最开始的地方也是显而易见的,后续的过滤器中大概率会依赖Session信息和安全上下文信息。
介绍一下UsernamePasswordAuthenticationFilter
表单认证是最常用的一个认证方式,一个最直观的业务场景便是允许用户在表单中输入用户名和密码进行登录,而这背后的UsernamePasswordAuthenticationFilter,在整个Spring Security的认证体系中则扮演着至关重要的角色。
org.springframework.security.web.authentication.UsernamePasswordAuthenticationFilter#attemptAuthentication

public Authentication attemptAuthentication(HttpServletRequest request,
      HttpServletResponse response) throws AuthenticationException {
   //获取表单中的用户名和密码
   String username = obtainUsername(request);
   String password = obtainPassword(request);
   ...
   username = username.trim();
   //组装成username+password形式的token
   UsernamePasswordAuthenticationToken authRequest = new UsernamePasswordAuthenticationToken(
         username, password);
   // Allow subclasses to set the "details" property
   setDetails(request, authRequest);
   //交给内部的AuthenticationManager去认证,并返回认证信息
   return this.getAuthenticationManager().authenticate(authRequest);
}
UsernamePasswordAuthenticationFilter本身的代码只包含了上述这么一个方法,非常简略,而在其父类AbstractAuthenticationProcessingFilter中包含了大量的细节,值得我们分析:

public abstract class AbstractAuthenticationProcessingFilter extends GenericFilterBean
      implements ApplicationEventPublisherAware, MessageSourceAware {
    //包含了一个身份认证器
    private AuthenticationManager authenticationManager;
    //用于实现remeberMe
    private RememberMeServices rememberMeServices = new NullRememberMeServices();
    private RequestMatcher requiresAuthenticationRequestMatcher;
    //这两个Handler很关键,分别代表了认证成功和失败相应的处理器
    private AuthenticationSuccessHandler successHandler = new SavedRequestAwareAuthenticationSuccessHandler();
    private AuthenticationFailureHandler failureHandler = new SimpleUrlAuthenticationFailureHandler();

    public void doFilter(ServletRequest req, ServletResponse res, FilterChain chain)
            throws IOException, ServletException {

        HttpServletRequest request = (HttpServletRequest) req;
        HttpServletResponse response = (HttpServletResponse) res;
        ...
        Authentication authResult;
        try {
            //此处实际上就是调用UsernamePasswordAuthenticationFilter的attemptAuthentication方法
            authResult = attemptAuthentication(request, response);
            if (authResult == null) {
                //子类未完成认证,立刻返回
                return;
            }
            sessionStrategy.onAuthentication(authResult, request, response);
        }
        //在认证过程中可以直接抛出异常,在过滤器中,就像此处一样,进行捕获
        catch (InternalAuthenticationServiceException failed) {
            //内部服务异常
            unsuccessfulAuthentication(request, response, failed);
            return;
        }
        catch (AuthenticationException failed) {
            //认证失败
            unsuccessfulAuthentication(request, response, failed);
            return;
        }
        //认证成功
        if (continueChainBeforeSuccessfulAuthentication) {
            chain.doFilter(request, response);
        }
        //注意,认证成功后过滤器把authResult结果也传递给了成功处理器
        successfulAuthentication(request, response, chain, authResult);
    }

}
整个流程理解起来也并不难,主要就是内部调用了authenticationManager完成认证,根据认证结果执行successfulAuthentication或者unsuccessfulAuthentication,无论成功失败,一般的实现都是转发或者重定向等处理,不再细究AuthenticationSuccessHandler和AuthenticationFailureHandler,有兴趣的朋友,可以去看看两者的实现类。
介绍一下AnonymousAuthenticationFilter
匿名认证过滤器,可能有人会想:匿名了还有身份?我自己对于Anonymous匿名身份的理解是Spirng Security为了整体逻辑的统一性,即使是未通过认证的用户,也给予了一个匿名身份。而AnonymousAuthenticationFilter该过滤器的位置也是非常的科学的,它位于常用的身份认证过滤器(如UsernamePasswordAuthenticationFilter、BasicAuthenticationFilter、RememberMeAuthenticationFilter)之后,意味着只有在上述身份过滤器执行完毕后,SecurityContext依旧没有用户信息,AnonymousAuthenticationFilter该过滤器才会有意义—-基于用户一个匿名身份。
org.springframework.security.web.authentication.AnonymousAuthenticationFilter

public class AnonymousAuthenticationFilter extends GenericFilterBean implements
      InitializingBean {

   private AuthenticationDetailsSource<HttpServletRequest, ?> authenticationDetailsSource = new WebAuthenticationDetailsSource();
   private String key;
   private Object principal;
   private List<GrantedAuthority> authorities;


   //自动创建一个"anonymousUser"的匿名用户,其具有ANONYMOUS角色
   public AnonymousAuthenticationFilter(String key) {
      this(key, "anonymousUser", AuthorityUtils.createAuthorityList("ROLE_ANONYMOUS"));
   }

   /**
    *
    * @param key key用来识别该过滤器创建的身份
    * @param principal principal代表匿名用户的身份
    * @param authorities authorities代表匿名用户的权限集合
    */
   public AnonymousAuthenticationFilter(String key, Object principal,
         List<GrantedAuthority> authorities) {
      Assert.hasLength(key, "key cannot be null or empty");
      Assert.notNull(principal, "Anonymous authentication principal must be set");
      Assert.notNull(authorities, "Anonymous authorities must be set");
      this.key = key;
      this.principal = principal;
      this.authorities = authorities;
   }

   ...

   public void doFilter(ServletRequest req, ServletResponse res, FilterChain chain)
         throws IOException, ServletException {
      //过滤器链都执行到匿名认证过滤器这儿了还没有身份信息,塞一个匿名身份进去
      if (SecurityContextHolder.getContext().getAuthentication() == null) {
         SecurityContextHolder.getContext().setAuthentication(
               createAuthentication((HttpServletRequest) req));
      }
      chain.doFilter(req, res);
   }

   protected Authentication createAuthentication(HttpServletRequest request) {
     //创建一个AnonymousAuthenticationToken
      AnonymousAuthenticationToken auth = new AnonymousAuthenticationToken(key,
            principal, authorities);
      auth.setDetails(authenticationDetailsSource.buildDetails(request));

      return auth;
   }
   ...
}
其实对比AnonymousAuthenticationFilter和UsernamePasswordAuthenticationFilter就可以发现一些门道了,UsernamePasswordAuthenticationToken对应AnonymousAuthenticationToken,他们都是Authentication的实现类,而Authentication则是被SecurityContextHolder(SecurityContext)持有的,一切都被串联在了一起。
介绍一下ExceptionTranslationFilter
ExceptionTranslationFilter异常转换过滤器位于整个springSecurityFilterChain的后方,用来转换整个链路中出现的异常,将其转化,顾名思义,转化以意味本身并不处理。一般其只处理两大类异常:AccessDeniedException访问异常和AuthenticationException认证异常。
这个过滤器非常重要,因为它将Java中的异常和HTTP的响应连接在了一起,这样在处理异常时,我们不用考虑密码错误该跳到什么页面,账号锁定该如何,只需要关注自己的业务逻辑,抛出相应的异常便可。如果该过滤器检测到AuthenticationException,则将会交给内部的AuthenticationEntryPoint去处理,如果检测到AccessDeniedException,需要先判断当前用户是不是匿名用户,如果是匿名访问,则和前面一样运行AuthenticationEntryPoint,否则会委托给AccessDeniedHandler去处理,而AccessDeniedHandler的默认实现,是AccessDeniedHandlerImpl。所以ExceptionTranslationFilter内部的AuthenticationEntryPoint是至关重要的,顾名思义:认证的入口点
public class ExceptionTranslationFilter extends GenericFilterBean {
  //处理异常转换的核心方法
  private void handleSpringSecurityException(HttpServletRequest request,
        HttpServletResponse response, FilterChain chain, RuntimeException exception)
        throws IOException, ServletException {
     if (exception instanceof AuthenticationException) {
           //重定向到登录端点
        sendStartAuthentication(request, response, chain,
              (AuthenticationException) exception);
     }
     else if (exception instanceof AccessDeniedException) {
        Authentication authentication = SecurityContextHolder.getContext().getAuthentication();
        if (authenticationTrustResolver.isAnonymous(authentication) || authenticationTrustResolver.isRememberMe(authentication)) {
          //重定向到登录端点
           sendStartAuthentication(
                 request,
                 response,
                 chain,
                 new InsufficientAuthenticationException(
                       "Full authentication is required to access this resource"));
        }
        else {
           //交给accessDeniedHandler处理
           accessDeniedHandler.handle(request, response,
                 (AccessDeniedException) exception);
        }
     }
  }
}
剩下的便是要搞懂AuthenticationEntryPoint和AccessDeniedHandler就可以了。
选择了几个常用的登录端点,以其中第一个为例来介绍,看名字就能猜到是认证失败之后,让用户跳转到登录页面。还记得我们一开始怎么配置表单登录页面的吗?
@Configuration
@EnableWebSecurity
public class WebSecurityConfig extends WebSecurityConfigurerAdapter {

    @Override
    protected void configure(HttpSecurity http) throws Exception {
        http
            .authorizeRequests()
                .antMatchers("/", "/home").permitAll()
                .anyRequest().authenticated()
                .and()
            .formLogin()//FormLoginConfigurer
                .loginPage("/login")
                .permitAll()
                .and()
            .logout()
                .permitAll();
    }
}
oauth2.0
为什么需要oauth2.0
主要是security提供的登录验证方式不易于扩展,其次是oauth2.0其实是security的增强版本
1.提供了四种方式
授权码模式、账号密码模式、简化模式(直接申请令牌并返回令牌,比如向程序,主要是申请端只有前端没有服务器的情况)、客户端模式(与用户无关的模式,服务器与服务器之间的通信,比如内部系统间api调用)
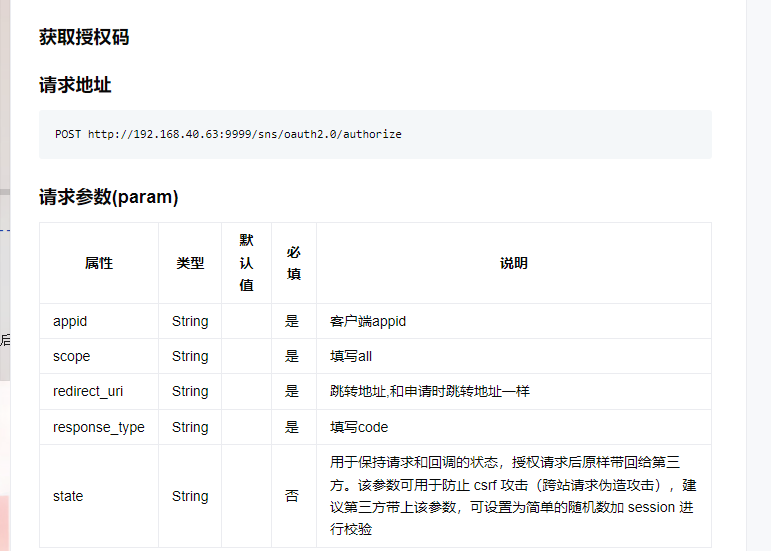
授权码模式
client_id 客户端id,创建应用的时候获取的
redirect_uri 重定向地址,认证完成后返回个code给到这个地址
scope 申请权限范围 比如读 写等
state 随机值,用于后续验证
response_type:方式 填code就行
2.oauth提供了返回参数增强
也就是我们在登陆成功后,可以新增一些返回参数,比如头像,权限,菜单等等之类的。通过实现tokenEnhancer,最终指定bean即可
@AllArgsConstructor
public class ProcessJwtTokenEnhancer implements TokenEnhancer {

    @Override
    public OAuth2AccessToken enhance(OAuth2AccessToken accessToken, OAuth2Authentication authentication) {
        Object principal = authentication.getUserAuthentication().getPrincipal();

        Map<String, Object> additionalInfo = new HashMap<>(6);

        String openId; //openId
        String tenantId;//租户id
        //会员用户
        if (authentication.getPrincipal() != null && authentication.getPrincipal() instanceof MemberDetails) {
            MemberDetails memberDetails = (MemberDetails) authentication.getPrincipal();
            openId = memberDetails.getOpenid();
            additionalInfo.put(TokenUtil.USER_ID, openId);
//            additionalInfo.put("sessionKey",memberDetails.getSessionKey());
            additionalInfo.put("infoAuth", StringUtil.isBlank(memberDetails.getAvatar())); //头像为空,提示获取头像信息 true为需要 false为不需要
            //管理员用户
        } else if (authentication.getPrincipal() != null && authentication.getPrincipal() instanceof ProcessUserDetails) {
            ProcessUserDetails adminUser = (ProcessUserDetails) principal;
            Map<String, Object> info = new HashMap<>(16);

            openId = Func.toStr(adminUser.getUserId());
            tenantId = Func.toStr(adminUser.getTenantId());
            info.put(TokenUtil.CLIENT_ID, TokenUtil.getClientIdFromHeader());
            info.put(TokenUtil.USER_ID, openId);
            info.put(TokenUtil.DEPT_ID, Func.toStr(adminUser.getDeptId()));
            info.put(TokenUtil.POST_ID, Func.toStr(adminUser.getPostId()));
            info.put(TokenUtil.ROLE_ID, Func.toStr(adminUser.getRoleId()));
            info.put(TokenUtil.TENANT_ID, tenantId);
            info.put(TokenUtil.OAUTH_ID, adminUser.getOauthId());
            info.put(TokenUtil.ACCOUNT, adminUser.getAccount());
            info.put(TokenUtil.USER_NAME, adminUser.getUsername());
            info.put(TokenUtil.NICK_NAME, adminUser.getName());
            info.put(TokenUtil.REAL_NAME, adminUser.getRealName());
            info.put(TokenUtil.ROLE_NAME, adminUser.getRoleName());
            info.put(TokenUtil.AVATAR, adminUser.getAvatar());
            info.put(TokenUtil.DETAIL, adminUser.getDetail());
            info.put(TokenUtil.LICENSE, TokenUtil.LICENSE_NAME);

            additionalInfo.put("auth", AesUtil.encryptToHex(JsonUtil.toJson(info), JwtSecretKey.getSecret32Key()));
            additionalInfo.put(TokenUtil.USER_ID, Func.toStr(adminUser.getUserId()));
            additionalInfo.put(TokenUtil.USER_NAME, adminUser.getUsername());
            additionalInfo.put(TokenUtil.NICK_NAME, adminUser.getName());
            additionalInfo.put(TokenUtil.ACCOUNT, adminUser.getAccount());
            additionalInfo.put(TokenUtil.AVATAR, adminUser.getAvatar());
            additionalInfo.put(TokenUtil.TENANT_ID, adminUser.getTenantId());
        }
        ((DefaultOAuth2AccessToken) accessToken).setAdditionalInformation(additionalInfo);
        return accessToken;
    }
}
/**
* 用于扩展jwt
*/
@Bean
@ConditionalOnMissingBean(name = "jwtTokenEnhancer")
public TokenEnhancer jwtTokenEnhancer() {
return new ProcessJwtTokenEnhancer();
}3.提供了自定义token获取方式,通过继承AbstractTokenGranter类实现,然后加到tokenGranter集合内,通过compositeTokenGranter进行集合新增,最后加入到endpoints.tokenGranter内即可
//将所有自定义的tokenGranter加入到集合
public static TokenGranter getTokenGranter(final AuthenticationManager authenticationManager, final AuthorizationServerEndpointsConfigurer endpoints, RedisOpration redisOpration, SocialProperties socialProperties, CaptchaService captchaService, MemberClient memberClient, ShanyanService shanyanService) {
        // 默认tokenGranter集合
        List<TokenGranter> granters = new ArrayList<>(Collections.singletonList(endpoints.getTokenGranter()));
        // 增加验证码模式
        granters.add(new BlockCaptchaTokenGranter(authenticationManager, endpoints.getTokenServices(), endpoints.getClientDetailsService(), endpoints.getOAuth2RequestFactory(), redisOpration, captchaService));
        //增强第三方登录模式 小程序、app、公众号等
        granters.add(new OpenIdTokenGranter(authenticationManager, endpoints.getTokenServices(), endpoints.getClientDetailsService(), endpoints.getOAuth2RequestFactory(), memberClient, socialProperties, redisOpration));
        //增加短信登陆模式
        granters.add(new MobileTokenGranter(authenticationManager, endpoints.getTokenServices(), endpoints.getClientDetailsService(), endpoints.getOAuth2RequestFactory(), redisOpration, memberClient));
        granters.add(new ShanyanTokenGranter(endpoints.getTokenServices(), endpoints.getClientDetailsService(), endpoints.getOAuth2RequestFactory(), memberClient, shanyanService));
        // 组合tokenGranter集合
        return new CompositeTokenGranter(granters);
}

//该方法是oauth2.0提供的
public class CompositeTokenGranter implements TokenGranter {

    private final List<TokenGranter> tokenGranters;

    public CompositeTokenGranter(List<TokenGranter> tokenGranters) {
        this.tokenGranters = new ArrayList<TokenGranter>(tokenGranters);
    }

    public OAuth2AccessToken grant(String grantType, TokenRequest tokenRequest) {
        for (TokenGranter granter : tokenGranters) {
            OAuth2AccessToken grant = granter.grant(grantType, tokenRequest);
            if (grant!=null) {
                return grant;
            }
        }
        return null;
    }

    public void addTokenGranter(TokenGranter tokenGranter) {
        if (tokenGranter == null) {
            throw new IllegalArgumentException("Token granter is null");
        }
        tokenGranters.add(tokenGranter);
    }

}
继承AuthorizationServerConfigurerAdapter类
@Override
public void configure(AuthorizationServerEndpointsConfigurer endpoints) {
    endpoints.tokenStore(tokenStore)
            .authenticationManager(authenticationManager)
            .allowedTokenEndpointRequestMethods(HttpMethod.POST)
            .userDetailsService(userDetailsService)
            //设置自定义异常
            .exceptionTranslator(new CustomOauth2Exception());
    //扩展token返回结果
    if (jwtAccessTokenConverter != null && jwtTokenEnhancer != null) {
        TokenEnhancerChain tokenEnhancerChain = new TokenEnhancerChain();
        List<TokenEnhancer> enhancerList = new ArrayList<>();
        enhancerList.add(jwtTokenEnhancer);
        enhancerList.add(jwtAccessTokenConverter);
        tokenEnhancerChain.setTokenEnhancers(enhancerList);
        //jwt增强
        endpoints.tokenEnhancer(tokenEnhancerChain).accessTokenConverter(jwtAccessTokenConverter);
    }

    endpoints.reuseRefreshTokens(false);
    DefaultTokenServices defaultProcessTokenServices = createDefaultProcessTokenServices();
    defaultProcessTokenServices.setClientDetailsService(endpoints.getClientDetailsService());
    endpoints.tokenServices(defaultProcessTokenServices);
    //配置授权码模式code自定义方式处理
    endpoints.authorizationCodeServices(authorizationCodeServices());

    //获取自定义tokenGranter
    TokenGranter tokenGranter = ProcessTokenGranter.getTokenGranter(authenticationManager, endpoints, redisOpration, socialProperties, captchaService, memberClient, shanyanService);
    //配置端点
    endpoints
            .tokenGranter(tokenGranter);
}
4.提供了根据token获取用户信息方式
security提供了securityContextHolder去获取用户信息,oauth2.0提供了tokenStore类,可以调用readAuthentication(token)去获取到用户信息,我在使用security和oauth2.0的时候,曾经通过securityContextHolder去获取信息,没获取到
其次是security的securityContextHolder在单服务情况下可以满足需要,但是如果我们的授权服务有多个呢,结果不得而知,而使用ReadAuthentication方式的话,无论多少台服务器都能够拿到用户信息
5.提供了自定义token头文件,仅需实现TokenExtractor,然后继承ResourceServerConfigurerAdapter,对configure(ResourceServerSecurityConfigurer resources)进行添加,也就是resources.tokenExtractor(token那个类)即可
@Slf4j
public class ProcessTokenExtractor implements TokenExtractor {

    @Override
    public Authentication extract(HttpServletRequest request) {
        String tokenValue = extractToken(request);
        if (tokenValue != null) {
            return new PreAuthenticatedAuthenticationToken(tokenValue, "");
        }
        return null;
    }

    protected String extractToken(HttpServletRequest request) {
        // first check the header...
        String token = extractHeaderToken(request);
        // bearer type allows a request parameter as well
        if (token == null) {
            log.debug("Token not found in headers. Trying request parameters.");
            token = request.getParameter(TokenConstant.HEADER);
            if (token == null) {
                log.debug("Token not found in request parameters.  Not an OAuth2 request.");
            } else {
                request.setAttribute(OAuth2AuthenticationDetails.ACCESS_TOKEN_TYPE, OAuth2AccessToken.BEARER_TYPE);
            }
        }

        return token;
    }

    /**
     * Extract the OAuth bearer token from a header.
     *
     * @param request The request.
     * @return The token, or null if no OAuth authorization header was supplied.
     */
    protected String extractHeaderToken(HttpServletRequest request) {
        //定义头文件读取token
        Enumeration<String> headers = request.getHeaders(TokenConstant.HEADER);
        while (headers.hasMoreElements()) { // typically there is only one (most servers enforce that)
            String value = headers.nextElement();
            if ((value.toLowerCase().startsWith(OAuth2AccessToken.BEARER_TYPE.toLowerCase()))) {
                String authHeaderValue = value.substring(OAuth2AccessToken.BEARER_TYPE.length()).trim();
                // Add this here for the auth details later. Would be better to change the signature of this method.
                request.setAttribute(OAuth2AuthenticationDetails.ACCESS_TOKEN_TYPE,
                        value.substring(0, OAuth2AccessToken.BEARER_TYPE.length()).trim());
                int commaIndex = authHeaderValue.indexOf(',');
                if (commaIndex > 0) {
                    authHeaderValue = authHeaderValue.substring(0, commaIndex);
                }
                return authHeaderValue;
            }
        }

        return null;
    }
}

//该方法是继承ResouceServerConfigurerAdapter
@Override
public void configure(ResourceServerSecurityConfigurer resources) throws Exception {
    //无权限异常
    resources
            //自定义token头
            .tokenExtractor(new ProcessTokenExtractor())
            //令牌失效提示
            .authenticationEntryPoint(resourceAuthenticationEntryPointException)
            //权限不足提示信息
            .accessDeniedHandler(accessDeniedHandlerException)
            //token
            .tokenServices(resourceServerTokenServices());
}
tokenStore解析
1.源码解析
public interface TokenStore {

    //根据oauth2AccessToken去获取认证的信息
    OAuth2Authentication readAuthentication(OAuth2AccessToken token);

    //通过String类型的token去获取授权认证的信息
    OAuth2Authentication readAuthentication(String token);

    //以token为key,对认证信息进行存储
    void storeAccessToken(OAuth2AccessToken token, OAuth2Authentication authentication);

    //通过token去获取访问令牌
    OAuth2AccessToken readAccessToken(String tokenValue);

    //移除token及认证信息
    void removeAccessToken(OAuth2AccessToken token);

    //存储刷新token,以refreshToken为key,对认证信息进行存储
    void storeRefreshToken(OAuth2RefreshToken refreshToken, OAuth2Authentication authentication);

    //通过refreshToken去获取刷新token访问凭证
    OAuth2RefreshToken readRefreshToken(String tokenValue);

    //刷新token令牌的身份验证
    OAuth2Authentication readAuthenticationForRefreshToken(OAuth2RefreshToken token);

    //移除刷新token的身份
    void removeRefreshToken(OAuth2RefreshToken token);

    //刷新令牌使用后刷新得到token,该功能必须的,因此刷新令牌时不能用于创建无限数量的令牌
    void removeAccessTokenUsingRefreshToken(OAuth2RefreshToken refreshToken);

    //通过认证信息检索已存在的令牌信息
    OAuth2AccessToken getAccessToken(OAuth2Authentication authentication);

    //通过客户端id和用户名去检索访问令牌集合
    Collection<OAuth2AccessToken> findTokensByClientIdAndUserName(String clientId, String userName);

    //检索当前客户端id下所有token的集合
    Collection<OAuth2AccessToken> findTokensByClientId(String clientId);

}
2.tokenStore的实现方式
InMemoryTokenStore 内存方式
顾名思义,该方式其实就是将token相关信息存储到服务器内存之中,该方式只针对单台服务器的情况,单台服务器完全可以使用该方式进行实现
JdbcTokenStore 数据库方式
通过jdbc的方式去对token进行存储解析刷新,如果在用户量多得情况下,是扛不住的,因为每次请求都会去调用readAuthencation,但是如果资源服务在每个业务系统,那必须得保证数据库为单库,否则无法读取到相关token信息
redisTokenStore redis方式
以redis的方式对token进行存储、解析、刷新,虽然满足了用户量多得情况,但是无法满足多个业务系统不同redis的情况,其次是单个redis不同库情况,需要自行实现,自行建立redis连接
JwtTokenStore jwt方式
jwt的结构
标头 header
alg: 默认是Hs256。也是jwt的默认加密算法
typ:类型,也就是jwt
有效载荷 payload 通常存放用户相关信息,不过不要存放敏感信息,有些网站已经提供了jwt方式解析了,可以解密得到这些信息
签名 signature 作用就是保证jwt没有被篡改过
无论是原生jwt还是oauth提供的jwt,其实都一样,token解析都包含claims,只要token不被篡改,无论是那种方式都可以拿到用户信息,这也说明了无论授权校验、资源服务器是多少台服务器,最终都可以通过token解析得到相关信息,缺点jwtTokenStore#removeAccessToken,jwt无法真正意义上做到删除,也就是咱们在注销登录的时候是无法真正意义上做到注销登录,所以该方法未实现,只能通过前端协作,清空token头即可
@Override
public void removeAccessToken(OAuth2AccessToken token) {
        // gh-807 Approvals (if any) should only be removed when Refresh Tokens are removed (or expired)
}
oauth2.1
SSO单点登录与oauth区别
SSO和oauth都是使用令牌的方式代替用户密码访问应用,流程也相似,只是概念不同而已,SSO是将登录认证和业务系统分离,使用独立的登录中心,实现在登录中心登录后,所有相关的业务系统都能免登录访问资源
oauth2.0的话,我在使用CSDN的时候,不想注册时使用微信或者qq授权登录,这个过程我在该CSDN是没有账号密码的,授权登录成功才会生成新的CSDN账号,而我们使用微信或qq的账号密码都是存放在登录中心或者qq和微信服务器中,这就是所谓的使用令牌代替账号密码访问应用
SSO是一种思想,CAS框架是这种思想的一种框架实现
sso概述

大概流程
用户进入某业务系统的时候,发现用户未登录,就会将用户重定向到单点登录系统,并且带上自身地址的相关参数
重定向到单点登录系统,系统会检查该用户是否登录,这也是sso系统的第一个接口,如果未登录,则重定向到登录界面,如果已登录,则设置全局session,并重定向到业务系统。
用户填写密码后提交登录,若正确则直接重定向到业务系统,并带上sso系统签发的令牌
之后所有交互用sessionId与业务系统交互即可,业务系统拿着令牌请求sso系统获取用户信息。
常见的sso就有淘宝,淘宝主页点聚划算、天猫等,都无需重新登录
oauth2.0概述
流程大体和sso差不多,不过oauth2.0里面有授权服务器、资源服务器、应用这样几个角色,我们使用sso的时候是不需要资源服务器这个角色的,有授权服务器和应用就够了。
授权服务器是用来认证的,应用的话特指各个应用系统,我们只需要登录成功后拿到用户信息以及用户所拥有的的权限即可。
以CSDN为例,
咱们登录CSDNAPP的时候点击微信orqq授权,这里的csdn就类似业务系统,微信授权服务就类似于单点登录系统
之后微信或qq会返回一个确认授权页面,也类似登录页面,这个页面是微信或者qq提供的,而非csdn
用户确认授权,其实是带上token的东西给qq或微信服务器,提交后微信或者qq返回一个code码,重定向到CSDN,
CSDN拿到这个code就去获取微信或者qq服务器去获取token,业务系统通过token就可以获取相关信息了,具体的话其实是获取code的,通过code去获取微信或qq用户信息相关字段,只不过是加密的,最后通过code和微信token换取sessionInfo就可以解密得到用户基本信息了,


 610
610


 被折叠的 条评论
为什么被折叠?
被折叠的 条评论
为什么被折叠?
 到【灌水乐园】发言


