


C++快速讲解(十):线程
前言:主要介绍了线程的创建、join和detach、线程传递参数、获取线程id、结束线程、并发访问、线程同步等。
1.创建线程
#include <iostream>
#include <thread>

using namespace std;
//创建线程

void show(){
    for (int i = 0; i < 10; ++i) {
        cout<<"---i:"<<i<<endl;
    }
}
int main() {
    thread t(show);
    cout<<"执行了main函数"<<endl;
    return 0;
}

2.join 和 detach
2.1 join
join 的意思是让主线程等待子线程执行结束后,在进行下一步,意思是让主线程挂起
#include <iostream>
#include <thread>
#include <windows.h>

using namespace std;

void show(){
    for (int i = 0; i < 10; ++i) {
        cout<<"i:"<<i<<endl;
        Sleep(500);
    }
}
int main() {
    //让这个线程执行上面的show 函数
    thread t(show) ;

    //让主线程等待子线程运行结束后,再继续下面的逻辑
    //否则主线程运行结束,程序就结束了。
    t.join();
    cout << "执行了main函数 " <<endl;
    return 0;
}

2.2 detach
detach的意思将本线程从调用线程中分离出来,允许本线程独立执行,从此和主线程再也没有任何关系。
#include <iostream>
#include <thread>
#include <windows.h>

using namespace std;

void show(){
    for (int i = 0; i < 10; ++i) {
        cout<<"i:"<<i<<endl;
        Sleep(500);
    }
}
int main() {
    thread t(show) ;
    t.detach();
    cout << "执行了main函数 " <<endl;
    return 0;
}
3.传递参数
往线程里面执行的函数传递参数,最长使用的办法就是bind机制 , 这里以在线程内部构建学生对象,从外部传递姓名和年纪数据。
#include <iostream>
#include <thread>
#include <functional>
using namespace std;
//传递参数
class Student{
public:
string name;
int age;
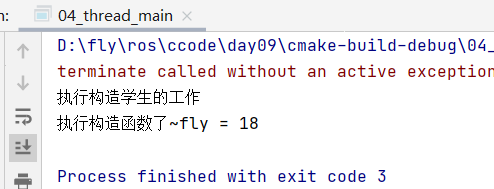
Student(string name,int age):name(name),age(age){
cout <<"执行构造函数了~" << name <<" = "<< age<< endl;
}
};
void constructor(string name ,int age ){
cout <<"执行构造学生的工作" << endl;
Student s(name ,age);
}
int main() {
thread t(bind(constructor,"fly",18));
return 0;
}
4.获取线程id和休眠
- 每一个线程在执行的时候,都有自己的一个标识id, 只有在少数情况下,线程的id会变得与众不同。通过 t.get_id() 获取线程对一个的id , 也可以使用get_id() 获取当前线程的 id 。
- 让线程休眠,等待一段时间然后继续执行,这样的场景在开发的时候经常会出现,在 c++中,让线程休眠,如果是在windows可以使用 windows.h头文件中的Sleep函数 , 如果是linux 系统,可以使用#include里面的usleep函数 或者 也可以使用 this_thread:: 里面的 sleep_for 函数
#include <iostream>
#include <thread>
#include <windows.h>
using namespace std;
// 获取线程id
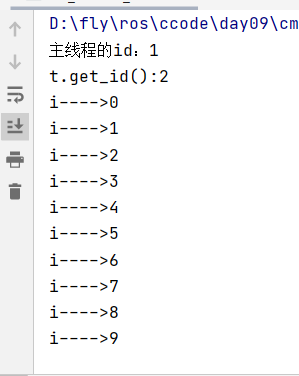
void show(){
for (int i = 0;i<10;i++){
Sleep(500);//休眠
cout<<"i---->"<<i<<endl;
}
}
int main() {
cout <<"主线程的id:"<< this_thread::get_id<< endl;
thread t(show);
cout<<"t.get_id():"<<t.get_id()<<endl;
t.join();
return 0;
}
5.结束线程
线程的退出,手段还是很多的,但是万般手段中,建议使用return。
#include <iostream>
#include <thread>
#include <functional>
using namespace std;
//结束线程
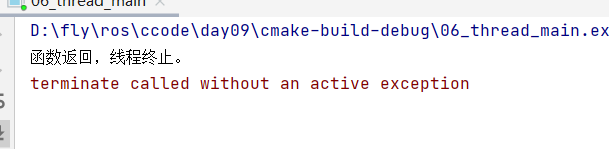
void show1(){
for (int i = 0; i < 25; ++i) {
if(i== 3){
cout <<"函数返回,线程终止。" << endl;
return ; //或者在这抛出异常,也形同return。
}
}
}
int main() {
thread t(show1);
return 0;
}
6.并发访问
由于cout对象并不会产生互斥,所以在多线程场景下,输出的结果并不是我们想要的,显得杂乱无章。这时候可以使用mutex 来控制互斥
#include <iostream>
#include <thread>
#include <windows.h>
#include <mutex>
using namespace std;
//并发访问

mutex mutext1;
void show(){
    int co = 10;
    while(co>0){
        mutext1.lock();//上锁
        cout<<"show_thread:"<<this_thread::get_id()<<endl;
        co--;
        mutext1.unlock();
        Sleep(500);
    }
}

int main() {
    thread t1(show);
    thread t2(show);
    t1.join();
    t2.join();
    return 0;
}

7.线程同步
如果有多个线程要同时访问一个变量或对象时,如果这些线程中既有读又有写操作 , 或者同时写入 ,就会导致变量值或数据出现混乱,从而导致程序异常。
7.1 使用互斥量处理同步
#include <iostream>
#include <thread>
#include <functional>
#include <windows.h>
#include <mutex>
#include <queue>

using namespace std;
//线程同步 使用互斥量处理同步

class Box{};
//互斥变量
mutex mutex1;

//队列存放盒子
queue<Box*> q;
//初始化盒子
void init(){
    for (int i = 0; i < 10; ++i) {
        q.push(new Box());
    }
}

//从对列中取出盒子
void moveBox(string name){
    mutex1.lock();
    if(!q.empty()){
        Sleep(1000);
        q.pop();
        cout<<name<<"搬走了一个盒子现在还剩"<<q.size()<<endl;
    }
    mutex1.unlock();
}

void fun1(){
    while(1){
        moveBox("fun1");
        Sleep(1000);
    }
}

void fun2(){
    while(1){
        moveBox("fun2");
        Sleep(700);
    }
}

int main() {
    init();
    thread t1(fun1);
    thread t2(fun2);

    //阻塞主线程
    t1.join();
    t2.join();
    return 0;
}

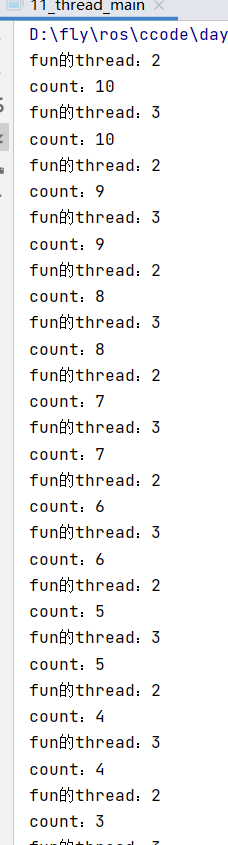
7.2 lock_guard
一般来说不建议直接调用mutex 的成员函数lock 或者 unlock 来执行加锁解锁的操作,这要求程序员必须准确的知道在什么位置进行解锁操作。c++ 提供了一个模板类 lock_guard ,可以对mutex进行包装,在执行lock_guard的构造时进行加锁操作,执行lock_guard析构时进行解锁操作
#include <iostream>
#include <thread>
#include <mutex>
#include <windows.h>
using namespace std;

mutex mutex1;
void fun(){
    int count=10;
    while(count>0){
        //执行这句话,即上锁,等本次循环结束,会自动释放锁
        lock_guard<mutex> lg(mutex1);
        cout<<"fun的thread:"<<this_thread::get_id()<<endl;
        cout<<"count:"<< count<<endl;
        count--;
        Sleep(1000);
    }
}

int main(){
    thread t1(fun);
    thread t2(fun);
    t1.join();
    t2.join();
    return 0 ;
}

7.3 unique_guard
unique_guard 拥有 lock_guard的所有功能,并且内部还提供了加锁和解锁的操作,以便对加锁的粒度进行细化,而 lock_guard 的加锁范围通常是一个范围区域(比如函数) 。unique_lock 对于锁的管理比较灵活.它不像lock_guard 一样.必须要求他管理的锁在他初始化的时候必须加锁.而是可以自己灵活的.想加锁.就加锁.
#include <iostream>
#include <deque>
#include <thread>
#include <mutex>
#include <windows.h>
using namespace std;

mutex mutex1;

void fun(){
    int count=10;
    while(count>0){
        //执行这句话,即上锁,等本次循环结束,会自动释放锁
        unique_lock<mutex> ul(mutex1);
        cout<<"fun的thread:"<<this_thread::get_id()<<endl;
        cout<<"count:"<< count<<endl;
        count--;
        ul.unlock(); //可以手动释放锁
        Sleep(500);
    }
}

int main() {
    thread t1(fun);
    thread t2(fun);
    t1.join();
    t2.join();
    return 0;
}
7.4 条件变量
条件变量时从 condition_variable 直接翻译过来的,条件变量可以很好的管理多线程的并发操作。条件变量可以让线程达到某个条件的时候进入等待状态, 当条件变成对立面的时候线程继续执行。
7.4.1 简单使用
#include <iostream>
#include <deque>
#include <thread>
#include <mutex>
#include <windows.h>
#include <condition_variable>
using namespace std;

condition_variable cv;
mutex m;

void fun1(){
    for(int i = 1;i<100;i++){
        Sleep(1000);
        lock_guard<mutex> lk(m);
        cout << "func1 ----  i = " << i << endl;
        if(i%10 == 0){
            cout << "func1当前i能整除10 ,通知func1运行" << endl;
            cv.notify_one();
        }
    }
}

void fun2(){
    for(int i = 1;i<100;i++){
        unique_lock<mutex> ul(m);
        cout << "func2 ----  i = " << i << endl;
        if(i%5 == 0){
            cout << "func2当前i能整除5 ,通知func2运行" << endl;
            cv.wait(ul);
        }
    }
}


int main(){
    thread t2(fun2);
    thread t1(fun1);
    t1.join();
    t2.join();
    return 0 ;
}

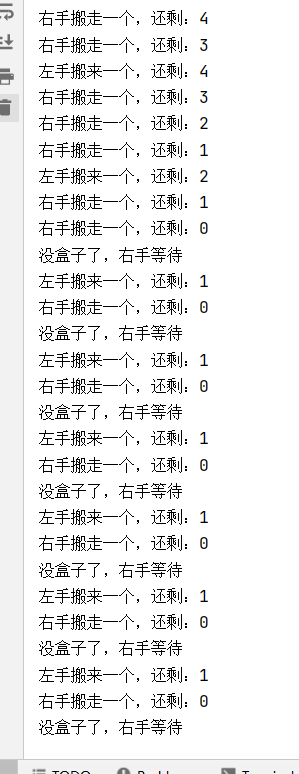
7.4.2 条件变量实现搬运盒子
#include <iostream>
#include <thread>
#include <string>
#include <condition_variable>
#include <deque>
#include <windows.h>

using namespace std;

mutex m;
condition_variable cv;

class Box{};

//模拟工作台
deque <Box *> queue;

//左边的手臂把盒子搬上去
void leftMoveIn(){
    while(1){
        Box *box = new Box();
        queue.push_back(box);
        cout << "左手搬来一个,还剩:" << queue.size() << endl;
        cv.notify_all();
        Sleep(3000);
    }
}

void rightMoveOut(){
    while(1){
        unique_lock<mutex> ul(m);
        if(!queue.empty()){   //无限循环状态的轮询.
            queue.pop_back();
            cout << "右手搬走一个,还剩:" << queue.size() << endl;
            Sleep(1000);
        }else{
            //表示处于空的状态.等
            cout <<"没盒子了,右手等待"<<endl;
            cv.wait(ul);
        }
    }
}

//初始化盒子
void init(){
    for (int i = 0; i < 5; ++i) {
        queue.push_back(new Box);
    }
}

int main() {
    init();
    thread leftHand(leftMoveIn);
    thread rightHand(rightMoveOut);
    leftHand.join();
    rightHand.join();
    return 0;
}
7.5 async 函数
一般来说,函数如果在线程内部执行,当函数执行完毕后,想要获取到函数的返回值。除了在线程执行结束后,通过改变中间变量的方式之外,没有更好的办法了。 async 函数除了兼备thread的功能之外,还可以获取到函数的返回值。
7.5.1 简单使用
#include <iostream>
#include <future>


using namespace std;

int add(int a , int b){
    return  a + b;
}

int main() {
    //async背后会开启线程,用于运行add函数 <int> 表示函数的返回值类型
    future<int> future = async(add, 3, 4);

    //获取add函数的返回结果,get()会阻塞主线程,知道函数执行结束
    int result = future.get();

    cout << "result = " << result << endl;
    return 0;
}
7.5.2 启动策略
默认情况下,async函数背后不一定会执行创建新的线程执行函数,也有可能在当前线程上运行指定的函数。这是由于它的启动策略决定,可以通过函数的第一个参数指定。
//默认的启动策略
auto fut1 = std::async(f); // run f using default launch policy

//上面的代码等同于这一行。
auto fut2 = std::async(std::launch::async|std::launch::deferred,f);
7.5.3 异步操作
在async函数的第一个参数传递 launch::async 即可确保函数是异步执行
#include <iostream>
#include <future>
#include <unistd.h>

using namespace std;

void printI(){
    for (int i = 0; i < 10; ++i) {
        cout << "i == " << i << endl;
        usleep(1000 * 1000 * 1);
    }
}

int main() {
    //表示使用异步执行add函数
    async(launch::async ,printI );

}
7.5.4 同步操作
不管是否开启新的线程,只要调用了wait() 或者 get() 都会让函数运行,并且主线程陷入阻塞状态。wait()表示阻塞主线程,不会有结果被返回。get() 的底层显示调用了wait,接着获取到函数的结果。
#include <iostream>
#include <future>
#include <unistd.h>

using namespace std;

void printI(){
    for (int i = 0; i < 10; ++i) {
        cout << "i == " << i << endl;
        usleep(1000 * 1000 * 1);
    }
}

int main() {
    //表示使用异步执行add函数
    future<void> f = async(launch::async ,printI );
    f.get();
}

//或者是:
int main() {
    //deferred: 表示延迟、推迟。 函数不会执行,除非后续调用get() 或  wait()
    future<void> f = async(launch::deferred ,printI );
    f.get();
    //f.wait();

    return 0 ;
}
结束!!!


 1万+
1万+


 被折叠的 条评论
为什么被折叠?
被折叠的 条评论
为什么被折叠?
 到【灌水乐园】发言


