


环境
版本
Eclipse:Eclipse IDE for Enterprise Java Developers.Version: 2019-03 (4.11.0)
OS: Windows 10, v.10.0, x86_64 / win32
Java version: 1.8.0_211
tomcat:6.0
Axis:axis2-1.6.4
下载地址:https://download.csdn.net/download/qq_32392597/11958674
环境变量配置
- 新增系统变量JAVA_HOME,变量值为jdk文件所在位置
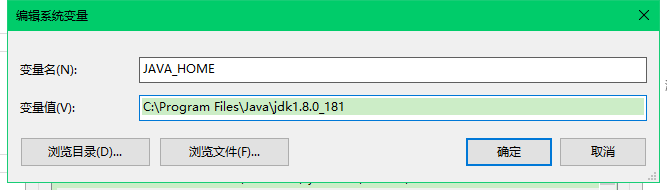
PATH加入:
C:\Program Files\Java\jdk1.8.0_181\lib;
C:\Program Files\Java\jdk1.8.0_181\jre\bin;
%JAVA_HOME%\bin;
在Eclipse的菜单栏中,Window --> Preferences --> Web Service --> Axis2
在Axis2 runtime location中选择Axis2解压缩包的位置,设置好后,点"OK"即行。

还有tomcat文件位置


开发Web Service
新建Web Project
- File -> New -> Other… -> Web -> Dynamic Web Project
- 将项目名称设置为为WebServiceTest,Target runtime选择之前配置的环境

- 选择Axis2 Web服务构面,OK后finish

- 操作完成后将在工作台中创建一个动态Web项目

通过?wsdl地址来生成新创建的服务的客户端
-
File -> New -> Other… -> Web Services -> Web ServiceClient
-
将地址粘贴到service definition中

-
在configuration中选择之前配置好的server runtime和web service runtime,

client project选择之前新建的WebServiceTest

-
然后在客户端配置页面,选择Axis2 Client Web Service配置页上的Generate test case to test service复选框。

-
如果选择了该选项,则Axis2发射器将生成与我们提供给客户端的WSDL匹配的JUnit测试用例。这些JUnit测试用例将生成到Axis2WSTestClient项目中名为test的新添加的源目录中。

-
发现出现中文乱码的问题

-
在window→preferences→General→workspace→Text file
encoding设置字符编码为UTF-8即可

这里有两种方法,一种是按照之前生成的测试代码进行补充数据后调试,还有就是根据AXIS2生成的示例调用其中的方法后调试。我这里先用自己写的代码调用该方法,其实道理都是一样的。
首先展示下代码:
调用代码:
public class Test {

	public static void main(String[] args) {
		try {
		   //实例化PubKey
		  PubKey CValue = new PubKey();
		  PubKeyRequestType Username = new PubKeyRequestType();

		  //设置要传入的参数值
  	  	  Username.setOtherInfo("xx");
  	  	  CValue.setArg0(Username);

  	  	  //实例化BeasPortTypeStub
  	  	  BeasPortTypeStub stub = new BeasPortTypeStub();
  	      PubKeyE c2f = new PubKeyE();
          c2f.setPubKey(CValue);

          //调用pubkey方法
          PubKeyResponse2 res = stub.pubKey(c2f);

          //获取结果值
          PubKeyResponseType Result = res.localPubKeyResponse.local_return;
  	      String Result2 = Result.getPubKey();
  	      System.out.println(
          		  "PubKeyResult : "+"\n"
          		  +Result2+"\n");
    } catch (AxisFault e) {
        e.printStackTrace();
    } catch (RemoteException e) {
            e.printStackTrace();
    }

}
为了更方便了解,这里展示下soapui解析地址后的页面

运行得到结果,成功:


 2368
2368


 被折叠的 条评论
为什么被折叠?
被折叠的 条评论
为什么被折叠?
 到【灌水乐园】发言


