


最近在做云游戏的项目,由于需要购买硬件,系统提供Android源码需要自己编译。所以特地学习一下记录一下Android的启动(我的是AOSP7.1然后+厂商系统补丁)
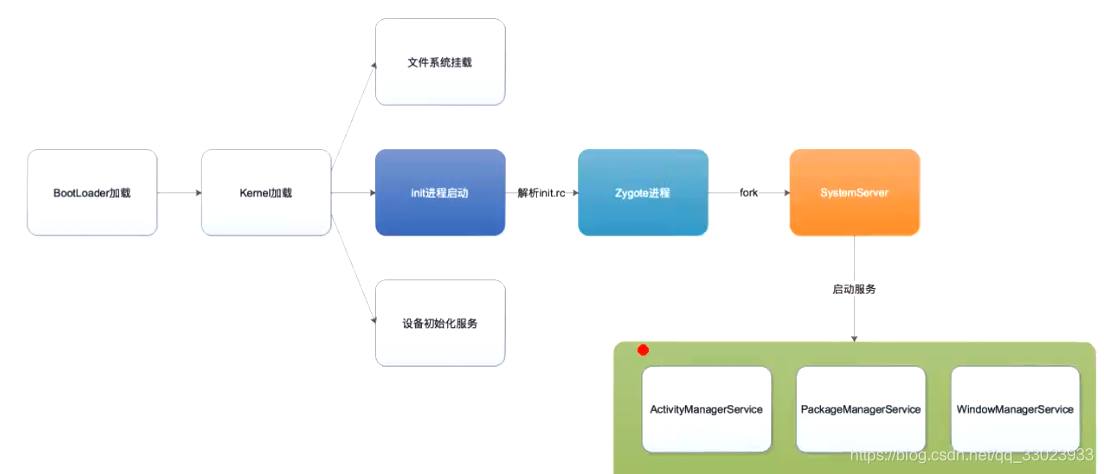
先上图:
目录
一. 启动流程硬件开机上电后,系统硬件内会有一个小程序就是bootloader
三.内核就会去挂载 文件以及初始化设备。最重要的是启动Init进程(这个就是重点相关的)
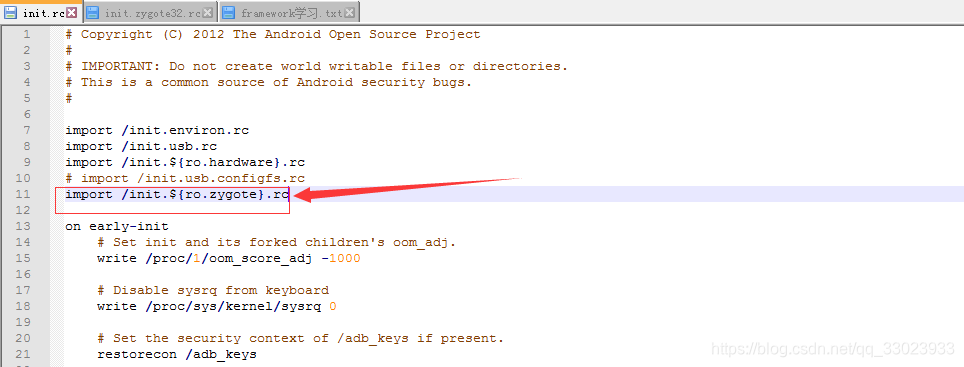
1.init.rc 脚本是在 init.cpp 入口方法 main 中开始解析的
2 紧接着我们去看看init.rc 源码,重点关注标红这一行,在这里 他又去引入了对应架构的zygote配置文件,以及在下面他启动了很多系统服务。
3 在system/core/init/init_parser.cpp中parse_config就开始了真正的解析工作 。。其实就是一行一行的读配置文件,然后import我们的zygote配置文件。
一. 启动流程硬件开机上电后,系统硬件内会有一个小程序就是bootloader
二.bootloader会引导内核启动加载
三.内核就会去挂载 文件以及初始化设备。最重要的是启动Init进程(这个就是重点相关的)
1.init.rc 脚本是在 init.cpp 入口方法 main 中开始解析的
实际工作调用了 init_parser.cpp 内的 init_parse_config_file 方法。
system/core/init/init.cpp
int main(int argc, char** argv) {
    // 解析 init.rc 脚本
    init_parse_config_file("/init.rc");
    return 0;
}
2 紧接着我们去看看init.rc 源码,重点关注标红这一行,在这里 他又去引入了对应架构的zygote配置文件,以及在下面他启动了很多系统服务。
3 在system/core/init/init_parser.cpp中parse_config就开始了真正的解析工作 。。其实就是一行一行的读配置文件,然后import我们的zygote配置文件。
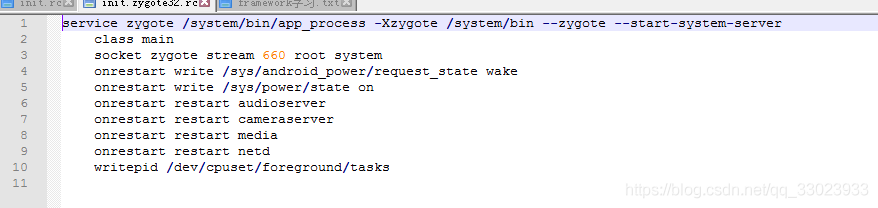
可以看到 系统开始启动一个叫zygote的系统服务了,但是他其实是执行的可执行文件app_process。。。。。。
看看system/bin

原来他是app_process.。。。改个名字。去看看 app_process源码。
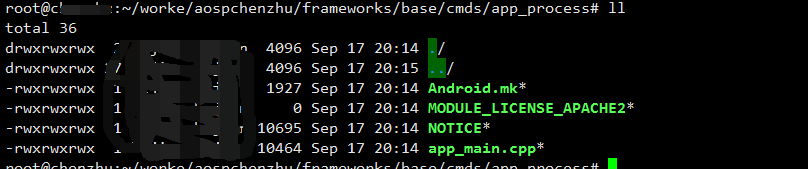
4 看下app_main.cpp源码
int main(int argc, char* const argv[])
{
if (prctl(PR_SET_NO_NEW_PRIVS, 1, 0, 0, 0) < 0) {
// Older kernels don't understand PR_SET_NO_NEW_PRIVS and return
// EINVAL. Don't die on such kernels.
if (errno != EINVAL) {
LOG_ALWAYS_FATAL("PR_SET_NO_NEW_PRIVS failed: %s", strerror(errno));
return 12;
}
}
AppRuntime runtime(argv[0], computeArgBlockSize(argc, argv));
// Process command line arguments
// ignore argv[0]
argc--;
argv++;
// Everything up to '--' or first non '-' arg goes to the vm.
//
// The first argument after the VM args is the "parent dir", which
// is currently unused.
//
// After the parent dir, we expect one or more the following internal
// arguments :
//
// --zygote : Start in zygote mode
// --start-system-server : Start the system server.
// --application : Start in application (stand alone, non zygote) mode.
// --nice-name : The nice name for this process.
//
// For non zygote starts, these arguments will be followed by
// the main class name. All remaining arguments are passed to
// the main method of this class.
//
// For zygote starts, all remaining arguments are passed to the zygote.
// main function.
//
// Note that we must copy argument string values since we will rewrite the
// entire argument block when we apply the nice name to argv0.
int i;
for (i = 0; i < argc; i++) {
if (argv[i][0] != '-') {
break;
}
if (argv[i][1] == '-' && argv[i][2] == 0) {
++i; // Skip --.
break;
}
runtime.addOption(strdup(argv[i]));
}
// Parse runtime arguments. Stop at first unrecognized option.
bool zygote = false;
bool startSystemServer = false;
bool application = false;
String8 niceName;
String8 className;
++i; // Skip unused "parent dir" argument.
while (i < argc) {
const char* arg = argv[i++];
if (strcmp(arg, "--zygote") == 0) {
zygote = true;
niceName = ZYGOTE_NICE_NAME;
} else if (strcmp(arg, "--start-system-server") == 0) {
startSystemServer = true;
} else if (strcmp(arg, "--application") == 0) {
application = true;
} else if (strncmp(arg, "--nice-name=", 12) == 0) {
niceName.setTo(arg + 12);
} else if (strncmp(arg, "--", 2) != 0) {
className.setTo(arg);
break;
} else {
--i;
break;
}
}
Vector<String8> args;
if (!className.isEmpty()) {
// We're not in zygote mode, the only argument we need to pass
// to RuntimeInit is the application argument.
//
// The Remainder of args get passed to startup class main(). Make
// copies of them before we overwrite them with the process name.
args.add(application ? String8("application") : String8("tool"));
runtime.setClassNameAndArgs(className, argc - i, argv + i);
} else {
// We're in zygote mode.
maybeCreateDalvikCache();
if (startSystemServer) {
args.add(String8("start-system-server"));
}
char prop[PROP_VALUE_MAX];
if (property_get(ABI_LIST_PROPERTY, prop, NULL) == 0) {
LOG_ALWAYS_FATAL("app_process: Unable to determine ABI list from property %s.",
ABI_LIST_PROPERTY);
return 11;
}
String8 abiFlag("--abi-list=");
abiFlag.append(prop);
args.add(abiFlag);
// In zygote mode, pass all remaining arguments to the zygote
// main() method.
for (; i < argc; ++i) {
args.add(String8(argv[i]));
}
}
if (!niceName.isEmpty()) {
runtime.setArgv0(niceName.string());
set_process_name(niceName.string());
}
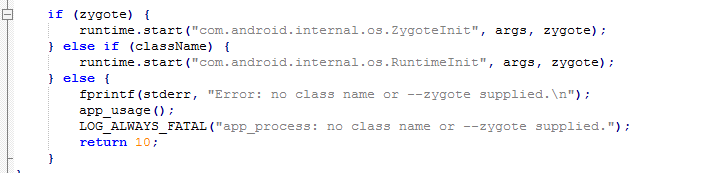
if (zygote) {
runtime.start("com.android.internal.os.ZygoteInit", args, zygote);
} else if (className) {
runtime.start("com.android.internal.os.RuntimeInit", args, zygote);
} else {
fprintf(stderr, "Error: no class name or --zygote supplied.\n");
app_usage();
LOG_ALWAYS_FATAL("app_process: no class name or --zygote supplied.");
return 10;
}
}
上面main方法balabala一大串后最终就是,执行runtime 。
5. 然后看看AndroidRuntime.cpp
![]()
在cpp中去执行
AndroidRuntime::start方法我们就只看这个里面的关键方法
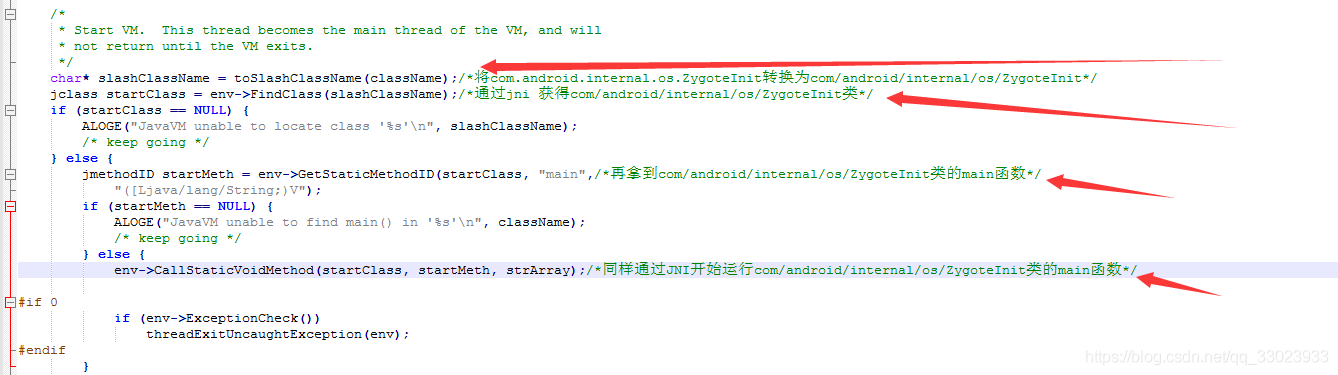
看到了吧,他把app_main.cpp的参数传递过来搞成Java类然后通过jni去启动。。真的牛皮

至此,进程的逻辑从c/c++层开始转到java层的运行逻辑了,并且运行start函数的线程将作为java层运行逻辑的主线程并在java虚拟机运行结束后回到该方法中,大致就是这样的过程。
6.开始到Java的ZygoteInit类主函数中去看看
![]()
直接看main方法
 public static void main(String argv[]) {
        // Mark zygote start. This ensures that thread creation will throw
        // an error.
        ZygoteHooks.startZygoteNoThreadCreation();

        try {
            Trace.traceBegin(Trace.TRACE_TAG_DALVIK, "ZygoteInit");
            RuntimeInit.enableDdms();
            // Start profiling the zygote initialization.
            SamplingProfilerIntegration.start();

            boolean startSystemServer = false;
            String socketName = "zygote";
            String abiList = null;
            for (int i = 1; i < argv.length; i++) {
                if ("start-system-server".equals(argv[i])) {
                    startSystemServer = true;
                } else if (argv[i].startsWith(ABI_LIST_ARG)) {
                    abiList = argv[i].substring(ABI_LIST_ARG.length());
                } else if (argv[i].startsWith(SOCKET_NAME_ARG)) {
                    socketName = argv[i].substring(SOCKET_NAME_ARG.length());
                } else {
                    throw new RuntimeException("Unknown command line argument: " + argv[i]);
                }
            }

            if (abiList == null) {
                throw new RuntimeException("No ABI list supplied.");
            }

            registerZygoteSocket(socketName);
            Trace.traceBegin(Trace.TRACE_TAG_DALVIK, "ZygotePreload");
            EventLog.writeEvent(LOG_BOOT_PROGRESS_PRELOAD_START,
                SystemClock.uptimeMillis());
            preload();
            EventLog.writeEvent(LOG_BOOT_PROGRESS_PRELOAD_END,
                SystemClock.uptimeMillis());
            Trace.traceEnd(Trace.TRACE_TAG_DALVIK);

            // Finish profiling the zygote initialization.
            SamplingProfilerIntegration.writeZygoteSnapshot();

            // Do an initial gc to clean up after startup
            Trace.traceBegin(Trace.TRACE_TAG_DALVIK, "PostZygoteInitGC");
            gcAndFinalize();
            Trace.traceEnd(Trace.TRACE_TAG_DALVIK);

            Trace.traceEnd(Trace.TRACE_TAG_DALVIK);

            // Disable tracing so that forked processes do not inherit stale tracing tags from
            // Zygote.
            Trace.setTracingEnabled(false);

            // Zygote process unmounts root storage spaces.
            Zygote.nativeUnmountStorageOnInit();

            ZygoteHooks.stopZygoteNoThreadCreation();

            if (startSystemServer) {
                startSystemServer(abiList, socketName);
            }

            Log.i(TAG, "Accepting command socket connections");
            runSelectLoop(abiList);

            closeServerSocket();
        } catch (MethodAndArgsCaller caller) {
            caller.run();
        } catch (Throwable ex) {
            Log.e(TAG, "Zygote died with exception", ex);
            closeServerSocket();
            throw ex;
        }
    }
其中关键的几个地方
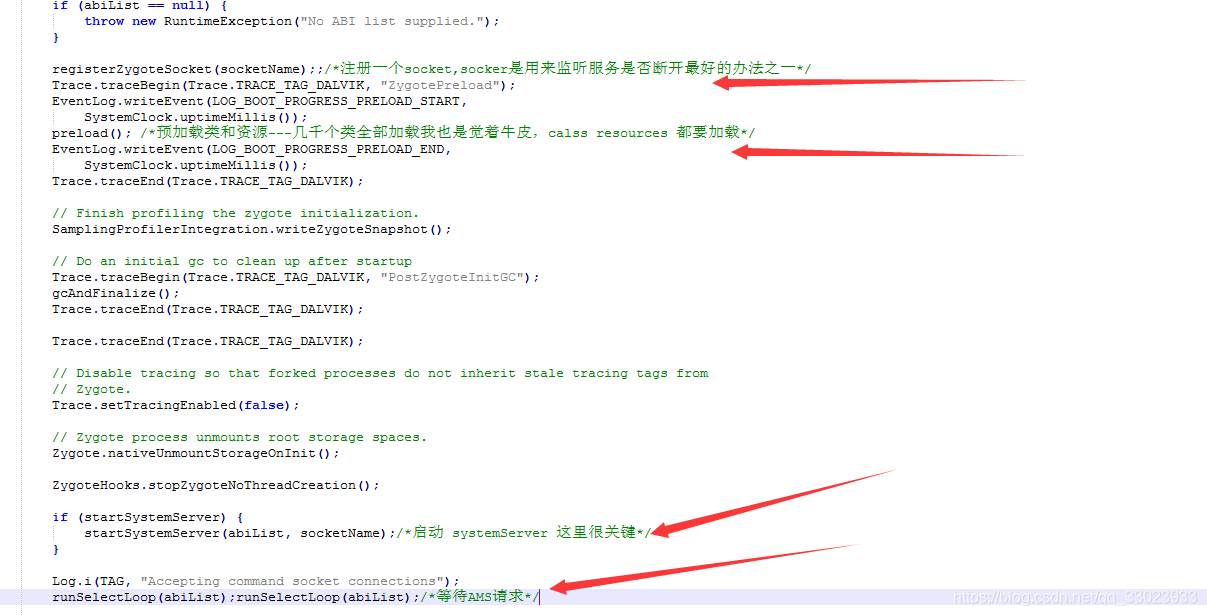
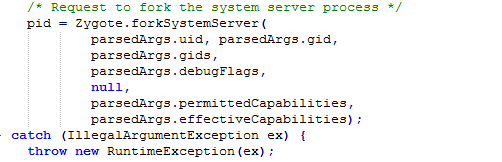
其中system_server 就是在这里起来的
![]()
![]()
![]()
看看 由于我的服务器是arm64 位的所以在起的时候起的是zygote64,我的并不是手机。。。。。。而是服务器虚拟的手机,这都不是重点 重点是上面三个图
至此系统的关键操作差不多了,剩下的就是启动我们的几大服务(AMS ,PMS,WMS。。。。等等),但是这里的服务并不是我们应用层所说的server服务,而是给上层提供能力的比如activity 和pack包安装卸载的能力。
导致就该我们自己玩了。。。。。。。
四 开机启动一个我们自己的系统。
上面分析了所有的过程现在我们开机要启动一个minicap的服务,首先我们要编写可执行文件。
如何编写可以看我前面文章地址:编译可以执行文件
编译成功后放入system/bin 下面参考上面的app_process
然后 在init.rc 中编写我们的脚本
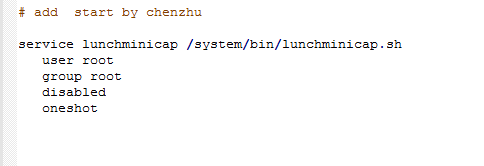
然后再你需要系统执行到哪一步的时候开启
![]()
我这里需要在
![]()
下执行,直接把lunchminicap 放在这下面就可以了。
这里就是我们的minicap可执行文件,参考编译可执行文件,就能得到lunchminicap.sh
![]()
下面看看 我们的进程吧。我们的开机启动是通过,sh脚本启动的所以这里是第一个进程没毛病。
然后看看我们的minicap

父进程为1 是开机启动的系统服务。至此over。


 1046
1046


 被折叠的 条评论
为什么被折叠?
被折叠的 条评论
为什么被折叠?
 到【灌水乐园】发言


