


1.概述
本文记录xv6操作系统的系统调用跟踪实验,xv6是一个类Unix的简单操作系统。该实验是要求实现一个trace系统调用,该系统调用的功能是根据用户传入的系统调用号跟踪某个或者某些进程的系统调用情况。
2. 实验要求
2.1 实验铺垫
有一个已给出的用户态trace.c程序如下:
复制
1 2 3 4 5 6 7 8 9 10 11 12 13 14 15 16 17 18 19 20 21 22 23 24 25 26 27 28 29 | #include "kernel/param.h"
#include "kernel/types.h"
#include "kernel/stat.h"
#include "user/user.h"
int
main(int argc, char *argv[])
{
int i;
//存储待跟踪程序的名称和参数
char *nargv[MAXARG];
//保证trace的参数不少于三个,并且跟踪的系统调用号在0-99之间
if(argc < 3 || (argv[1][0] < '0' || argv[1][0] > '9')){
fprintf(2, "Usage: %s mask command\n", argv[0]);
exit(1);
}
//调用trace系统调用,传入待跟踪系统调用号
if (trace(atoi(argv[1])) < 0) {
fprintf(2, "%s: trace failed\n", argv[0]);
exit(1);
}
//保存待跟踪程序的名称和参数
for(i = 2; i < argc && i < MAXARG; i++){
nargv[i-2] = argv[i];
}
//运行待跟踪的程序
exec(nargv[0], nargv);
exit(0);
}
|
该程序应该实现的执行效果如下:
复制
1 2 3 4 5 | $ trace 32 grep hello README 3: syscall read -> 1023 3: syscall read -> 966 3: syscall read -> 70 3: syscall read -> 0 |
命令格式为
$ trace <command_args …>
syscall_num是系统调用号,command是待跟踪的程序,command_args是待跟踪程序的参数。例如上面的例子就是跟踪32号系统调用,跟踪的程序是grep。
输出的格式如下:
: syscall ->
pid是进程序号, syscallname是系统调用名称,returnvalue是该系统调用返回值,并且要求各个进程的输出是独立的,不相互干扰。
2.2 实验内容
- 用户态程序trace.c已经给出,需要我们实现对应的内核态程序trace系统调用(sys_trace)并添加进xv6系统。
- trace()函数传入了一个待跟踪的系统调用号,因为需要跟踪的系统调用是进程间独立的,因此sys_trace()系统调用应当实现功能:保存下这个待跟踪的系统调用号到当前进程(为trace.c程序创建的进程)。
- xv6中使用struct proc{}表示一个进程,在系统调用被触发的时候就可以根据proc中存储的系统调用号判断当前这个系统调用是不是需要进行跟踪。
- trac.c在运行待跟踪程序(如上文的grep命令)的时候并没有发生进程切换,这是将待跟踪系统调用号保存到当前进程(为trace.c程序创建的进程)proc中,并且能够在grep程序运行的时候从proc中取出系统调用号并捕获待跟踪系统调用(read)的关键。当进程调用exec函数时,该进程执行的程序完全替换为新程序,但是并不会创建新的进程,前后的进程id并未改变。exec只是用磁盘上的一个新程序替换了当前进程的代码段、数据段、堆、栈。
- 内核态系统调用入口程序syscall.c中判断当前进程proc中保存的待跟踪系统调用号是否与当前的系统调用号相同,如果相同则表示捕获到,输出进程id,系统调用函数名称,系统调用返回值。
3. xv6代码结构介绍
代码主要有三个部分组成:

- 第一个是kernel。我们可以ls kernel的内容,里面包含了基本上所有的内核文件。因为XV6是一个宏内核结构,这里所有的文件会被编译成一个叫做kernel的二进制文件,然后这个二进制文件会被运行在kernle mode中。

- 第二个部分是user。这基本上是运行在user mode的程序。这也是为什么一个目录称为kernel,另一个目录称为user的原因。
- 第三部分叫做mkfs。它会创建一个空的文件镜像fs.img,我们会将这个镜像存在磁盘上,这样我们就可以直接使用一个空的文件系统。
3.1 创建第一个进程
xv6运行在QEMU虚拟机中,QEMU仿真了RISC-V处理器。xv6的起始运行地址是0x80000000,当RISC-V仿真器启动时,它初始化自己并运行一个存储在只读内存中的引导加载程序(boot loader)。引导加载程序将xv6内核加载到内存中。然后,CPU开始在_entry(/kernel/entry.S)以machine mode执行xv6,此时还没有启用分页机制,虚拟地址直接映射到物理地址。
复制
1 2 3 4 5 6 7 8 9 10 11 12 13 14 15 16 17 18 19 20 21 | # qemu -kernel loads the kernel at 0x80000000
# and causes each CPU to jump there.
# kernel.ld causes the following code to
# be placed at 0x80000000.
.section .text
_entry:
# set up a stack for C.
# stack0 is declared in start.c,
# with a 4096-byte stack per CPU.
# sp = stack0 + (hartid * 4096)
la sp, stack0
li a0, 1024*4
csrr a1, mhartid
addi a1, a1, 1
mul a0, a0, a1
add sp, sp, a0
# jump to start() in start.c
call start
spin:
j spin
|
boot loader将xv6内核加载到物理地址0x80000000的内存中,地址区间0x0:0x80000000预留给IO设备。_entry中的指令设置了一个栈,用来运行C程序,随后调用了start函数(start.c)。
复制
1 2 3 4 5 6 7 8 9 10 11 12 13 14 15 16 17 18 19 20 21 22 23 24 25 26 27 28 29 30 31 32 33 | // entry.S jumps here in machine mode on stack0.
void
start()
{
// set M Previous Privilege mode to Supervisor, for mret.
unsigned long x = r_mstatus();
x &= ~MSTATUS_MPP_MASK;
x |= MSTATUS_MPP_S;
w_mstatus(x);
// set M Exception Program Counter to main, for mret.
// requires gcc -mcmodel=medany
w_mepc((uint64)main);
// disable paging for now.
w_satp(0);
// delegate all interrupts and exceptions to supervisor mode.
w_medeleg(0xffff);
w_mideleg(0xffff);
w_sie(r_sie() | SIE_SEIE | SIE_STIE | SIE_SSIE);
// ask for clock interrupts.
timerinit();
// keep each CPU's hartid in its tp register, for cpuid().
int id = r_mhartid();
w_tp(id);
// switch to supervisor mode and jump to main().
asm volatile("mret");
}
|
start函数执行了一些只允许在machine mode模式下的配置,然后转入supervisor mode,要进入supervisor mode,RISC-V 提供了指令 mret。它通过将main的地址写入寄存器mepc将返回地址设置为main,随后程序计数器指向main函数(kernel/main.c)
复制
1 2 3 4 5 6 7 8 9 10 11 12 13 14 15 16 17 18 19 20 21 22 23 24 25 26 27 28 29 30 31 32 33 34 35 36 37 | // start() jumps here in supervisor mode on all CPUs.
void
main()
{
if(cpuid() == 0){
consoleinit();
printfinit();
printf("\n");
printf("xv6 kernel is booting\n");
printf("\n");
kinit(); // physical page allocator
kvminit(); // create kernel page table
kvminithart(); // turn on paging
procinit(); // process table
trapinit(); // trap vectors
trapinithart(); // install kernel trap vector
plicinit(); // set up interrupt controller
plicinithart(); // ask PLIC for device interrupts
binit(); // buffer cache
iinit(); // inode cache
fileinit(); // file table
virtio_disk_init(); // emulated hard disk
userinit(); // first user process
__sync_synchronize();
started = 1;
} else {
while(started == 0)
;
__sync_synchronize();
printf("hart %d starting\n", cpuid());
kvminithart(); // turn on paging
trapinithart(); // install kernel trap vector
plicinithart(); // ask PLIC for device interrupts
}
scheduler();
}
|
main函数初始化一些设备和子系统后,通过userinit()函数创建第一个进程,该进程执行了一段用户态汇编程序initcode.S,如下所示。使用exec系统调用将/user/init.c程序替换执行,Init()随后创建标准输入输出设备文件,启动一个shell程序,系统启动完成。
复制
1 2 3 4 5 6 7 8 9 10 11 12 13 14 15 16 17 18 19 20 21 22 23 24 25 26 27 28 29 30 | # initcode.S
# Initial process that execs /init.
# This code runs in user space.
#include "syscall.h"
# exec(init, argv)
.globl start
start:
la a0, init
la a1, argv
li a7, SYS_exec
ecall
# for(;;) exit();
exit:
li a7, SYS_exit
ecall
jal exit
# char init[] = "/init\0";
init:
.string "/init\0"
# char *argv[] = { init, 0 };
.p2align 2
argv:
.long init
.long 0
|
3.2 系统调用
userinit()函数中调用的汇编代码initcode.S,所执行的exec是系统的执行的第一个系统调用。这个汇编程序中,它首先将init中的地址加载到a0(la a0, init),argv中的地址加载到a1(la a1, argv),exec系统调用对应的数字加载到a7(li a7, SYS_exec),最后调用ECALL。所以这里执行了3条指令,之后在第4条指令将控制权交给了操作系统。
userinit会创建初始进程,返回到用户空间,执行刚刚介绍的3条指令,再回到内核空间。查看系统调用处理函数syscall.c的代码。
复制
1 2 3 4 5 6 7 8 9 10 11 12 13 14 15 16 17 18 19 20 21 22 | void
syscall(void)
{
int num;
struct proc *p = myproc();
num = p->trapframe->a7;
if(num > 0 && num < NELEM(syscalls) && syscalls[num]) {
p->trapframe->a0 = syscalls[num]();
//
if (p->tracemask & (1 << num))
{
printf("%d: syscall %s -> %d\n",p->pid, syscalls_name[num], p->trapframe->a0);
}
} else {
printf("%d %s: unknown sys call %d\n",
p->pid, p->name, num);
p->trapframe->a0 = -1;
}
}
|
num = p->trapframe->a7 会读取使用的系统调用对应的系统调用号。如果我们查看syscall.h,可以看到7对应的是exec系统调用。
复制
1 2 3 4 5 6 7 8 9 | // System call numbers #define SYS_fork 1 #define SYS_exit 2 #define SYS_wait 3 #define SYS_pipe 4 #define SYS_read 5 #define SYS_kill 6 #define SYS_exec 7 #define SYS_fstat 8 |
因此,这里实现的功能是告诉内核,某个用户应用程序执行了ECALL指令,并且想要调用exec系统调用。p->trapframe->a0 = syscallnum 这一行是实际执行系统调用。这里可以看出,num用来索引一个数组,这个数组是一个函数指针数组,可以想象的是syscalls[7]对应了exec的入口函数。
复制
1 2 3 4 5 6 7 8 9 10 11 | static uint64 (*syscalls[])(void) = {
[SYS_fork] sys_fork,
[SYS_exit] sys_exit,
[SYS_wait] sys_wait,
[SYS_pipe] sys_pipe,
[SYS_read] sys_read,
[SYS_kill] sys_kill,
[SYS_exec] sys_exec,
[SYS_fstat] sys_fstat,
};
|
sys_exec中的第一件事情是从用户空间读取参数,它会读取path,也就是要执行程序的文件名。然后从用户空间将参数拷贝到内核空间。initcode.S完成了通过exec调用init程序。init会为用户空间设置好一些东西,比如配置好console,调用fork,并在fork出的子进程中执行shell。
复制
1 2 3 4 5 | if(pid == 0){
exec("sh", argv);
printf("init: exec sh failed\n");
exit(1);
}
|
4. 添加系统调用sys_trace
添加一个系统调用应该包含以下步骤:
-
在syscall.h中添加系统调用号
-
在系统调用入口函数sys_call.c增加sys_trace系统调用
-
添加一个entry到user/usys.pl。perl语言自动生成汇编语言usys.S,是用户态系统调用接口,首先把系统调用号压入a7寄存器,然后就直接ecall进入系统内核。而上文syscall函数就把a7寄存器的数字读出来调用对应的函数,所以这里就是系统调用用户态和内核态的切换接口。
复制
1 2 3 4 5 6 | #usys.S .global trace trace: li a7, SYS_trace ecall ret |
- 添加声明到user/user.h,让程序在编译的时候可以通过。
- 添加系统调用号如下:
复制
1 2 3 4 5 6 7 8 9 10 11 12 13 14 15 16 17 18 19 20 21 22 23 24 | /kern/syscall.h // System call numbers #define SYS_fork 1 #define SYS_exit 2 #define SYS_wait 3 #define SYS_pipe 4 #define SYS_read 5 #define SYS_kill 6 #define SYS_exec 7 #define SYS_fstat 8 #define SYS_chdir 9 #define SYS_dup 10 #define SYS_getpid 11 #define SYS_sbrk 12 #define SYS_sleep 13 #define SYS_uptime 14 #define SYS_open 15 #define SYS_write 16 #define SYS_mknod 17 #define SYS_unlink 18 #define SYS_link 19 #define SYS_mkdir 20 #define SYS_close 21 #define SYS_trace 22 |
- syscall.c增加sys_trace系统调用
复制
1 2 3 4 5 6 7 8 9 10 11 12 13 14 15 16 17 18 19 20 21 22 23 24 25 26 27 28 | /kern/syscall.c
// 添加sys_trace声明
...
extern uint64 sys_unlink(void);
extern uint64 sys_wait(void);
extern uint64 sys_write(void);
extern uint64 sys_uptime(void);
extern uint64 sys_trace(void);
// 添加到syscalls数组中
...
static uint64 (*syscalls[])(void) = {
[SYS_fork] sys_fork,
[SYS_exit] sys_exit,
[SYS_wait] sys_wait,
[SYS_pipe] sys_pipe,
[SYS_read] sys_read,
[SYS_kill] sys_kill,
...
[SYS_close] sys_close,
[SYS_trace] sys_trace,
};
// 添加识别名,因为实验最终的实现效果需要打印系统调用名称,因此这里用一个数组存储系统调用的名称
...
char* syscalls_name[24] = {"", "fork", "exit", "wait", "pipe", "read", "kill", "exec",
"fstat", "chdir", "dup", "getpid", "sbrk", "sleep", "uptime",
"open", "write", "mknod", "unlink", "link", "mkdir", "close", "trace"};
|
5. 实现跟踪打印系统调用
-
在sysproc.c中实现该系统调用处理函数
-
proc.h中为struct proc{}新增一个tracemask变量,用来保存当前进程要跟踪的系统调用号。
-
proc.c下的fork函数中实现子进程复制父进程tracemask功能。
-
syscall()系统调用入口分发函数,实现系统调用的跟踪。
-
添加$U/_trace到Makefile中的UPROGS变量里
- 实现系统调用处理函数
我们需要将用户态trace传入的待跟踪系统调用号绑定到当前进程的proc中,因此需要在struck proc中新增一个tracemask整型变量来保存用户态传入的系统调用号。
复制
1 2 3 4 5 6 7 8 9 10 11 12 13 14 15 16 17 18 19 20 21 22 23 24 | /kern/proc.h
// Per-process state
struct proc {
struct spinlock lock;
// p->lock must be held when using these:
enum procstate state; // Process state
struct proc *parent; // Parent process
void *chan; // If non-zero, sleeping on chan
int killed; // If non-zero, have been killed
int xstate; // Exit status to be returned to parent's wait
int pid; // Process ID
// these are private to the process, so p->lock need not be held.
uint64 kstack; // Virtual address of kernel stack
uint64 sz; // Size of process memory (bytes)
pagetable_t pagetable; // User page table
struct trapframe *trapframe; // data page for trampoline.S
struct context context; // swtch() here to run process
struct file *ofile[NOFILE]; // Open files
struct inode *cwd; // Current directory
char name[16]; // Process name (debugging)
int tracemask;
};
|
通过函数argint()从a0寄存器中获取用户态传递的参数赋值给当前进程的tracemask,该参数是要跟踪的系统调用号。
复制
1 2 3 4 5 6 7 8 9 10 11 | /kern/sysproc.c
uint64
sys_trace(void)
{
int n;
if (argint(0, &n) < 0)
return -1;
myproc()->tracemask = n;
return 0;
}
|
- 修改kernel/proc.c中的fork函数,添加子进程复制父进程mask的功能
复制
1 2 3 4 5 6 7 8 9 10 11 12 13 14 15 16 17 18 19 20 21 22 | /kern/proc.c
int
fork(void)
{
int i, pid;
struct proc *np;
struct proc *p = myproc();
...
safestrcpy(np->name, p->name, sizeof(p->name));
// copy mask
np->tracemask = p->tracemask;
pid = np->pid;
np->state = RUNNABLE;
release(&np->lock);
return pid;
}
|
- syscall()函数中实现系统调用的跟踪
复制
1 2 3 4 5 6 7 8 9 10 11 12 13 14 15 16 17 18 19 20 21 | void
syscall(void)
{
int num;
struct proc *p = myproc();
num = p->trapframe->a7;
if(num > 0 && num < NELEM(syscalls) && syscalls[num]) {
p->trapframe->a0 = syscalls[num]();
//tracemask的32位代表32个系统调用号,满足第num位是1就会满足if条件,打印该系统调用
if (p->tracemask & (1 << num))
{
printf("%d: syscall %s -> %d\n",p->pid, syscalls_name[num], p->trapframe->a0);
}
} else {
printf("%d %s: unknown sys call %d\n",
p->pid, p->name, num);
p->trapframe->a0 = -1;
}
}
|
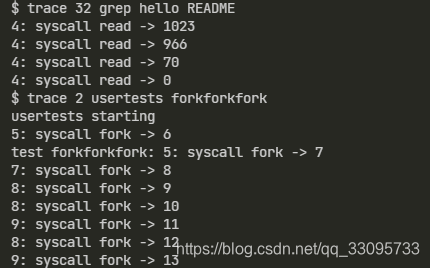
- 添加$U/_trace到Makefile中的UPROGS变量里,运行结果如下
- gdb调试qemu
在xv6源码目录下执行:
sudo make CPUS=1 qemu-gdb
qemu会启动一个gdb服务端,端口为25000,重新打开一个终端,输入如下命令:
gdb-multiarch kernel/kernel
set architecture riscv:rv64
target remote localhost:25000
6. 添加系统调用sysinfo
该系统调用要求实现的功能有两个:
1.获取当前系统中空闲的内存大小。
2.获取当前系统中的进程数量,即进程状态不是UNUSED的进程。
以上两个数据需要保存到struct sysinfo结构体中,根据sysinfotest.c文件中对该结构体的引用情况,对结构体定义如下。
复制
1 2 3 4 5 | //kernel/sysinfo.h
struct sysinfo {
uint64 freemem; // amount of free memory (bytes)
uint64 nproc; // number of process
};
|
添加系统调用的整个过程与上文中的流程一样,流程如下:
- 在user/user.h中声明系统调用函数 int sysinfo(struct sysinfo *)
- 在user/usys.pl中注册entry
- 在kernel/syscall.h中注册系统调用号
- 在kernel/sysproc.c中对uint64 sys_sysinfo(void)进行实现
- 在kernel/kalloc.c中实现空闲内存的计算
- 在kernel/proc.c中实现统计进程数量
复制
1 2 3 4 5 6 7 8 9 10 11 12 13 14 15 16 17 18 19 20 | uint64
sys_sysinfo(void)
{
struct sysinfo info;
uint64 addr;
// 获取用户态传入的sysinfo结构体
if (argaddr(0, &addr) < 0)
return -1;
//获取当前进程
struct proc* p = myproc();
//计算剩余内存
info.freemem = freememory();
//计算进程数量
info.nproc = proc_size();
//拷贝info到用户空间
if (copyout(p->pagetable, addr, (char*)&info, sizeof(info)) < 0)
return -1;
return 0;
}
|
在kernel/kalloc.c中实现freememsize(),xv6使用struct kmem结构体组成的链表freelist表示可用内存,统计keme.freelist中节点的个数乘以页大小就可以得到当前可用内存大小。
xv6将内核之后的地址到PHYSTOP (KERNBASE + 12810241024)之间的这段地址以PGSIZE为单位全部初始化为1,然后每次初始化一个PGSIZE就把这个页使用头插法插入到了kmem.freelist链表上,kmem.freelist始终指向链表的第一个节点。
因此只要遍历该链表就能计算出全部的空闲内存。
复制
1 2 3 4 5 6 7 8 9 10 11 12 | uint64
freememory()
{
struct run* p = kmem.freelist;
uint64 num = 0;
while (p)
{
num ++;
p = p->next;
}
return num * PGSIZE;
}
|
在kernel/kalloc.c中实现proc_size()。xv6使用proc[NPROC]数组存储系统中的进程,遍历该数组判断进程状态不为UNUSED的进程进行计数。
复制
1 2 3 4 5 6 7 8 9 10 11 | int
proc_size()
{
int i;
int n = 0;
for (i = 0; i < NPROC; i++)
{
if (proc[i].state != UNUSED) n++;
}
return n;
}
|


 9059
9059


 被折叠的 条评论
为什么被折叠?
被折叠的 条评论
为什么被折叠?
 到【灌水乐园】发言


