


Typora自动编号功能
前言
最近切到Typora写需求文档和开发文档了,因为相比于Word的笨重,基于MarkDown的Typora,对于几乎纯文本的编辑工作更加轻量和友好。而且,Typora也支持图片,也可以将文档导出为pdf以便于分发。
但是,文档写多了之后,就发现一个问题,虽然MarkDown支持6级标题,但是天然的没有自动序号。好多时候,你看着导航窗格里面的标题,不能很快地进行区分;而Word在这个方面就有很好的优势。那么,你可能说,无序号的标题是MarkDown文档的特性。可真正实际运用中,你会发现,无序号的标题会降低你的工作效率。在这个时候,我们就非常的想要给Typora增加一个自动序号的功能。因为,Word已经回不去了。
那么,这篇文章就是讲解如何为Typora加上这么一个自动序号的功能的。
如何修改主题
俗话说:“授之以鱼,不如授之以渔”。在讲如何添加自动编号功能之前,我要先讲一下如何修改的,不能不明所以。
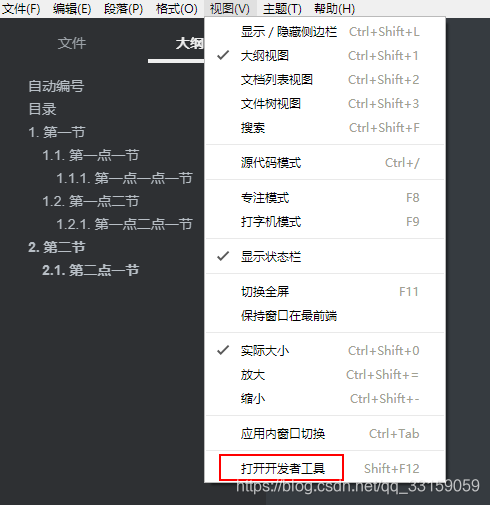
Typora的底层是一个浏览器,或者说是一个Electron应用。不信,你可以按下快捷键Shift + F12,或者点击视图中的打开开发者工具按钮:
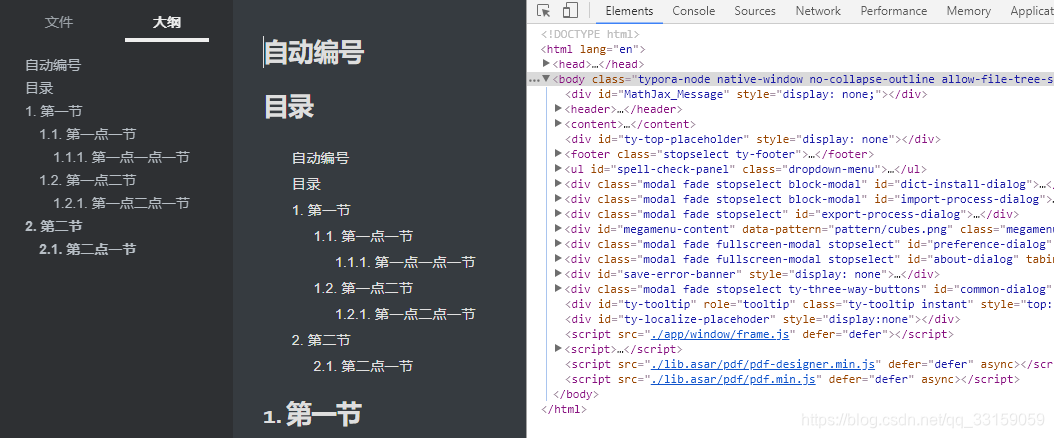
就可以看到熟悉的浏览器控制台调试界面了:
既然知道Typora的实现基于浏览器,那么就好办了。各个界面肯定都是HTML语言渲染出来的,那么,我们就可以通过添加css样式表,来添加自动编号的功能。好在Typora官方提前想到了这个事,专门出了篇官方文章来告诉我们怎么去添加自定义的样式文件。
知道了怎么添加自定义样式文件,还得知道怎么去定制样式表。语言吗,肯定是CSS。剩下的就差定位编辑区、导航窗格区和目录树区对应的元素了。最简洁的方法,就是使用元素选择键去定位,下图中的红色按钮就是:
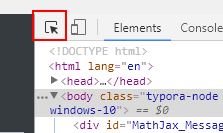
三个区域的元素定位如下:
- 正文标题: #write
- [TOC]目录树区: .md-toc-content
- 侧边栏的目录大纲区: .sidebar-content
到此,前菜都已准备好。
自动编号功能
那么,开始准备主菜。
编写css样式文件,命名为:base.user.css。要完成自动编号功能,必须借助CSS3中的如下特性:
- 计数器:counter(基准计数器),用于计算
基准计数器的值- 计数器增量:counter-increment,设置每次增长的量
- 重置计数器:counter-reset,用于将当前标题的计数器重置到指定的基准计数器
- 子代类型选择器:nth-of-type,可以从子代中选择出同一类型元素中的指定元素
另外需要注意的是,计数器只会计算同一级别标题的值。所以,必须将各级别标题的计数器值连接在一起使用。其他的我就不多说了,下面代码中我做的有注释。
详见代码:
/* 正文标题区: #write */
/* [TOC]目录树区: .md-toc-content */
/* 侧边栏的目录大纲区: .sidebar-content */

/**
 * 说明:
 *     Typora的标题共有6级,从h1到h6。
 *     我个人觉得h1级的标题太大,所以我的标题都是从h2级开始。
 *     个人习惯每篇文章都有一个总标题,有一个目录,所以h2级的标题前两个都不会计数。
 *     一般情况下,我虽然不使用h1级的标题,但是为了以防万一,h1级的标题前两个也都不会计数。
 *     若想启用h1级标题,就取消包含“content: counter(h1) "."”项的注释,然后将包含“content: counter(h2) "."”的项注释掉即可。
 */
/** initialize css counter */
#write, .sidebar-content,.md-toc-content{
	/* 设置全局计数器的基准 */
	/* 因为我喜欢从h2级标题用起,所以这里设置为h2 */
    counter-reset: h2
}

#write h1, .outline-h1, .md-toc-item.md-toc-h1 {
    counter-reset: h2
}

#write h2, .outline-h2, .md-toc-item.md-toc-h2 {
    counter-reset: h3
}

#write h3, .outline-h3, .md-toc-item.md-toc-h3 {
    counter-reset: h4
}

#write h4, .outline-h4, .md-toc-item.md-toc-h4 {
    counter-reset: h5
}

#write h5, .outline-h5, .md-toc-item.md-toc-h5 {
    counter-reset: h6
}

/** put counter result into headings */
#write h1:before,
.outline-h1>.outline-item>.outline-label:before,
.md-toc-item.md-toc-h1>.md-toc-inner:before {
    counter-increment: h1;
    content: counter(h1) ". "
}

/* 使用h1标题时,去掉前两个h1标题的序号,包括正文标题、目录树和大纲 */
/* nth-of-type中的数字表示获取第几个h1元素,请根据情况自行修改。 */
#write h1:nth-of-type(1):before,
.outline-h1:nth-of-type(1)>.outline-item>.outline-label:before,
.md-toc-item.md-toc-h1:nth-of-type(1)>.md-toc-inner:before,
#write h1:nth-of-type(2):before,
.outline-h1:nth-of-type(2)>.outline-item>.outline-label:before,
.md-toc-item.md-toc-h1:nth-of-type(2)>.md-toc-inner:before{
	counter-reset: h1;
	content: ""
}

#write h2:before,
.outline-h2>.outline-item>.outline-label:before,
.md-toc-item.md-toc-h2>.md-toc-inner:before {
    counter-increment: h2;
    content: counter(h2) ". "
}

/* 使用h2标题时,去掉前两个h2标题的序号,包括正文标题、目录树和大纲 */
/* nth-of-type中的数字表示获取第几个h2元素,请根据情况自行修改。 */
#write h2:nth-of-type(1):before,
.outline-h2:nth-of-type(1)>.outline-item>.outline-label:before,
.md-toc-item.md-toc-h2:nth-of-type(1)>.md-toc-inner:before,
#write h2:nth-of-type(2):before,
.outline-h2:nth-of-type(2)>.outline-item>.outline-label:before,
.md-toc-item.md-toc-h2:nth-of-type(2)>.md-toc-inner:before{
	counter-reset: h2;
	content: ""
}

#write h3:before,
h3.md-focus.md-heading:before, /** override the default style for focused headings */
.outline-h3>.outline-item>.outline-label:before,
.md-toc-item.md-toc-h3>.md-toc-inner:before {
	text-decoration: none;
    counter-increment: h3;
    /* content: counter(h1) "." counter(h2) "." counter(h3) ". " */
    content: counter(h2) "." counter(h3) ". "
}

#write h4:before,
h4.md-focus.md-heading:before,
.outline-h4>.outline-item>.outline-label:before,
.md-toc-item.md-toc-h4>.md-toc-inner:before {
	text-decoration: none;
    counter-increment: h4;
    /* content: counter(h1) "." counter(h2) "." counter(h3) "." counter(h4) ". " */
    content: counter(h2) "." counter(h3) "." counter(h4) ". "
}

#write h5:before,
h5.md-focus.md-heading:before,
.outline-h5>.outline-item>.outline-label:before,
.md-toc-item.md-toc-h5>.md-toc-inner:before {
	text-decoration: none;
    counter-increment: h5;
    /* content: counter(h1) "." counter(h2) "." counter(h3) "." counter(h4) "." counter(h5) ". " */
    content: counter(h2) "." counter(h3) "." counter(h4) "." counter(h5) ". "
}

#write h6:before,
h6.md-focus.md-heading:before,
.outline-h6>.outline-item>.outline-label:before,
.md-toc-item.md-toc-h6>.md-toc-inner:before {
	text-decoration: none;
    counter-increment: h6;
    /* content: counter(h1) "." counter(h2) "." counter(h3) "." counter(h4) "." counter(h5) "." counter(h6) ". " */
    content: counter(h2) "." counter(h3) "." counter(h4) "." counter(h5) "." counter(h6) ". "
}

/** override the default style for focused headings */
#write>h3.md-focus:before,
#write>h4.md-focus:before,
#write>h5.md-focus:before,
#write>h6.md-focus:before,
h3.md-focus:before,
h4.md-focus:before,
h5.md-focus:before,
h6.md-focus:before {
    color: inherit;
    border: inherit;
    border-radius: inherit;
    position: inherit;
    left:initial;
    float: none;
    top:initial;
    font-size: inherit;
    padding-left: inherit;
    padding-right: inherit;
    vertical-align: inherit;
    font-weight: inherit;
    line-height: inherit;
}
保存即可。
如何使主题生效
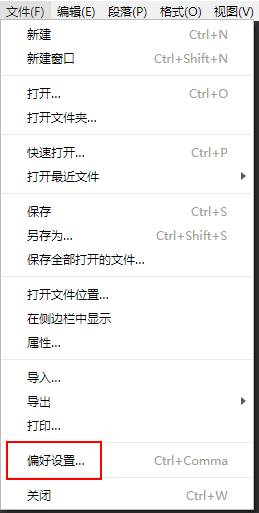
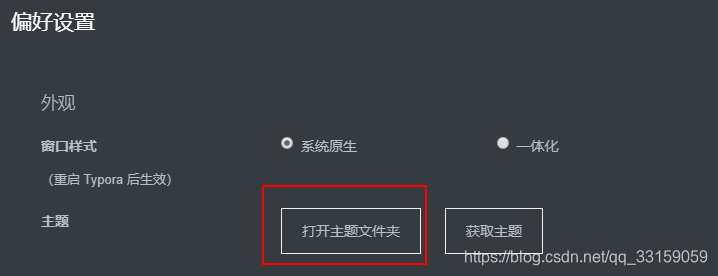
将如上代码保存,文件名就是上面的base.user.css,这是默认会被加载的样式主题文件的默认命名。然后打开偏好设置:
再打开打开主题文件夹,将文件放到打开的目录中:
最后,重启Typora(一定要重启)。重启完,即可使用。
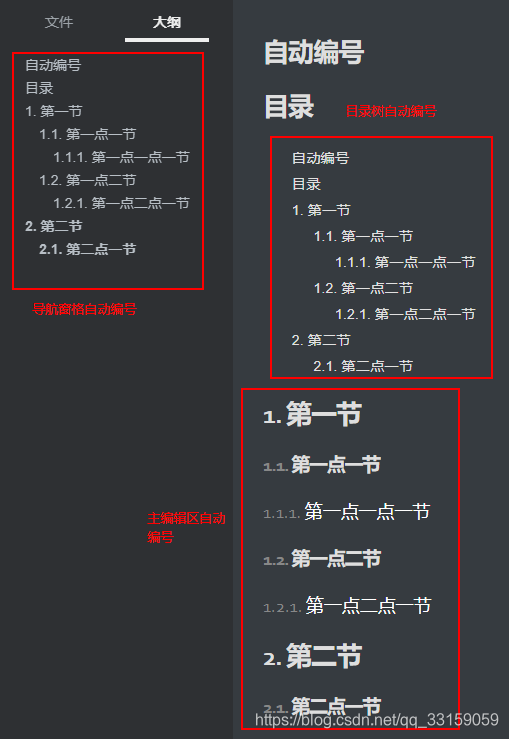
效果图:
总结
如上的代码可以成功的实现三个区域的自动编号功能,但是还有好多不完美的地方,我把他列出来,以后再做改进:
- 自动编号不能做到自动适应,我是从2级标题开始用的,如果使用1级标题,那么之后的编号前都会有个0。以后,可以增加逻辑判断来改善。但是目前CSS好像并没有这样的功能,大家如果知道可以告知我。
- 自动编号导出为pdf文档的时候,生成的标签是没有编号的。因为目录树区和主编辑区都属于正文区域,所以,这两个区域有编号。后期看看能不能改一改pdf库。
其他的我可能没发现的,欢迎大家指出,我会及时更新的。
不过,我发出这篇文章的时候,也会是无序号的。(^_^)
参考
写文章总是有参考的,下面给出参考网址:
- [1] 如何编写主题:https://theme.typora.io/doc/Write-Custom-Theme/
- [2] 如何添加定制的CSS:https://support.typora.io/Add-Custom-CSS/
- [3] 自动编号:https://support.typora.io/Auto-Numbering/
- [4] nth-of-type:http://www.runoob.com/cssref/sel-nth-of-type.html
- [5] counter-increment:http://www.runoob.com/cssref/pr-gen-counter-increment.html
- [6] counter-reset:http://www.runoob.com/cssref/pr-gen-counter-reset.html


 1670
1670

 被折叠的 条评论
为什么被折叠?
被折叠的 条评论
为什么被折叠?
 到【灌水乐园】发言


