


目录
Spring Boot
其并不是对Spring功能上的增强,而是一种快速使用Spring的方式
Spring Boot特性
- 创建独立的Spring应用程序
- 嵌入的Tomcat,无需部署WAR文件
- 简化maven配置
- 自动配置Spring
- 提供生产就绪型功能,如指标,健康检查和外部配置
- 开箱即用,没有代码生成,也无需XML配置。
三种创建方式
- 从官网创建
- idea脚手架创建
- maven创建
SpringBoot HelloWorld
1、POM文件
1.1 继承
<parent>
        <groupId>org.springframework.boot</groupId>
        <artifactId>spring-boot-starter-parent</artifactId>
        <version>2.2.0.RELEASE</version>
        <relativePath></relativePath>
</parent>
SpringBoot的父级依赖,只有继承他项目才是SpringBoot项目
1.2 依赖
<dependency>
            <groupId>org.springframework.boot</groupId>
            <artifactId>spring-boot-starter-web</artifactId>
            <version>2.2.0.RELEASE</version>
</dependency>
包含了web开发的所有启动器,打包依赖,这里不必指定version,会遵从父级。
1.3 插件
<build>
        <plugins>
            <plugin>
                <groupId>org.springframework.boot</groupId>
                <artifactId>spring-boot-maven-plugin</artifactId>
            </plugin>
        </plugins>
</build>
spring-boot-maven-plugin插件是将springboot的应用程序打包成jar包的插件,将所有应用程序启动运行所需的jar包都包含进来。
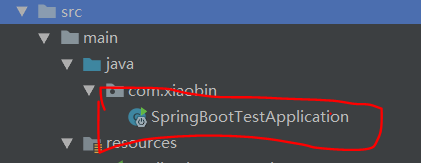
2、启动类
其作用是启动springboot项目(不同于启动器),是基于main方法运行,启动时会做注解扫描(@Controller、@Service....),扫描的位置是同包或者子包下的注解,所以启动类的位置应放在包的根下。

/**
 * 启动类*/
//1、启动类必须加这个注解
@SpringBootApplication
public class SpringBootTestApplication
{
    public static void main(String[] args)
    {
        SpringApplication.run(SpringBootTestApplication.class,args);//2、必须要有
    }
}
@SpringBootApplication和 SpringApplication.run(启动类类名, args)是固定写法,标识启动类。
2.1 启动类和启动器区别
- 启动类是一个class,是项目的启动入口
- 启动器是jar包的坐标
3、启动器
SpringBoot将所有的功能场景都抽取出来,做成一个个starter(启动器),要用什么功能就导入什么场景,只需要在项目里引入这些starter,相关场景的所有依赖都会导入进来,最终实现一站式开发。
其中spring-boot-starter是核心启动器。一般官方启动器命名格式spring-boot-starter-xx。
4、配置文件
SpringBoot提供一个名为application的全局配置文件,支持两种格式:properteis和YAML。两种配置文件作用一样,但是书写格式不同。
4.1、properteis格式
比如配置内嵌的tomcat的监听端口
server.port=8080
4.2、YAML格式
扩展名为yaml或者yml。
server:
port:8080
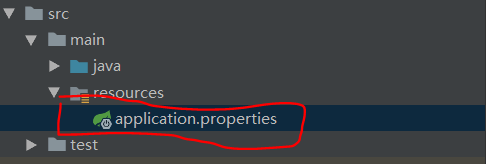
4.3 存放位置
- 当前根目录或者其下的config目录中
- 项目的resourc或者其下的config目录中
4.4 配置文件的加载顺序
- 不同格式:properties格式高于yml,且同一属性取最先读取的,后面的不覆盖前面的。
- 不同位置:项目根目录/config > 根目录 > reource/config > resource
4.5 配置文件中的占位符
语法:${}
作用:
- 获取框架提供的方法中的值,如random.int
- 获取配置文件中的键的值赋给另一个键作为值
server:
value:8080
port: ${server.value} //port:${random.int(1024-9999)}
4.6 bootstrap配置文件
SpringBoot有两种上下文:
- bootstrap : 应用程序的上下文
- application
bootstrap是aplication的父对象,且加载优先级bootstrap > bootstrap。两者共用一个环境
5、SpringBoot核心注解
5.1 @SpringBootApplication
是SpringBoot的启动类,是很多注解的组合。
5.2 @SpringBootConfiguration
相当于Spring中的@Configuration,标注这个类是一个配置类。
5.3 @Configuration
通过对bean对象的操作替代spring中的xml文件。
5.4 @EnableAutoConfiguration
SpringBoot自动配置
5.5 @AutoConfigurationPackage
自动注入主类下所在包下所有的加了注解的类。
5.6 @Import
5.7 @ComponentScan
组件扫描,可自动发现和装配一些bean。
5.8 @ConfigurationPropertiesScan
扫描配置属性
6、SpringBoot在Controller中的常用注解
6.1 @RestController
相当于@Controller + @ResponsBody, 直接返回return的内容
6.2 @GetMapping
是@RequestMapping(method = RequestMethod.GET)的缩写
6.3 @PostMapping
6.4 @PutMapping
6.5 @DeleteMapping
7、HelloWorld
1、创建一个maven工程

2、修改pom文件,引入依赖,变成SpringBoot项目
<?xml version="1.0" encoding="UTF-8"?>
<project xmlns="http://maven.apache.org/POM/4.0.0"
         xmlns:xsi="http://www.w3.org/2001/XMLSchema-instance"
         xsi:schemaLocation="http://maven.apache.org/POM/4.0.0 http://maven.apache.org/xsd/maven-4.0.0.xsd">
    <modelVersion>4.0.0</modelVersion>

    <parent>
        <groupId>org.springframework.boot</groupId>
        <artifactId>spring-boot-starter-parent</artifactId>
        <version>2.2.0.RELEASE</version>
        <relativePath></relativePath>
    </parent>

    <groupId>xiaobin_springboot</groupId>
    <artifactId>spring-boot-test</artifactId>
    <version>1.0-SNAPSHOT</version>

    <properties>
        <java.version>1.8</java.version>
    </properties>

    <dependencies>
        <dependency>
            <groupId>org.springframework.boot</groupId>
            <artifactId>spring-boot-starter-web</artifactId>
        </dependency>

        <dependency>
            <groupId>org.springframework.boot</groupId>
            <artifactId>spring-boot-starter-test</artifactId>
            <scope>test</scope>
            <exclusions>
                <exclusion>
                    <groupId>org.junit.vintage</groupId>
                    <artifactId>junit-vintage-engine</artifactId>
                </exclusion>
            </exclusions>
        </dependency>
    </dependencies>

    <build>
        <plugins>
            <plugin>
                <groupId>org.springframework.boot</groupId>
                <artifactId>spring-boot-maven-plugin</artifactId>
            </plugin>
        </plugins>
    </build>

</project>
3、修改tomcat监听端口
默认8080,也可以不修改,仅以此演示配置文件的使用。创建配置文件:
server.port=8080
4、创建启动类
import org.springframework.boot.SpringApplication;
import org.springframework.boot.autoconfigure.SpringBootApplication;

/**
 * 启动类*/
//1、启动类必须加这个注解
@SpringBootApplication
public class SpringBootTestApplication
{
    public static void main(String[] args)
    {
        SpringApplication.run(SpringBootTestApplication.class,args);//2、必须要有
    }
}
5、创建Controller

import org.springframework.web.bind.annotation.RequestMapping;
import org.springframework.web.bind.annotation.RestController;

/**
 * 处理请求controller*/
@RestController    //@Controller + @ResponsBody 直接返回json串
public class HelloWorldController
{
    @RequestMapping("/helloWorld")
    public String showHelloWorld()
    {
        return "HelloWorld";
    }
}
到此helloworld编写完了。
启动启动类,出现下图说明启动成功

在浏览器键入http://localhost:8888/helloWorld,出现:

至此,第一个helloworld就成功了。
SpringBoot整合web层技术
1、整合Servlet方式一
通过注解扫描完成Servlet组件的注册
1.1 创建Servlet
/**
 * 整合Servlet方式一
 * */
@WebServlet(name = "FirstServlet",urlPatterns = "/first")
public class FirstServlet extends HttpServlet
{
    public void doGet(HttpServletRequest request, HttpServletResponse response)
    {
        System.out.println("第一个Servlet...");
    }
}
1.2 修改启动类
/**
 * 启动类*/
//1、启动类必须加这个注解
@SpringBootApplication
@ServletComponentScan //在SpringBoot启动时会扫描@WebServlet注解,并将该类实例化
public class SpringBootTestApplication
{
    public static void main(String[] args)
    {
        SpringApplication.run(SpringBootTestApplication.class,args);//2、必须要有
    }
}
在浏览器输入http://localhost:8888/first即可在控制台输出"第一个Servlet...",即成功。
2、整合Servlet方式二
通过方法完成Servlet组建的注册
2.1 创建Servlet
/**
 * 整合servlet方式二
 * */
public class SecondServlet extends HttpServlet
{
    public void doGet(HttpServletRequest request, HttpServletResponse response)
    {
        System.out.println("第二个Servlet...");
    }
}
2.2 创建Servlet配置类
//Servlet配置类,该方法也可以放到启动类当中
@Configuration
public class ServletConfig
{
    //完成Servlet组件的注册
    @Bean
    public ServletRegistrationBean getServletRegistrationBean()
    {
        ServletRegistrationBean bean = new ServletRegistrationBean(new SecondServlet());
        bean.addUrlMappings("/second");
        return bean;
    }
}在浏览器输入http://localhost:8888/first即可在控制台输出"第二个Servlet...",即成功。
3、整合Filter方式一
通过注解扫描完成Filter组件注册
3.1 创建Filter
//整合Filter方式一
@WebFilter(filterName = "FirstFilter",urlPatterns = "/first")
public class FirstFilter implements Filter
{
public void destroy()
{
}
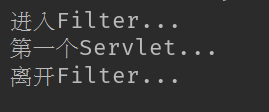
public void doFilter(ServletRequest req, ServletResponse resp, FilterChain chain) throws ServletException, IOException
{
System.out.println("进入Filter...");
chain.doFilter(req, resp);
System.out.println("离开Filter...");
}
public void init(FilterConfig config) throws ServletException
{
}
}3.2修改启动类
/**
 * 启动类*/
//1、启动类必须加这个注解
@SpringBootApplication
@ServletComponentScan //在SpringBoot启动时会扫描@WebServlet,@WebFilter注解,并将该类实例化
public class SpringBootTestApplication
{
    public static void main(String[] args)
    {
        SpringApplication.run(SpringBootTestApplication.class,args);//2、必须要有
    }
}
在浏览器键入http://localhost:8888/first,控制台出现下图则成功:
4、整合Filter方式二
通过方法完成Filter组件注册
4.1 创建Filter
//整合Filter方式二
public class SecondFilter implements Filter
{
    public void destroy()
    {

    }

    public void doFilter(ServletRequest req, ServletResponse resp, FilterChain chain) throws ServletException, IOException
    {
        System.out.println("进入第二个Filter...");
        chain.doFilter(req, resp);
        System.out.println("离开第二个Filter...");
    }

    public void init(FilterConfig config) throws ServletException
    {

    }

}
4.2 创建Filter配置类
//Filter配置类
@Configuration
public class FilterConfig
{
    @Bean
    public FilterRegistrationBean getFilterRegistrationBean()
    {
        FilterRegistrationBean bean = new FilterRegistrationBean(new SecondFilter());
        bean.addUrlPatterns("/second");
        return bean;
    }
}
5、整合Listener方式一
通过注解扫描
5.1 创建Listener
//整合Listener方式一
@WebListener
public class FirstListener implements ServletContextListener
{
    public void contextDestroyed(ServletContextEvent event)
    {

    }
    public void contextInitialed(ServletContextEvent event)
    {
        System.out.println("Listener 初始化...");
    }
}
5.2 修改启动类
/**
 * 启动类*/
//1、启动类必须加这个注解
@SpringBootApplication
@ServletComponentScan //在SpringBoot启动时会扫描@WebServlet,@WebFilter,@WebLisener注解,并将该类实例化
public class SpringBootTestApplication
{
    public static void main(String[] args)
    {
        SpringApplication.run(SpringBootTestApplication.class,args);//2、必须要有
    }
}
6、整合Listener方式二
通过方法,和前面组件类似,只不过不需要addUrl...不一一赘述。
SpringBoot访问静态资源
在项目目录并没有WebContent目录,springboot默认在static下存放静态资源,templates下存放动态页面(推荐Thymeleaf)。
也可以自定义位置。
SpringBoot整合动态资源(Thymeleaf)
1、添加依赖
<dependency>
            <groupId>org.springframework.boot</groupId>
            <artifactId>spring-boot-starter-thymeleaf</artifactId>
 </dependency>
2、创建Controller和Html
//页面跳转controller
@Controller
public class PageController
{
    //页面跳转方法
    @GetMapping("/show")
    public String showPage(Model model)
    {
        model.addAttribute("msg","Hello Thymeleaf");
        return "indexThymeleaf";
    }
}
<!DOCTYPE html>
<html lang="en" xmlns:th="http://www.w3.org/1999/xhtml">
<head>
<meta charset="UTF-8">
<title>XB</title>
</head>
<body>
<span th:text="你好XB"></span>
<hr>
<span th:text="${msg}"></span>
</body>
</html>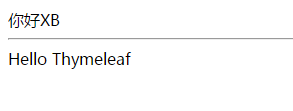
3、SpringBoot中配置Thymeleaf
spring.thymeleaf.prefix=classpath:/templates/  #默认路径
spring.thymeleaf.suffix=.html
spring.thymeleaf.encoding=utf-8
SpringBoot 整合jdbc和mybatis
SpringBoot异常处理
五种处理方式
1、自定义错误页面
如果要所有异常都跳转到统一页面则需要在src/main/resources/templates目录下创建error.html(名称必须为error.html)
或者在templates下建一个error目录,在下面建相应错误页面,如templates/error/404.html
如果异常没有跳转很可能是maven导入模板引擎时出错,导致没有去templates下查找错误页面
2、通过@ExceptionHandler注解处理异常
创建Controller
@Controller
public class UsersController
{
    @RequestMapping("showInfo")
    public String showInfi()
    {//人为制造异常
        String str = null;
        str.length();
        return "ok";
    }

    //处理空指针异常
    @ExceptionHandler(value = {NullPointerException.class})
    public ModelAndView nullpointExceptionHandler(Exception e)
    {
        ModelAndView mv = new ModelAndView();
        mv.addObject("err",e.toString());
        mv.setViewName("error1");  //异常下跳转
        return mv;
    }
}
3、通过@ControllerAdvice和@ExceptionHandler处理异常(全局处理)
这种方式异常和处理方法不必在同一类下
@ControllerAdvice
public class GlobalException
{
    @ExceptionHandler(value = {NullPointerException.class})
    public ModelAndView nullpointExceptionHandler(Exception e)
    {
        ModelAndView mv = new ModelAndView();
        mv.addObject("err",e.toString());
        mv.setViewName("error1.html");//异常下跳转
        return mv;
    }
}
4、通过SimpleMappingExceptionResolver
处理类
@Configuration
public class GlobalException2
{
    public SimpleMappingExceptionResolver getException()
    {
        SimpleMappingExceptionResolver resolver = new SimpleMappingExceptionResolver();
        Properties properties = new Properties();
        //参数1:异常全名   参数2:跳转视图
        properties.put("java.lang.NullPointerException","error1");
        properties.put("java.lang.NullPointerException","error2");

        resolver.setExceptionMappings(properties);

        return resolver;
    }
}
5、通过HandlerExceptionResolver接口自定义异常处理类(最好)
@Configuration
public class GlobalException3 implements HandlerExceptionResolver
{

    @Override
    public ModelAndView resolveException(HttpServletRequest request, HttpServletResponse response, Object handler, Exception ex) {
        //必须实现该方法
        ModelAndView mv = new ModelAndView();
        //判断不同类型异常
        if(ex instanceof NullPointerException)
        {
            mv.setViewName("error1");
        }
        if(ex instanceof ArithmeticException)
        {
            mv.setViewName("error2");
        }

        mv.addObject("error", ex.toString());
        return mv;
    }
}
更新中......


 1597
1597


 被折叠的 条评论
为什么被折叠?
被折叠的 条评论
为什么被折叠?
 到【灌水乐园】发言


