一、fragment 基本介绍:
Fragment表现Activity中用户界面的一个行为或者是一部分。它有自己的生命周期,接收它自己的输入事件,并且可以在activity运行时添加或者删除。Fragment必须总是被嵌入到一个activity之中,并且fragment的生命周期直接受其宿主activity的生命周期的影响,即受Activity 的停止 销毁 而 停止销毁。当activity处于resumed的生命周期状态,可以单独的操控每个fragment,比如添加或者删除。当你执行这样一项事务时,可以将它添加到后台的一个栈中,这个栈由activity管理着——activity里面的每个后台栈内容实体是fragment发生过的一条事务记录。
二、Fragments 生命周期视图:
三、fragment的子类(或是继承自它的子类)。
fragment类的代码看起来很像activity。它与 activity一样都有回调函数,例如onCreate(),onStart(),onPause(),和onStop()。
一般情况下 至少要实现以下几个生命周期方法:
(1) onCreate() ; 创建 fragment 时调用此方法 实现代码中 可初始化 想要 在 fragment 中保持 的必要组件, fragment 暂停 或者 停滞状态之后会重新启用;
(2) onCreateView(); 第一次为 fragment 绘制用户界面时候调用 , 函数必须要 返回 fragment 的根View ,没有用户界面情况下 返回 null;
(3) onPause() ; fragment 在销毁之前 所调用, 在用户结束会话之前,通常在这里提交任何应该持久化的变化(因为用户可能不在返回);
还有一些继承的子类:
DialogFragment 显示一个浮动的对话框;
ListFragment 显示一个由适配器管理的条目列表, 类似于
ListActivity;
PreferenceFragment 显示一个 Prefrence 对象的体系结构列表 l类似
Prefrence
Activity;
四、使用FragmentTransaction 来对activity中的fragment进行操作
FragmentManager fragmentManager = getFragmentManager();
FragmentTransaction fragmentTransaction = fragmentManager.beginTransaction();
可以用add()函数添加fragment,并指定要添加的fragment以及要将其插入到哪个视图(view)之中:
ExampleFragment fragment =newExampleFragment();
fragmentTransaction.add(R.id.fragment_container, fragment);
fragmentTransaction.commit(); // 使用 commit() 使变化生效
add()函数的第一个参数 是fragment被放置的ViewGroup,它由资源ID(resource ID)指定,第二个参数就是要添加的fragment。
还有一些其他 相关函数 remove(),和replace()
下面给出 fragment 替换另一个 fragment 的例子
// Create new fragment and transactionFragment
newFragment =newExampleFragment();
FragmentTransaction transaction = getFragmentManager().beginTransaction();
// Replace whatever is in the fragment_container view with this fragment,
// and add the transaction to the back stack
transaction.replace(R.id.fragment_container, newFragment); transaction.addToBackStack(null);
// Commit the transaction
transaction.commit();
将变更添加到
FragmentTransaction中的顺序注意以下两点:
(1)必须要在最后调用commit()
(2)如果你正将多个fragment添加到同一个容器中,那么添加顺序决定了它们在视图层次(view hierarchy)里显示的顺序。
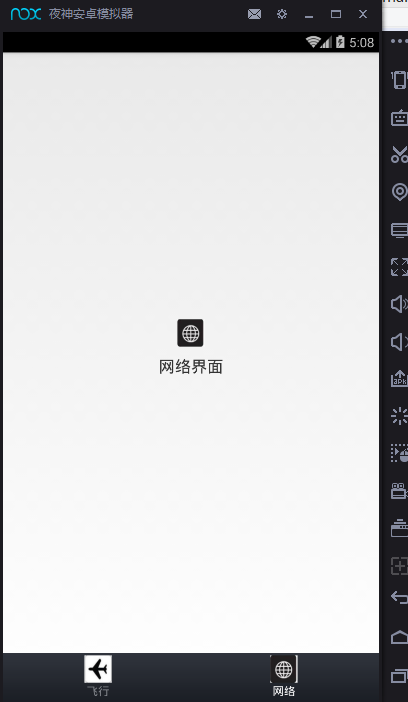
五、 下面自己写了一个示例 比较简单
MainActivity 函数:
public class MainActivity extends Activity implements OnClickListener{


    //声明 飞行 布局

    private View messageLayout;
    private TextView messageText;
    private ImageView messageImage;
    private Fragment messageFragment;

    // 声明 网络 布局
    private Fragment contactsFragment;
    private View contactsLayout;
    private TextView contactsText;
    private ImageView contactsImage;


    // 声明fragment 管理器
    private FragmentManager fragmentManager;
    @Override
    protected void onCreate(Bundle savedInstanceState) {
        super.onCreate(savedInstanceState);
        // 设置当前 Activity 无 title 全屏
        //注意 此方法 必须在setContentView(R.layout.activity_main)之前调用 否则会抛出异常
        requestWindowFeature(Window.FEATURE_NO_TITLE);
        setContentView(R.layout.activity_main);
        //初始化组件对象
        initViews();
        fragmentManager = getFragmentManager();
        setTabSelection(0);
    }

    private void initViews() {
        // TODO Auto-generated method stub
        messageLayout = findViewById(R.id.message_layout);
        contactsLayout = findViewById(R.id.contacts_layout);

        messageImage = (ImageView) findViewById(R.id.message_image);
        contactsImage = (ImageView) findViewById(R.id.contacts_image);

        messageText = (TextView) findViewById(R.id.message_text);
        contactsText = (TextView) findViewById(R.id.contacts_text);
        // 添加点击事件
        messageLayout.setOnClickListener(this);
        contactsLayout.setOnClickListener(this);
    }

    @Override
    public void onClick(View view) {
        // TODO Auto-generated method stub
        switch (view.getId()) {
        case R.id.message_layout:
            setTabSelection(0);
            break;

        case R.id.contacts_layout:
            setTabSelection(1);
            break;

        }
    }

    private void setTabSelection(int i) {
        // TODO Auto-generated method stub
        //清空选项的背景颜色和字体颜色
        clearSelection();
        //创建  FragmentTransaction  处理 fragment
       FragmentTransaction transaction = fragmentManager.beginTransaction();
       // 使没别选中的 fragment 布局隐藏
        hideFragments(transaction);

        switch (i) {
        case 0:
            // 设置被选中 状态下的背景图片 和字体颜色
            messageImage.setImageResource(R.drawable.message_selected);
            messageText.setTextColor(Color.WHITE);
            if (messageFragment == null) {
                // 下面是被选中的 对应的 fragment 首次创建
                messageFragment = new MessageFragment();
                transaction.add(R.id.content, messageFragment);
            } else {
                // 已经创建过了 就直接展现出来
                transaction.show(messageFragment);
            }
            break;
        case 1:
            // 设置被选中 状态下的背景图片 和字体颜色
            contactsImage.setImageResource(R.drawable.contacts_selected);
            contactsText.setTextColor(Color.WHITE);
            if (contactsFragment == null) {
                // 下面是被选中的 对应的 fragment 首次创建
                contactsFragment = new ContactsFragment();
                transaction.add(R.id.content, contactsFragment);
            } else {
                // 已经创建过了 就直接展现出来
                transaction.show(contactsFragment);
            }
            break;
        }
        transaction.commit();
    }


    private void clearSelection() {
        // TODO Auto-generated method stub
        messageImage.setImageResource(R.drawable.message_unselected);
        messageText.setTextColor(Color.parseColor("#82858b"));
        contactsImage.setImageResource(R.drawable.contacts_unselected);
        contactsText.setTextColor(Color.parseColor("#82858b"));
    }

    private void hideFragments(FragmentTransaction transaction) {
        // TODO Auto-generated method stub
        if (messageFragment != null) {
            transaction.hide(messageFragment);
        }
        if (contactsFragment != null) {
            transaction.hide(contactsFragment);
        }
    }

}
MessageFragment 函数:
public class MessageFragment extends Fragment {

	public View onCreateView(LayoutInflater inflater, ViewGroup container,
			Bundle savedInstanceState) {
		View messageLayout = inflater.inflate(R.layout.message_layout,
				container, false);
		return messageLayout;
	}

}
ContactsFragment 函数:
public class ContactsFragment extends Fragment {

	@Override
	public View onCreateView(LayoutInflater inflater, ViewGroup container,
			Bundle savedInstanceState) {
		View contactsLayout = inflater.inflate(R.layout.contacts_layout,
				container, false);
		return contactsLayout;
	}

}
下面把 布局代码贴出来:
<LinearLayout xmlns:android="http://schemas.android.com/apk/res/android"
    android:layout_width="match_parent"
    android:layout_height="match_parent"
    android:orientation="vertical" >

    <FrameLayout
        android:id="@+id/content"
        android:layout_width="match_parent"
        android:layout_height="0dp"
        android:layout_weight="1" >
    </FrameLayout>

    <LinearLayout
        android:layout_width="match_parent"
        android:layout_height="60dp"
        android:background="@drawable/tab_bg" >

        <RelativeLayout
            android:id="@+id/message_layout"
            android:layout_width="0dp"
            android:layout_height="match_parent"
            android:layout_weight="1" >

            <LinearLayout
                android:layout_width="match_parent"
                android:layout_height="wrap_content"
                android:layout_centerVertical="true"
                android:orientation="vertical" >

                <ImageView
                    android:id="@+id/message_image"
                    android:layout_width="wrap_content"
                    android:layout_height="wrap_content"
                    android:layout_gravity="center_horizontal"
                    android:src="@drawable/message_unselected" />

                <TextView
                    android:id="@+id/message_text"
                    android:layout_width="wrap_content"
                    android:layout_height="wrap_content"
                    android:layout_gravity="center_horizontal"
                    android:text="飞行"
                    android:textColor="#82858b" />
            </LinearLayout>
        </RelativeLayout>

        <RelativeLayout
            android:id="@+id/contacts_layout"
            android:layout_width="0dp"
            android:layout_height="match_parent"
            android:layout_weight="1" >

            <LinearLayout
                android:layout_width="match_parent"
                android:layout_height="wrap_content"
                android:layout_centerVertical="true"
                android:orientation="vertical" >

                <ImageView
                    android:id="@+id/contacts_image"
                    android:layout_width="wrap_content"
                    android:layout_height="wrap_content"
                    android:layout_gravity="center_horizontal"
                    android:src="@drawable/contacts_unselected" />

                <TextView
                    android:id="@+id/contacts_text"
                    android:layout_width="wrap_content"
                    android:layout_height="wrap_content"
                    android:layout_gravity="center_horizontal"
                    android:text="网络"
                    android:textColor="#82858b" />
            </LinearLayout>
        </RelativeLayout>


    </LinearLayout>

</LinearLayout>
界面一 布局:
<?xml version="1.0" encoding="utf-8"?>
<RelativeLayout xmlns:android="http://schemas.android.com/apk/res/android"
    android:layout_width="match_parent"
    android:layout_height="match_parent" >

    <LinearLayout
        android:layout_width="wrap_content"
        android:layout_height="wrap_content"
        android:layout_centerInParent="true"
        android:orientation="vertical" >

        <ImageView
            android:layout_width="wrap_content"
            android:layout_height="wrap_content"
            android:layout_gravity="center_horizontal"
            android:src="@drawable/contacts_selected" />

        <TextView
            android:layout_width="wrap_content"
            android:layout_height="wrap_content"
            android:layout_gravity="center_horizontal"
            android:padding="10dp"
            android:text="飞行界面"
            android:textSize="20sp" />
    </LinearLayout>

</RelativeLayout>
界面二 布局:
<?xml version="1.0" encoding="utf-8"?>
<RelativeLayout xmlns:android="http://schemas.android.com/apk/res/android"
    android:layout_width="match_parent"
    android:layout_height="match_parent" >

    <LinearLayout
        android:layout_width="wrap_content"
        android:layout_height="wrap_content"
        android:layout_centerInParent="true"
        android:orientation="vertical" >

        <ImageView
            android:layout_width="wrap_content"
            android:layout_height="wrap_content"
            android:layout_gravity="center_horizontal"
            android:src="@drawable/contacts_selected" />

        <TextView
            android:layout_width="wrap_content"
            android:layout_height="wrap_content"
            android:layout_gravity="center_horizontal"
            android:padding="10dp"
            android:text="网络界面"
            android:textSize="20sp" />
    </LinearLayout>

</RelativeLayout>

界面做的 太菜了 是那个意思 .
希望大家支持下 我只是刚刚起步 转载的 朋友请注明 出处 谢谢!
http://blog.csdn.net/qq_33271083
源代码 点击打开链接


 1万+
1万+

 被折叠的 条评论
为什么被折叠?


