


Vue3 + vite + Ts 组件间通信
1、props
- 概述:
props是使用频率最高的一种通信方式,常用与:父和子互相传递- 若
父传子:属性值是非函数。 - 若
子传父:属性值是函数。
- 若
- 简单例子:
<!--父组件-->
<template>
  <div class="app">
    <h3>App 页面</h3>
    <h4>{{ str }}</h4>
    <h5 v-if="toy">儿子给的玩具:{{ toy }}</h5>
    <Test :str="str" :getToy="getToy" />
  </div>
</template>

<script setup lang="ts">
import { ref } from "vue";
import Test from "@/components/Test.vue";

const str = ref<string>("父亲有一台车,车名叫:劳斯莱斯");

const toy = ref<string>("");
/**
 * 获取儿子给玩具信息方法
 */
function getToy(value: string) {
  toy.value = value;
}
</script>

<style lang="scss">
.app {
  background: pink;
  padding: 20px;
  border-radius: 10px;
  box-shadow: 2px 2px 2px #cdcdcd;
}

h3 {
  color: #c00000;
}

h5 {
  color: green;
}
</style>
<!--子组件-->
<template>
  <div class="clid">
    <h3>我是 测试 自定义组件</h3>
    <h4>{{ clidStr }}</h4>
    <h5>父亲把车传给了儿子:{{ str }}</h5>
    <el-button type="warning" @click="getToy(clidStr)">给父亲玩具</el-button>
  </div>
</template>

<script setup lang="ts">
import { ref } from "vue";
defineProps(["str", "getToy"]);

const clidStr = ref("儿子有一个玩具,名字叫:奥特曼");
</script>

<style lang="scss" scoped>
.clid {
  padding: 20px;
  border-radius: 10px;
  background: #f8f8f8;
}
</style>
2、自定义事件
- 简单例子,代码如下:
<!--父组件-->
<template>
  <div class="app">
    <h3>App 页面</h3>
    <h4 v-if="str">儿子给的玩具:{{ str }}</h4>
    <!-- 给子组件 Test 绑定自定义事件 -->
    <Test @customHandle="handle" />
  </div>
</template>

<script setup lang="ts">
import { ref } from "vue";
import Test from "@/components/Test.vue";

const str = ref<string>("");

/**
 * 自定义事件
 * 子组件会调用
 */
function handle(data: string) {
  str.value = data;
}
</script>

<style lang="scss">
.app {
  background: pink;
  padding: 20px;
  border-radius: 10px;
  box-shadow: 2px 2px 2px #cdcdcd;
}

h3 {
  color: #c00000;
}

h5 {
  color: green;
}
</style>
<!--子组件-->
<template>
  <div class="clid">
    <h3>我是 测试 自定义组件</h3>
    <h4>我是一个玩具:{{ clidStr }}</h4>
  </div>
</template>

<script setup lang="ts">
import { ref, onMounted } from "vue";

const clidStr = ref("儿子有一个玩具,名字叫:奥特曼");

// 声明事件
const emit = defineEmits(["customHandle"]);

/**
 * 声明周期函数
 * 程序运行 3 秒后执行方法
 */
onMounted(() => {
  setTimeout(() => {
    emit("customHandle", clidStr.value);
  }, 3000);
});
</script>

<style lang="scss" scoped>
.clid {
  padding: 20px;
  border-radius: 10px;
  background: #f8f8f8;
}
</style>
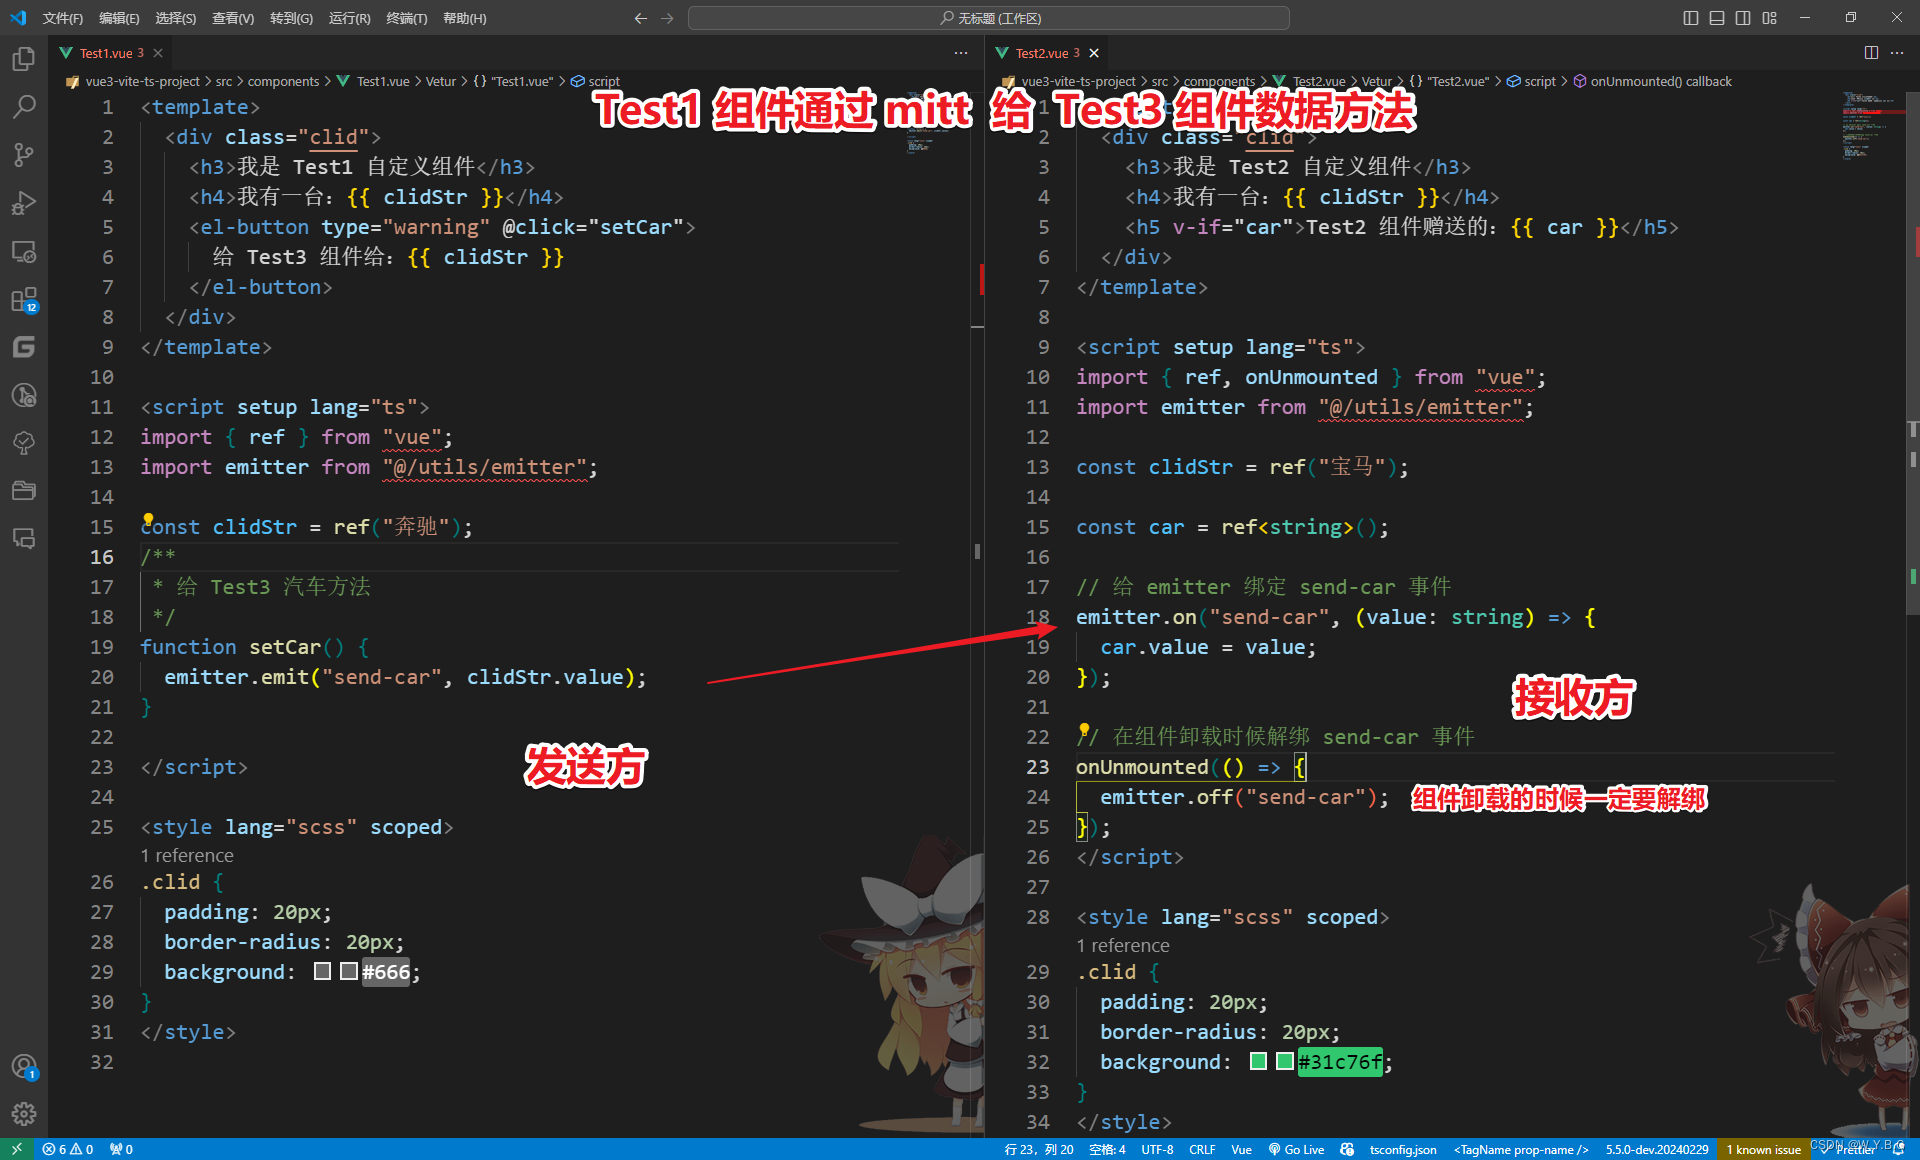
3、mitt
mitt:是一种工具;- 任意组件间通信
pubsub、$bus、mitt
接收数据的:提前绑定好事件(pubsub:提前订阅消息)
提供数据的:在合适的时候触发事件(pubsub:发布消息)
- 安装
mitt
npm install mitt
- 在项目根目录
src中创建utils文件夹,然后在utils文件夹中创建emitter.ts文件,代码如下:
// 引入 mitt
import mitt from "mitt";

// 调用 mitt 得到 emitter ,emitter 能:绑定事件、触发事件
const emitter = mitt();

// 绑定事件
emitter.on("test", () => {
  console.log("test 事件已触发");
});

emitter.on("test2", () => {
  console.log("test2 事件已触发");
});

// 触发事件
emitter.emit("test");
emitter.emit("test2");

// 解绑事件
emitter.off("test");
emitter.off("test2");

// 全部解绑
emitter.all.clear();

// 暴露 emitter
export default emitter;
-
API说明

-
项目中使用示例:
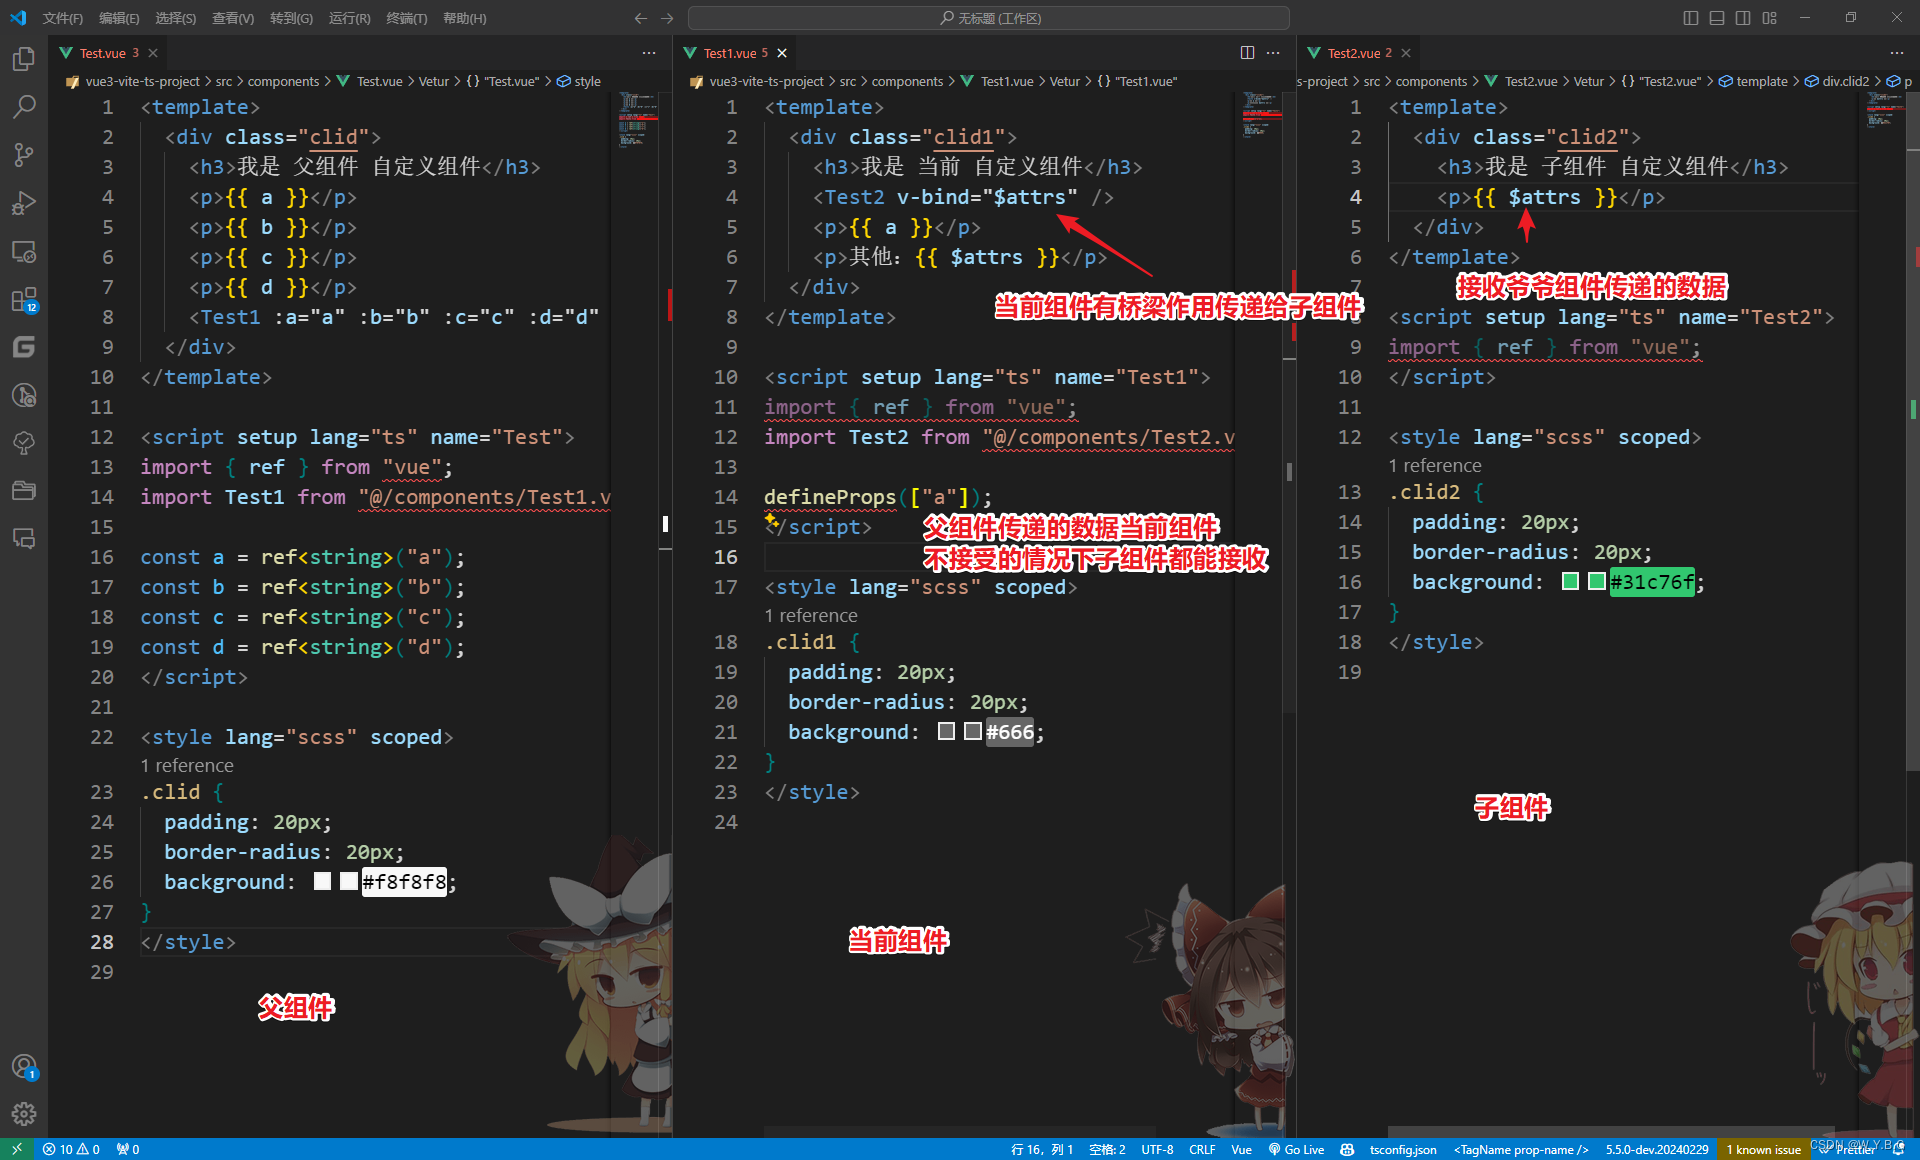
4、$attrs
- 概述:
$attrs用于实现当前组件的父组件,向当前组件的子组件通信(祖 传 孙)。 - 具体说明:
$attrs是一个对象,包含所有父组件传入的标签属性。 - 中间组件必须给子组件传递一下父组件的数据(中间组件有桥梁的作用)
注意:
$attrs会自动排除props中声明的属性(可以认为声明过的props被子组件自己“消费”了)
5、$ refs 、$parent
- 概念:
$ref用于:父传子$parent用于:子传父
- 原理如下:
$ref:值为对象,包含所有被ref属性标识的DOM元素或组件实例。$parent:值为对象,当前组件的父组件实例对象。
ref和parent的使用示例,代码如下:
<!--父组件-->
<template>
  <div class="clid">
    <h3>我是 父组件 自定义组件</h3>
    <p>房产:{{ fangchan }}</p>
    <p>
      <el-button type="warning" @click="editTest1BookNameHandle"
        >修改 Test1 的书名</el-button
      >
      <el-button type="warning" @click="editTest2GouNameHandle"
        >修改 Test2 的狗名</el-button
      >
      <el-button type="warning" @click="getAllClidHandle($refs)"
        >获取所有子组件</el-button
      >
    </p>
    <Test1 ref="test1" />
    <br />
    <Test2 ref="test2" />
  </div>
</template>

<script setup lang="ts" name="Test">
import { ref } from "vue";
import Test1 from "@/components/Test1.vue";
import Test2 from "@/components/Test2.vue";

/**
 * 修改 Test1 的书名
 */
const test1 = ref();
function editTest1BookNameHandle() {
  test1.value.book += "~";
}

/**
 * 修改 Test2 的狗名
 */
const test2 = ref();
function editTest2GouNameHandle() {
  test2.value.gou += "~";
}

const fangchan = ref<number>(4);

/**
 * 获取所有子组件
 */
function getAllClidHandle(refs: { [key: string]: any }) {
  for (let key in refs) {
    console.log(refs[key]);
  }
}

defineExpose({ fangchan });
</script>

<style lang="scss" scoped>
.clid {
  padding: 20px;
  border-radius: 20px;
  background: #f8f8f8;
}
</style>
<template>
  <div class="clid1">
    <h3>我是 Test1 自定义组件</h3>
    <p>书名:{{ book }}</p>
    <p>玩具:{{ toy }}</p>
    <p>从父亲获取的房产:{{ house }}</p>
    <p>
      <el-button type="warning" @click="getHouseHandle($parent)"
        >获取父亲的房产</el-button
      >
    </p>
  </div>
</template>

<script setup lang="ts" name="Test1">
import { ref } from "vue";

const book = ref<string>("西游记");
const toy = ref<string>("奥特曼");

// 把数据交给外部
defineExpose({ book });

/**
 * 从父组件中获取数据
 * @param parent
 */
const house = ref<number>(0);
function getHouseHandle(parent: any) {
  house.value += 1;
  parent.fangchan -= 1;
}
</script>

<style lang="scss" scoped>
.clid1 {
  padding: 20px;
  border-radius: 20px;
  background: #666;
}
</style>
<template>
  <div class="clid2">
    <h3>我是 Test2 自定义组件</h3>
    <p>{{ mao }}</p>
    <p>{{ gou }}</p>
  </div>
</template>

<script setup lang="ts" name="Test2">
import { ref } from "vue";

const mao = ref<string>("狸花猫");
const gou = ref<string>("哈士奇");

// 把数据交给外部
defineExpose({ gou });
</script>

<style lang="scss" scoped>
.clid2 {
  padding: 20px;
  border-radius: 20px;
  background: #31c76f;
}
</style>
6、provide、inject
- 不需要中间组件传递数量,能实现任意组件通信
- 简单例子,代码如下:
<template>
  <div class="clid">
    <h3>我是 父组件 自定义组件</h3>
    <p>房产:{{ fangchan }}</p>
    <Test1 ref="test1" />
  </div>
</template>

<script setup lang="ts" name="Test">
import { ref, provide } from "vue";
import Test1 from "@/components/Test1.vue";

const fangchan = ref<number>(4);

/**
 * 修改房产数量方法
 */
function setHouseCountHandle(x: number) {
  fangchan.value -= x;
}

// 给后代提供数据
provide("house", { fangchan, setHouseCountHandle });
</script>

<style lang="scss" scoped>
.clid {
  padding: 20px;
  border-radius: 20px;
  background: #f8f8f8;
}
</style>
<template>
  <div class="clid2">
    <h3>我是 Test2 自定义组件</h3>
    <p>{{ mao }}</p>
    <p>{{ gou }}</p>
    <p>{{ fangchan }}</p>
    <p>
      <el-button type="warning" @click="setHouseCountHandle(1)"
        >获取父亲房产方法</el-button
      >
    </p>
  </div>
</template>

<script setup lang="ts" name="Test2">
import { ref, inject } from "vue";

const mao = ref<string>("狸花猫");
const gou = ref<string>("哈士奇");

// 接收祖先传递的数据
const { fangchan, setHouseCountHandle } = inject("house", {
  fangchan: 0,
  setHouseCountHandle: (x: number) => {},
});
</script>

<style lang="scss" scoped>
.clid2 {
  padding: 20px;
  border-radius: 20px;
  background: #31c76f;
}
</style>


 128
128


 被折叠的 条评论
为什么被折叠?
被折叠的 条评论
为什么被折叠?
 到【灌水乐园】发言


