


进程
一、认识进程
当启动一个程序时,操作系统创建一个进程,并在该进程中执行程序里的指令,
程序结束进程就没了,进程死了程序就结束了,进程是伴随程序执行时而存在的动态概念。
进程是资源分配的最小单位,最重要的资源就是cup的时间片,内存。

进程之间有父子关系,子进程是父进程启动的,每个进程都有一个父进程。
当子进程终止时,父进程会得到通知并能取得子进程的退出状态,给子进程收尸。
所有的进程都是1号进程的子进程,进程下面还有更小的一个单位:线程。
一个进程至少有一个线程,也可以有多个线程。
每个进程一般都拥有4G的虚拟内存(32位系统,真实并没有,第11章讲过的知识)。
创建一个子进程,子进程也拥有独立的4G虚拟内存,并且复制父进程的运行状态(代码都是一样的,并且代码运行到哪都一样)子进程退出后一般进入“僵死态”,其父进程会得到通知并能取得子进程的退出状态,父进程回收子进程资源,若是其父进程已经结束,则由父进程的父进程回收,以此类推。
ps查看进程工具
举例1:
# ps -axu | more
参数:
a:显示跟当前终端关联的所有进程,tty项中‘?’表示没有绑定终端
u:基于用户的格式显示(U: 显示某用户ID所有的进程)
x:显示所有进程,不以终端机来区分
f:全部列出,通常和其他选项联用。
e:显示所有进程,环境变量
注: 最后一列[xxxx] 使用方括号括起来的进程是内核态的进程。 没有括起来的是用户态进程。
上面的参数输出每列含意:
USER: 启动这些进程的用户
PID: 进程的ID
%CPU 进程占用的CPU百分比;
%MEM 占用内存的百分比;
VSZ:进程占用的虚拟内存大小(单位:KB)
RSS:进程占用的物理内存大小(单位:KB)
STAT:该程序目前的状态,Linux进程有5种基本状态:
R :该程序目前正在运作,或者是可被运作;
S :该程序目前正在睡眠当中 ,但可被某些讯号(signal) 唤醒。
T :该程序目前正在侦测或者是停止了;
Z :该程序应该已经终止,但是其父程序却无法正常的终止他,造成 zombie (疆尸) 程序的状态
D 不可中断状态.
5个基本状态后,还可以加一些字母,比如:Ss、R+
它们含意如下::
<: 表示进程运行在高优先级上
N: 表示进程运行在低优先级上
L: 表示进程有页面锁定在内存中
s: 表示进程是控制进程
l: 表示进程是多线程的
+: 表示当前进程运行在前台
START:该 process 被触发启动的时间;
TIME :该 process 实际使用 CPU 运作的时间。
COMMAND:该程序的实际指令
二、创建进程
2.1 fork()函数:创建子进程(我们的工作是linux平台)
头文件
#include <sys/types.h>
#include <unistd.h>
函数原型
pid_t fork(void); //pid_t实际是一个int整型类型
返回值:
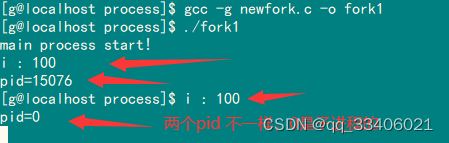
成功时,子进程的PID将在父进程中返回,并在子进程中返回0。
失败时,在父项中返回-1,不创建子进程。
备注:子进程资源、代码、内存状况都与父进程的一样,互不干扰。子进程就从fork()之后的代码执行。
示例:
#include <stdio.h>
#include <stdlib.h>
#include <unistd.h>
#include <sys/types.h>
int main(int argc,char *argv[]){
    int i = 100;
    printf("main process start!\n");
    fork();      //创建一个新的子进程,此行开始,后面的程序执行线,从一条变成了两条线
    printf("i : %d \n",i);
    //会被执行两次,父进程执行一次,子进程执行一次,有的时候你会看到打印一次结果主进程结束,然后又再打印,
    //是因为主进程执行完毕的时候,子进程还没执行完,所以会在主进行执行完后才打印出来。
    return 0;
}
编译执行后,我们看到i :100,打印了两次,而上一个输出‘main process start’只执行了一次

演示:子进程的PID将在父进程中返回,并在子进程中返回0
#include <stdio.h>
#include <stdlib.h>
#include <unistd.h>
#include <sys/types.h>
int main(int argc,char *argv[]){
    int i = 100;
    printf("main process start!\n");
    pid_t pid = fork();      //创建一个新的子进程,此行开始,后面的程序执行线,从一条变成了两条线
    printf("i : %d \n",i);
    printf("pid=%d\n",pid);
    return 0;
}
进一步:通过fork的返回值来区分父进程和子进程,从而执行不同的动作
int main() {
    int i = 100;
    printf("start main\n");
    pid_t pid = fork();
    if(pid < 0){
       //小于0,表示子进程创建失败,就不玩了,退出
       exit(1);
    }
    if(pid == 0){
        printf("this is child procss! \n");
    }else{
        printf("this is parent process!\n");
    }
    return 0;
}
2.2 vfork()与exec()
vfork():创建子进程
头文件
#include <sys/types.h>
#include <unistd.h>
函数原型
pid_t vfork(void);
返回值
成功时,子进程的PID将在父进程中返回,并在子进程中返回0。
失败时,在父项中返回-1,不创建子进程。
注意:相对比于fork有以下特点:
1、共享父进程的资源,也就是共同操作一份虚拟内存,数据相互影响。
2、父进程进入睡眠,一直等到子进程结束或者是调用exec系列函数。
3、专门用来于exec系列函数配合使用。
验证1和2示例:
#include <stdio.h>
#include <stdlib.h>
#include <unistd.h>
#include <sys/types.h>
int main(int argc,char *argv[]){
    int i = 100;
    printf("main process start!\n");
    pid_t pid = vfork();      //创建一个新的子进程,此行开始,后面的程序执行线,从一条变成了两条线
    if(pid <0){
        printf("vfork error!\n");
        exit(1);
    }
    if(pid ==0){
        i = 200;
        printf("sub process start! i: %d\n",i);
        exit(0);
    }
    //用了条件语句,下面的是在主线程中执行的了
    printf("parent process!  i : %d \n",i);
    printf("parent process pid=%d\n",pid);
    return 0;
}

去掉子进程中的exit(0)

vfork()与exec()系列函数进行配合使用
exec()系列函数功能:在进程中加载新的程序文件或者脚本,覆盖原有代码,重新运行。
(调用第三方程序,成功调用了第三方,则原来程序就不继续执行了)
头文件:
#include <unistd.h>
函数原型:
int execl(const char *path, const char *arg, ...);
int execv(const char *path, char *const argv[ ]);
int execle(const char *path, const char *arg, ..., char * const envp[ ]);
int execlp(const char *file, const char *arg, ...);
int execvp(const char *file, char *const argv[ ]);
int execvpe(const char *file, char *const argv[ ],char *const envp[ ]);
参数:
path 即将被加载执行的可执行文件或脚本的路径
file 即将被加载执行的可执行文件或脚本的名字
arg 以列表方式罗列的可执行文件或脚本的参数
argv 以数组方式组织的可执行文件或脚本的参数
envp 用户自定义的环境变量数组
返回值
调用第三方程序,成功调用原来程序就不继续执行了,返回值就没用了。
如果调用失败或出错就返回-1。
注意:
1,函数名带字母 l 意味着其参数以列表(list)的方式提供。
2,函数名带字母 v 意味着其参数以矢量(vector)数组的方式提供。
3,函数名带字母 p 意味着会利用环境变量 PATH 来找寻指定的执行文件。
4,函数名带字母 e 意味着用户提供自定义的环境变量。
5,在给execl()函数传参时,最后一个参数为NULL,以标识参数结尾。
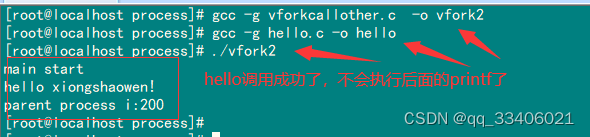
子进程中成功调用了第三方程序,子进程后面的代码就不会执行了。
如例子中的printf("in child i=%d\n", i);就不会执行:
#include <stdio.h>
#include <stdlib.h>
#include <unistd.h>
#include <sys/types.h>
int main(int argc,char *argv[]){
    printf("main start\n");
    int i = 100;
    pid_t pid = vfork();
    if(pid < 0){
        printf("vfork error!\n");
        exit(1);
    }
    if(pid ==0){
        i= 200;
        execl("hello","hello","xiongshaowen!",NULL);  //调用第三方脚本,这里我另写hello.c 第二个参数,经常随意写的,结尾用NULL
        printf("execl调用成功,这里不会被执行,如果有,则调用不成功!\n");  //execl调用成功,这里不会被执行,如果有,则调用不成功
    }
    printf("parent process i:%d \n",i);
    return 0;
}
hello.c:
#include <stdio.h>
int main(int argc, char *argv[]) {
    printf("hello %s\n", argv[1]);
    return 0;
}
还可以使用execlp()函数调用系统命令:
#include <sys/types.h>
#include <unistd.h>

int main() {
    printf("main\n");
    int i = 100;
    pid_t pid = vfork();
    if(pid == 0){
        i = 200;
        execlp("ls","ls","-l",NULL);  //ls是linux的系统命令,#PATH,查看到环环境变量中有命令的shell环境变量,所以不用写路径就可调用
        printf("in child i=%d\n", i); // 不会被执行了
    }
    printf("in parent i=%d\n",i);
    return 0;
}

环境变量
Linux的环境变量种类
按变量的生存周期来划分,Linux变量可分为两类:
1 永久的:需要修改配置文件,变量永久生效。
2 临时的:使用export命令声明即可,变量在关闭shell时失效。
设置环境变量的三种方法
1 在/etc/profile文件中添加变量【对所有用户生效(永久的)】
# vi /etc/profile
export CLASSPATH=./JAVA_HOME/lib;$JAVA_HOME/jre/lib
# source /etc/profile
2 在用户目录下的.bash_profile文件中增加变量【对单一用户生效(永久的)】
例如:编辑guok用户目录(/home/guok)下的.bash_profile
$ vi/home/zhonghao/.bash.profile
export CLASSPATH=./JAVAHOME/lib;JAVA_HOME/jre/lib
$ source /home/zhonghao/.bash_profile
3 直接运行export命令定义变量【只对当前shell(BASH)有效(临时的)】
export 变量名=变量值
环境变量的查看
1 使用echo命令查看单个环境变量。
echo $PATH
2 使用env查看所有环境变量。
env
使用unset删除指定的环境变量
清除环境变量的值用unset命令。
export  TEST="Test"
unset  TEST #删除环境变量TEST
$ env|grep TEST #此命令没有输出,证明环境变量TEST已经删除
三、退出进程
3.1 exit()函数,终止一个进程
头文件
#include <stdlib.h>
函数原型
void exit(int status);
参数
退出状态,常用宏EXIT_SUCCESS(0)表示成功, EXIT_FAILURE(1)表示失败
注意:
- status&0377的值(其实就是status的低8位)返回给父进程,在父进程可用wait()来获取。(0377–>011 111 111)
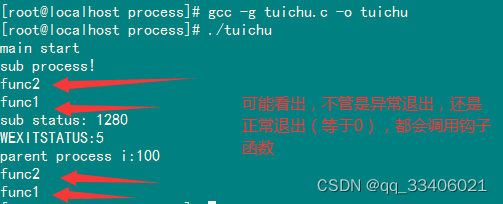
- 在退出进程前会先执行atexit或者是on_exit所登记的退出处理函数,俗称钩子函数,钩子函数一般是我自定义的。
- 清理IO缓冲区,假如退出程序之前输出缓冲区有数据则会输出。
- _exit:直接退出进程,不会进行多余的操作(例如不会调用钩子函数)
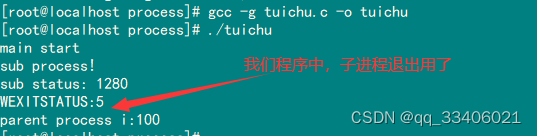
父进程等待子进程结束,并获取子进程的结束状态。使用宏WEXITSTATUS来获取。
#include <stdio.h>
#include <stdlib.h>
#include <unistd.h>
#include <sys/types.h>
#include <sys/wait.h>
int main(int argc,char *argv[]){
    printf("main start\n");
    int i = 100;
    pid_t pid = fork();
    if(pid < 0){
        printf("fork error!\n");
        exit(1);
    }
    if(pid ==0){
        printf("sub process!\n");
        exit(5);   //只要整数就可以

    }
    //父进程里wait函数,让父进程等待子进程的状态值改变,当子改后,会获取改变的状态
    int status;
    wait(&status);   //把子进程的状态值放入参数变量中
    printf("sub status: %d\n",status);     //这值不是 5 哦
    printf("WEXITSTATUS:%d\n",WEXITSTATUS(status));   //这里输出的是 5,WEXITSTATUS是一个宏
    printf("parent process i:%d \n",i);
    return 0;
}
对wait函数和宏WEXITSTATUS,拓展一下:
子进程的结束,状态返回后存于status;
底下有几个宏可判别结束情况
WIFEXITED (status)如果子进程正常结束则为非0值,真。
WEXITSTATUS (status)取得子进程exit返回的结束代码,一般会先用WIFEXITED来判断是否正常结束才能使用此宏。
WIFSIGNALED (status)如果子进程是因为信号而结束则此宏值为真。
WTERMSIG (status)取得子进程因信号而中止的信号代码,一般会先用WIFSIGNALED来判断后才使用此宏。
WIFSTOPPED (status)如果子进程处于暂停执行情况则此宏值为真。
WSTOPSIG (status)取得引发子进程暂停的信号代码,一般会先用WIFSTOPPED来判断后才使用此宏。
3.2 atexit()函数,注册一个或多个函数,这些函数会在进程退出前被调用
头文件
#include <stdlib.h>
函数原型
int atexit(void (*function)(void));
参数 一个无返回值,无参数的函数指针
返回值:成功返回0,失败返回非0值
#include <stdio.h>
#include <stdlib.h>
#include <unistd.h>
#include <sys/types.h>
#include <sys/wait.h>
//func1,func2是两个钩子函数,注册到进程中, 当进程结速之前会调用
void func1(void){
    printf("func1\n");
}
void func2(void){
    printf("func2\n");
}
int main(int argc,char *argv[]){
    printf("main start\n");
    //注册函数到进程
    atexit(func1);
    atexit(func2);

    int i = 100;
    pid_t pid = fork();
    if(pid < 0){
        printf("fork error!\n");
        exit(1);
    }
    if(pid ==0){
        printf("sub process!\n");
        exit(5);   //只要整数就可以

    }
    //父进程里wait函数,让父进程等待子进程的状态值改变,当子改后,会获取改变的状态
    int status;
    wait(&status);   //把子进程的状态值放入参数变量中
    printf("sub status: %d\n",status);     //这值不是 5 哦
    printf("WEXITSTATUS:%d\n",WEXITSTATUS(status));   //这里输出的是 5,WEXITSTATUS是一个宏
    printf("parent process i:%d \n",i);
    return 0;
}
3.2 on_exit()函数,注册一个/多个函数,在进程退出前被调用
头文件
#include <stdlib.h>
函数原型
int on_exit(void (*function)(int , void *), void *arg);
//void *表示一个有效指针,它确实指向实实在在的数据,只是数据的类型尚未确定,
//在后续使用过程中一般要进行强制类型转换。
参数
function是一个待参数的函数指针
arg是function指向函数的参数,以字符串形式
返回值:成功返回0,失败返回非0值
备注:function(int status, void *);一个是退出状态,一个是参数地址
#include <stdio.h>
#include <stdlib.h>
#include <unistd.h>
#include <sys/types.h>
#include <sys/wait.h>
//func1,func2是两个钩子函数,注册到进程中, 当进程结速之前会调用
/*void func1(void){
    printf("func1\n");
}
void func2(void){
    printf("func2\n");
}*/
void func3(int status,void *arg){
    printf("status: %d ,args: %s\n",status,(char *)arg); //(char *)强转类型,这里是字符数组(字符数组名表示数组的首地址)
}
int main(int argc,char *argv[]){
    printf("main start\n");
    //注册函数到进程
    //atexit(func1);
    //atexit(func2);
    on_exit(func3, " this is on_exit call\n");
    int i = 100;
    pid_t pid = fork();
    if(pid < 0){
        printf("fork error!\n");
        exit(1);
    }
    if(pid ==0){
        printf("sub process!\n");
        exit(5);   //只要整数就可以

    }
    //父进程里wait函数,让父进程等待子进程的状态值改变,当子改后,会获取改变的状态
    //int status;
    //wait(&status);   //把子进程的状态值放入参数变量中
    //printf("sub status: %d\n",status);     //这值不是 5 哦
   // printf("WEXITSTATUS:%d\n",WEXITSTATUS(status));   //这里输出的是 5,WEXITSTATUS是一个宏
    printf("parent process i:%d \n",i);
    return 0;
}

3.3 _exit()直接退出,不会触发钩子函数
#include <stdio.h>
#include <stdlib.h>
#include <sys/types.h>
#include <unistd.h>

void func(int status, void *arg) {
    printf("status=%d, arg=%s", status, (char *)arg);
}

int main(int argc, char *argv[]) {
    printf("main\n");

    pid_t pid = fork();

    on_exit(func, " this is on_exit call\n");
    if (pid == 0) {
        printf("this is child process!\n");
        // exit(5);
        _exit(5);
    }

    printf("this is parent process!\n");

    return 0;
}
四、守护进程
4.1 守护进程的概念
通常情况下创建的子进程受限于父进程,受限于组等。
比如说在终端运行一个程序a,在控制终端下按下Ctrl+C(向子进程发出挂断信号),
或者直接关掉终端,程序a都会被终端连带退出。
而守护进程就相当于独立出来,不再受组、父进程等影响的一个进程。
例如在终端运行的一个程序,关闭终端后,守护进程不受影响,仍可继续运行。
很多服务进程都是守护进程。
进程组:
每个进程也会属于一个进程组
每个进程组都有一个进程组号,该号等于该进程组组长的PID号
一个进程只能为它自己或子进程设置进程组ID号
会话期:
会话期(session)是一个或多个进程组的集合。
setsid()函数可以建立一个会话期:
如果,调用setsid的进程不是一个进程组的组长,此函数创建一个新的会话期。
(1)此进程变成该对话期的首进程
(2)此进程变成一个新进程组的组长进程。
(3)此进程没有控制终端,如果在调用setsid前,该进程有控制终端,那么与该终端的联系被解除。
(4)如果该进程是一个进程组的组长,此函数返回错误。为了保证这一点,我们先调用fork()然后exit()父进程,此时只有子进程在运行,子进程继承了父进程的进程组ID,但是进程PID却是新分配的,
所以不可能是新会话的进程组的PID。在这里调用setsid()函数从而保证了不得报错。
if((pid=fork())>0)  //parent
        exit(0);
    else if(pid==0){        //th1 child
        setsid();           //th1是成为会话期组长
        if(fork() ==0){     //th2不会是会话期组长(变成孤儿进程组)
            ...
        }
    }
4.2 守护进程的编写思路
- 脱离控制终端,登录会话和进程组
进程属于一个进程组,进程组号(GID)就是进程组长的进程号(PID)。
登录会话可以包含多个进程组。
这些进程组共享一个控制终端。这个控制终端通常是创建进程的登录终端。
控制终端,登录会话和进程组通常是从父进程继承下来的。
我们的目的就是要摆脱它们,使之不受它们的影响。
调用setsid()使进程成为会话组长,脱离原来的控制终端,登录会话和进程组。
- 禁止进程重新打开控制终端
现在,进程已经成为无终端的会话组长。
但它可以重新申请打开一个控制终端。
可以通过使进程不再成为会话组长来禁止进程重新打开控制终端:
if(pid=fork())
     exit(0); //结束第一子进程,第二子进程继续(第二子进程不再是会话组长)
- 关闭打开的文件描述符
进程从创建它的父进程那里继承了打开的文件描述符。
如不关闭,将会浪费系统资源, 造成进程所在的文件系统无法卸下以及引起无法预料的错误。
按如下方法关闭它们:
for (i = 0; i < NOFILE; i++) close(i); //NOFILE依赖#include <sys/param.h>
-
改变当前工作目录
进程活动时,其工作目录所在的文件系统不能卸下。
一般需要将工作目录改变到根目录。
chdir(“/”); //改变目录 -
重设文件创建权限掩码
进程从创建它的父进程那里继承了文件创建权限掩码。
它可能修改守护进程所创建的文件的存取位。
为防止这一点,将文件创建掩模清除:umask(0); -
处理SIGCHLD信号
处理SIGCHLD信号并不是必须的。
但对于某些进程,特别是服务器进程往往在请求到来时生成子进程处理请求。
如果父进程不等待子进程结束,子进程将成为僵尸进程(zombie)从而占用系统资源。
如果父进程等待子进程结束,将增加父进程的负担,影响服务器进程的并发性能。
在Linux下可以简单地将 SIGCHLD信号的操作设为SIG_IGN。
signal(SIGCHLD,SIG_IGN);自动回收子进程的资源,不会产生僵尸进程。
例: 将一个普通进程变为守护进程例子
#include <stdio.h>
#include <unistd.h>
#include <signal.h>
#include <stdlib.h>
#include <sys/types.h>
#include <sys/stat.h>
#include <sys/param.h>

int main(int argc, char *argv[]){
    pid_t pid;
    int i;
    signal(SIGCHLD,SIG_IGN);  //忽略终端信号,自动回收子进程的资源,不会参数僵尸进程。
    //1.脱离父,只剩下第一子进程
    pid = fork();
    if(pid<0){   //创建子进程失败
        exit(1);
    }else if(pid>0){  //进程号大于0是父进程
        exit(0);
    }

    setsid();  //实际脱离,第一子进程是进程组长了,新建了一个会话期

    //2.禁止控制终端,第一子进程继承了最初始的父进程有终端绑定,创建第二子进程,这样它成为了守护进程了
    pid = fork();
    if(pid<0){   //创建子进程失败
        exit(1);
    }else if(pid>0){  //进程号大于0是父进程,这里是第一子进程了,也退出了
        exit(0);
    }
    //剩下第二子进程,孤儿进程 ,不可能是进程组长,就失去了申请终端的权力了
    //3.关闭文件描述符
    for(i=0;i<NOFILE;i++)
      close(i);


    //4.改变工作目录
    chdir("/");
    //5.重设创建文件的默认认权限掩码
    umask(0);
    pause();   //让进程暂停

    return 0;
}
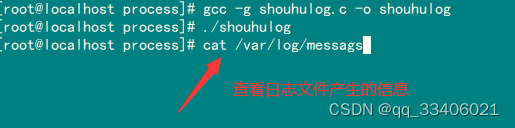
编译执行,再查询进程,可发现守护进程没有(TTY 为‘?’)没有绑定终端,我们关闭当前终端,再打开终端,再查询守护进程,看到了还在。

守护进程可以使用命令:kill -s 9 进程ID( 来结束进程
由于关闭了所有打开的文件描述符(包括标准输入0,标准输出1、标准出错2),所以需要输出信息的的话,可以使用系统日志文件。
void openlog(const char *ident, int option, int facility);//打开日志
void syslog(int priority, const char *format, ...);//写入日志
void closelog(void);//关闭日志
4.4 openlog()函数,为程序打开到系统记录器的连接。(打开系统日志文件)
头文件
#include <syslog.h>
原型
void openlog(const char *ident, int option, int facility);
参数
ident:添加到每条消息的前面,用来标识消息,通常设置为程序的名称。
option:指定控制openlog()操作和后续syslog()调用的标志。
可以是下面一个或多个值的“或”
LOG_CONS    如果系统日志服务器不能用,写入控制台
LOG_NDELAY    立即打开连接,正常情况下,直到发送第一条消息才打开连接
LOG_PERROR    打印输出到stderr(标准出错,通常是显示屏,不缓冲输出)
LOG_PID       每条消息中包含进程 PID
facility:指定程序发送消息的类型。
LOG_AUTHPRIV    安全授权消息
LOG_CRON    时钟守护进程,记录时间
LOG_DAEMON    其他系统守护进程
LOG_KERN    内核消息
LOG_LPR        打印机子系统
LOG_MAIL    邮件子系统
LOG_USER    默认
4.5 syslog()函数,生成一条日志消息(将信息写入日志文件)
头文件
#include <syslog.h>
原型
void syslog(int priority, const char *format, ...);
参数,priority:priority指定消息的重要性。
LOG_EMERG    系统不能使用
LOG_ALERT    立即采取措施
LOG_CRIT    紧急事件
LOG_ERR        出错条件
LOG_WARNING    警告条件
LOG_NOTICE    正常但重大事件
LOG_INFO    信息消息
LOG_DEBUG    调试信息
format:类似于printf函数,指定格式的字符串
备注:syslog在首次使用的时候自动打开日志文件,也就是说可以不调用openlog()函数。
4.6 closesys()函数,关闭系统日志文件
头文件
#include <syslog.h>
原型
void closelog(void);
linux系统上日志文件通常是/var/log/syslog
测试代码:将信息写到系统日志文件中
#include <stdio.h>
#include <unistd.h>
#include <signal.h>
#include <stdlib.h>
#include <sys/types.h>
#include <sys/stat.h>
#include <sys/param.h>
#include <syslog.h>    //系统日志头文件

 //初始化守护进程的函数
 int daemon_init(){
       pid_t pid;
    int i;
    signal(SIGCHLD,SIG_IGN);
    //1.脱离父,只剩下第一子进程
    pid = fork();
    if(pid<0){   //创建子进程失败
        exit(1);
    }else if(pid>0){  //进程号大于0是父进程
        exit(0);
    }

    setsid();  //实际脱离,第一子进程是进程组长了,新建了一个会话期

    //2.禁止控制终端,第一子进程继承了最初始的父进程有终端绑定,创建第二子进程,这样它成为了守护进程了
    pid = fork();
    if(pid<0){   //创建子进程失败
        exit(1);
    }else if(pid>0){  //进程号大于0是父进程,这里是第一子进程了,也退出了
        exit(0);
    }
    //剩下第二子进程,孤儿进程 ,不可能是进程组长,就失去了申请终端的权力了
    //3.关闭文件描述符
    for(i=0;i<NOFILE;i++)
      close(i);


    //4.改变工作目录
    chdir("/");
    //5.重设创建文件的默认认权限掩码
    umask(0);

 }


int main(int argc, char *argv[]){
    int i =5;
    //创建一个守护进程,在后台进行
    daemon_init();

    //想要在守护进程里输出信息,靠日志文件的打开,写入,
    openlog("shouhulog",LOG_CONS | LOG_PID,LOG_DAEMON);
    while (i--)
    {
        syslog(LOG_INFO,"THIS is syslog test!-----%d \n",i);
        sleep(2);
    }
    closelog();   //关闭日志

    pause();   //让进程暂停

    return 0;
}
线程
一、线程(Tread)
在前面的课程里我们已经认识了进程,线程,有时被称为轻量级进程(Lightweight Process,LWP),是程序执行流的最小单元。是比进程更小一层的单位,是进程中的一个实体,是被系统独立调度和分派的基本单位,线程自己不拥有系统资源,只拥有一点在运行中必不可少的资源,但它可与同属一个进程的其它线程共享进程所拥有的全部资源。
一个线程有自己线程ID。
一个线程可以创建和撤消另一个线程,同一进程中的多个线程之间可以并发执行。
由于线程之间的相互制约,致使线程在运行中呈现出间断性。
每一个程序都至少有一个线程,那就是程序本身。
线程是程序中一个单一的顺序控制流程。
在单个程序中同时运行多个线程完成不同的工作,称为多线程。
多线程是多任务处理的一种特殊形式,多任务处理允许让电脑同时运行两个或两个以上的程序。
一般情况下,两种类型的多任务处理:基于进程和基于线程。
基于进程的多任务处理是程序的并发执行。
基于线程的多任务处理是同一程序的片段的并发执行。
一般情况下我们实现多任务并发处理,建议用基于线程。
理解并发:
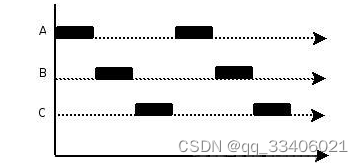
微观角度:所有的并发处理都有排队等候,唤醒,执行等这样的步骤,在微观上他们都是序列被处理的,如果是同一时刻到达的请求(或线程)也会根据优先级的不同,而先后进入队列排队等候执行。
宏观角度:多个几乎同时到达的请求(或线程)在宏观上看就像是同时在被处理。
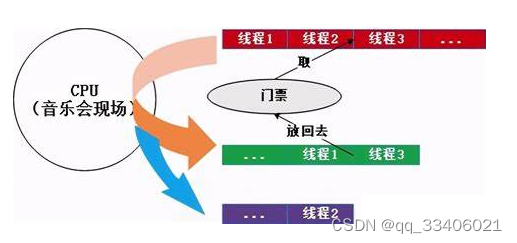
通俗点讲:并发就是只有一个CPU资源,程序(或线程)之间要竞争得到执行机会。
图中的第一个阶段,在A执行的过程中B,C不会执行,因为这段时间内这个CPU资源被A竞争到了,同理,第二个阶段只有B在执行,第三个阶段只有C在执行。
其实,并发过程中,A,B,C并不是同时在进行的(微观角度),但又是同时进行的(宏观角度)。
二、线程创建
POSIX标准的线程创建:
#include <pthread.h>
int pthread_create(pthread_t *thread,pthread_attr_t *attr,
(void*)(*start_routine)(void*),void *arg);
pthread_create 创建一个新的线程,并让它可执行。下面是关于参数的说明:
参数描述:
thread 指向线程标识符指针。
attr 一个不透明的属性对象,可以被用来设置线程属性。可以指定线程属性对象,也可以使用默认值 NULL。
start_routine 线程运行函数起始地址,一旦线程被创建就会执行。
arg 运行函数的参数。它必须通过把引用作为指针强制转换为void * 类型进行传递。如果没有传递参数,则使用 NULL。
pthread_create 创建线程成功时,函数返回 0,若返回值不为 0 则说明创建线程失败。
注意 pthread库不是Linux系统默认的库,编译时需要使用库libpthread.so,
在编译时要加 -lpthread 参数: gcc main.c -lpthread -o main,通用的动态库使用方法。
用gcc编译使用了POSIX thread的程序时通常需要加额外的选项,以便使用thread-safe的库及头文件从gcc 4.5.2版本开始已经没有了关于-lpthread的介绍了。
所以多线程编译应该尽量用-pthread,而不是-lpthread。
创建线程这里还会用到的几个系统函数:
pthread_t pthread_self(void)      //获取本线程的id
int pthread_equal(pthread_t thread1,pthread_t thread2)   //判断两个线程id是否指向同一个线程
int pthread_once(pthread_once_t * once_control,void(*init_routine)(void))
                              //once_control:0,1,2
                                //用来保证init_routine线程函数在进程中仅执行一次
                                //在多线程编程环境下,尽管pthread_once()调用会出现在多个线程中,
                                //init_routine()函数进执行一次,究竟在哪个线程中执行是不定的,是由内核调度来决定的
例:默认线程属性、无参数传递的线程并发编程实例
#include <stdio.h>
#include <pthread.h>
#define NUM_Threads 5

// 线程的运行函数
void *PrintHello(void *arg){
     pthread_t newthid;
     newthid = pthread_self();
     printf("this is a new thread,thread ID = %lu\n",newthid);
    return 0;   //结束
}

int main(){
    printf("main start!\n");
    printf("main thread,ID is %lu\n",pthread_self());  //pthread_self()获取本线程id。
    int i;
    int ret;
    // 定义线程的id变量,多个变量使用数组
    pthread_t tids[NUM_Threads];

    for (i=0; i<NUM_Threads; i++){
        // 参数依次是: 创建的线程id,线程参数,调用的函数,传入的函数参数
       ret = pthread_create(&tids[i], NULL, PrintHello, NULL);
       if (ret != 0){
          printf("pthread_create error: error_code = \n");
      }
    }
    sleep(2); //让主线程睡2秒,以便可以看到所有线程执行,不然的话,转瞬即逝,有可以一条线程都看不到
    printf("main end!\n");
    return 0;          //结束main方法
}
//编译执行,注意,要用到线程动态库,所以加 -pthread,我的centos7上,线程创建不了,暂没处理
gcc -pthread -g voidparamthread.c -o threa1.exe
./thread1
main start!
main thread,ID is 1
this is a new thread,thread ID = 2
this is a new thread,thread ID = 3
this is a new thread,thread ID = 4
this is a new thread,thread ID = 5
main end!
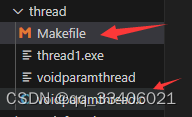
每次加-lpthread或-pthread,很麻烦,我们创建一个Makefile文件,写上如下代码,再编译:make c文件名,即可自动生成可执行文件
CC = gcc
CFLAGS = -pthread
编译执行

注意::::让主线程睡2秒,以便可以看到所有线程执行,不然的话,转瞬即逝,有可以一条线程都看不到,这个处理问题我们在后面讲的可联合线程退出中讲解,因为这里只做测试线程创建,所有的线程默认是可结合的
例:默认线程属性、简单参数传递的线程并发编程实例
// 基于线程的并发编程,向线程传递参数1
#include <sys/types.h>
#include <stdio.h>
#include <unistd.h>
#include <pthread.h>
#include <stdlib.h>
#define NUM_Threads 5

void * PrintHello(void *arg){
     //pthread_t newthid;
     //newthid = pthread_self();
     int newthid = *((int *)arg);
     printf("this is a new thread,thread ID = %d\n",newthid);
    return NULL;   //结束
}

int main(){
    printf("main start!\n");
    printf("main thread,ID is %lu\n",pthread_self());  //pthread_self()获取本线程id。
    int i;
    int ret;
    // 定义线程的id变量,多个变量使用数组
    pthread_t tids[NUM_Threads];
    //pthread_t tid;
    int j = 1000;
    for(i=0; i<NUM_Threads;i++){
        // 参数依次是: 创建的线程id,线程参数,调用的函数,传入的函数参数
       ret = pthread_create(&tids[i], NULL, PrintHello, &j);  //&tids[i]
       if (ret != 0){
          printf("pthread_create error: error_code = \n");
      }
    }
    sleep(2);                  //让主线程睡2秒,以便可以看到所有线程执行,不然的话,转瞬即逝,有可以一条线程都看不到
    printf("main end!\n");
    return 0;          //结束main方法
}
//编译执行,由于已启用了Makefile文件配置,所以用make来编译
root@ubuntu:/mnt/hgfs/workspaceC/thread# make paramthread
gcc -pthread    paramthread.c   -o paramthread
root@ubuntu:/mnt/hgfs/workspaceC/thread# ./paramthread

main start!
main thread,ID is 139742903514944
this is a new thread,thread ID = 1000
this is a new thread,thread ID = 1000
this is a new thread,thread ID = 1000
this is a new thread,thread ID = 1000
main end!
例:默认线程属性、结构体参数传递的线程并发编程实例
// 基于线程的并发编程,向线程传递参数2(传递结构体)
#include <sys/types.h>
#include <stdio.h>
#include <unistd.h>
#include <pthread.h>
#include <stdlib.h>
#define NUM_Threads 5
typedef struct thread_data{   //定义一数据类型thread_data,它以结构体为原型
      int threadno;
      char message;
}THDATA, *PTHDATA;             //THDATA,表示类型了,不是结体变量

void * PrintHello(void *arg){
     //pthread_t newthid;
     //newthid = pthread_self();     //系统分配的线程ID
     PTHDATA tid = (THDATA *)arg;
     printf("this is a new thread,thread ID = %d,message =%c \n",tid->threadno,tid->message);
    return 0;  //退出线程 ,不是返回值
}

int main(){
    printf("main start!\n");
    printf("main thread,ID is %lu\n",pthread_self());  //pthread_self()获取本线程id。
    int i;
    int ret;
    pthread_t tids[NUM_Threads];
    THDATA index[NUM_Threads];      //结构体数组
    for(i = 0; i< NUM_Threads; i++){
        index[i].threadno = i;
        index[i].message = 'A'+i;   //'A','B','C','D','E'
        ret =  pthread_create(&tids[i],NULL,PrintHello,&index[i]);
        if(ret !=0){
            printf("线程创建错误!\n");
        }

    }
    printf("main end!\n");
    return 0;
}

//编译执行   (虚拟机win+ubuntn共享文件夹中的程序执行)
troot@ubuntu:/mnt/hgfs/workspaceC/thread# ./structparam

main start!
main thread,ID is 140109424219968
this is a new thread,thread ID = 2,message =C
this is a new thread,thread ID = 4,message =E
this is a new thread,thread ID = 1,message =B
this is a new thread,thread ID = 0,message =A
main end!
例:我们想在多线程的情况下,让某些函数只执行一次,使用函数pthread_once的例子
#include <sys/types.h>
#include <stdio.h>
#include <unistd.h>
#include <pthread.h>
#include <stdlib.h>
#define NUM_Threads 5
pthread_once_t once = PTHREAD_ONCE_INIT;

void run(void){
    printf("每个线程里都调用的函数,当前调用的线程id:%lu\n",pthread_self());
}

void * thread1(void * arg){
    pthread_t thid = pthread_self();
    printf("thread1的id: %lu\n",thid);
    //保证run函数只被一条线程调用
    pthread_once(&once,run);  //调用run函数
    printf("thread1 over!\n");

}

void * thread2(void * arg){
    pthread_t thid = pthread_self();
    printf("thread2的id: %lu\n",thid);
    //保证run函数只被一条线程调用
    pthread_once(&once,run);  //调用run函数
    printf("thread2 over!\n");

}

int main(){
    printf("main start!\n");
    printf("主线程,ID is %lu\n",pthread_self());  //pthread_self()获取本线程id。
    //创建2条线程
    pthread_t thid1,thid2;
    pthread_create(&thid1,NULL,thread1,NULL);
    pthread_create(&thid2,NULL,thread2,NULL);

    printf("主线程 结束\n");
    return 0;
}
//编译执行
root@ubuntu:/mnt/hgfs/workspaceC/thread# ./pthreadonce

main start!
主线程,ID is 140130648434496

thread1的id: 140130648430336
每个线程里都调用的函数,当前调用的线程id:140130648430336

thread1 over!
thread2的id: 140130640037632
thread2 Over
主线程 结束
设置线程属性、无参数传递的线程并发编程
线程属性结构体
typedef struct __pthread_attr_s
{
    int __detachstate;
    int __schedpolicy;
    struct __sched_param __schedparam;
    int __inheritsched;
    int __scope;
    size_t __guardsize;
    int __stackaddr_set;
    void *__stackaddr;
    size_t __stacksize;
}pthread_attr_t;
初始化属性
使用pthread_attr_init()将对象属性初始化为其缺省值。
int pthread_attr_init(pthread_attr_t *tattr);
初始化后的主要属性的默认缺省值:

销毁属性
请使用pthread_attr_destroy() 删除初始化期间分配的存储空间。属性对象将会无效。
pthread_attr_destroy原型:
int pthread_attr_destroy(pthread_attr_t *tattr);
返回值
成功完成后将返回零。其他任何返回值都表示出现了错误。
例:完整的简单使用线程属性的例子,下面用的全是默认的属性值:
#include <pthread.h>
#include <stdio.h>
#include <pthread.h>
#include <stdlib.h>
#include <unistd.h>

void* printHello(void* arg) {
    printf("this is a new thread!\n");
    return 0;
}

int main() {
    printf("main start!\n");
    pthread_t thread_id;
    pthread_attr_t attr;
    int ret;

    //初始化线程属性
    ret = pthread_attr_init(&attr);
    if (ret != 0) {
        perror("pthread_attr_init error!");
    }

    //对属性进行读和改

    //用上面的线程属性创建线程
    ret = pthread_create(&thread_id, &attr, printHello, NULL);
    if (ret != 0) {
        perror("pthread_create error!");
    }

    //销毁线程属性
    ret = pthread_attr_destroy(&attr);
    if (ret != 0) {
        perror("pthread_attr_destroy error!");
    }

    sleep(2);
    printf("main end!\n");
    return 0;
}
分离状态和线程终止有关系,后面细讲。
获取和设置栈溢出保护区大小
pthread_attr_getguardsize() 可以获取attr 对象的guardsize。
pthread_attr_getguardsize语法
#include <pthread.h>
int pthread_attr_getguardsize(const pthread_attr_t *attr, size_t *guardsize);
pthread_attr_setguardsize(),可以设置attr 对象的guardsize(栈保护区),这对嵌入式开发相当重要。系统可为每个线程分配栈内存,默认大约4kb.
pthread_attr_setguardsize()原型:
#include <pthread.h>
int pthread_attr_setguardsize(pthread_attr_t *attr, size_t guardsize);
返回值
成功完成后将返回零。其他任何返回值都表示出现了错误。
例子1:
#include <pthread.h>
#include <stdio.h>
#include <pthread.h>
#include <stdlib.h>
#include <unistd.h>

void* printHello(void* arg) {
    printf("this is a new thread!\n");
    return 0;
}

int main() {
    printf("main start!\n");
    pthread_t thread_id;
    pthread_attr_t attr;                       //attr 线程属性指针
    int ret;

    //初始化线程属性
    ret = pthread_attr_init(&attr);
    if (ret != 0) {
        perror("pthread_attr_init error!");
    }

    //对属性进行读和改
     size_t guardsize;                                    //保护区大小变量,系统已定义好了默认值
     ret = pthread_attr_getguardsize(&attr,&guardsize);   //获取保护区大小值,这里是默认值
     if(ret !=0){
        printf("线程属性getguardsize错误!\n");
        exit(1);
     }
     printf("获得的栈保护区guardsize默认大小: %lu\n",guardsize);

     ret = pthread_attr_setguardsize(&attr,0);    //设置栈保护区大小,这里是去掉保护区
     if(ret !=0){
        printf("线程属性setguardsize错误!\n");
        exit(1);
     }
     ret = pthread_attr_getguardsize(&attr,&guardsize);   //获取保护区大小值
     if(ret !=0){
        printf("线程属性getguardsize错误!\n");
        exit(1);
     }
     printf("获得的栈保护区guardsize去掉的大小: %lu\n",guardsize);

    //用上面的线程属性创建线程
    ret = pthread_create(&thread_id, &attr, printHello, NULL);
    if (ret != 0) {
        perror("pthread_create error!\n");
        exit(1);
    }

    //销毁线程属性
    ret = pthread_attr_destroy(&attr);
    if (ret != 0) {
        perror("pthread_attr_destroy error!");
        exit(1);
    }

    sleep(2);
    printf("main end!\n");
    return 0;
}
//编译执行,由于用了Makefile文件,所以我们只要make 文件名即可,文件名是c文件的名字,不包括扩展名
root@ubuntu:/mnt/hgfs/workspaceC/thread# make threadattrgetset

    gcc -pthread    threadattrgetset.c   -o threadattrgetset

root@ubuntu:/mnt/hgfs/workspaceC/thread# ./threadattrgetset

  main start!
  获得的栈保护区guardsize默认大小: 4096
  获得的栈保护区guardsize去掉的大小: 0
  this is a new thread!
  main end!
获取和设置范围
请使用pthread_attr_getscope()检索线程范围。
pthread_attr_getscope 语法
int pthread_attr_getscope(pthread_attr_t *tattr, int *scope);
使用pthread_attr_setscope()建立线程的争用范围:
pthread_attr_setscope语法
int pthread_attr_setscope(pthread_attr_t *tattr,int scope);
scope值为PTHREAD_SCOPE_SYSTEM时,表示与系统中所有线程一起竞争CPU时间。
scope值为PTHREAD_SCOPE_PROCESS 时,表示仅与同进程中的线程竞争CPU时间。
注意:目前Linux只实现了PTHREAD_SCOPE_SYSTEM!
例子1:
//2.线程竞争范围的获取与设置
     int scope;
     ret = pthread_attr_getscope(&attr,&scope);
     if(ret !=0){
        printf("线程属性getscope错误!\n");
        exit(1);
     }
    printf("getscope默认: %d\n",scope);   //0对应 PTHREAD_SCOPE_SYSTEM,表示与系统中所有线程 一起竞争CPU时间,
例子2:修改范围 ,LINUX中会出错,因为只有一个值
#include <pthread.h>
pthread_attr_t tattr;
int ret;
/* bound thread */
ret = pthread_attr_setscope(&tattr, PTHREAD_SCOPE_SYSTEM);
/* unbound thread */
ret = pthread_attr_setscope(&tattr, PTHREAD_SCOPE_PROCESS);  //报错
获取和设置线程并行级别
pthread_getconcurrency()返回先前调用pthread_setconcurrency()时设置的值。
pthread_getconcurrency语法
#include <pthread.h>
int pthread_getconcurrency(void);
pthread_setconcurrency语法
#include <pthread.h>
int pthread_setconcurrency(int new_level);
获取和设置调度策略和调度优先级
pthread_attr_getschedpolicy()检索调度策略。
pthread_attr_getschedpolicy语法
int pthread_attr_getschedpolicy(pthread_attr_t *tattr, int *policy);
pthread_attr_getschedparam()将返回pthread_attr_setschedparam()定义的调度优参数。
pthread_attr_getschedparam语法
int pthread_attr_getschedparam(pthread_attr_t *tattr,const struct sched_param *param);
struct sched_param {
    int sched_priority;     /* Scheduling priority */
};
pthread_attr_setschedpolicy()设置调度策略。
pthread_attr_setschedpolicy() 语法
int pthread_attr_setschedpolicy(pthread_attr_t *tattr, int policy);
POSIX 标准指定SCHED_FIFO、SCHED_RR或SCHED_OTHER的调度策略属性。
pthread_attr_setschedparam() 可以设置调度参数。
pthread_attr_setschedparam 语法
int pthread_attr_setschedparam(pthread_attr_t *tattr,const struct sched_param *param);
例子:获取默认调度策略
 //3.调度策略
    int policy;
    ret = pthread_attr_getschedpolicy(&attr,&policy);
    if(ret !=0){
        printf("pthread _attr_getschedpolicy error!\n");
        exit(1);
    }
    printf("默认的policy: %d\n",policy);
设置策略后,再获取
ret = pthread_attr_setschedpolicy(&attr,SCHED_FIFO);
if (ret != 0) {
    printf("pthread_attr_getschedpolicy error!\n");
    exit(1);
}

ret = pthread_attr_getschedpolicy(&attr,&policy);
if (ret != 0) {
    printf("pthread_attr_gdetschedpolicy error!\n");
    exit(1);
}
printf("修改后policy:%d,FIFO:%d,RR:%d,OTHER:%d\n",policy,SCHED_FIFO,SCHED_RR,SCHED_OTHER);
例:调度优先级获取与设置,设置优先级,在unbuntu上发生设置错误 。暂不知原因。
struct sched_param param;
ret = pthread_attr_getschedparam(&attr,¶m);
if(ret !=0){
printf("pthread _attr_getschedparam error!\n");
exit(1);
}
printf("默认做优先级: %d\n",param.sched_priority);
//修改优先级
param.sched_priority = 10; //修改
ret = pthread_attr_setschedparam(&attr , ¶m);
if(ret!=0){
printf("pthread _attr_setschedparam error!\n");
exit(1);
}
ret = pthread_attr_getschedparam(&attr, ¶m);
if(ret != 0){
printf("pthread _attr_getschedparam error!\n");
exit(1);
}
printf("修改后的调度优先级: %d\n",param.sched_priority);
有关调度策略和优先级的机制:
系统中的每个线程都关联了一个调度策略和优先级,调度器正是根据调度策略和优先级进行线程调度的,从而决定哪个线程将在下一个调度中得到CPU时间;
对于普通调度策略SCHED_OTHER,没有优先级概念,实际上必须是0
对于实时调度策略(SCHED_FIFO, SCHED_RR),优先级需要设置为1(最小)–99(最大)中的某个值;
调度器为每个优先级维护了一个待调度线程的列表,当需要进行调度时,
调度器访问最高优先级的非空的列表,然后从列表头选择一个线程调度运行;
所有的调度都是支持抢占的,如果有高优先级的线程准备好运行了,那么它将抢占当前运行的线程,这使得当前线程被重新加入到等待调度的列表中;
线程的调度策略决定了一个可调度线程应该放在哪个列表的哪个位置;
调度策略决定了在同一个优先级列表中的可调度线程的顺序;
SCHED_FIFO:先进先出调度
SCHED_FIFO线程的优先级必须大于0,当它运行时,一定会抢占正在运行的普通策略的线程(SCHED_OTHER);
SCHED_FIFO策略是没有时间片的算法,需要遵循以下规则:
-
如果一个SCHED_FIFO线程被高优先级线程抢占了,那么它将会被添加到该优先级等待列表的首部,
以便当所有高优先级的线程阻塞的时候得到继续运行;策略中没有CUP时间片的问题。
SCHED_FIFO会一直运行直到运行完毕,或者它被IO请求阻塞,或者被更高优先级的线程抢占。 -
当一个阻塞的SCHED_FIFO线程变为可运行时,它将被加入到同优先级列表的尾部;
-
如果通过系统调用改变线程的优先级,则根据不同情况有不同的处理方式:
a)如果优先级提高了,那么线程会被添加到所对应新优先级的尾部;
b)如果优先级没变,那么线程在列表中的位置不变;
c)如果优先级降低了,那么它将被加入到新优先级列表的首部; -
如果线程调用了sched_yield(),那么它将被加入到列表的尾部;
SCHED_RR:轮转调度
SCHED_RR是SCHED_FIFO的简单增强,对于SCHED_FIFO适用的规则对于SCHED_RR同样适用;
如果SCHED_RR线程的运行时间大于等于时间总量,那么它将被加入到对应优先级列表的尾部;
如果SCHED_RR线程被抢占了,当它继续运行时它只运行剩余的时间量;
FIFO和RR区别
SCHED_FIFO,对同样优先级的任务,是让一个任务运行完再调度下一个任务。
SCHED_RR,对同样优先级的任务,分配给每一个任务一个特定的时间片,然后轮转依次运行。
SCHED_OTHER:默认Linux时间共享调度
SCHED_OTHER只能用于优先级为0的线程,
调度器通过动态优先级来决定调用哪个SCHED_OTHER线程,动态优先级是基于nice值的,
nice值随着等待运行但是未被调度执行的时间总量的增长而增加;这样的机制保证了所有SCHED_OTHER线程调度的公平性;
例子,线程不好演示,我们用实时进程来演示,绑定到同一个核上,不然我实验环境是(vm上设置了)4个核,看不出效果:
//threadsched.c文件
#include <stdio.h>
#include <stdlib.h>
#include <unistd.h>
#define __USE_GNU
#include <pthread.h>
#include <sched.h>
void test_func(){ //耗时的函数,以便看到效果
unsigned long long res =0;
int i=0;
for(i=0;i<8000;i++){
res+=2;
}
}
int main(int argc,char * argv[]){ //argc是我们运行主函数时搞了几个参数,默认参argv[0]为本程序所在的路径
if(argc !=3){ // ./threadsched 1 99 ,执行命令时也是一个参数,再1 和99,总共三个参数
perror("要三个参数运行这个程序!\n"); // 打印错误信息到屏
return -1; //或exit(1);退出主线程
}
//把进程绑定到一个cpu上
cpu_set_t mask; //表示一组cpu,默认情况下,我设置了4核,即4个cpu
CPU_ZERO(&mask); //使得mask里不有一个cpu,清0,它们编号是从 1,2,3...编号的
CPU_SET(1,&mask); //绑定一个cpu
if(sched_setaffinity(0,sizeof(mask),&mask) == -1){ //0表示当前运行的进程,即把进程绑定到1号cpu上,
perror("sched_setaffinity error!\n");
}
struct sched_param param; //调度参数,里边有优先级
int ret =0;
int sched_method = atoi(argv[1]); //获取到第二个参数,是调度策略,0,other,1,FIFO,2,RR
int priority = atoi(argv[2]); //获取第三个参数,拿到优先级 1-99
param.sched_priority = priority;
//和我们前面使用线程属性有一点点区别,这里我们是进程,但逻辑道理和线程是一致的。
if(sched_setscheduler(getpid(),sched_method,¶m) == -1){ //这个函数,要用root来运行
perror("sched_setscheduler error!\n");
}
printf("当前进程正在运行.....pid:%d,策略:%d,调度优先级: %d\n",getpid(),sched_method,priority);
//有输出后,立马,让当前线程,休眼2秒,给其进程机会,不然其它进程没机会运行,因为cpu运行很快
sleep(2);
int i=0;
for(i=0; i<300000;i++){ //这里没有任意义的,只是耗时间,看进程调度效果的
test_func();
}
printf("当前进程正在结束.....pid:%d,策略:%d,调度优先级: %d\n",getpid(),sched_method,priority);
return 0;
}
//编译
gcc -g -pthread threadsched.c -o threadsched
编写一个run.sh文件,&表示在后台运行,每一个./threadsched表示一个进程
#/bin/sh
./threadsched 0 0 &
sleep 0.7;
./threadsched 1 70 &
sleep 0.7;
./threadsched 1 99 &
sleep 0.7;
./threadsched 1 70 &
sleep 0.7;
./threadsched 1 50 &
sleep 0.7;
./threadsched 1 30 &
sleep 0.7;
./threadsched 1 10 &
从下图中可以看出,优先级最高的会抢资源,也最先结束,最后结束的是优先级低的。

对于FIFO而言,一旦sleep过后:
高优先级运行,低优先级是没戏运行的,
同等优先级的进程,先运行的不运行完,后运行的也没戏。
对于RR而言,
在高优先级的先运行的基础上,
同等优先级的进程过家家,你玩一会儿,我玩一会儿,我玩完你再一会儿,每个进程耗费一个时间片的时间。
对于Linux,RR时间片是100ms
获取和设置继承的调度策略
pthread_attr_getinheritsched()将返回由pthread_attr_setinheritsched()设置的调度策略。
pthread_attr_getinheritsched语法
int pthread_attr_getinheritsched(pthread_attr_t *tattr, int *inherit);
pthread_attr_setinheritsched() 设置继承的调度策略。
pthread_attr_setinheritsched语法
int pthread_attr_setinheritsched(pthread_attr_t *tattr, int inherit);
inherit 值PTHREAD_INHERIT_SCHED 表示新建的线程将继承创建者线程中定义的调度策略。
将忽略在pthread_create() 调用中定义的所有调度属性。
如果使用PTHREAD_EXPLICIT_SCHED,则将使用pthread_create() 调用中的属性。
默认值,看实验和生产环境的结果,最靠谱!
#include <pthread.h>
#include <stdio.h>
#include <pthread.h>
#include <stdlib.h>
#include <unistd.h>

void* printHello(void* arg) {
    printf("this is a new thread!\n");
    return 0;
}

int main() {
    printf("main start!\n");
    pthread_t thread_id;
    pthread_attr_t attr;                       //attr 线程属性指针
    int ret;

    //初始化线程属性
    ret = pthread_attr_init(&attr);
    if (ret != 0) {
        perror("pthread_attr_init error!");
    }

     int isinherit;
    ret = pthread_attr_getinheritsched(&attr,&isinherit);
    if(ret !=0){
        printf("pthread_attr_getinheritsched error!\n");
        exit(1);
    }
    printf("线程继承属性默认值为:%d ,PTHREAD_INHERIT_SCHED:%d,PTHREAD_EXPLICIT_SCHED: %d\n",isinherit,PTHREAD_INHERIT_SCHED,PTHREAD_EXPLICIT_SCHED);
       //默认值为0,即为PTHREAD_INHERIT_SCHED常量
    ret = pthread_attr_setinheritsched(&attr,PTHREAD_EXPLICIT_SCHED); //设置线程继承属性值,
    if(ret!=0){
        printf("ptherad_inherit_setinheritsched error!\n");
        exit(1);
    }
    ret = pthread_attr_getinheritsched(&attr,&isinherit);
    if(ret !=0){
        printf("pthread_attr_getinheritsched error!\n");
        exit(1);
    }
    printf("线程继承属性修改后的值为:%d ,PTHREAD_INHERIT_SCHED:%d,PTHREAD_EXPLICIT_SCHED: %d\n",isinherit,PTHREAD_INHERIT_SCHED,PTHREAD_EXPLICIT_SCHED);

    //用上面的线程属性创建线程
    ret = pthread_create(&thread_id, &attr, printHello, NULL);
    if (ret != 0) {
        perror("pthread_create error!\n");
        exit(1);
    }


    //销毁线程属性
    ret = pthread_attr_destroy(&attr);
    if (ret != 0) {
        perror("pthread_attr_destroy error!");
        exit(1);
    }

    sleep(2);
    printf("main end!\n");
    return 0;
}
//编译执行
获取和设置栈大小
pthread_attr_getstacksize()将返回由pthread_attr_setstacksize() 设置的栈大小。
pthread_attr_getstacksize 语法
int pthread_attr_getstacksize(pthread_attr_t *tattr,size_t *size);
pthread_create()创建线程时,若不指定分配堆栈大小,系统会分配默认值,通过命令查看方法如下:
ulimit -s
8896
上面的单位为 Kb,所以,线程默认堆栈大小为 8M。
也可以在终端下通过 ulimit -s value 用来重新设置 stack 大小。
先看获取栈大小的例子:
#include <stdio.h>
#include <stdlib.h>
#include <pthread.h>//线程操作所需头文件

int main(void)
{
	size_t stack_size = 0; //堆栈大小变量
	pthread_attr_t attr; //线程属性结构体变量

	//初始化线程属性
	int ret = pthread_attr_init(&attr);
	if(ret != 0)
	{
		perror("pthread_attr_init");
		return -1;
	}

	//获取当前的线程栈大小
    ret = pthread_attr_getstacksize(&attr, &stack_size);
    if(ret != 0)
	{
		perror("pthread_attr_getstacksize");
		return -1;
	}

	//打印堆栈值
	printf("stack_size = %dB, %dk\n", stack_size, stack_size/1024);
   return 0;
}
一般来说,默认堆栈大小为 8388608, 单位为字节。
但在某些嵌入式系统中,如果其内存不是很大,若采用默认值的话,
会导致出现问题,若内存不足,则 pthread_create() 会返回 12,创建线程失败!
pthread_attr_setstacksize()可以设置线程栈大小。
pthread_attr_setstacksize 语法
int pthread_attr_setstacksize(pthread_attr_t *tattr, size_t size);
#include <pthread.h>
pthread_attr_t tattr;
size_t size;
int ret;
size = (PTHREAD_STACK_MIN + 0x4000);   //#include <limits.h>

/* setting a new size */
ret = pthread_attr_setstacksize(&tattr, size);
stacksize 属性定义系统分配的栈大小(以字节为单位)。
size 不应小于系统定义的最小栈大小size。
如果size 为零,则使用缺省大小。
PTHREAD_STACK_MIN 是启动线程所需的栈空间量。
此栈空间没有考虑执行应用程序代码所需的线程程序的要求。
获取和设置栈地址
pthread_attr_setstack() 可以设置线程栈地址和大小。
pthread_attr_setstack() 语法
int pthread_attr_setstack(pthread_attr_t *tattr,void *stackaddr,size_t stacksize);
如果将stackaddr设置为非空值,而不是缺省的NULL,则系统将在该地址初始化栈,假设大小为stacksize。
例子:
#include <pthread.h>
#include <stdio.h>
#include <stdlib.h>
#include <unistd.h>
#include <limits.h>

void* printHello(void* arg) {
    printf("this is a new thread!\n");
    return 0;
}

int main() {
    printf("main start!\n");
    pthread_t thread_id;
    pthread_attr_t attr;                       //attr 线程属性指针
    int ret;

    //初始化线程属性
    ret = pthread_attr_init(&attr);
    if (ret != 0) {
        perror("pthread_attr_init error!");
    }

    //对属性进行读和改


        //7.设置栈地址及大小
    void * base;
    size_t stack_size = 16000 + 0x4000;
    base = (void *)malloc(16000+ 0x4000);  //MIN 是线程最小的栈空间,16kb
    ret = pthread_attr_setstack(&attr,base,stack_size);
    if(ret!=0){
        perror("pthread_attr_setstack error!\n");
    }
    ret = pthread_attr_getstack(&attr,&base,&stack_size);
    if(ret!=0){
        perror("获取线程栈地址失败!\n");
    }
    printf("栈地址:%p,栈内存大小: %ld\n",base,stack_size);

    //用上面的线程属性创建线程
    ret = pthread_create(&thread_id, &attr, printHello, NULL);
    if (ret != 0) {
        perror("pthread_create error!\n");
    }


    //销毁线程属性
    ret = pthread_attr_destroy(&attr);
    if (ret != 0) {
        perror("pthread_attr_destroy error!");
        exit(1);
    }

    sleep(2);
    printf("main end!\n");
    return 0;
}
//编译执行
root@ubuntu:/mnt/hgfs/workspaceC/thread# make threadattrgetset
gcc -pthread    threadattrgetset.c   -o threadattrgetset
root@ubuntu:/mnt/hgfs/workspaceC/thread# ./threadattrgetset
main start!
栈地址:0x5615bcd436b0,栈内存大小: 32384
this is a new thread!
main end!
stackaddr 属性定义线程栈的基准(低位地址)。
stacksize 属性指定栈的大小。
三、线程的终止和资源回收
线程退出有多种方式,如return,pthread_exit(),pthread_cancel()等;
线程分为可结合的(joinable)和 分离的(detached)两种,不同状态的线程回收资源方式不同。
如果没有在创建线程时设置线程的属性PTHREAD_CREATE_DETACHED,
则线程默认是可结合的PTHREAD_CREATE_JOINABLE。可结合的线程在线程退出后不会立即释放资源,必须要调用pthread_join来显式的结束线程,收回资源。
分离的线程在线程退出时系统会自动回收资源。
1、设置分离线程的几种方法:
1)在创建线程时加上线程属性
int pthread_attr_setdetachstate(pthread_attr_t *attr, int detachstate);
//获取状态 int pthread_attr_getdetachstate(const pthread_attr_t *attr, int *detachstate);
pthread_attr_t attr;
pthread_t thread;
pthread_attr_init(&attr);
/* 设置线程的属性为分离的 */
pthread_attr_setdetachstate(&attr, PTHREAD_CREATE_DETACHED);
pthread_create(&thread, &attr, thread_function, NULL);
/* 不用线程属性后,销毁 */
pthread_attr_destroy(&attr);
2)在线程中(如线程运行的函数中写也可)调用pthread_detach(pthread_self());
//上面的设置获取线程属性的例子中,创建的线程运行方法中写上
void* printHello(void* arg) {
    printf("this is a new thread!\n");
    pthread_detach(pthread_self());  //此处
    return;
}
3)主线程中调用pthread_detach(pid),pid为子线程的线程号
//创建子线程后,在主线程中写上
if(thread_id>0){  //pid>0的是主线程,子线程都等于0
   pthread_detach(pthread_id);
}
要注意的是,设置为分离的线程是不能调用pthread_join函数的,调用后会出错。
2、可结合的线程的几种退出方式
1)子线程使用return退出,主线程中使用pthread_join回收线程资源
2)子线程使用pthread_exit退出,主线程中使用pthread_join接收pthread_exit的返回值,并回收线程资源
3)主线程中调用pthread_cancel,然后调用pthread_join回收线程资源
int pthread_join(pthread_t threadid,void **retval)
首先来个例子,理解一下pthread_join阻塞父线程,让子线程都可一个不落下的创建,前面讲线程中最开始创建5个线程时,我们用了sleep(2)让主线程沉睡2秒,等所有子线程创建,这个方法是很不好的,会耗费大量时间的,这里我们只在如下代码中加 pthread_join(thid,NULL);阻塞主线程,让子线程执行完
#include <pthread.h>
#include <stdio.h>
#include <stdlib.h>
#include <unistd.h>
void *thread1(void *arg){
    printf("我是一个新建的子线程!\n");
    return NULL;
}
int main(){
    printf("main start!\n");
    printf("main thread,ID is %lu\n",pthread_self());  //pthread_self()获取本线程id。
    int i;
    pthread_t thid;
    int ret;
    ret = pthread_create(&thid,NULL,thread1,NULL);  //创建子线程,线程指针,运行函数,函数的参数
    if(ret!=0){
        printf("创建子线程错误!\n");
        exit(1);
    }

    pthread_join(thid,NULL);//阻塞主线程,等待子线程结束完后,才放开阻塞

    printf("main end!\n");
    return 0;
}
//编译执行
root@ubuntu:/mnt/hgfs/workspaceC/thread# make join_exit
gcc -pthread    join_exit.c   -o join_exit
root@ubuntu:/mnt/hgfs/workspaceC/thread# ./join_exit

main start!
main thread,ID is 140580984215360
我是一个新建的子线程!
main end!
第 1)和2)的例子:
全局变量来传
返回字符串
#include <pthread.h>
#include <stdio.h>
#include <stdlib.h>
#include <unistd.h>
char * s;
void *thread1(void *arg){  //这里的void不是指无的意思,是没有确定数据类型的意思
    printf("我是一个新建的子线程!\n");
    s="用全局变量返回字符串!";
    return (void *)s;
}
int main(){
    printf("main thread start!\n");
    int i;
    pthread_t thid;
    void *a;                 //一级指针,等下pthread_join要用二级指针传递的
    int ret;
    ret = pthread_create(&thid,NULL,thread1,NULL);  //创建子线程,线程指针,运行函数,函数的参数
    if(ret!=0){
        printf("创建子线程错误!\n");
        exit(1);
    }

    pthread_join(thid,&a);      //阻塞主线程,等待子线程结束完后,才放开阻塞
    printf("%s\n",(char *)a);

    printf("main thread end!\n");
    return 0;
}
返回整型
#include <pthread.h>
#include <stdio.h>
#include <stdlib.h>
#include <unistd.h>
//char * s;
int i;
void *thread1(void *arg){  //这里的void不是指无的意思,是没有确定数据类型的意思
    printf("我是一个新建的子线程!\n");

    //s="用全局变量返回字符串!";
    i=123;

    //return (void *)s;
    return (void *)&i;
}
int main(){
    printf("main thread start!\n");
    int i;
    pthread_t thid;
    void *a;                 //一级指针,等下pthread_join要用二级指针传递的
    int ret;
    ret = pthread_create(&thid,NULL,thread1,NULL);  //创建子线程,线程指针,运行函数,函数的参数
    if(ret!=0){
        printf("创建子线程错误!\n");
        exit(1);
    }
    //原型:int pthread_join(pthread_t threadid,void **retval);
    pthread_join(thid,&a);      //阻塞主线程,等待子线程结束完后,才放开阻塞
    //printf("%s\n",(char *)a);
    printf("%d\n",*(int *)a);
    printf("main thread end!\n");
    return 0;
}
pthread_exit((void *)&i);===return (void *)&i;
通过malloc分配变量进行传递
//不用定义全局变量int i
void *thread1(void * arg) {
    int *i = malloc(sizeof(int));  //在堆内存区中分配了一个int型区,相当于全局变量
    *i= 123;
    printf("This is a pthread1.%d\n",*i);
    pthread_exit((void *)i);  //结束线程,返回一个值。
}
第 3)例子:
关联函数:
int pthread_cancel(pthread_t thread)
发送终止信号给thread线程,如果成功则返回0,否则为非0值。发送成功并不意味着thread会终止。
线程会怎么终止,还有具体的细节逻辑。
int pthread_setcancelstate(int state, int *oldstate)
设置本线程对Cancel信号的反应,state有两种值:
PTHREAD_CANCEL_ENABLE(缺省)和PTHREAD_CANCEL_DISABLE,
int pthread_setcanceltype(int type, int *oldtype)
设置本线程取消动作的执行时机,type由两种取值:
PTHREAD_CANCEL_DEFERRED和PTHREAD_CANCEL_ASYCHRONOUS,
仅当Cancel状态为Enable时有效,分别表示收到信号后继续运行至下一个取消点再退出和立即执行取消动作(退出);
void pthread_testcancel(void)
需要取消点的地方创建一个取消点,
pthread标准不止这一个设置取消点的方法,调用某些标准库函数,也有创建取消点的效果。
#include <pthread.h>
#include <stdio.h>
#include <stdlib.h>
#include <unistd.h>
void *thread1(void *arg){
   pthread_setcancelstate(PTHREAD_CANCEL_ENABLE,NULL);   //默认的也可不写
   pthread_setcanceltype(PTHREAD_CANCEL_DEFERRED,NULL); //默认的,不马上结束线程,到下一个取肖点的时候再结束
   long long i=0;
   while(1){    //死循环,永不结束,如果主线程不发送取消信号和子线程中没有取消点,则程序运行不会结束
    i++;
    pthread_testcancel();    //创建一个取消点  或下行代码,即标准输入输出也会创建取消点
    //printf("i:%lld\n",i);
   }
}

int main(){
    pthread_t thid;    //线程id
    void *a;
    int ret;
    ret = pthread_create(&thid,NULL,thread1,NULL);
    if(ret!=0){
        printf("pthread_create error!\n");
        exit(1);
    }
    sleep(2);    //模拟主线程运行其它线程,2秒后,需要结束子线程,
    pthread_cancel(thid);   //这个函数只是给子线程发送一个cancel信号
    pthread_join(thid,NULL);

    return 0;
}
注意两种特殊情况:
1、在主线程中,如果从main函数返回或是调用了exit函数退出主线程,则整个进程将终止,
此时进程中所有线程也将终止,因此在主线程中不能过早地从main函数返回。
2、如果主线程调用pthread_exit函数,则仅仅是主线程消亡,进程不会结束,
进程内的其他线程也不会终止,直到所有线程结束,进程才会结束。
线程终止,挂钩子函数,可以手动做一些资源释放的动作:
当线程要使用临界资源时需提出申请,如果该资源未被使用,则申请成功,否则等待。
临界资源被一个线程所独占,当一个线程终止时,如果不释放其占有的临界资源,则该资源会被认为还被已退出的线程所使用,因而永远不会得到释放。
如果一个线程在等待使用这个临界资源,它就有可能无限的等下去,这就形成了死锁。
为此,系统提供了一些函数,用于手动释放资源,避免死锁,
手段是监听从pthread_cleanup_push()的调用点到pthread_cleanup_pop()的调用点之间的程序段中的终止动作(如调用pthread_exit),这种终止线程的动作会触发pthread_cleanu_push()所注册的钩子函数,在钩子函数中可以手动释放临界资源。
临界资源
虽然多个线程可以共享同一个进程中的各种资源,但其中许多资源一次只能为一个线程所使用,我们把一次仅允许一个线程使用的资源称为临界资源。许多物理设备都属于临界资源,如打印机等。
pthread_cleanup_push()/pthread_cleanup_pop()是以宏方式实现的:
void pthread_cleanup_push(void (*routine) (void  *),  void *arg)
void pthread_cleanup_pop(int execute)  //execute参数0或者非0值,非0:弹栈执行,0:弹栈不执行钩子函数
这是pthread.h中的宏定义:
#define pthread_cleanup_push(routine,arg)
  { struct _pthread_cleanup_buffer _buffer;
    _pthread_cleanup_push (&_buffer, (routine), (arg));
#define pthread_cleanup_pop(execute)
    _pthread_cleanup_pop (&_buffer, (execute)); }
pthread_cleanup_push()带有一个"{",而pthread_cleanup_pop()带有一个"}",
因此这两个函数必须成对出现,且必须位于程序的同一级别的代码段中才能通过编译。
有三种情况线程清理函数会被调用:
线程还未执行 pthread_cleanup_pop 前,被 pthread_cancel 取消
线程还未执行 pthread_cleanup_pop 前,主动执行 pthread_exit 终止
线程执行 pthread_cleanup_pop,且 pthread_cleanup_pop 的参数不为 0.
注意:如果线程还未执行 pthread_cleanup_pop 前通过 return 返回,是不会执行清理函数的。
#include <pthread.h>
#include <stdio.h>
#include <stdlib.h>
#include <unistd.h>
//定义一个钩子函数
void *cleanup(void *p){
    free(p);
    printf("在钩子函数里清理了资源!\n");
}
void *thread1(void *arg){
   //只等线程结束后被调用的钩子函数,回收一下临界资源
   void *p = malloc(20);
   pthread_cleanup_push(cleanup,p);  //可注册多个钩子函数,这里只一个

   printf("push注册了钩子函数!\n");
   sleep(1);   //模拟线程干了一些业务逻辑的事情
   printf("事儿干完了,准备结束线程\n");
   pthread_exit(NULL);
   pthread_cleanup_pop(1);
}

int main(){
    pthread_t thid;
    int ret;
    ret = pthread_create(&thid,NULL,thread1,NULL);
    if(ret !=0){
        printf("pthread_create error!\n");
        exit(1);
    }
    pthread_join(thid,NULL);
    pthread_exit(0);         //可用return 0,这里我们测试,因线程还未执行 pthread_cleanup_pop 前,主动执行 pthread_exit 终止,会调用钩子函数来清理线程

}
//编译执行
[root@localhost thread]# make cleanup
gcc -pthread    cleanup.c   -o cleanup
[root@localhost thread]# ./cleanup

push注册了钩子函数!
事儿干完了,准备结束线程
在钩子函数里清理了资源!
注意:在子线程中如果申请了单独的堆空间,不应用free直接清理;
因为假如在线程中直接free,在free之后线程被取消,清理函数被执行,则会出现重复free的情况。
四、线程同步
新建的线程和进程中已经存在的线程是异步的,在执行的层面上,各执行各的,但这些线程共享同一个进程所拥有的公共资源,比如多个线程都使用到同一个变量时,就会产生竞争。
从而导致一些异常或我们意料之外或我们无法确定的情况发生,这种情况我们叫线程安全问题。
多个线程资源竞争演示
#include <pthread.h>
#include <stdio.h>
#include <stdlib.h>
#include <unistd.h>
int count = 0;   //全局变量,在多线程的环境下,多线程共享的资源

void * doit(void *arg){
    int val =0;
    int i;
    for(i=0;i<5;i++){
        val = count;
        printf("val=%d\n",++val);
        printf("thid:%lu\n",pthread_self());
        count = val;
    }
}

int main(){
    pthread_t thid1,thid2;
    //创建两条线程
    pthread_create(&thid1,NULL,doit,NULL);
    pthread_create(&thid2,NULL,doit,NULL);

    //等特子线程结束,收回资源,同时阻塞主线程,让其等它们执行完
    pthread_join(thid1,NULL);
    pthread_join(thid2,NULL);

    return 0;    //退出主线程

}
[root@localhost synchronous]# ./yuchang
val=1
thid:139795820672768
val=2
thid:139795829065472
val=2
thid:139795820672768
val=3
thid:139795829065472
val=4
thid:139795820672768
val=5
thid:139795829065472
val=6
thid:139795820672768
val=7
thid:139795829065472
val=8
thid:139795820672768
val=9
thid:139795829065472
上面的这种现象就是线程安全问题,结果我们无法确定,无法预测我们写程序的执行结果,这种问题,在很多场景下,我们是要解决的!
注意:在centos 7中看不到效果,在windows下看到乱的效果,也不知为什么,是不是centos 7中实现了同步机制。
Linux下提供了多种方式来处理线程安全问题,最常用的是互斥锁、条件变量、信号量和读写锁。
用这些方式解决线程安全问题我们就叫线程同步。
1、互斥锁(mutex)
锁机制是同一时刻只允许一个线程执行一个关键部分的代码。
关联函数说明:
1) 初始化锁
int pthread_mutex_init(pthread_mutex_t *mutex,const pthread_mutex_attr_t *mutexattr);
//attr:设置互斥量的属性,通常可采用默认属性,即可将 attr 设为 NULL
//静态初始化,放在全局变量的位置
pthread_mutex_t fastmutex = PTHREAD_MUTEX_INITIALIZER;
2) 阻塞加锁
int pthread_mutex_lock(pthread_mutex *mutex);
3 ) 非阻塞加锁
int pthread_mutex_trylock(pthread_mutex_t *mutex);
该函数语义与 pthread_mutex_lock() 类似,不同的是在锁已经被占据时返回 EBUSY 而不是挂起等待。
4 ) 解锁(要求锁是lock状态,并且由加锁线程解锁)
int pthread_mutex_unlock(pthread_mutex *mutex);
5)销毁锁(此时锁必需unlock状态,否则返回EBUSY)
int pthread_mutex_destroy(pthread_mutex *mutex);
示例代码:
#include <pthread.h>
#include <stdio.h>
#include <stdlib.h>
#include <unistd.h>
int count = 0;   //全局变量,在多线程的环境下,多线程共享的资源
pthread_mutex_t mutex = PTHREAD_MUTEX_INITIALIZER;   //定义锁

void * doit(void *arg){
    int val =0;
    int i=0;
    for(i=0;i<5;i++){
        pthread_mutex_lock(&mutex);                   //给线程加锁
        val = count;
        printf("val=%d\n",++val);
        printf("thid:%lu\n",pthread_self());
        count = val;
        pthread_mutex_unlock(&mutex);                 //解锁,让其它线程去执行
        sleep(0.3);
    }
    pthread_exit(NULL);    //退出线程
}

int main(){
    pthread_t thid1,thid2;
    //创建两条线程
    pthread_create(&thid1,NULL,doit,NULL);
    pthread_create(&thid2,NULL,doit,NULL);

    //等特子线程结束,收回资源,同时阻塞主线程,让其等它们执行完
    pthread_join(thid1,NULL);

    pthread_join(thid2,NULL);
    pthread_mutex_destroy(&mutex);                       //销锁

    return 0;    //退出主线程

}
root@ubuntu:/mnt/hgfs/workspaceC/thread/synchronous# make threadlock
gcc -pthread    threadlock.c   -o threadlock
root@ubuntu:/mnt/hgfs/workspaceC/thread/synchronous# ./threadlock
val=1
thid:140262510577408
val=2
thid:140262518970112
val=3
thid:140262510577408
val=4
thid:140262518970112
val=5
thid:140262510577408
val=6
thid:140262518970112
val=7
thid:140262510577408
val=8
thid:140262518970112
val=9
thid:140262510577408
val=10
thid:140262518970112
2、条件变量配合互斥锁
条件变量是利用线程间共享全局变量进行同步的一种机制。互斥锁的不好之处在于,很难控制由那条线程去操作。
1)初始化条件变量
int pthread_cond_init(pthread_cond_t *cond,pthread_condattr_t *cond_attr); //动态初始化
pthread_cond_t cond = PTHREAD_COND_INITIALIZER; //静态初始化
尽管POSIX标准中为条件变量定义了属性,但在Linux中没有实现,因此cond_attr值通常为NULL,且被忽略。
2)条件变量阻塞(等待)
(1)无条件等待
int pthread_cond_wait(pthread_cond_t *cond,pthread_mutex_t *mutex);
(2)计时等待
int pthread_cond_timewait(pthread_cond_t *cond,pthread_mutex *mutex,const timespec *abstime);
如果在给定时刻前条件没有满足,则返回ETIMEOUT,结束等待,其中abstime以与time()系统调用相同意义的绝对时间形式出现,是时间戳。
无论哪种等待方式,都必须和一个互斥锁配合,怎么配合下面实例里看。
3)激发条件
(1)激活一个等待该条件的线程(存在多个等待线程时激活其中一个,到底那个被激活不能确定)
int pthread_cond_signal(pthread_cond_t *cond);
pthread_cond_signal函数的作用是发送一个信号给另外一个正在处于阻塞等待状态的线程,使其脱离阻塞状态,继续执行,如果没有线程处于阻塞等待状态,pthread_cond_signal也会成功返回。
(2)激活所有等待线程
int pthread_cond_broadcast(pthread_cond_t *cond);
作用是发送一个信号给另外所有正在处于阻塞等待状态的线程。
4)销毁条件变量
int pthread_cond_destroy(pthread_cond_t *cond);
只有在没有线程在该条件变量上等待的时候才能销毁这个条件变量,否则返回EBUSY
示例代码1:
前面的互斥锁,能让多线,一条一条执行,但是那个在先,那个在后,随机的,不可控。
但现在在互斥锁配合下的条件变量,我们可以指定那个现在先执行,那个后执行了,
例如我们可以让thread_2先于thread_1执行:
#include <pthread.h>
#include <stdio.h>
#include <stdlib.h>
#include <unistd.h>

pthread_mutex_t lock;
pthread_cond_t cond;

void *thread_1(void *arg){
    pthread_mutex_lock(&lock);
    pthread_cond_wait(&cond,&lock);   //条件变量配互斥锁,最先抢到的会阻塞在此,让其线程执行,
      //业务代码,这里只一条语句
     printf("%s\n", __func__);

    pthread_mutex_unlock(&lock);
    pthread_exit(NULL);

}

void *thread_2(void *arg){
    pthread_mutex_lock(&lock);
    //pthread_cond_wait(&cond,&lock);   //条件变量配互斥锁,
      //业务代码,这里只一条语句
     printf("%s\n", __func__);

     pthread_cond_signal(&cond);     //线程2不会锁,直到执行完后,发送信号,让其它线程接收
    pthread_mutex_unlock(&lock);
    pthread_exit(NULL);

}
int main(){
    pthread_t thids[2];
    int i;
    pthread_mutex_init(&lock,NULL);
    pthread_cond_init(&cond,NULL);
    //创建两条线程
    pthread_create(&thids[0],NULL,thread_1,NULL);
    pthread_create(&thids[1],NULL,thread_2,NULL);

    //结束线程
    for(i=0;i<2;i++){
        pthread_join(thids[i],NULL);
    }
    pthread_mutex_destroy(&lock);
    pthread_cond_destroy(&cond);
    return 0;

}
//编译执行,多执行几次,可以看到thread2优先执行,只有一次不退出时也是thread2
root@ubuntu:/mnt/hgfs/workspaceC/thread/synchronous# make threadiflock
gcc -pthread    threadiflock.c   -o threadiflock
root@ubuntu:/mnt/hgfs/workspaceC/thread/synchronous# ./threadiflock
thread_2
thread_1
root@ubuntu:/mnt/hgfs/workspaceC/thread/synchronous# ./threadiflock
thread_2
^Z
[3]+  Stopped                 ./threadiflock
root@ubuntu:/mnt/hgfs/workspaceC/thread/synchronous# ./threadiflock
thread_2
thread_1
root@ubuntu:/mnt/hgfs/workspaceC/thread/synchronous# ./threadiflock
thread_2
^Z                         //办
[4]+  Stopped                 ./threadiflock
root@ubuntu:/mnt/hgfs/workspaceC/thread/synchronous# ./threadiflock
thread_2
thread_1
为什么pthread_cond_wait要配合上互斥锁,为什么需要加锁?
mutex用于保护条件变量,同一时刻只能让一个线程wait,修改条件变量。
wait干的事情:
把调用线程放到条件等待队列上,
释放mutex,
等其他线程发来继续执行下去的信号。
示例代码2:
#include <stdio.h>
#include <unistd.h>
#include <stdlib.h>
#include <string.h>
#include <pthread.h>

pthread_mutex_t lock;
pthread_cond_t cond;

void *thread_1(void *data)
{
    pthread_mutex_lock(&lock);
    pthread_cond_wait(&cond, &lock);
    printf("%s\n", __func__);
    pthread_mutex_unlock(&lock);
}

void *thread_2(void *data)
{
    pthread_mutex_lock(&lock);
    pthread_cond_wait(&cond, &lock);
    printf("%s\n", __func__);
    pthread_mutex_unlock(&lock);
}

int main(int argc, char const *argv[])
{
    int cid = 0;
    pthread_t pid[2];
    pthread_mutex_init(&lock, NULL);
    pthread_cond_init(&cond, NULL);

    pthread_create(&pid[0], NULL, thread_1, NULL);
    pthread_create(&pid[1], NULL, thread_2, NULL);

    while (1) {
        scanf("%d", &cid);
        getchar();

        if (cid == 1) {
            pthread_cond_signal(&cond); /* 单播,向其中一个线程发送信号 */
        } else if (cid == 2) {
            pthread_cond_broadcast(&cond); /* 广播,向所有等待条件变量的线程发送信号 */
        } else if (cid == 3) {
            break;
        }
    }

    pthread_join(pid[0], NULL);
    pthread_join(pid[1], NULL);

    pthread_mutex_destroy(&lock);
    pthread_cond_destroy(&cond);

    return 0;
}
//编译执行
>make threadiflockevery
>./threadiflockevery
>2
thread_2
thread_1
3                   //输入3,退出程序
>./threadiflockevery   //再次执行
>1
thread_2
3、信号量
信号量的本质是一种数据操作锁,它本身只是一种外部资源的标识。
简单说一下信号量的工作机制:
信号量只能进行两种操作等待和发送信号,即P(sv) 和V(sv)他们的行为是这样的:
P(sv) :如果sv 的值大于零,就给它减1;如果它的值为零,就挂起该线程的执行。
V(sv) :如果有其他线程因等待sv 而被挂起,就让它恢复运行,如果没有线程因等待sv 而挂起,就给它加1。
临界区:是一个访问共用资源的程序片段,而这些共用资源(临界资源)具有无法同时被多个线程访问的特性。
举个例子:就是两个线程共享信号量sv ,一旦其中一个线程执行了P(sv) 操作,它将得到信号量,并可以进入临界区,使sv 减1。第二个线程将被阻止进入临界区,因为当它试图执P(sv) 时,sv 为0,它会被挂起以等待第一个线程离开临界区域并执行V(sv)释放信号量,这时第二个线程就可以恢复执行。
线程使用信号量依赖的头文件:
#include <semaphore.h>
线程使用的基本信号量函数有四个:
1)初始化信号量
int sem_init(sem_t *sem , int pshared, unsigned int value);
参数:
sem - 指定要初始化的信号量;
pshared - 信号量 sem 的共享选项,linux只支持0,表示它是当前进程的局部信号量;
value - 信号量 sem 的初始值。
返回值:
success为0,failure为-1
2) 信号量值加1
给参数sem指定的信号量值加1。
int sem_post(sem_t *sem);
返回值:
success为0,failure为-1
3) 信号量值减1
给参数sem指定的信号量值减1。
int sem_wait(sem_t *sem);
如果sem所指的信号量的数值为0,函数将会等待直到有其它线程使它不再是0为止。
返回值:
success为0,failure为-1
4) 销毁信号量
销毁指定的信号量。
int sem_destroy(sem_t *sem);
返回值:
success为0,failure为-1
例子:
#include <stdlib.h>
#include <stdio.h>
#include <unistd.h>
#include <string.h>
#include <pthread.h>
#include <semaphore.h>   //sem_xx,信号量需要的头文件

sem_t bin_sem;            //定义一个信号量
char work_area[1024];
void *thread_func(void *arg){
   sem_wait(&bin_sem);               //信号量大于0,放行,信号量由主线程去发送,下面的主函数中会sem_post(&bin_sem)加1
   printf("%s,%ld\n",__func__,pthread_self());
   while(strncmp("end",work_area,3)!=0){
    printf("你输入的字符的个数: %ld,线程号:%ld\n",strlen(work_area)-1,pthread_self());
    sem_wait(&bin_sem);  //信号最减1,若为0,则一直在等特,直到其它线程让它大于0,
   }
   pthread_exit(NULL);
}

int main(){
    int ret = 0;
    pthread_t a_th,b_th,c_th;
    //初始化信号量
    ret = sem_init(&bin_sem,0,0);
    if(ret!=0){
        perror("sem_init error!\n");
        exit(1);
    }

    ret = pthread_create(&a_th,NULL,thread_func,NULL);
    ret = pthread_create(&b_th,NULL,thread_func,NULL);
    ret = pthread_create(&c_th,NULL,thread_func,NULL);

     printf("请输入信息,输入end结束输入: \n");
    while(strncmp("end",work_area,3)!=0){
        fgets(work_area,1024,stdin);    //从键盘上输入信息,放到work_area中,最多1024个字符
        sem_post(&bin_sem);             //信号量初始为0,现在加1,放开线程进入执行
    }
    //结束线程,阻塞主线程
    sem_post(&bin_sem);               //子线程执行完事后,有可能阻塞,导致另一个线程进不去,所以在此让信号量加1,让其进行正常结束,输入end不结束整个程序输入
    ret = pthread_join(a_th,NULL);
    sem_post(&bin_sem);
    ret = pthread_join(b_th,NULL);
    sem_post(&bin_sem);
    ret = pthread_join(c_th,NULL);


    //销信号量
    ret = sem_destroy(&bin_sem);
    return 0;
}
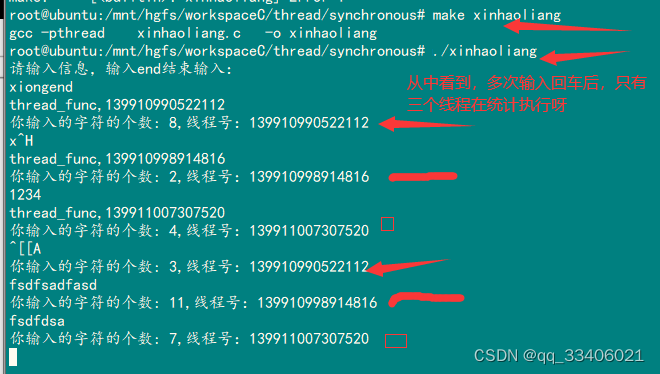
放两个线程(或多个线程)
    printf("请输入信息,输入end结束输入: \n");
    while(strncmp("end",work_area,3)!=0){
        fgets(work_area,1024,stdin);    //从键盘上输入信息,放到work_area中,最多1024个字符
        sem_post(&bin_sem);             //信号量初始为0,现在加1,放开线程进入执行
        sem_post(&bin_sem);             //信号量初始为0,现在加1,放开线程进入执行
    }
root@ubuntu:/mnt/hgfs/workspaceC/thread/synchronous# ./xinhaoliang
请输入信息,输入end结束输入:
fsda
thread_func,140716511315712
你输入的字符的个数: 4,线程号:140716511315712
你输入的字符的个数: 4,线程号:140716511315712
eddffd
你输入的字符的个数: 6,线程号:140716511315712
你输入的字符的个数: 6,线程号:140716511315712
4、读写锁
互斥锁将试图进入临界区的所有其他线程都阻塞住。
然而有时候我们可以在读某个数据与修改某个数据之间作以区分。
读写锁的分配规则:
- 读操作可以多个线程并发进行
- 写的时候某一个线程独占资源
- 写的优先级高于读的优先级
场景:
- 线程A加读锁成功, 又来了三个线程,做读操作, 可以加锁成功。
- 线程A加写锁成功, 又来了三个线程,做读操作,三个线程阻塞。
- 线程A加读锁成功, 又来了B线程加写锁阻塞,又来了C线程加读锁阻塞。
读写锁的优点:
某些应用中读数据比写数据频繁的多,这些应用可以从读写锁代替互斥锁中获益。任意给定时刻允许多个读出者存在,提供了更高的并发度,同时在某个写入者修改数据期间保护该数据,以免其他读者或写者干扰。
什么时候使用读写锁?
互斥锁: 数据所有的读写都是串行的
读写锁:
- 读: 并行
- 写: 串行
读的频率 大于 写的频率
操作函数:
#include <pthread.h>
// 初始化读写锁
int pthread_rwlock_init(pthread_rwlock_t *restrict rwlock,
         const pthread_rwlockattr_t *restrict attr);
参数:
- rwlock: 读写锁地址
- attr: 读写锁属性, 使用默认属性, 设置为: NULL
销毁读写锁资源
int pthread_rwlock_destroy(pthread_rwlock_t *rwlock);
// 加读锁
rwlock被加了写锁, 这时候阻塞
rwlock被加了读锁, 不阻塞, 可以加锁成功 -> 读共享
int pthread_rwlock_rdlock(pthread_rwlock_t *rwlock);
// 非阻塞加读锁
int pthread_rwlock_tryrdlock(pthread_rwlock_t *rwlock);
// 加写锁
rwlock -> 加了读锁, 加了写锁 多会阻塞 -> 写独占
int pthread_rwlock_wrlock(pthread_rwlock_t *rwlock);
// 非阻塞加写锁
int pthread_rwlock_trywrlock(pthread_rwlock_t *rwlock);
// 读写锁解锁
int pthread_rwlock_unlock(pthread_rwlock_t *rwlock);
练习例子:
8个线程操作同一个全局变量,其中3个线程不定时写同一全局资源,其中5个线程不定时读同一全局资源
#include <stdio.h>
#include <stdlib.h>
#include <string.h>
#include <unistd.h>
#include <errno.h>
#include <pthread.h>
//读写锁的应用,分别定义读,写函数
int number =1;    //线程共享变量
pthread_rwlock_t rwlock;   //定义读写锁

//线程读函数
void * readNum(void *arg){
    while(1){
        pthread_rwlock_rdlock(&rwlock);   //设置读写锁为读锁
        printf("====读,线程号:%ld,number=%d\n",pthread_self(),number);
        pthread_rwlock_unlock(&rwlock);    //解锁
        usleep(100);                       //睡100微秒,因为计算机的cpu太快了,可能当前线程一直在运行,其它线程抢不到它
    }
    return NULL;     //或, pthread_exit(NULL)
}
//线程写函数
void * writeNum(void *arg){
    while(1){
        pthread_rwlock_wrlock(&rwlock);   //设置读写锁为写锁,会阻塞其它线程
        number++;
        printf("++++++++++++写,线程号:%ld,number=%d\n",pthread_self(),number);
        usleep(100);              //睡100微秒
        pthread_rwlock_unlock(&rwlock);    //解锁
    }
    return NULL;
}

int main(){
    int i;
    pthread_t wthids[3],rthids[5];   //设置3个写线程号,5个读线程号
    //初始化读写锁
    pthread_rwlock_init(&rwlock,NULL);

    //创建8个线程,实际开发要检测创建的失败否(if(ret!=0)....,这里我不写了,只当测试用
    for(i=0;i<3;i++){

        pthread_create(&wthids[i],NULL,writeNum,NULL);
    }
    for(i=0;i<5;i++){
         pthread_create(&rthids[i],NULL,readNum,NULL);

    }

    //收回线程,实际开发要检测失败否(if(ret!=0)....,这里我不写了,只当测试用
    for(i=0;i<3;i++){

        pthread_join(wthids[i],NULL);
    }
    for(i=0;i<5;i++){
         pthread_join(rthids[i],NULL);

    }

    //销毁锁
    pthread_rwlock_destroy(&rwlock);
    return 0;
}
root@ubuntu:/mnt/hgfs/workspaceC/thread/synchronous# make rwlock
gcc -pthread    rwlock.c   -o rwlock
root@ubuntu:/mnt/hgfs/workspaceC/thread/synchronous# ./rwlock
====读,线程号:140204632577792,number=2119
====读,线程号:140204624185088,number=2119
====读,线程号:140204607399680,number=2119
====读,线程号:140204615792384,number=2119
====读,线程号:140204599006976,number=2119
++++++++++++写,线程号:140204640970496,number=2120
++++++++++++写,线程号:140204640970496,number=2121
====读,线程号:140204624185088,number=2121
====读,线程号:140204615792384,number=2121
====读,线程号:140204607399680,number=2121
====读,线程号:140204599006976,number=2121
====读,线程号:140204632577792,number=2121
++++++++++++写,线程号:140204640970496,number=2122
++++++++++++写,线程号:140204640970496,number=2123
五、线程池
线程池是一种多线程处理形式,大多用于高并发服务器上,它能合理有效的利用高并发服务器上的线程资源;
在网络编程中,线程与进程用于处理各项分支子功能,我们通常的操作是:
接收消息 ==> 消息分类 ==> 线程创建 ==> 传递消息到子线程 ==> 线程分离 ==> 在子线程中执行任务 ==> 任务结束退出;
对大多数小型局域网的通信来说,上述方法足够满足需求;
但当我们的通信范围扩大到广域网或大型局域网通信中时,我们将面临大量消息频繁请求服务器;
在这种情况下,创建与销毁线程都已经成为一种奢侈的开销,特别对于嵌入式服务器来说更应保证内存资源的合理利用;
因此,线程池技术应运而生;
线程池允许一个线程可以多次复用,且每次复用的线程内部的消息处理可以不相同,将创建与销毁的开销省去而不必来一个请求开一个线程;
结构讲解:
线程池是一个抽象的概念,其内部由任务队列,一堆线程,管理者线程组成;
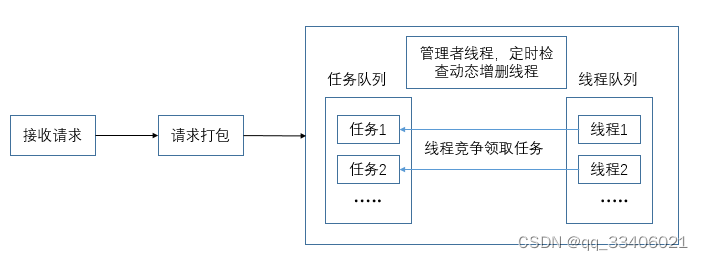
一个线程模板
以上图为例,实现一个最基础的线程池;
threadpool.h
#ifndef __THREADPOOL_H_
#define __THREADPOOL_H_

typedef struct threadpool_t threadpool_t;   //threadpool_t是struct threadpool的别名

/*创建线程池*/
threadpool_t *threadpool_create(int min_thr_num, int max_thr_num, int queue_max_size);
/*销毁线程池*/
int threadpool_destroy(threadpool_t *pool);
/*管理线程*/
void *admin_thread(void *threadpool);
/*工作线程*/
void *threadpool_thread(void *threadpool);
/*向线程池的任务队列中添加一个任务*/
int threadpool_add_task(threadpool_t *pool, void *(*function)(void *arg), void *arg);
//结束线程并把线程池里的id设置为0
void thread_exit(threadpool_t *pool);
/*获取忙线程数*/
int get_thread_busy(threadpool_t *pool);
/*获取活线程数*/
int get_thread_alive(threadpool_t *pool);

#endif
threadpool.c
#include "threadpool.h"

#include <pthread.h>
#include <signal.h>
#include <stdio.h>
#include <stdlib.h>
#include <string.h>
#include <unistd.h>

#define DEFAULT_TIME 3       /*默认时间3s,管理线程间隔多少时间,去扫描线程池*/
#define DEFAULT_THREAD_NUM 2 /*每次创建或销毁的线程个数*/
#define true 1
#define false 0

/*任务类型结构体*/
typedef struct {
    void *(*function)(void *);
    void *arg;
} threadpool_task_t;

/*线程池结构体*/
struct threadpool_t {
    pthread_t admin_tid; /* 管理者线程tid */

    threadpool_task_t *task_queue; /* 任务队列 */
    int queue_front;               /* 队头 */
    int queue_rear;                /* 队尾 */
    int queue_size;                //当前任务个数
    int queue_max_size;            /* 队列能容纳的最大任务数 */

    pthread_t *threads; /* 线程队列 */

    //线程池本身的一些基本信息
    int min_thr_num;       /* 线程池中最小线程数 */
    int max_thr_num;       /* 线程池中最大线程数 */
    int live_thr_num;      /* 线程池中存活的线程数 */
    int busy_thr_num;      /* 忙线程,正在工作的线程 */
    int wait_exit_thr_num; /* 需要销毁的线程数 */

    //线程池本身是一个多线程共享的变量,避免对线程池本身里的属性变量产生线程安全问题
    pthread_mutex_t lock;           /* 锁住整个结构体,对线程池结构体里的属性变量读写的时候,需要保护 */
    pthread_mutex_t thread_counter; /* 专门用于读写忙线程数这个属性变量的锁 */
    pthread_cond_t queue_is_full;   /* 条件变量,任务队列不为满 */
    pthread_cond_t queue_is_empty;  /* 任务队列不为空 */

     /*状态*/
    int shutdown; /* true为关闭 */
};

/*创建线程池*/
threadpool_t * threadpool_create(int min_thr_num, int max_thr_num, int queue_max_size) {
    threadpool_t *pool = NULL;

    do {
        //给保存线程池信息的结构体pool分配内存
        if ((pool = (threadpool_t *)malloc(sizeof(threadpool_t))) == NULL) {
            printf("malloc threadpool false; \n");
            break;  //用do....while就是为了用break关键字
        }

        /*线程池信息初始化*/
        pool->min_thr_num = min_thr_num;
        pool->max_thr_num = max_thr_num;
        pool->busy_thr_num = 0;
        pool->live_thr_num = min_thr_num;  //在后面外面就会按最新线程数创建线程,放到线程池
        pool->wait_exit_thr_num = 0;
        pool->queue_front = 0;
        pool->queue_rear = 0;
        pool->queue_size = 0;
        pool->queue_max_size = queue_max_size;
        pool->shutdown = false;

        /*根据最大线程数,给工作线程数组开空间,清0*/
        pool->threads = (pthread_t *)malloc(sizeof(pthread_t) * max_thr_num);
        if (pool->threads == NULL) {
            printf("malloc threads false;\n");
            break;
        }
        memset(pool->threads, 0, sizeof(pthread_t) * max_thr_num);  //内存空间的初始化
        //约定线程队列里,放线程进去,会把线程的id放进去,是0表示没有可用的线程

        /*队列开空间*/
        pool->task_queue = (threadpool_task_t *)malloc(sizeof(threadpool_task_t) * queue_max_size);
        if (pool->task_queue == NULL) {
            printf("malloc task queue false;\n");
            break;
        }

        /*初始化互斥锁和条件变量*/
        if (pthread_mutex_init(&(pool->lock), NULL) != 0 || pthread_mutex_init(&(pool->thread_counter), NULL) != 0 || pthread_cond_init(&(pool->queue_is_empty), NULL) != 0 || pthread_cond_init(&(pool->queue_is_full), NULL) != 0) {
            printf("init lock or cond false;\n");
            break;
        }

        /*启动min_thr_num个工作线程*/
        for (int i = 0; i < min_thr_num; i++) {
            /*pool指向当前线程池*/
            pthread_create(&(pool->threads[i]), NULL, threadpool_thread, (void *)pool);
            printf("启动 thread %ld... \n", pool->threads[i]);
        }
        // threadpool_thread:工作线程的线程函数,一会儿外面就继续实现它

        /*管理者线程*/
        pthread_create(&(pool->admin_tid), NULL, admin_thread, (void *)pool);
        // admin_thread:管理线程的线程函数

        //所有的初始化都没问题
        return pool;
    } while (0);

    // do --- while里初始化过程出问题,break,跳出循环,就不会执行return pool;
    //循环外面外面就可以手动将资源释放掉,避免内存被浪费
    // 上面某个步骤出错了,释放掉已经申请的内存资源
    if (pool && pool->threads) free(pool->threads);
    if (pool && pool->task_queue) free(pool->task_queue);
    if (pool) free(pool);

    return NULL;
}

/*工作线程的线程函数*/
void *threadpool_thread(void *threadpool) {
    //核心作用就完成任务队列里的任务
    threadpool_t *pool = (threadpool_t *)threadpool;
    threadpool_task_t task;  //下面的循环体里要用的任务队列的任务,任务类型变量
                             //工作线程要不停的工作,放在while循环
    while (true) {
        pthread_mutex_lock(&(pool->lock));
        //做一个判断,任务队列,是不是空的,如果是空,没任务,工作线程就应该阻塞,用条件变量阻塞
        while ((pool->queue_size == 0) && (!pool->shutdown)) {
            printf("thread %ld 任务队列空的,工作线程阻塞 \n", pthread_self());
            pthread_cond_wait(&(pool->queue_is_empty), &(pool->lock));

            //判断是否需要清除线程,自杀功能
            if (pool->wait_exit_thr_num > 0) {
                pool->wait_exit_thr_num--;
                //判断线程池中的线程数是否大于最小线程数,是则结束当前线程
                if (pool->live_thr_num > pool->min_thr_num) {
                    printf("thread %ld 开始自杀 \n", pthread_self());
                    pool->live_thr_num--;
                    pthread_mutex_unlock(&(pool->lock));
                    thread_exit(pool);  //自定义的结束线程,里面有工作线程的id还原为0的操作
                }
            }
        }

        //上面的循环结束后,表示,任务队列里有任务可做
        //线程池开关状态
        if (pool->shutdown) {
            pthread_mutex_unlock(&(pool->lock));  //防止死锁
            printf("thread %ld 线程池已经进入销毁的过程,线程自杀 \n", pthread_self());
            thread_exit(pool);  //线程池已经关闭,以为这线程池已经进入销毁的过程,线程也要自杀
        }

        //到了执行任务的阶段
        //到这里,表面任务队列里有任务,线程池是正常的,那么该线程可以拿出任务来执行
        task.function = pool->task_queue[pool->queue_front].function;  //出队操作
        task.arg = pool->task_queue[pool->queue_front].arg;
        //移动头结点索引
        pool->queue_front = (pool->queue_front + 1) % pool->queue_max_size;  //环型结构
        pool->queue_size--;

        //马上就去执行任务函数,任务队列里少了一个任务,假设原队列是满的,现在少了一个,队列就从满——》不满
        pthread_cond_broadcast(&(pool->queue_is_full));
        pthread_mutex_unlock(&(pool->lock));

        //任务开始了,忙线程数就该加1了,忙线程数这个变量,修改频繁,我们专门给它弄了一个锁
        printf("thread %ld 开始工作 working \n", pthread_self());
        pthread_mutex_lock(&(pool->thread_counter));  //锁住忙线程变量
        pool->busy_thr_num++;
        pthread_mutex_unlock(&(pool->thread_counter));

        //调用任务函数,真在开始执行任务
        (*(task.function))(task.arg);
        free(task.arg);
        task.arg = NULL;

        //任务结束,在减回去
        printf("thread %ld 完成工作 working \n", pthread_self());
        pthread_mutex_lock(&(pool->thread_counter));
        pool->busy_thr_num--;
        pthread_mutex_unlock(&(pool->thread_counter));
    }
    pthread_exit(NULL);
}

/* 自定义的结束线程函数 */
void thread_exit(threadpool_t *pool) {
    pthread_t tid = pthread_self();
    for (int i = 0; i < pool->max_thr_num; i++) {
        if (pool->threads[i] == tid) {
            pool->threads[i] = 0;
            printf("thread_exit() called, %ld 自杀...\n", tid);
            break;
        }
    }
    pthread_exit(NULL);
}

/*管理线程*/
void *admin_thread(void *threadpool) {
    threadpool_t *pool = (threadpool_t *)threadpool;
    //管理线程一直都在干事情,所以要一个循环
    while (!pool->shutdown) {
        sleep(DEFAULT_TIME); /*隔一段时间再管理*/
        //读取线程池的部分信息,进而管理线程,决定要增加一些线程,还是干掉一些线程
        pthread_mutex_lock(&(pool->lock));     /*加锁*/
        int queue_size = pool->queue_size;     /*任务数*/
        int live_thr_num = pool->live_thr_num; /*存活的线程数*/
        int max_threads = pool->max_thr_num;   /* 最大线程数*/
        int min_threads = pool->min_thr_num;   /*最小线程数*/
        pthread_mutex_unlock(&(pool->lock));   /*解锁*/

        pthread_mutex_lock(&(pool->thread_counter));
        int busy_thr_num = pool->busy_thr_num; /*忙线程数*/
        pthread_mutex_unlock(&(pool->thread_counter));

        printf("工作线程:%d-活线程:%d-任务数:%d,最大线程数:%d\n", busy_thr_num, live_thr_num, queue_size, max_threads);

        /*创建新线程 实际任务数量大于存活的线程数,存活线程数小于最大线程数*/
        if (queue_size >= live_thr_num && live_thr_num <= max_threads) {
            //下面要对线程池属性进行就行,线程池属性是公共变量,避免结过混乱,要加锁
            pthread_mutex_lock(&(pool->lock));
            int add = 0;
            /*一次增加 DEFAULT_THREAD_NUM 个线程*/
            for (int i = 0; i < pool->max_thr_num && add < DEFAULT_THREAD_NUM && pool->live_thr_num < pool->max_thr_num; i++) {
                if (pool->threads[i] == 0) {
                    pthread_create(&(pool->threads[i]), NULL, threadpool_thread, (void *)pool);
                    add++;
                    pool->live_thr_num++;
                    printf("a new thread is created-----------------------\n");
                }
            }
            pthread_mutex_unlock(&(pool->lock));
        }

        /*销毁多余的线程 忙线程x2 都小于 存活线程,并且存活的大于最小线程数*/
        if ((busy_thr_num * 2) < live_thr_num && live_thr_num > min_threads) {
            printf("线程过多,需要销毁,工作线程:%d-活线程:%d-任务数:%d,最大线程数:%d\n", busy_thr_num, live_thr_num, queue_size, max_threads);
            /*一次销毁DEFAULT_THREAD_NUM个线程*/
            pthread_mutex_lock(&(pool->lock));
            pool->wait_exit_thr_num = DEFAULT_THREAD_NUM;
            pthread_mutex_unlock(&(pool->lock));

            for (int i = 0; i < DEFAULT_THREAD_NUM; i++) {
                //通知正在处于空闲的线程,自杀
                pthread_cond_signal(&(pool->queue_is_empty));
                printf("通知线程自杀 --\n");
            }
        }
    }
    return NULL;
}

/*向线程池的任务队列中添加一个任务*/
int threadpool_add_task(threadpool_t *pool, void *(*function)(void *arg), void *arg) {
    pthread_mutex_lock(&(pool->lock));
    /*如果队列满了,调用wait阻塞*/
    while ((pool->queue_size == pool->queue_max_size) && (!pool->shutdown)) {
        pthread_cond_wait(&(pool->queue_is_full), &(pool->lock));
    }
    /*如果线程池处于关闭状态*/
    if (pool->shutdown) {
        pthread_mutex_unlock(&(pool->lock));
        return -1;
    }

    /*执行到这里,表明队列没满,添加任务到任务队列*/
    pool->task_queue[pool->queue_rear].function = function;
    pool->task_queue[pool->queue_rear].arg = arg;
    pool->queue_rear = (pool->queue_rear + 1) % pool->queue_max_size; /* 逻辑环  */
    pool->queue_size++;

    /*添加完任务后,队列就不为空了,唤醒线程池中的一个线程*/
    pthread_cond_signal(&(pool->queue_is_empty));
    pthread_mutex_unlock(&(pool->lock));
    return 0;
}

/*销毁线程池*/
int threadpool_destroy(threadpool_t *pool) {
    if (pool == NULL) {
        return -1;
    }
    pool->shutdown = true;

    /*销毁管理者线程*/
    pthread_join(pool->admin_tid, NULL);

    //通知所有线程去自杀(在自己领任务的过程中)
    for (int i = 0; i < pool->live_thr_num; i++) {
        pthread_cond_broadcast(&(pool->queue_is_empty));
    }

    /*等待线程结束 先是pthread_exit 然后等待其结束*/
    for (int i = 0; i < pool->live_thr_num; i++) {
        pthread_join(pool->threads[i], NULL);
    }

    // 释放堆内存
    if (pool->task_queue) {
        free(pool->task_queue);
        pool->task_queue = NULL;
    }
    if (pool->threads) {
        free(pool->threads);
        pool->threads = NULL;
    }

    pthread_mutex_destroy(&pool->lock);
    pthread_mutex_destroy(&pool->thread_counter);
    pthread_cond_destroy(&pool->queue_is_full);
    pthread_cond_destroy(&pool->queue_is_empty);

    free(pool);
    pool = NULL;
    return 0;
}

/*获取忙线程数*/
int get_thread_busy(threadpool_t *pool) {
    pthread_mutex_lock(&(pool->thread_counter));
    int busyNum = pool->busy_thr_num;
    pthread_mutex_unlock(&(pool->thread_counter));
    return busyNum;
}

/*获取活线程数*/
int get_thread_alive(threadpool_t *pool) {
    pthread_mutex_lock(&(pool->lock));
    int aliveNum = pool->live_thr_num;
    pthread_mutex_unlock(&(pool->lock));
    return aliveNum;
}
使用线程池接口的例子
main.c
#include <pthread.h>
#include <stdio.h>
#include <stdlib.h>
#include <string.h>
#include <unistd.h>
#include "threadpool.h"

//线程函数
void *taskFunc(void* arg) {
    int num = *(int*)arg;
    printf("thread %ld is working, number = %d\n", pthread_self(), num);
    sleep(1);    //这里不沉睡的话,有可能只有一条线程做完所有的工作
}

int main() {
    threadpool_t* pool = threadpool_create(3, 10, 100);//

    /* 接收到任务后添加 */
    for (int i = 0; i < 120; ++i){
        int* num = (int*)malloc(sizeof(int));
        *num = i + 100;
        threadpool_add_task(pool, taskFunc, num);
    }


    sleep(40);    //这里不睡多点秒数的话,有可能完成不了任务,因为上面都要深睡一秒了,但是由于有3条并发线程,所以可完成了

    threadpool_destroy(pool);
    return 0;
}
//编译执行
root@ubuntu:/mnt/hgfs/workspaceC/thread/threadpool# gcc -g -pthread main.c threadpool.c  -o main
root@ubuntu:/mnt/hgfs/workspaceC/thread/threadpool# ./main


启动 thread 140264508249856...
启动 thread 140264499857152...
启动 thread 140264491464448...
thread 140264491464448 开始工作 working
thread 140264491464448 is working, number = 100
thread 140264499857152 开始工作 working
thread 140264499857152 is working, number = 101
thread 140264508249856 开始工作 working
thread 140264508249856 is working, number = 102
thread 140264491464448 完成工作 working
thread 140264491464448 开始工作 working
thread 140264491464448 is working, number = 103
thread 140264499857152 完成工作 working
thread 140264499857152 开始工作 working
thread 140264499857152 is working, number = 104
thread 140264508249856 完成工作 working
thread 140264508249856 开始工作 working
thread 140264508249856 is working, number = 105
thread 140264491464448 完成工作 working
thread 140264491464448 开始工作 working
thread 140264491464448 is working, number = 106
thread 140264499857152 完成工作 working
thread 140264499857152 开始工作 working
thread 140264499857152 is working, number = 107
thread 140264508249856 完成工作 working
thread 140264508249856 开始工作 working
thread 140264508249856 is working, number = 108
工作线程:3-活线程:3-任务数:11,最大线程数:10
a new thread is created-----------------------
a new thread is created-----------------------
thread 140264466286336 开始工作 working
thread 140264466286336 is working, number = 109
thread 140264474679040 开始工作 working
thread 140264474679040 is working, number = 110
thread 140264491464448 完成工作 working
thread 140264491464448 开始工作 working
thread 140264491464448 is working, number = 111
thread 140264499857152 完成工作 working
thread 140264499857152 开始工作 working
thread 140264499857152 is working, number = 112
thread 140264508249856 完成工作 working
thread 140264508249856 开始工作 working
thread 140264508249856 is working, number = 113
thread 140264491464448 完成工作 working
thread 140264491464448 开始工作 working
thread 140264491464448 is working, number = 114
thread 140264499857152 完成工作 working
thread 140264499857152 开始工作 working
thread 140264499857152 is working, number = 115
thread 140264508249856 完成工作 working
thread 140264508249856 开始工作 working
thread 140264508249856 is working, number = 116
thread 140264466286336 完成工作 working
thread 140264466286336 开始工作 working
thread 140264466286336 is working, number = 117
thread 140264474679040 完成工作 working
thread 140264474679040 开始工作 working
thread 140264474679040 is working, number = 118
thread 140264491464448 完成工作 working
thread 140264491464448 开始工作 working
thread 140264491464448 is working, number = 119
thread 140264499857152 完成工作 working
thread 140264499857152 任务队列空的,工作线程阻塞
thread 140264508249856 完成工作 working
thread 140264508249856 任务队列空的,工作线程阻塞
thread 140264466286336 完成工作 working
thread 140264466286336 任务队列空的,工作线程阻塞
thread 140264474679040 完成工作 working
thread 140264474679040 任务队列空的,工作线程阻塞
工作线程:1-活线程:5-任务数:0,最大线程数:10
线程过多,需要销毁,工作线程:1-活线程:5-任务数:0,最大线程数:10
通知线程自杀 --
通知线程自杀 --
thread 140264499857152 开始自杀
thread_exit() called, 140264499857152 自杀...
thread 140264508249856 开始自杀
thread_exit() called, 140264508249856 自杀...
thread 140264491464448 完成工作 working
thread 140264491464448 任务队列空的,工作线程阻塞
工作线程:0-活线程:3-任务数:0,最大线程数:10
工作线程:0-活线程:3-任务数:0,最大线程数:10
工作线程:0-活线程:3-任务数:0,最大线程数:10
工作线程:0-活线程:3-任务数:0,最大线程数:10
工作线程:0-活线程:3-任务数:0,最大线程数:10
工作线程:0-活线程:3-任务数:0,最大线程数:10
工作线程:0-活线程:3-任务数:0,最大线程数:10
工作线程:0-活线程:3-任务数:0,最大线程数:10
工作线程:0-活线程:3-任务数:0,最大线程数:10
工作线程:0-活线程:3-任务数:0,最大线程数:10
工作线程:0-活线程:3-任务数:0,最大线程数:10
工作线程:0-活线程:3-任务数:0,最大线程数:10
thread 140264466286336 线程池已经进入销毁的过程,线程自杀
thread_exit() called, 140264466286336 自杀...
thread 140264491464448 线程池已经进入销毁的过程,线程自杀
thread_exit() called, 140264491464448 自杀...
如果编译不相带上-pthread和threadpool.c的话,我们要编写一个Makefile文件,再直接make main可译编译成可执行文件

Makefile
CC=gcc
CFLAGS=-pthread threadpool.c


 3329
3329


 被折叠的 条评论
为什么被折叠?
被折叠的 条评论
为什么被折叠?
 到【灌水乐园】发言


