


SSM整合
一步步搭建整合
SSM基础框架
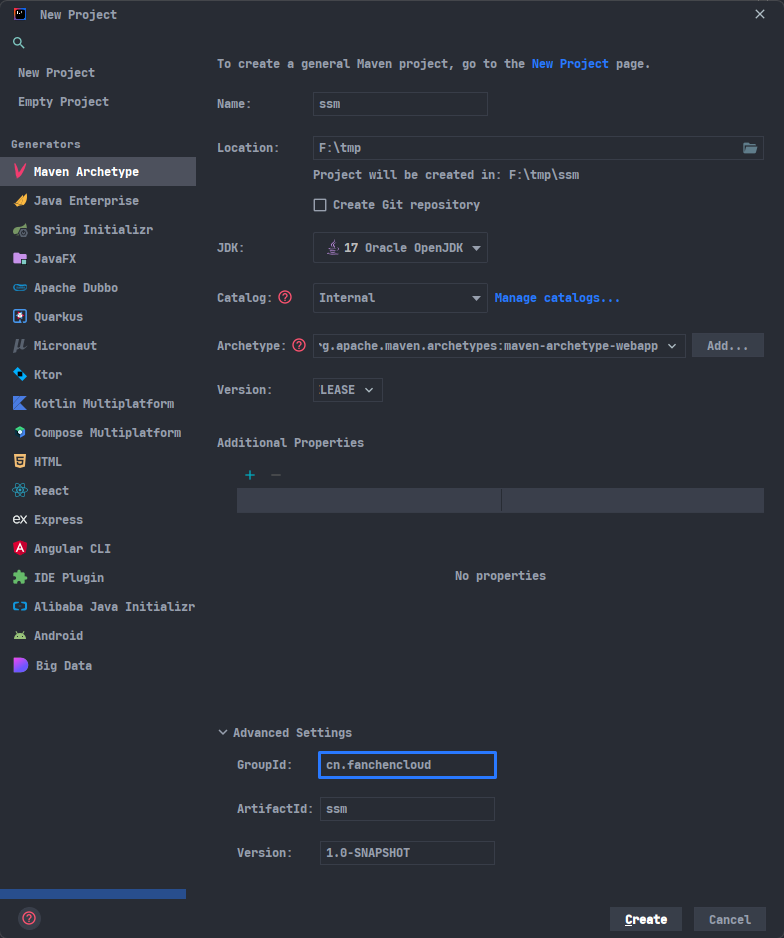
创建Maven工程
Idea -> 新建工程 -> maven
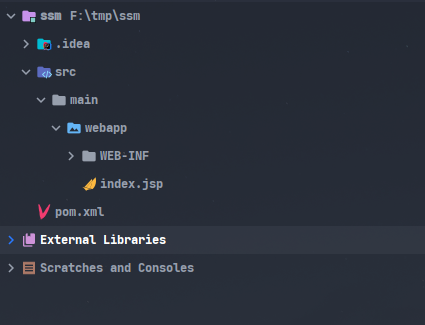
刚创建的工程目录如下:
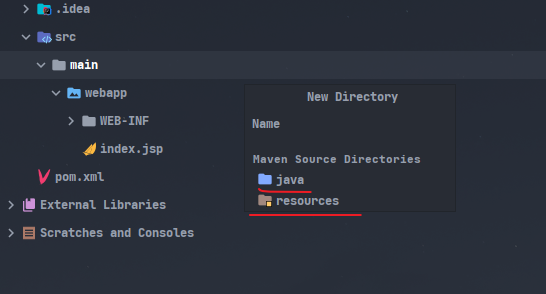
需要添加java、resources两个目录
创建测试使用的数据库和数据表
创建数据库
test数据表user
drop database if exists `test`;
create database `test`;
use `test`;

# 创建数据表
create table `user`
(
    `id`   int(11)      not null auto_increment comment '用户id',
    `name` varchar(255) not null comment '用户名',
    `age`  int(11)      not null comment '用户年龄',
    primary key (`id`)
) engine = InnoDB
  auto_increment = 1
  default charset = utf8mb4
    comment = '用户表';
集成Spring
-
引入Spring相关依赖
pom.xml文件中添加spring-webmvc依赖即可,会同时引入spring-aop、spring-beans、spring-context、spring-core、spring-expression、spring-web等依赖<!-- Spring Framework --> <dependency> <groupId>org.springframework</groupId> <artifactId>spring-webmvc</artifactId> <version>5.3.20</version> </dependency> -
在资源目录
resources下新建spring配置文件applicationContext.xml<?xml version="1.0" encoding="UTF-8"?> <beans xmlns="http://www.springframework.org/schema/beans" xmlns:xsi="http://www.w3.org/2001/XMLSchema-instance" xmlns:context="http://www.springframework.org/schema/context" xsi:schemaLocation=" http://www.springframework.org/schema/beans https://www.springframework.org/schema/beans/spring-beans.xsd http://www.springframework.org/schema/context https://www.springframework.org/schema/context/spring-context.xsd"> <!-- 开启注解的扫描 --> <context:component-scan base-package="cn.fanchencloud.ssm"> <!-- 配置哪些注解不扫描 --> <context:exclude-filter type="annotation" expression="org.springframework.stereotype.Controller"/> </context:component-scan> </beans> -
创建测试服务
TestServicepackage cn.fanchencloud.ssm.service; import org.springframework.stereotype.Service; /** * Version: V1.0 <br/> * Datetime: 2022/6/13 2:03 <br/> * Description: 测试服务 * * @author: chen */ @Service public class TestService { public String test() { System.out.println("Test 服务 查询 。。。。"); return "test"; } } -
编写单元测试
import cn.fanchencloud.ssm.service.TestService; import org.junit.Test; import org.springframework.context.support.ClassPathXmlApplicationContext; /** * Version: V1.0 <br/> * Datetime: 2022/6/13 2:05 <br/> * Description: 测试Spring * * @author: chen */ public class TestSpring { @Test public void testSpring() { // 加载Spring配置文件 ClassPathXmlApplicationContext applicationContext = new ClassPathXmlApplicationContext("classpath:applicationContext.xml"); // 获取对象 TestService testService = applicationContext.getBean(TestService.class); // 调用方法 String result = testService.test(); System.out.println(result); } } -
运行可得
Test 服务 查询 。。。。
test

Process finished with exit code 0
集成Spring MVC
-
修改
web.xml:在这个配置文件中配置中文乱码过滤器和前端控制器dispatcherServlet<?xml version="1.0" encoding="UTF-8"?> <web-app xmlns:xsi="http://www.w3.org/2001/XMLSchema-instance" xmlns="http://java.sun.com/xml/ns/javaee" xsi:schemaLocation="http://java.sun.com/xml/ns/javaee http://java.sun.com/xml/ns/javaee/web-app_3_0.xsd" id="WebApp_ID" version="3.0"> <!-- 配置中文乱码过滤器 start --> <filter> <filter-name>characterEncodingFilter</filter-name> <filter-class>org.springframework.web.filter.CharacterEncodingFilter</filter-class> <init-param> <param-name>encoding</param-name> <param-value>UTF-8</param-value> </init-param> </filter> <filter-mapping> <filter-name>characterEncodingFilter</filter-name> <url-pattern>/*</url-pattern> </filter-mapping> <!-- 配置中文乱码过滤器 end --> <!-- 配置前端控制器 start --> <servlet> <servlet-name>dispatcherServlet</servlet-name> <servlet-class>org.springframework.web.servlet.DispatcherServlet</servlet-class> <init-param> <param-name>contextConfigLocation</param-name> <param-value>classpath:springMVC.xml</param-value> </init-param> <load-on-startup>1</load-on-startup> </servlet> <servlet-mapping> <servlet-name>dispatcherServlet</servlet-name> <url-pattern>/</url-pattern> </servlet-mapping> <!-- 配置前端控制器 end --> </web-app>此处之前创建的
web.xml约束头配置有误,会导致ModelAndView传值到 jsp页面 $ 不能取值此处放上之前的代码,用以对比
<!DOCTYPE web-app PUBLIC
 "-//Sun Microsystems, Inc.//DTD Web Application 2.3//EN"
 "http://java.sun.com/dtd/web-app_2_3.dtd" >

<web-app>
<?xml version="1.0" encoding="UTF-8"?> <web-app xmlns:xsi="http://www.w3.org/2001/XMLSchema-instance" xmlns="http://java.sun.com/xml/ns/javaee" xsi:schemaLocation="http://java.sun.com/xml/ns/javaee http://java.sun.com/xml/ns/javaee/web-app_3_0.xsd" id="WebApp_ID" version="3.0"> -
编写Spring MVC的配置文件
springMVC.xml,位于resources根目录<?xml version="1.0" encoding="UTF-8"?> <beans xmlns="http://www.springframework.org/schema/beans" xmlns:xsi="http://www.w3.org/2001/XMLSchema-instance" xmlns:context="http://www.springframework.org/schema/context" xmlns:mvc="http://www.springframework.org/schema/mvc" xsi:schemaLocation="http://www.springframework.org/schema/beans http://www.springframework.org/schema/beans/spring-beans.xsd http://www.springframework.org/schema/context https://www.springframework.org/schema/context/spring-context.xsd http://www.springframework.org/schema/mvc https://www.springframework.org/schema/mvc/spring-mvc.xsd"> <!-- 开启注解扫描,但是只处理 controller 包下的 Controller 注解 --> <context:component-scan base-package="cn.fanchencloud.ssm.controller"> <context:include-filter type="annotation" expression="org.springframework.stereotype.Controller"/> </context:component-scan> <!-- 配置视图解析器 --> <bean id="viewResolver" class="org.springframework.web.servlet.view.InternalResourceViewResolver"> <property name="prefix" value="/WEB-INF/pages/"/> <property name="suffix" value=".jsp"/> </bean> <!-- 开启SpringMVC注解的支持 --> <mvc:annotation-driven/> </beans> -
验证Spring MVC配置成功
为了验证,在
WEB-INF/pages下创建了一个test.jsp<%-- Created by IntelliJ IDEA. User: chen Date: 2022/6/13 Time: 2:27 To change this template use File | Settings | File Templates. --%> <%@ page contentType="text/html;charset=UTF-8" language="java" %> <html> <head> <title>测试</title> </head> <body> <h2>测试页面</h2> <hr> <h4> 姓名:${ name } <br> age: ${ age } </h4> </body> </html>在
controller下编辑TestControllerpackage cn.fanchencloud.ssm.controller; import org.springframework.stereotype.Controller; import org.springframework.web.bind.annotation.RequestMapping; import org.springframework.web.bind.annotation.RequestMethod; import org.springframework.web.servlet.ModelAndView; /** * Version: V1.0 <br/> * Datetime: 2022/6/13 1:45 <br/> * Description: 测试 * * @author: chen */ @Controller @RequestMapping("/test") public class TestController { @RequestMapping(value = "/test", method = RequestMethod.GET) public ModelAndView test() { ModelAndView modelAndView = new ModelAndView("test"); modelAndView.addObject("name", "fanchencloud"); modelAndView.getModel().put("age", 18); return modelAndView; } } -
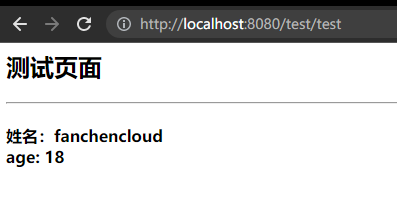
配置Tomcat运行后使用http://localhost:8080/test/test进行访问
整合Spring和Spring MVC
目的:
- 在controller中能成功调用service中的Service对象
- 在项目启动的时候就加载Spring的配置文件applicationContext.xml
-
修改
web.xml,将下面这段添加到文件末尾(webapp标签之前)<!-- 配置监听器,使得在项目启动的时候能加载Spring的配置文件 --> <listener> <listener-class>org.springframework.web.context.ContextLoaderListener</listener-class> </listener> <context-param> <param-name>contextConfigLocation</param-name> <param-value>classpath:applicationContext.xml</param-value> </context-param> -
修改controller中的
TestController,加入调用TestService的代码package cn.fanchencloud.ssm.controller; import cn.fanchencloud.ssm.service.TestService; import org.springframework.beans.factory.annotation.Autowired; import org.springframework.stereotype.Controller; import org.springframework.web.bind.annotation.RequestMapping; import org.springframework.web.bind.annotation.RequestMethod; import org.springframework.web.servlet.ModelAndView; /** * Version: V1.0 <br/> * Datetime: 2022/6/13 1:45 <br/> * Description: 测试 * * @author: chen */ @Controller @RequestMapping("/test") public class TestController { /** * 测试服务 */ private TestService testService; // 添加代码 @RequestMapping(value = "/test", method = RequestMethod.GET) public ModelAndView test() { // 执行测试任务 testService.test(); // 添加代码 ModelAndView modelAndView = new ModelAndView("test"); modelAndView.addObject("name", "fanchencloud"); modelAndView.getModel().put("age", 18); return modelAndView; } // 添加代码 @Autowired public void setTestService(TestService testService) { this.testService = testService; } } -
部署到Tomcat运行有还是使用http://localhost:8080/test/test进行访问,可以看到页面正常渲染显示,控制台也打印出了
TestService的test方法已执行
集成MyBatis
-
pom文件添加MyBatis的依赖
<!-- MyBatis --> <dependency> <groupId>org.mybatis</groupId> <artifactId>mybatis</artifactId> <version>3.5.10</version> </dependency> <!-- MySQL驱动 --> <dependency> <groupId>mysql</groupId> <artifactId>mysql-connector-java</artifactId> <version>8.0.29</version> </dependency> -
创建实体类
Userpackage cn.fanchencloud.ssm.entity; import lombok.Data; import lombok.ToString; /** * Version: V1.0 <br/> * Datetime: 2022/6/13 14:29 <br/> * Description: 用户表实体类 * * @author: chen */ @Data @ToString public class User { /** * 用户id */ private Integer id; /** * 用户名 */ private String name; /** * 用户年龄 */ private Integer age; } -
创建mapper接口
package cn.fanchencloud.ssm.mapper; import cn.fanchencloud.ssm.entity.User; import org.apache.ibatis.annotations.Mapper; /** * Version: V1.0 <br/> * Datetime: 2022/6/13 14:29 <br/> * Description: 用户表数据访问接口 * * @author: chen */ @Mapper public interface UserMapper { /** * 根据id查询用户 * * @param id 用户id * @return 用户 */ User selectUserById(int id); } -
创建mapper映射xml文件
<?xml version="1.0" encoding="UTF-8"?> <!DOCTYPE mapper PUBLIC "-//mybatis.org//DTD Mapper 3.0//EN" "http://mybatis.org/dtd/mybatis-3-mapper.dtd"> <mapper namespace="cn.fanchencloud.ssm.mapper.UserMapper"> <resultMap id="BaseResultMap" type="cn.fanchencloud.ssm.entity.User"> <!--@Table test.`user`--> <id column="id" jdbcType="INTEGER" property="id"/> <result column="name" jdbcType="VARCHAR" property="name"/> <result column="age" jdbcType="INTEGER" property="age"/> </resultMap> <sql id="Base_Column_List"> id, `name`, age </sql> <select id="selectUserById" resultMap="BaseResultMap"> select <include refid="Base_Column_List"/> from test.`user` where id = #{id,jdbcType=INTEGER} </select> </mapper> -
创建
MyBatis配置文件mybatis-config.xml<?xml version="1.0" encoding="UTF-8" ?> <!DOCTYPE configuration PUBLIC "-//mybatis.org//DTD Config 3.0//EN" "http://mybatis.org/dtd/mybatis-3-config.dtd"> <configuration> <environments default="development"> <environment id="development"> <transactionManager type="JDBC"/> <dataSource type="POOLED"> <property name="driver" value="com.mysql.cj.jdbc.Driver"/> <property name="url" value="jdbc:mysql://192.168.211.202:3318/test?useUnicode=true&characterEncoding=utf8&rewriteBatchedStatements=true&useSSL=false&serverTimezone=UTC&allowPublicKeyRetrieval=true"/> <property name="username" value="root"/> <property name="password" value="Admin@123456"/> </dataSource> </environment> </environments> <mappers> <mapper resource="mapper/UserMapper.xml"/> </mappers> </configuration> -
创建单元测试文件
import cn.fanchencloud.ssm.entity.User;
import cn.fanchencloud.ssm.mapper.UserMapper;
import org.apache.ibatis.session.SqlSession;
import org.apache.ibatis.session.SqlSessionFactory;
import org.apache.ibatis.session.SqlSessionFactoryBuilder;
import org.junit.Test;

import java.io.IOException;
import java.io.InputStream;

/**
 * Version: V1.0    <br/>
 * Datetime:   2022/6/13 14:41   <br/>
 * Description: 测试MyBatis
 *
 * @author: chen
 */
public class TestMyBatis {

    @Test
    public void testMyBatis() throws IOException {
        // 加载MyBatis配置文件
        InputStream inputStream = TestMyBatis.class.getClassLoader().getResourceAsStream("mybatis-config.xml");
        // 创建SqlSessionFactory
        SqlSessionFactory sqlSessionFactory = new SqlSessionFactoryBuilder().build(inputStream);
        // 获取SqlSession
        SqlSession sqlSession = sqlSessionFactory.openSession();
        // 获取接口实现类对象
        UserMapper userMapper = sqlSession.getMapper(UserMapper.class);
        User user = userMapper.selectUserById(1);
        System.out.println(user);
        sqlSession.close();
        assert inputStream != null;
        inputStream.close();
    }
}
运行该单元测试可以看到正常使用MyBatis查询到数据,并输出
Connected to the target VM, address: '127.0.0.1:56548', transport: 'socket'
User(id=1, name=fanchen, age=18)
Disconnected from the target VM, address: '127.0.0.1:56548', transport: 'socket'

Process finished with exit code 0
整合MyBatis
-
引入相关依赖
<!-- MyBatis-Spring --> <!-- https://mvnrepository.com/artifact/org.mybatis/mybatis-spring --> <dependency> <groupId>org.mybatis</groupId> <artifactId>mybatis-spring</artifactId> <version>2.0.7</version> </dependency> <!-- druid 连接池 --> <!-- https://mvnrepository.com/artifact/com.alibaba/druid --> <dependency> <groupId>com.alibaba</groupId> <artifactId>druid</artifactId> <version>1.2.10</version> </dependency> <!--对JDBC 的简单封装--> <dependency> <groupId>org.springframework</groupId> <artifactId>spring-jdbc</artifactId> <version>5.3.20</version> </dependency> -
修改myBatis配置文件
mybatis-config.xml<?xml version="1.0" encoding="UTF-8" ?> <!DOCTYPE configuration PUBLIC "-//mybatis.org//DTD Config 3.0//EN" "http://mybatis.org/dtd/mybatis-3-config.dtd"> <configuration> <!-- 配置全局属性 --> <settings> <!-- 使用jdbc的getGeneratedKeys获取数据库自增主键值 --> <setting name="useGeneratedKeys" value="true"/> <!-- 使用列别名替换列名 默认:true --> <setting name="useColumnLabel" value="true"/> <!-- 开启驼峰命名转换:Table{create_time} -> Entity{createTime} --> <setting name="mapUnderscoreToCamelCase" value="true"/> <!-- 打印查询语句 --> <!-- <setting name="logImpl" value="LOG4J"/> --> </settings> </configuration> -
创建数据库配置信息文件
db.properties# 驱动名称 driverName=com.mysql.cj.jdbc.Driver # 数据库连接地址 url=jdbc:mysql://192.168.211.202:3318/test?useUnicode=true&characterEncoding=utf8&rewriteBatchedStatements=true&useSSL=false&serverTimezone=UTC&allowPublicKeyRetrieval=true # 数据库用户名 username=root # 数据库密码 password=Admin@123456 -
修改Spring配置文件
applicationContext.xml<?xml version="1.0" encoding="UTF-8"?> <beans xmlns="http://www.springframework.org/schema/beans" xmlns:xsi="http://www.w3.org/2001/XMLSchema-instance" xmlns:context="http://www.springframework.org/schema/context" xmlns:tx="http://www.springframework.org/schema/tx" xsi:schemaLocation="http://www.springframework.org/schema/beans https://www.springframework.org/schema/beans/spring-beans.xsd http://www.springframework.org/schema/context https://www.springframework.org/schema/context/spring-context.xsd http://www.springframework.org/schema/tx http://www.springframework.org/schema/tx/spring-tx.xsd"> <!-- 开启注解的扫描 --> <context:component-scan base-package="cn.fanchencloud.ssm"> <!-- 配置哪些注解不扫描 --> <context:exclude-filter type="annotation" expression="org.springframework.stereotype.Controller"/> </context:component-scan> <!-- 引入 properties 文件 --> <bean class="org.springframework.beans.factory.config.PropertyPlaceholderConfigurer"> <property name="locations"> <list> <value>classpath:db.properties</value> </list> </property> </bean> <!-- 配置 druid 连接池 start --> <bean id="dataSource" class="com.alibaba.druid.pool.DruidDataSource" init-method="init" destroy-method="close"> <property name="driverClassName" value="${driverName}"/> <property name="url" value="${url}"/> <property name="username" value="${username}"/> <property name="password" value="${password}"/> <!-- 连接池初始大小 --> <property name="initialSize" value="5"/> <!-- 最小空闲数 --> <property name="minIdle" value="2"/> <!-- 最大连接数 --> <property name="maxActive" value="20"/> <!-- 获取连接等待超时时间 --> <property name="maxWait" value="60000"/> <!-- 配置间隔多久启动一次验证,每隔多久执行一次验证,检测是否有效连接 --> <property name="timeBetweenEvictionRunsMillis" value="60000"/> <!-- 配置一个连接在池中最小生存的时间 --> <property name="minEvictableIdleTimeMillis" value="300000"/> <!-- 用来验证数据库连接的查询语句 --> <property name="validationQuery" value="select 1"/> <!-- 应用向连接池申请连接,并且testOnBorrow为false时,连接池将会判断连接是否处于空闲状态,如果是,则验证这条连接是否可用 --> <property name="testWhileIdle" value="true"/> <!-- 如果为true,默认是false,应用向连接池申请连接时,连接池会判断这条连接是否是可用的 --> <property name="testOnBorrow" value="false"/> <!-- 如果为true(默认false),当应用使用完连接,连接池回收连接的时候会判断该连接是否还可用 --> <property name="testOnReturn" value="false"/> <!-- 打开PSCache,并且指定每个连接上PSCache的大小 --> <!-- 是否缓存preparedStatement,也就是PSCache。PSCache对支持游标的数据库性能提升巨大,比如说oracle --> <property name="poolPreparedStatements" value="true"/> <!-- 要启用PSCache,必须配置大于0,当大于0时, poolPreparedStatements自动触发修改为true, 在Druid中,不会存在Oracle下PSCache占用内存过多的问题,因为Oracle的PSCache是默认开启的 可以把这个数值配置大一些,比如说100,不过要小于maxActive数量 --> <property name="maxOpenPreparedStatements" value="20"/> <property name="maxPoolPreparedStatementPerConnectionSize" value="20"/> <!-- 连接池中的minIdle数量以内的连接,空闲时间超过minEvictableIdleTimeMillis,则会执行keepAlive操作 --> <property name="keepAlive" value="true"/> <!-- <property name="filters" value="stat,wall,log4j"/> --> </bean> <!-- 配置 druid 连接池 end --> <!-- 配置 SqlSessionFactoryBean --> <bean id="sqlSessionFactory" class="org.mybatis.spring.SqlSessionFactoryBean"> <!-- 配置数据源 --> <property name="dataSource" ref="dataSource"/> <!-- 配置扫描实体类的目录 --> <property name="typeAliasesPackage" value="cn.fanchencloud.ssm.entity"/> <!-- 扫描sql配置文件:mapper需要的xml文件 --> <property name="mapperLocations" value="classpath:mapper/*.xml"/> <!-- 配置 MyBatis 全局配置文件:mybatis-config.xml --> <property name="configLocation" value="classpath:mybatis-config.xml"/> </bean> <!-- 配置dao接口位置 --> <bean class="org.mybatis.spring.mapper.MapperScannerConfigurer"> <property name="basePackage" value="cn.fanchencloud.ssm.mapper"/> </bean> <!--配置事务管理器--> <bean id="transactionManager" class="org.springframework.jdbc.datasource.DataSourceTransactionManager"> <property name="dataSource" ref="dataSource"/> </bean> <!--启用事务注解--> <tx:annotation-driven/> </beans>修改比较多,主要是配置了Druid数据源、配置SqlSessionFactory、配置dao接口位置、配置事务管理器、启用事务注解
-
修改
TestService、UserService-
UserService.java
package cn.fanchencloud.ssm.service; import cn.fanchencloud.ssm.entity.User; import org.springframework.stereotype.Service; import javax.annotation.Resource; import cn.fanchencloud.ssm.mapper.UserMapper; /** * Version: V1.0 <br/> * Datetime: 2022/6/13 15:39 <br/> * Description: ${DES} * * @author: chen */ @Service public class UserService{ @Resource private UserMapper userMapper; /** * 根据id查询用户 * @param id 用户id * @return 用户 */ public User getUserById(int id) { return userMapper.selectUserById(id); } } -
TestService.java
package cn.fanchencloud.ssm.service;

import cn.fanchencloud.ssm.entity.User;
import org.springframework.beans.factory.annotation.Autowired;
import org.springframework.stereotype.Service;

/**
 * Version: V1.0    <br/>
 * Datetime:   2022/6/13 2:03   <br/>
 * Description: 测试服务
 *
 * @author: chen
 */
@Service
public class TestService {

    private UserService userService;

    public String test() {
        System.out.println("Test 服务 查询 。。。。");
        User user = userService.getUserById(1);
        System.out.println(user);
        return "test";
    }

    @Autowired
    public void setUserService(UserService userService) {
        this.userService = userService;
    }
}
-
-
运行试验
还是部署至Tomcat后,在浏览器中输入http://localhost:8080/test/test进行查看,Jsp页面正常渲染,控制台输出查询到的用户信息
Test 服务 查询 。。。。
User(id=1, name=fanchen, age=18)
配置返回Json数据的支持
到上面的步骤为止,已经可以完成对于SSM框架的整合了,但是在对前端提供Json数据的时候会发现,如果只返回普通的String字符串的话完全没问题,但是当返回的数据为对象或者复杂的封装结构的时候请求该接口会出现
406的报错,因此还需要进行以下配置
-
对返回数据格式进行封装
创建数据封装类
Msg—— 创建Msg.javapackage cn.fanchencloud.ssm.vo; import cn.fanchencloud.ssm.enums.HttpCode; import com.alibaba.fastjson.annotation.JSONField; import lombok.Data; import lombok.experimental.Accessors; /** * Created by handsome programmer. * ProjectName: academyProject * User: chen * Date: 2021/12/2 * Time: 0:48 * Description: 统一返回格式 * * @author chen */ @Data @Accessors(chain = true) public class Msg<T> { /** * 状态码 */ @JSONField(ordinal = 1) private int code; /** * 返回内容 */ @JSONField(ordinal = 2) private String msg; /** * 数据对象 */ @JSONField(ordinal = 3) private T data; /** * 私有化构造函数,防止手动创建实例 */ private Msg() { } /** * 私有化全参构造函数 * * @param code 状态码 * @param msg 消息 * @param data 数据 */ private Msg(int code, String msg, T data) { this.code = code; this.msg = msg; this.data = data; } /** * 返回成功消息 * * @return 成功消息 */ public static Msg<Void> success() { return Msg.msg(null); } /** * 返回成功数据 * * @return 成功消息 */ public static <T> Msg<T> success(T data) { return Msg.success("success", data); } /** * 返回成功消息 * * @param msg 返回内容 * @return 成功消息 */ public static Msg<Void> msg(String msg) { return Msg.success(msg, null); } /** * 返回成功消息 * * @param msg 返回内容 * @param data 数据对象 * @return 成功消息 */ public static <T> Msg<T> success(String msg, T data) { return new Msg<>(HttpCode.SUCCESS, msg, data); } /** * 返回错误消息 * * @return 警告消息 */ public static Msg<Void> error() { return Msg.error("操作失败"); } /** * 返回错误消息 * * @param msg 返回内容 * @return 警告消息 */ public static Msg<Void> error(String msg) { return Msg.error(msg, null); } /** * 返回错误消息 * * @param msg 返回内容 * @param data 数据对象 * @return 警告消息 */ public static <T> Msg<T> error(String msg, T data) { return new Msg<>(HttpCode.UNKNOWN, msg, data); } /** * 返回错误消息 * * @param code 状态码 * @param msg 返回内容 * @return 警告消息 */ public static Msg<Void> code(int code, String msg) { return new Msg<>(code, msg, null); } /** * 资源不存在 */ public static Msg<Void> notFound() { return new Msg<>(HttpCode.NOT_FOUND, "资源不存在", null); } /** * 资源不存在 * * @param message 返回内容 */ public static Msg<Void> notFound(String message) { return new Msg<>(HttpCode.NOT_FOUND, message, null); } /** * 系统错误 */ public static Msg<Void> systemError() { return new Msg<>(HttpCode.INTERNAL_ERROR, "系统处理异常", null); } /** * 系统错误 * * @param message 返回内容 */ public static Msg<Void> systemError(String message) { return new Msg<>(HttpCode.INTERNAL_ERROR, message, null); } /** * 无权限访问 */ public static Msg<Void> noPermission() { return new Msg<>(HttpCode.FORBIDDEN, "无权限访问", null); } } -
修改MVC的数据转换器 —— 修改Spring MVC的配置文件
    <!-- 开启SpringMVC注解的支持 -->
    <mvc:annotation-driven/>
将上面的配置修改成下面的
	<!-- 开启SpringMVC注解的支持 -->
    <mvc:annotation-driven>
        <mvc:message-converters register-defaults="true">
            <bean class="com.alibaba.fastjson.support.spring.FastJsonHttpMessageConverter">
                <property name="supportedMediaTypes">
                    <list>
                        <value>application/json;charset=UTF-8</value>
                        <value>text/json;charset=UTF-8</value>
                    </list>
                </property>
                <property name="features">
                    <array value-type="com.alibaba.fastjson.serializer.SerializerFeature">
                        <!-- 避免循环引用 -->
                        <value>DisableCircularReferenceDetect</value>
                        <!-- 配置时间返回格式 -->
                        <value>WriteDateUseDateFormat</value>
                    </array>
                </property>
            </bean>
        </mvc:message-converters>
    </mvc:annotation-driven>
记得引入fastjson的依赖


 1060
1060


 被折叠的 条评论
为什么被折叠?
被折叠的 条评论
为什么被折叠?
 到【灌水乐园】发言


