


webpack 4笔记
定义
模块化打包工具 可以识别任何模块化引入的方法;
模块化处理
ES module :
 import Header from './header.js';
 export default Header;
CommonJS :
var Header = require('./header.js');
module.exports = Header;
AMD CMD 模块化引入;
https://www.webpackjs.com/api/module-methods/#import-
环境
node:7.10.1
npm: 5.5.1
webpack 4.26.0 wabpack-cli 3.1.2
安装 npm install webpack@4.26.0 webpack-cli@3.1.2 -g (-g全局 -d本地)
loader
处理css style-loader css-loader sass-loader postcss-loader
链接: https://www.webpackjs.com/loaders/
postcss-loader支持css3跨浏览器支持 项目目录创建postcss.config.js 配置autoprefixer 再在项目创建.browserslistrc文件
last 2 version
> 1%
iOS >= 7
Android > 4.1
Firefox > 20
如果想在scss文件引入scss文件并处理 要配置css-loader options
{
		loader: "css-loader",
    options: {
 //在 css-loader 前应用的 loader 的数量 比如在scss文件里重新引入别的scss文件 需要配置两个loader重新编译
 			importLoaders: 2,
      modules: true, //使用css模块化
      },
 },
plugin
plugin可以在webpack在运行到某一时刻帮你做一些事情
链接: https://www.webpackjs.com/plugins/
常见的plugin clearwebpackplugin htmlwebpackplugin
Entry
基本配置
链接https://www.webpackjs.com/configuration/entry-context/
 entry: { //多入口打包 打包成功后挂载到cdn上
		main: "./src/index.js",
    sub: "./src/index.js"
	},
	output: {
		publicPath: "./", //可以配置cdn 如果服务器存储了打包后的js
		path: path.resolve(__dirname, "dist"),
		filename: "[name].js", //入口文件的key值对应的文件名
	},
Devtool
Sourcemap
链接 https://www.webpackjs.com/configuration/devtool/
生产: 如果需要souremap 使用 cheap-module-source-map;
dev: cheap-module-eval-source-map;
webpackdevServer
三种方法 实现热加载
链接https://www.webpackjs.com/configuration/dev-server/
一:Package,json script里配置
"scripts": {
    "watch": "webpack --watch"
  },
修改源代码会自动打包 但是会清除html文件 要在clearwebpackplugin配置参数
new CleanWebpackPlugin({cleanStaleWebpackAssets: false}),
二:webpackdevserver
安装webpack-dev-server: npm i webpack-dev-server -D
Webpack.config.js里配置devserver
devServer: {
    publicPath: '/',  //没有配置 页面显示空白
		contentBase: "./dist",
},
Package.json里配置
"scripts": {
    "start": "webpack-dev-server"
},
三: 通过node express 和 webpack-dev-middleware手写server
下载安装 npm i express webpack-dev-middleware -D
项目目录下创建一个server.js
const express = require('express');
const webpack = require('webpack');
const webpackMiddleware = require("webpack-dev-middleware"); //webpack-dev-middleware 是一个express中间件
const config = require('./webpack.config.js');
const complier = webpack(config); // 创建编译器

const app = express();
app.use(webpackMiddleware(complier, {
    publicPath: config.devServer.publicPath,
}))

app.listen(3000, () => {
    console.log('server is running at http://localhost:3000');
})
Package.json
"scripts": {
    "server": "node server.js"
  },
也可以启动一个服务
HMR(HotModuleReplacementPlugin )
作用: 修改css代码之后 不用刷新页面 更新现有的dom;
链接: https://www.webpackjs.com/api/hot-module-replacement/
使用方法 webpack.config.js
devServer: {
	hot: true,
  hotOnly: true,
}
//引入const webpack = require('webpack');
plugins: [
	new webpack.HotModuleReplacementPlugin()
]
Css vue react 修改会自动刷新是因为 相应的loader中 已经内置了 hmr的代码
如果修改js中的代码 实现局部刷新 要在js代码中编写
import Number from './number';

Number();

if(module.hot) { //修改number里的内容 要重新删除原来的内容 并执行新的内容
    module.hot.accept('./number', () => {
        document.body.removeChild(document.getElementById('Number'));
        Number();
    })
}
babel
安装 npm install --save-dev babel-loader @babel/core
安装npm install @babel/preset-env --save-dev
链接:https://www.babeljs.cn/setup#installation
Module 配置rules
{
  test: /\.m?js$/,
    exclude: /node_modules/,
      use: {
        loader: "babel-loader",
          options: {
            presets: ["@babel/preset-env"],
          },
      },
},
作用es6=>es5的规则 但是部分语法是没有转化的 要借助babel/polyfill
安装 npm install --save @babel/polyfill
在 index.js 引入import ‘@babel/polyfill’;
这样会使打包后的文件变大 因为将所有es6语法都做了兼容
然后需要配置一下 preset-env
	presets: [[ //双括号
    "@babel/preset-env",
    {
      "targets": {
        chrome: ">67",//兼容浏览器版本
      },
      "useBuiltIns": "usage", //使用usage 或者是entry 都是默认添加babel/polyfill
    },
  ]],
但是项目中还是不要再index.js 引入babel/polyfill 会污染全局环境
安装 npm install --save-dev @babel/plugin-transform-runtime npm install --save @babel/runtime
链接: https://www.babeljs.cn/docs/babel-plugin-transform-runtime
讲解: https://zhuanlan.zhihu.com/p/147083132
Webpack.config.js
options: {
  // presets: [[
  // 	"@babel/preset-env",
  // 	{
  // 		// "targets": {
  // 		// 	"chrome": "67",
  // 		// },
  // 		"useBuiltIns": "usage", 为了让polyfill 按需引入 减小包体积
  // 	},
  // ]],
  plugins: [
    [
      "@babel/plugin-transform-runtime",
      {
        corejs: 2, //这里要引入一个corejs2的包 npm install --save @babel/runtime-corejs2
        helpers: true,
        regenerator: true,
        useESModules: false,
      },
    ],
  ],
},
这样引入的好处 就是避免 全局引入babel/polyfill
使用.babelrc文件
将webpack.config.js里的barbel.options配置 移除到这个文件 效果一样
[外链图片转存失败,源站可能有防盗链机制,建议将图片保存下来直接上传(img-Lpr95ymM-1651137926784)(/Users/cairenjie/Library/Application Support/typora-user-images/image-20220410224725585.png)]
使用babel.config.js 一样道理
创建babel.config.js
module.exports = {
	...options, //options 就是babel的配置
}
Tree shaking
针对与生产环境
并且只支持ES modules 通过import 引入的资源 没有使用到会被过滤
案例https://blog.csdn.net/qq_36605165/article/details/116845921
//生产环境默认有摇树优化
但是需要配置 sideEffects 在package.json里
如果是开发环境想要配置 修改 webpack.config.js 和 package.json
//webpack.config.js
optimization: {
  usedExports: true,
}
//package.json
"sideEffects": false, //排除响应模块 false: 所有模块都需要摇树优化

  "sideEffects": [ //css文件没有 export 所以要排除
    "*.css"
  ]
webpack环境 模块化配置webpack
development : 配置项webpack.dev.js 通过webpack-dev-server启动
production :配置项webpack.prod.js 打包
"scripts": {
    "dev": "webpack-dev-server --config webpack.dev.js",
    "build": "webpack --config webpack.prod.js"
  },
将webpack dev 和 prod 两个js 全部提取出来 通过webpack-merge
const merge = require('webpack-merge');
const commConfig = require('./webpack.common.js');

const prodConfig = {
	mode: "production",
	devtool: "cheap-module-source-map",
};

module.exports = merge(commConfig, prodConfig);
webpack 和 Code splitting
eg:首次访问页面的时候 引入 loadsh 第三方插件库 很大
业务代码1mb 插件1mb 打包2mb的main.js
修改业务代码之后 又重新打包2mb的文件
解决方法
将loadsh 放在src/lodash.js内 然后在webpack.common.js里配置一个入口
//lodash.js
import _ from 'lodash';
window._ = _;
entry: {
		lodash: ["./src/lodash.js"]
		main: ["./src/index.js"],
	},
打包会生成两个js ;这样 再次修改业务代码 只会更新1mb的 main.js 不会更新lodash.js
SplitChunksPlugin
解析: https://juejin.cn/post/6992887038093557796
webpack 官网https://www.webpackjs.com/plugins/split-chunks-plugin/
optimization: {
    splitChunks: { //splitChunk默认对异步打包
      chunks: "all", //async initial 异步同步 all所有
      minSize: 30000,
      minChunks: 1,
      maxAsyncRequests: 5,
      maxInitialRequests: 3,
      automaticNameDelimiter: "~",
      name: true,
      cacheGroups: { //缓存分组
        vendors: {
          test: /[\\/]node_modules[\\/]/,//打包后的文件名 打包node_modules内的
          priority: -10,
		  		filename: 'vendors.js',
        },
        default: {
          minChunks: 1,
          priority: -20,
          reuseExistingChunk: true,
        },
      },
    },
  },
splitChunks 默认对import异步引入进行打包( / *webpackChunkName: ‘sss’ */) 通过注释的方法进行异步chunks
npm i @babel/plugin-syntax-dynamic-import -D
MiniCssExtractPlugin
参考: https://webpack.docschina.org/plugins/css-minimizer-webpack-plugin/
参考: https://webpack.docschina.org/plugins/mini-css-extract-plugin/
将css文件与js文件抽离开
缺点就是不支持HMR热更新css 所以开发环境不好用 只配置到生产环境
npm:
npm i -D mini-css-extract-plugin@0.5.0
在webpack.prod.js
然后在通过css-minimizer-webpack-plugin 对css文件进行压缩整合
npm install css-minimizer-webpack-plugin@1.3.0--save-dev
const merge = require("webpack-merge");
const commConfig = require("./webpack.common.js");
const MiniCssExtractPlugin = require("mini-css-extract-plugin");
const CssMinimizerPlugin = require("css-minimizer-webpack-plugin");

const prodConfig = {
  mode: "production",
  devtool: "cheap-module-source-map",
  module: {
    rules: [
      {
        test: /\.css$/,
        use: [MiniCssExtractPlugin.loader, "css-loader", "postcss-loader"], //cssloader 处理css相关文件成一个css 然后通过style-loader 将css插入到html中
      },
      {
        test: /\.scss$/,
        use: [
          MiniCssExtractPlugin.loader,
          {
            loader: "css-loader",
            options: {
              //在 css-loader 前应用的 loader 的数量 比如在scss文件里重新引入别的scss文件 需要配置两个loader重新编译
              importLoaders: 2,
              modules: true, //使用css模块化
            },
          },
          "sass-loader",
          "postcss-loader",
        ],
      },
    ],
  },
  optimization: {
    minimizer: [
      // 在 webpack@5 中,你可以使用 `...` 语法来扩展现有的 minimizer(即 `terser-webpack-plugin`),将下一行取消注释
      // `...`,
      new CssMinimizerPlugin(),
    ],
  },
  plugins: [
    new MiniCssExtractPlugin({
      fileName: "[name].css",
      chunkFilename: "[name].chunk.css",
    }),
  ],
};

module.exports = merge(commConfig, prodConfig);
package.json里要设置
"sideEffects": [
    "*.css" //如果是false 则生产环境不会将css分离
  ],
生产环境打包js 添加hash值对浏览器做缓存
output: {
    publicPath: "./", //可以配置cdn 如果服务器存储了打包后的js
    path: path.resolve(__dirname, "../dist"),
    filename: "[name][contenthash].js", //根据hash解决浏览器缓存
    chunkFilename: "[name][contenthash].js", //根据hash解决浏览器缓存
  },
js 如果没有更新 响应的chunkFilename 的hash值不变
如果发现没有改变js 的情况下 打包的hash值发生了改变则需要在optimization进行runtime配置
optimization: {
  runtimeChunk:{
    name: 'runtime'
  },
}
Shimming(webpack 垫片)
类似于JQ这样的插件$ 如果说每一个模块下的js都要使用$ 那么都需要import引入一遍
webpack内置了 ProvidePlugin插件
new webpack.ProvidePlugin({
      $: "jquery",
    })
这样不需要单独引入就可以直接使用$
模块下的this
模块下js的this不指向window 需要imports-loader将this指向window
下载: npm i -D imports-loader@0.8.0
webpack.common.js
{
    test: /\.m?js$/,
        exclude: /node_modules/,
            use: [
                {
                    loader: 'babel-loader',
                },
                {
                    lodaer: 'imports-loader?this=>window',
                }
            ],
},
但是这样 import 会报错 所以不建议将window this指向改变
PWA
作用是 服务器如果断开连接 再次访问会有缓存 只针对线上的代码 webpack.prod.js
npm i -D workbox-webpack-plugin
const WorkboxPlugin = require('workbox-webpack-plugin')
plugins: [
	new  WorkboxPlugin.GennerateSW({
		clientsClaim: true,
		skipWaiting: true
	})
]
这样打包会生成一个service-worker.js 是一个缓存文件
然后再src/index.js 添加一个监听
if('serviceWorker' in navigator) {
	window.addEventListener('load', () => {
		navigator.serviceWorker.register('/service-worker.js')
		.then(registration => {
			console.log('service-worker registed')
		}).catch(err => {
			console.log('service-worker registed error')
		})
	})
}
TypeScript打包配置
安装 npm i -D ts-loader@5.3.2 typescript@3.2.2
types 什么文件查询 https://www.typescriptlang.org/dt/search?search=lodash
需要再项目下创建tsconfig.json
配置rules
rules: [
    {
        test: /\.m?tsx$/,
        exclude: /node_modules/,
        use: [
            {
                loader: 'ts-loader',
            },
        ],
    },
],
如果需要下载插件 比如jquery 还需要下载@types/jquery lodash @types/lodash
webpack打包优化
1:提升npm node yarn 版本 会对webpack打包速度有一定的提升
2: loader 的作用范围要缩小
3: plugin 也不要滥用 根据环境响应的使用 还有就是plugin的可靠性
resolve 参数
如果import 引入一个js 默认可以不用加.js 如果引入的是一个jsx 就会报错 所以要配置reslove参数
比如 import child from ‘child’ //默认就是js 如果是一个jsx 不配置extensions必须写明后缀
import child from 'child.jsx’才可以
function resolve (dir) {
  return path.join(__dirname, ".", dir);
}
resolve: {
  extensions: ['.js', '.jsx', '.json'], //extensions 不要配置太多 会加重解析
  mainFiles: ['index'], //引入一个目录 默认去找当下的index.js
 	alias: {
    "@": resolve("src"),
  } //引入别名
},
webpack优化DLL动态链接库
参考: https://juejin.cn/post/6957597810938085384
目标:
1 第三方模块只打包一次
2 我们引入第三方模块的时候 要用dll文件引入
创建一个webpack.dll.js
const path = require('path');

//将react react-dom lodash 打包到dll文件下的vendors.dll.js
module.exports = {
    entry: {
        vendors: ['react', 'react-dom', 'lodash'],
    },
    output: {
        filename: '[name].dll.js',
        path: path.resolve(__dirname, '../dll'),
        library: '[name]', //将js打包生成一个库 配置了library可以用script标签引入
    },
  	plugins: [ //将vendors.dll.js 做一个json映射
        new webpack.DllPlugin({
            name: '[name]',
            path: path.resolve(__dirname, '../dll/[name].manifest.json'),
        })
    ]
}
然后在dll文件夹下面创建了一个 vendors.dll.js
然后我们需要将这个js 动态引入到 打包后的html里 需要按照一个add-asset-html-webpack-plugin;
下载: npm i add-asset-html-webpack-plugin
在webpack.common.js里plugins里配置
plugins: [
  new CleanWebpackPlugin({ cleanStaleWebpackAssets: false }),
  new HemlWebpackPlugin({
    template: "./src/index.html",
    filename: "index.html",
  }),
  new AddAssetHtmlPlugin({
    filepath: require.resolve(__dirname, '../dll/vendors.dll.js'),
  }),
  webpack.DllReferencePlugin({ //然后通过dll映射的文件 使用
    manifest: path.resolve(__dirname, '../dll/vendors.manifest.json'),
  })
],
如果说 将webpack.dll.js 里的entry配置多个的时候 那么引入就会变得很多
entry: {
  vendors: ['lodash'],
  react: ['react', 'react-dom'],
},
Webpack.common.js里的 配置
plugins: [
		new CleanWebpackPlugin({ cleanStaleWebpackAssets: false }),
		new HemlWebpackPlugin({
			template: "./src/index.html",
			filename: "index.html",
		}),
    new AddAssetHtmlPlugin({
      filepath: path.resolve(__dirname, '../dll/vendors.dll.js'),
    }),
    new AddAssetHtmlPlugin({
      filepath: path.resolve(__dirname, '../dll/react.dll.js'),
    }),
    new webpack.DllReferencePlugin({
      manifest: path.resolve(__dirname, '../dll/vendors.manifest.json'),
    }),
    new webpack.DllReferencePlugin({
      manifest: path.resolve(__dirname, '../dll/react.manifest.json'),
    }),
	],
再配置多个的话 手动配置就会很麻烦 解决办法
Webpack.common.js 首先定义一个 公共plugins
const plugins = [
  new CleanWebpackPlugin({ cleanStaleWebpackAssets: false }),
  new HemlWebpackPlugin({
    template: "./src/index.html",
    filename: "index.html",
  }),
]
然后根据nodejs 将 dll和 manifest文件 遍历
const fs = require('fs');
const path = require('path');
const files = fs.readdirSync(path.resolve(__dirname, '../dll'));
webpack 配置多页面打包
webpack.common.js里配置多个入口
entry: {
    main: ['./src/index.js'],
    demo: ['./src/demo.js']
},
然后plugins里配置多个
[
  new CleanWebpackPlugin({ cleanStaleWebpackAssets: false }),
  new HemlWebpackPlugin({
    template: './src/index.html',
    filename: 'index.html',
	chunks: ['runtime', 'vendors', 'main'],	 //打包的html加载的chunkjs
  }),
  new HemlWebpackPlugin({
    template: './src/index.html',
    filename: 'demo.html',
	chunks: ['runtime', 'vendors', 'demo'],
  }),
];
然后打包 会在dist目录下生成两个html 分别加载各自的资源
但是如果多页面的个数很多 这样写就比较冗余
整个将plugins 改写
const path = require('path');
const fs = require('fs');
const { CleanWebpackPlugin } = require('clean-webpack-plugin');
const HemlWebpackPlugin = require('html-webpack-plugin');
const BundleAnalyzerPlugin = require('webpack-bundle-analyzer').BundleAnalyzerPlugin;
const webpack = require('webpack');
const AddAssetHtmlPlugin = require('add-asset-html-webpack-plugin');

const merge = require('webpack-merge');
const devConfig = require('./webpack.dev.js');
const prodConfig = require('./webpack.prod.js');
function resolve(dir) {
  return path.join(__dirname, '.', dir);
}

const makePlugins = (config) => {
  //生成plugins
  const comPlugins = [ //公共的plugins
    new CleanWebpackPlugin({ cleanStaleWebpackAssets: false }),
    new webpack.ProvidePlugin({
      $: 'jquery',
      _: 'lodash',
    }),
  ];
	//根据多入口的entry 名称生成html
  Object.entries(config.entry).forEach(([name, value]) => {
    comPlugins.push(
      new HemlWebpackPlugin({
        template: './src/index.html',
        filename: `${name}.html`,
        chunks: ['runtime', 'vendors', name],
      })
    );
  });
  //dll 映射加载plugins
  const files = fs.readdirSync(path.resolve(__dirname, '../dll'));
  files.forEach((file) => {
    if (file.includes('.manifest')) {
      comPlugins.push(
        new webpack.DllReferencePlugin({
          manifest: path.resolve(__dirname, `../dll/${file}`),
        })
      );
    }
    if (file.includes('.dll')) {
      comPlugins.push(
        new AddAssetHtmlPlugin({
          filepath: path.resolve(__dirname, `../dll/${file}`),
        })
      );
    }
  });
  return comPlugins;
};

const commConfig = {
  entry: {
    main: ['./src/index.js'],
    demo: ['./src/demo.js'],
	list: ['./src/list.js']
  },
  resolve: {
    extensions: ['.js', '.jsx', '.json'],
    mainFiles: ['index'], //引入一个目录 默认去找当下的index.js
    alias: {
      '@': resolve('src'),
    }, //引入别名
  },
  module: {
    rules: [
      {
        test: /\.m?jsx?$/,
        exclude: /node_modules/,
        include: path.resolve(__dirname, '../src'),
        use: [
          {
            loader: 'babel-loader',
          },
          {
            loader: 'imports-loader',
          },
        ],
      },
      {
        test: /\.(png|jpe?g|gif|svg)(\?.*)?$/,
        use: {
          loader: 'file-loader',
          options: {
            //placeholder: '占位符'
            name: '[name]_[hash].[ext]',
            outputPath: 'images/', //打包后的图片存放的文件夹
            limit: 10240, //10k
          },
        },
      },
    ],
  },
  plugins: [
    // new BundleAnalyzerPlugin(),
  ],
  optimization: {
    runtimeChunk: {
      name: 'runtime',
    },
    usedExports: true,
    splitChunks: {
      //splitChunk默认对异步打包
      chunks: 'all', //async initial 异步同步 all所有
      minSize: 30000,
      minChunks: 1,
      maxAsyncRequests: 5,
      maxInitialRequests: 3,
      automaticNameDelimiter: '~',
      name: true,
      cacheGroups: {
        //缓存分组
        vendors: {
          test: /[\\/]node_modules[\\/]/, //打包后的文件名 打包node_modules内的
          filename: 'vendors-chunk.js',
          priority: -10,
        },
        default: {
          //打包引入自己的js
          minChunks: 1,
          priority: -20,
          reuseExistingChunk: true,
        },
      },
    },
  },
};

commConfig.plugins = makePlugins(commConfig);

module.exports = (env) => {
  if (env && env.production) {
    //env.production 是package.json --env.production 传的参数
    return merge(commConfig, prodConfig);
  } else {
    return merge(commConfig, devConfig);
  }
};
如何编写一个loader
api: https://www.webpackjs.com/api/loaders/
首先编写一个index.js
console.log('hello del')
loader本是就是一个函数 目的是将del 改变
webpack.config.js
module: {
    rules: [
      {
        test: /\.js$/,
        use: [
          {
            loader: path.resolve(__dirname, './loaders/replaceLoader.js'),
            options: { name: 'lee' }, //传递一个参数
          },
        ],
      },
    ],
  },
创建loaders文件夹 下面创建一个replaceLoader.js
//不可以用箭头函数 因为要使用this
module.exports = function (source) {
    console.log(this.query.name);
    return source.replace('dell', this.query.name);
};
也可以使用options 获取参数 但是需要下载loader-utils [npm i loader-utils@1.2.3 -D]
const loaderUtils = require('loader-utils');

module.exports = function (source) {
    const options = loaderUtils.getOptions(this);
    console.log(options);
    const res = source.replace('dell', options.name);
    this.callback(null, res)
};
然后进行打包
eval("console.log('hello lee');\r\n\n\n//# sourceURL=webpack:///./src/index.js?"); //打包后的结果
将dell 改变成了 lee
手写Plugin
实现一个打包结束后 在dist文件下生产一个版权信息的文件
loader是一个函数 plugin是一个类
在项目目录下创建一个Plugins目录 创建一个copyright-webpack-plugin.js
class CopyrightWebpackPlugin {
    constructor() {
        console.log('CopyrightWebpackPlugin constructor');
    }

    apply(compiler) {

    }
}

module.exports = CopyrightWebpackPlugin;
然后在 webpack.config.js里 引入
const path = require('path');
const CopyrightWebpackPlugin = require('./plugins/copyright-webpack-plugin');

module.exports = {
  mode: 'development',
  entry: {
    main: ['./src/index.js'],
  },
  output: {
    path: path.resolve(__dirname, './dist'),
    filename: '[name].js',
  },
  plugins: [
    new CopyrightWebpackPlugin(),
  ]
};
官网api https://www.webpackjs.com/api/compilation-hooks/
Apply 接收一个compiler对象
class CopyrightWebpackPlugin {
    apply(compiler) {
        compiler.hooks.emit.tapAsync('CopyrightWebpackPlugin', (compilation, cb) => {
            compilation.assets['copyright.txt'] = {
                source: function () {
                    return 'copyright by webpack-plugin-copyright';
                },
                size: function () {
                    return this.source().length;
                }
            }
            cb();
        })
    }
}

module.exports = CopyrightWebpackPlugin;
如果想查看compilation 对象的信息 在里面console.log(compilation) 运行 不是很直观
使用node 命令 package.json里配置一个信息
"scripts": {
  "debug": "node --inspect --inspect-brk node_modules/webpack/bin/webpack.js"
},
运行 会在浏览器弹出一个node debugger
class CopyrightWebpackPlugin {
    apply(compiler) {
        //同步
        // compiler.hooks.compile.tap('CopyrightWebpackPlugin', (compilation, cb) => {
        //    console.log(compilation, 'compilation')
        // })
        //异步
        compiler.hooks.emit.tapAsync('CopyrightWebpackPlugin', (compilation, cb) => {
            debugger;
            compilation.assets['copyright.txt'] = {
                source: function () {
                    return 'copyright by webpack-plugin-copyright';
                },
                size: function () {
                    return this.source().length;
                }
            }
            cb();
        })
    }
}

module.exports = CopyrightWebpackPlugin;
在代码中添加debugger; 再去运行
实现一个bundler 简单的webpack打包
创建bundler.js
首先 如何对入口文件进行分析;
"scripts": {
    "bundler": "node ./bundler.js | highlight" //npm i highlight -g (Node代码高亮)
  },
安装babel-parser: npm i @babel/parser --save https://www.babeljs.cn/docs/babel-parser
const fs = require("fs");
const parser = require("@babel/parser");

const moduleAnalyser = (filename) => {
	const content = fs.readFileSync(filename, "utf-8");
	let ast = parser.parse(content, {
		sourceType: "module",
	});
	console.log(ast.program);
};

moduleAnalyser("./src/index.js");
打印结果是ast语法树 然后在通过babel-traverse: https://www.babeljs.cn/docs/babel-traverse
npm install --save @babel/traverse
还需要将es module的写法进行babel转化 安装babel-core
对入口文件进行分析;
const fs = require("fs");
const path = require("path");
const parser = require("@babel/parser");
const traverse = require("@babel/traverse").default;
const babel = require("@babel/core");

const moduleAnalyser = (filename) => {
	const content = fs.readFileSync(filename, "utf-8"); //获取文件里的内容
	let ast = parser.parse(content, {
		sourceType: "module",
	}); //将内容转化成ast语法树
	const dependencies = {};// 将语法树的文件路径 保存
	traverse(ast, {
		ImportDeclaration({ node }) {
			const dirname = path.dirname(filename);
			const newFile = "./" + path.join(dirname, node.source.value);
			dependencies[node.source.value] = newFile;
		},
	});

	const { code } = babel.transformFromAst(ast, null, { //将ast语法树转化成浏览器可执行的code
		presets: ["@babel/preset-env"],
	});
	return {
		filename,
		dependencies,
    code, //将ast转换成js代码
	};
};

const moduleInfo = moduleAnalyser("./src/index.js");
console.log(moduleInfo);
对入口文件 进行递归遍历 处理
//分析所有模块引入的文件 递归遍历
const makeDependenciesGraph = (entry) => {
	const entryModule = moduleAnalyser(entry);
	const graphArray = [entryModule];
	for (let i = 0; i < graphArray.length; i++) {
		const item = graphArray[i];
		const { dependencies } = item;
		for (let j in dependencies) {
			graphArray.push(moduleAnalyser(dependencies[j]));
		}
	}

	const graph = {};
	graphArray.forEach((item) => {
		graph[item.filename] = {
			dependencies: item.dependencies,
			code: item.code,
		};
	});

	return graph;
};

const graphInfo = makeDependenciesGraph("./src/index.js");
然后将递归遍历的ast语法树解析
graph对象

const generateCode = (entry) => {
    const graph = JSON.stringify(makeDependenciesGraph(entry));
    return `
        (function(graph){
            function require(module) {
                function localRequire(relativePath) { //递归遍历
                    return require(graph[module].dependencies[relativePath])
                }
                var exports = {};
                (function(require, exports, code) {
                    eval(code)
                })(localRequire, exports, graph[module].code)

                return exports;
            }
            require('${entry}');
        })(${graph});
    `
}

const code = generateCode("./src/index.js");
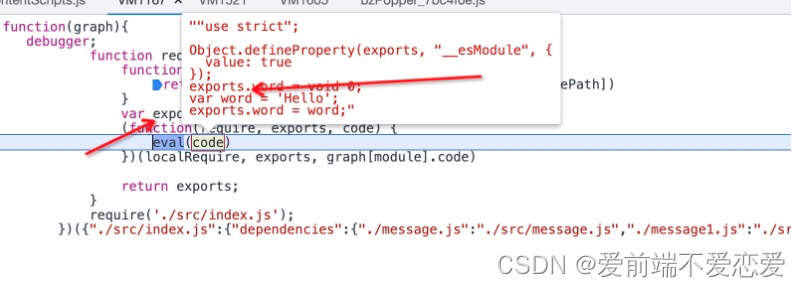
因为解析的code 有exports对象 所以创建exports对象 最后导出
浏览器可以直接执行:
(function(graph){
            function require(module) {
                function localRequire(relativePath) {
                    return require(graph[module].dependencies[relativePath])
                }
                var exports = {};
                (function(require, exports, code) {
                    eval(code)
                })(localRequire, exports, graph[module].code)

                return exports;
            }
            require('./src/index.js');
        })({"./src/index.js":{"dependencies":{"./message.js":"./src/message.js","./message1.js":"./src/message1.js"},"code":"\"use strict\";\n\nvar _message = _interopRequireDefault(require(\"./message.js\"));\n\nvar _message2 = require(\"./message1.js\");\n\nfunction _interopRequireDefault(obj) { return obj && obj.__esModule ? obj : { \"default\": obj }; }\n\nconsole.log(_message[\"default\"], _message2.msg);"},"./src/message.js":{"dependencies":{"./word.js":"./src/word.js"},"code":"\"use strict\";\n\nObject.defineProperty(exports, \"__esModule\", {\n  value: true\n});\nexports[\"default\"] = void 0;\n\nvar _word = require(\"./word.js\");\n\nvar message = \"Hello \".concat(_word.word, \"!\");\nvar _default = message;\nexports[\"default\"] = _default;"},"./src/message1.js":{"dependencies":{},"code":"\"use strict\";\n\nObject.defineProperty(exports, \"__esModule\", {\n  value: true\n});\nexports.msg = void 0;\nvar msg = 'msg1';\nexports.msg = msg;"},"./src/word.js":{"dependencies":{},"code":"\"use strict\";\n\nObject.defineProperty(exports, \"__esModule\", {\n  value: true\n});\nexports.word = void 0;\nvar word = 'Hello';\nexports.word = word;"}});
打印结果Hello Hello! msg1
本人的github地址 可以参考代码
https://github.com/cai1994214/webpack-demo


 312
312


 被折叠的 条评论
为什么被折叠?
被折叠的 条评论
为什么被折叠?
 到【灌水乐园】发言


