


<LinearLayout xmlns:android="http://schemas.android.com/apk/res/android"
    xmlns:app="http://schemas.android.com/apk/res-auto"
    xmlns:tools="http://schemas.android.com/tools"
    android:layout_width="match_parent"
    android:layout_height="match_parent"
    android:orientation="vertical"
    tools:context="com.js.shubin.zhuangtailanapplication.MainActivity">
    <ImageView
        android:layout_width="match_parent"
        android:layout_height="200dp"
        android:scaleType="centerCrop"
        android:visibility="gone"
        android:src="@mipmap/shanshui"/>

    <android.support.v7.widget.Toolbar
        android:id="@+id/toolbar"
        android:layout_width="match_parent"
        android:visibility="visible"
        android:background="?attr/colorPrimary"
        android:layout_height="wrap_content">
    </android.support.v7.widget.Toolbar>
    <ImageView
        android:layout_width="match_parent"
        android:layout_height="match_parent"
        android:scaleType="centerCrop"
        android:src="@drawable/meijing"
         />
</LinearLayout>
2:android4.4+ api19
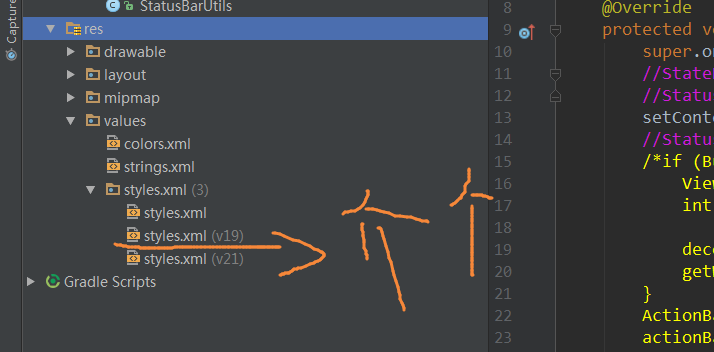
android 5.0之前是要自己设置代码才能显示透明栏,当然我这次想说的就是不用代码只用布局。4.4的情况下,我们先创建一个values的资源文件文件下个styles-v19的xml文件
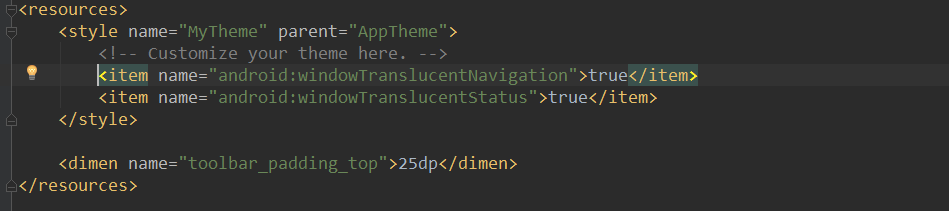
设置主题和正常的styles一样不过要加一个<item name="android:windowIsTranslucent">true</item>:

那么怎么办呢,。。。其实很简单,你只要再加一个就能成功的实现了:
没错就是 <item name="android:windowTranslucentNavigation">true</item>,如果你上一步已经成功了就不要加了,我们看看效果:

android:paddingTop="@dimen/toolbar_padding_top"
他怎么这么强?只要在v19里面设置<dimen name="toolbar_padding_top">25dp</dimen>就ok了(同时,其他style的就设置为0,),恩,状态栏距离顶部25dp...???然后我们再看看

 <LinearLayout
        android:layout_width="match_parent"
        android:gravity="center"
        android:visibility="visible"
        android:background="@color/colorAccent"
        android:layout_height="45dp">
        <TextView
            android:layout_width="wrap_content"
            android:layout_height="wrap_content"
            android:layout_gravity="center"
            android:textSize="17sp"
            android:text="标题"/>
    </LinearLayout>
    <ImageView
        android:layout_width="match_parent"
        android:layout_height="match_parent"
        android:scaleType="centerCrop"
        android:src="@drawable/meijing"
/> 哦,肯定是没有加android:paddingTop="@dimen/toolbar_padding_top",于是我聪明的在里面加上了.真是机智如我,
 我勒个去。。。。。。
<LinearLayout
        android:layout_width="match_parent"
        android:layout_height="wrap_content"
        android:background="@color/colorAccent"
        android:fitsSystemWindows="true">

    </LinearLayout>
    <LinearLayout
        android:layout_width="match_parent"
        android:gravity="center"
        android:visibility="visible"
        android:background="@color/colorAccent"
        android:paddingTop="@dimen/toolbar_padding_top"
        android:layout_height="45dp">
        <TextView
            android:layout_width="wrap_content"
            android:layout_height="wrap_content"
            android:layout_gravity="center"
            android:textSize="17sp"
            android:text="标题"/>
    </LinearLayout>
    <ImageView
        android:layout_width="match_parent"
        android:layout_height="match_parent"
        android:scaleType="centerCrop"
        android:src="@drawable/meijing"
/> 成功了。。。。(当然,5.0上没有影响)
3、图片的透明状态栏
你已经注意到了最上面的布局,有一个ImageView,设置为gone,这里有用咯。。。其实图片的透明状态栏,让图片渗入到状态栏的做法。。就是将手机自己的状态栏去掉,那么图片就上去了。。。。。。嘎嘎嘎嘎嘎嘎嘎嘎嘎嘎。。
那么在4.4的情况下,我们上面的操作不改动,直接设置图片。。。

那么5.0也直接设置呢。。
。
mdzz,怎么可能这么轻松。。。。这个时候要上代码了,要用代码来让他们消失在我们的eyes(我真是有才)里面了。。。
if (Build.VERSION.SDK_INT >= Build.VERSION_CODES.KITKAT) {//4.4 全透明状态栏
            activity.getWindow().addFlags(WindowManager.LayoutParams.FLAG_TRANSLUCENT_STATUS);
        }

        if (Build.VERSION.SDK_INT >= Build.VERSION_CODES.LOLLIPOP) {//5.0 全透明实现
           // activity.getWindow().setStatusBarColor(Color.TRANSPARENT);  //直接用这个方法会有兼容性问题
            Window window = activity.getWindow();
            window.clearFlags(WindowManager.LayoutParams.FLAG_TRANSLUCENT_STATUS);
            window.getDecorView().setSystemUiVisibility(View.SYSTEM_UI_FLAG_LAYOUT_FULLSCREEN
                    | View.SYSTEM_UI_FLAG_LAYOUT_STABLE);
            window.addFlags(WindowManager.LayoutParams.FLAG_DRAWS_SYSTEM_BAR_BACKGROUNDS);
            window.setStatusBarColor(Color.TRANSPARENT);//calculateStatusColor(Color.WHITE, (int) alphaValue)
}setContentView(R.layout.activity_main);之前使用这个,你最好封装一个方法调用咯。。。。看看效果吧:

谢谢网上的代码和大神,我是搬运工,搬运了很多。。。。。。


 1312
1312

 被折叠的 条评论
为什么被折叠?
被折叠的 条评论
为什么被折叠?
 到【灌水乐园】发言


