


Fluent Bit部署与配置
事件处理流程
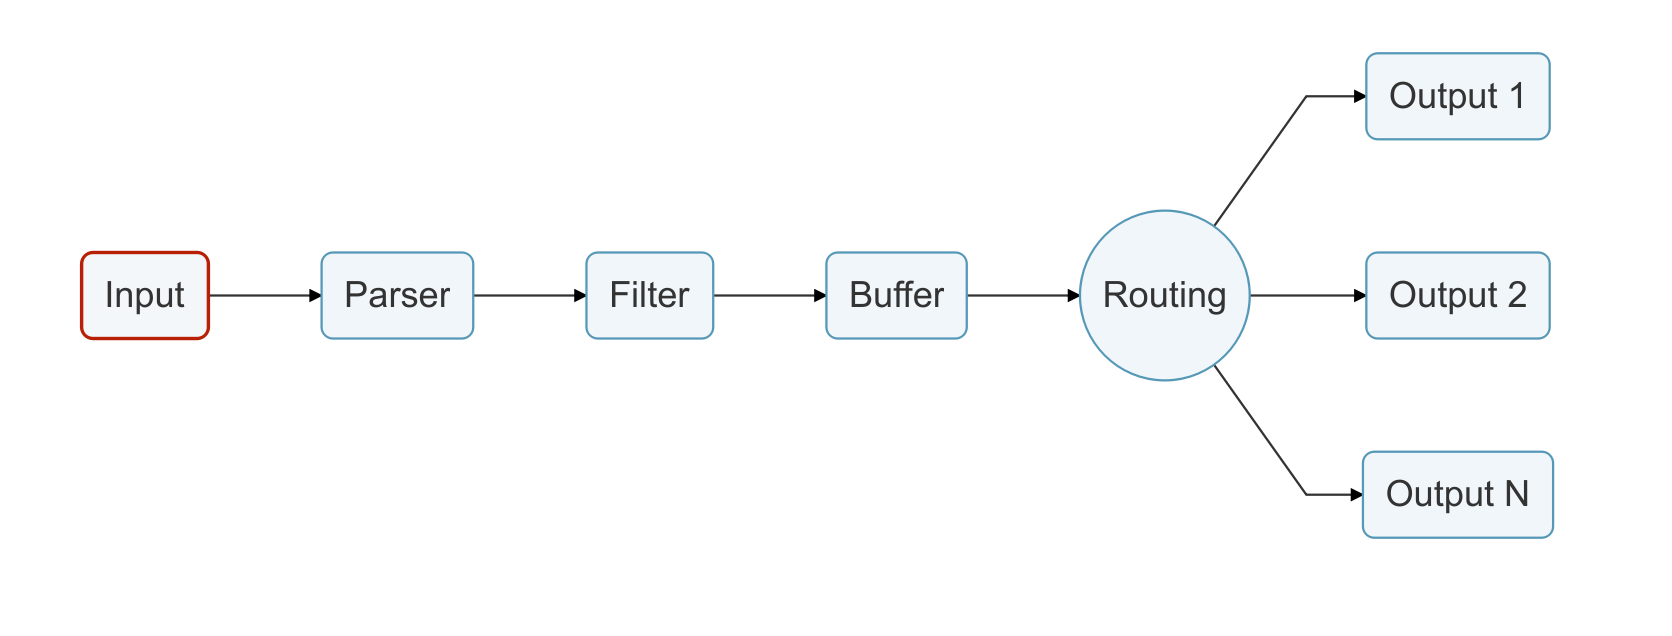
与fluentd类似,fluent bit配置文件由以下几个插件组成
| 部分 | 功能 | 可配置区域 |
|---|---|---|
| Input | 数据入口点,通过输入插件实现,此接口允许收集和接收数据,比如日志文件、TCP上报数据等。 | |
| Parser | Parser能够把从input接口获取的非结构化数据进行格式化操作,Parser是可选的,具体取决于Input输入插件。 | Service配置路径,Input、Filter使用 |
| Filter | Filter是过滤器插件,它允许修改input插件提取的数据。 | |
| Buffer | 默认情况下,Buffer把Input插件的数据缓存在内存当中,直到路由并传递到output接口为止。 | Input、Output、Service |
| Routing | 用于标记Input接口获取的数据,根据规则匹配把数据路由到什么位置。 | input、filter、output |
| OutPut | OutPut用于定义数据目的地和目的地输出插件,注意:借助于Routing插件可以把数据输出到多个目的地。 |
配置文件格式
- 配置文件基本结构
[SERVICE] # 配置类型,由SERVICE、INPUT、FILTER、OUTPUT四部分组成
    Daemon    off   # 每个配置类型参数
每个配置类型支持的配置参数可参考文档:https://docs.fluentbit.io/manual/administration/configuring-fluent-bit/classic-mode/configuration-file
- 引入环境变量
打开终端设置环境变量
$ export MY_OUTPUT=stdout
配置文件引用环境变量
[SERVICE]
    Flush        1
    Daemon       Off
    Log_Level    info

[INPUT]
    Name cpu
    Tag  cpu.local

[OUTPUT]
    Name  ${MY_OUTPUT}
    Match *
配置文件内置命令
- @INCLUDE包含文件
为了避免复杂的长配置文件,建议将特定部分拆分为不同的文件,从一个主文件中调用它们
@INCLUDE input_*.conf
- @SET设置配置变量
可以通过set命令指定全局配置文件变量
@SET my_input=cpu
@SET my_output=stdout

[SERVICE]
    Flush 1

[INPUT]
    Name ${my_input}

[OUTPUT]
    Name ${my_output}
路由匹配
与fluentd类型,fluent-bit也支持多个输入、过滤和输出,通过输入的tag标签、过滤和输出的match标签进行关联
配置示例:
[INPUT]
    name cpu
    tag  my_cpu

[INPUT]
    name mem
    tag  my_mem

[FILTER]
    name       grep
    match      *

[OUTPUT]
    name   es
    match  my_cpu

[OUTPUT]
    name   stdout
    match  *_mem
部署调试
下载地址:https://docs.fluentbit.io/manual/installation/getting-started-with-fluent-bit
# 添加yum源
[root@tiaoban ~]# cat > /etc/yum.repos.d/fluentbit.repo << EOF
[fluent-bit]
name = Fluent Bit
baseurl = https://packages.fluentbit.io/centos/$releasever/
gpgcheck=1
gpgkey=https://packages.fluentbit.io/fluentbit.key
repo_gpgcheck=1
enabled=1
EOF
# 安装fluent-bit
[root@tiaoban ~]# dnf install -y fluent-bit

# 添加环境变量
[root@tiaoban ~]# vim /etc/profile
export PATH=$PATH:/opt/fluent-bit/bin
[root@tiaoban ~]# source /etc/profile
[root@tiaoban ~]# fluent-bit version

# 创建配置文件
[root@tiaoban ~]# cat > /etc/fluent-bit/test.conf << EOF
[INPUT]
    name cpu
    tag  cpu.local

[OUTPUT]
    name  stdout
    match *
EOF

# 指定配置文件启动
[root@tiaoban ~]# fluent-bit -c /etc/fluent-bit/test.conf

# 观察fluent-bit控制台输出
[0] cpu.local: [[1694353045.716823057, {}], {"cpu_p"=>0.000000, "user_p"=>0.000000, "system_p"=>0.000000, "cpu0.p_cpu"=>0.000000, "cpu0.p_user"=>0.000000, "cpu0.p_system"=>0.000000, "cpu1.p_cpu"=>0.000000, "cpu1.p_user"=>0.000000, "cpu1.p_system"=>0.000000}]
输入插件
fluent-bit内置四十多种输入,可以从文件、系统指标、网络、中间件中获取数据,具体可参考文档:https://docs.fluentbit.io/manual/pipeline/inputs
http输入
配置文件
[INPUT]
    name http      # 输入标签,必填
    listen 0.0.0.0 # 监听地址,默认为0.0.0.0
    port 9999      # 监听端口,默认为9880
    tag test.log   # 标签,可选

[OUTPUT]
    name stdout
    match *
访问测试
# 请求fluent bit服务
# curl -i -X POST -d 'json={"action":"hello","fluent":1}' http://127.0.0.1:9999/http.logs
# 控制台打印内容如下
[0] http.logs: [[1694353388.403483997, {}], {"json"=>"{"action":"hello","fluent":1}"}]
文件输入
配置文件
[INPUT]
    name        tail
    path        /var/log/test.log

[OUTPUT]
    name   stdout
    match  *
访问测试
# 日志文件追加内容
echo '{"action":"hello","fluent":1}' >> /var/log/test.log
# 控制台打印内容如下
[0] tail.0: [[1694356075.427866157, {}], {"log"=>"{"action":"hello","fluent":1}"}]
解析插件
通常情况下,我们都需要将采集到的字符串数据立刻转换为结构化的数据,fluent-bit内置5种常用解析插件,例如常用的Apche、Nginx、Docker、syslog等,还支持正则、json等解析器,更多解析器内容参考官方文档:https://docs.fluentbit.io/manual/pipeline/parsers。
可以查看/etc/fluent-bit/plugins.conf文件为我们内置的常用配置解析。
[root@huanbao fluent-bit]# cat /etc/fluent-bit/parsers.conf | grep Name
    Name   apache
    Name   apache2
    Name   apache_error
    Name   nginx
    Name        k8s-nginx-ingress
    Name   json
    Name         docker
    Name        docker-daemon
    Name        syslog-rfc5424
    Name        syslog-rfc3164-local
    Name        syslog-rfc3164
    Name    mongodb
    Name    envoy
    Name    istio-envoy-proxy
    Name cri
    Name    kube-custom
json解析
json解析器靠也将原始的字符串转换为json格式数据。
配置文件
# cat test.conf
[SERVICE]
    Parsers_File /etc/fluent-bit/my-parsers.conf # 指定解析器路径

[INPUT]
    name    stdin
    tag     stdin
    parser  my_json  # 指定解析器名称

[OUTPUT]
    name    stdout
    match   *

# cat my-parsers.conf
[PARSER]
    Name        my_json  # 解析器名称
    Format      json
    Time_Key    time     # 时间字段
    Time_Format %Y-%m-%d %H:%M:%S.%L # 时间字段格式
    Time_Offset +0800    # 时间偏移量
控制台输入测试数据,查看输出
{"key1": 123, "key2": "abc", "time": "2023-09-11 12:13:14.123"}
[0] stdin: [[1694434394.123000000, {}], {"key1"=>123, "key2"=>"abc"}]
正则解析
正则解析允许使用自定义的Ruby正则表达式用来捕获哪些内容属于哪个键名,flunt-bit为我们内置了常用的服务日志正则解析,我们也可以自定义解析器实现正则解析。
配置文件
# cat test.conf
[SERVICE]
    Parsers_File /etc/fluent-bit/my-parsers.conf

[INPUT]
    name    stdin
    tag     stdin
    parser  regex_parser

[OUTPUT]
    name    stdout
    match   *

# cat my-parsers.conf
[PARSER]
    Name        regex_parser
    Format      regex
    Regex       /^(?<logtime>[^|]+) \| (?<level>[A-Z]*) *\| __main__:(?<size>\d*) - (?<message>.*)$/ # 自定义正则表达式
    Time_Key    logtime								# 时间字段
    Time_Format %Y-%m-%d %H:%M:%S.%L  # 时间字段格式
    Time_Offset +0800                 # 时间偏移量也就是时区
    Types       size:integer					# 默认为string,可指定字段类型为integer, bool, float, hex
控制台输入测试数据,查看输出
2023-09-09 09:20:10.439369419 | WARNING  | __main__:48 - hello world
[0] stdin: [[1694251210.439369419, {}], {"level"=>"WARNING", "size"=>48, "message"=>"hello world"}]
过滤插件
清单查找
我们可以定义一个文件,里面包含需要查找的指定值列表,当fluent-bit匹配到指定字段的值在文件列表中时,会进行进一步的操作。
定义匹配值列表文件
# cat ip.txt
127.0.0.1
192.168.10.20
配置文件
[SERVICE]
    Parsers_File /etc/fluent-bit/parsers.conf

[INPUT]
    name    stdin
    tag     stdin
    parser  json

[FILTER]
    name       checklist
    match      *
    file       /etc/fluent-bit/ip.txt  # 查找指定值列表文件
    lookup_key remote_addr             # 查找字段
    record     ioc    abc              # 对查找到的事件记录值进行替换

[OUTPUT]
    name    stdout
    match   *
控制台输入测试数据,查看输出,7.7.7.2原样输出,而127.0.0.1替换为新值
{"remote_addr": "7.7.7.2", "ioc": "false"}
[0] stdin: [[1694403462.428626822, {}], {"remote_addr"=>"7.7.7.2", "ioc"=>"false"}]
{"remote_addr": "127.0.0.1", "ioc": "true"}
[0] stdin: [[1694403470.458475546, {}], {"remote_addr"=>"127.0.0.1", "ioc"=>"abc"}]
地理位置信息
使用GeoIP2过滤器可以从使用GeoIP2数据库中查询指定ip的地理位置信息。
配置文件
[SERVICE]
    Parsers_File /etc/fluent-bit/parsers.conf

[INPUT]
    name    stdin
    parser  json

[FILTER]
    name        geoip2
    match       *
    database    /etc/fluent-bit/GeoLite2-City.mmdb
    lookup_key  remote_addr
    record      geoip.country remote_addr %{country.names.en}
    record      geoip.isocode remote_addr %{country.iso_code}
    Record      geoip.latitude remote_addr %{location.latitude}
    Record      geoip.longitude remote_addr %{location.longitude}

[OUTPUT]
    name    stdout
    match   *
控制台输入测试数据,查看输出
{"remote_addr": "66.102.9.80"}
[0] stdin.0: [[1694704796.348692285, {}], {"remote_addr"=>"66.102.9.80", "geoip.country"=>"United States", "geoip.isocode"=>"US", "geoip.latitude"=>37.751000, "geoip.longitude"=>-97.822000}]
查找过滤
Grep 过滤器插件可以根据指定值或正则表达式匹配或排除特定记录。
配置文件
[SERVICE]
    Parsers_File /etc/fluent-bit/parsers.conf

[INPUT]
    name    stdin
    tag     stdin
    parser  json

[FILTER]
    name       grep
    match      *
    logical_Op or														# or多条件匹配
    regex      log demo											# 匹配log字段值为demo
    regex      kubernetes['k8s']['ns'] test
    exclude    log test                     # 排除log字段值为test


[OUTPUT]
    name    stdout
    match   *
控制台输入测试数据,查看输出
{"log":"test","k8s":{"pod":"myapp-0","ns":"default"}}
{"log":"demo","k8s":{"pod":"myapp-1","ns":"test"}}
[0] stdin: [[1694405014.424165540, {}], {"log"=>"demo", "k8s"=>{"pod"=>"myapp-1", "ns"=>"test"}}]
{"log":"demo","k8s":{"pod":"myapp-1","ns":"default"}}
[0] stdin: [[1694405049.343430446, {}], {"log"=>"demo", "k8s"=>{"pod"=>"myapp-1", "ns"=>"default"}}]
字段添加、删除
通过record_modifier插件我们可以添加或删除指定字段
[SERVICE]
    Parsers_File /etc/fluent-bit/parsers.conf

[INPUT]
    name    stdin
    tag     stdin
    parser  json

[FILTER]
    name        record_modifier
    match       *
    record      hostname ${HOSTNAME}				# 新增hostname字段
    remove_key  name												# 删除name字段

[OUTPUT]
    name    stdout
    match   *
控制台输入测试数据,查看输出
{"name":"alex","age":18}
[0] stdin: [[1694406109.148689686, {}], {"age"=>18, "hostname"=>"huanbao"}]
字段和值操作
通过modify插件我们可以对字段和值进行多种操作
[SERVICE]
    Parsers_File /etc/fluent-bit/parsers.conf

[INPUT]
    name    stdin
    tag     stdin
    parser  json

[FILTER]
    name    modify
    match   *
    set     name        zhangsan		# 设置字段值
    add     weight      200					# 新增字段和值
    remove  height									# 移除字段
    rename  username    users				# 重命名字段

[OUTPUT]
    name    stdout
    match   *
{"name":"alex","age":18,"username":"user1","height":180}
[0] stdin: [[1694406758.893586121, {}], {"age"=>18, "users"=>"user1", "name"=>"zhangsan", "weight"=>"200"}]
多行处理
通常情况下异常日志可能会有多行打印,我们需要将多行日志合并到一条事件中。
自定义解析器
# cat > /etc/fluent-bit/my-parsers.conf << EOF
[MULTILINE_PARSER]
    name          multiline-regex-test
    type          regex
    flush_timeout 1000
    #
    # Regex rules for multiline parsing
    # ---------------------------------
    #
    # configuration hints:
    #
    #  - first state always has the name: start_state
    #  - every field in the rule must be inside double quotes
    #
    # rules |   state name  | regex pattern                                                                                                 | next state
    # ------|---------------|----------------------------------------------------------------------------------------------------------------------------
    rule      "start_state"   "/^(?<time>\d{4}-\d{1,2}-\d{1,2} \d{1,2}:\d{1,2}:\d{1,2}) \[(?<thread>.*)\] (?<level>[^\s]+)(?<message>.*)/"   "cont"
    rule      "cont"          "/^\s+at.*/"                                                                                                   "cont"
    EOF
配置文件
[SERVICE]
    Parsers_File /etc/fluent-bit/my-parsers.conf

[INPUT]
    name            tail
    path            /var/log/test.log
    read_from_head  true

[FILTER]
    name                  multiline
    match                 *
    multiline.key_content log
    multiline.parser      multiline-regex-test

[OUTPUT]
    name    stdout
    match   *
添加测试日志数据
# cat > /var/log/test.log << EOF
2023-03-03 14:27:31 [main] INFO  Main - Start
2023-03-03 14:27:32 [main] ERROR Main - Exception
        at javax.management.RuntimeErrorException: null
    at Main.main(Main.java:16) ~[bin/:na]
2023-03-03 14:27:33 [main] INFO  Main - End
EOF
控制台查看输出内容
[0] tail.0: [[1694423705.197513690, {}], {"log"=>"2023-03-03 14:27:31 [main] INFO  Main - Start"}]
[1] tail.0: [[1694423705.197541527, {}], {"log"=>"2023-03-03 14:27:32 [main] ERROR Main - Exception
        at javax.management.RuntimeErrorException: null
    at Main.main(Main.java:16) ~[bin/:na]"}]
[0] tail.0: [[1694423705.197554970, {}], {"log"=>"2023-03-03 14:27:33 [main] INFO  Main - End"}]
嵌套处理
配置文件
[SERVICE]
    Parsers_File /etc/fluent-bit/parsers.conf

[INPUT]
    name    stdin
    tag     stdin
    parser  json

[FILTER]
    name                  nest
    match                 *
    operation             nest	  # 操作可选nest或lift
    wildcard              user.*	# 要操作的字段通配符
    nest_under            users   # 嵌套目标字段名称
    remove_prefix         user.   # 移除前缀

[OUTPUT]
    name    stdout
    match   *
控制台查看输出内容
{"id":1,"user.age":18,"user.name":"zhangsan"}
[0] stdin: [[1694424516.508415513, {}], {"id"=>1, "users"=>{"age"=>18, "name"=>"zhangsan"}}]
Lua脚本
除了内置的过滤插件外,也可以使用lua过滤器对传入的数据进行自定义处理
配置文件
[SERVICE]
    Parsers_File /etc/fluent-bit/parsers.conf

[INPUT]
    name    stdin
    tag     stdin
    parser  json

[FILTER]
    name    lua
    match   *
    call    append_tag
    code    function append_tag(tag, timestamp, record) new_record = record new_record["tag"] = tag return 1, timestamp, new_record end

[OUTPUT]
    name    stdout
    match   *
其中定义了lua脚本函数名为append_tag,它的功能是获取事件的tag信息并添加到输出中。
控制台查看输出内容
{"hello":"world"}
[0] stdin: [[1694698956.354120731, {}], {"tag"=>"stdin", "hello"=>"world"}]
输出插件
输出文件
配置文件
[SERVICE]
    Parsers_File /etc/fluent-bit/parsers.conf

[INPUT]
    name    stdin
    tag     stdin
    parser  json

[OUTPUT]
    name       file
    match  		 *
    path       /var/log											# 输出目录
    file			 fluent-bit.txt								# 输出文件名
    template   {time} user={user} age={age} # 指定输出格式
    workers		 1                            # 输出线程数
输出http
通常情况下会使用fluent-bit采集数据通过http输出到fluentd,最后由fluentd统一写入es或者kafka。
fluent-bit配置文件
[SERVICE]
    Parsers_File /etc/fluent-bit/parsers.conf

[INPUT]
    name    stdin
    tag     stdin
    parser  json

[OUTPUT]
    name  http
    match *
    host  192.168.2.3
    port  80
    URI   /something
    format json
    header_tag  FLUENT-TAG
fluentd配置文件
<source>
  @type http
  add_http_headers true
  port 80
  bind 0.0.0.0
</source>

<match something>
  @type rewrite_tag_filter
  <rule>
    key HTTP_FLUENT_TAG
    pattern /^(.*)$/
    tag $1
  </rule>
</match>
输出elasticsearch
配置文件
[SERVICE]
    Parsers_File /etc/fluent-bit/parsers.conf

[INPUT]
    name    stdin
    tag     stdin
    parser  json

[OUTPUT]
    name                es
    match               *
    host                172.18.0.100
    port                9200
    HTTP_User           elastic
    HTTP_Passwd         0IgIjSHiIhGWp_TWqoJk
    tls                 On
    tls.verify          Off
    index               fluent-bit.log
    Suppress_Type_Name  On
- HTTP_User/HTTP_Passwd:es用户名和密码
- tls:使用https方式连接
- tls.verify:跳过ca证书验证
- index:写入的index,如果是数据流推荐设置index,如果是写入索引,推荐使用Logstash_Format和Logstash_Prefix参数设置
- Suppress_Type_Name:es8以后移除_type参数,需要设置为On才能正常写入es集群
输出kafka
配置文件
[SERVICE]
    Parsers_File /etc/fluent-bit/parsers.conf

[INPUT]
    name    stdin
    tag     stdin
    parser  json

[OUTPUT]
    name        kafka
    match       *
    Brokers     192.168.1.3:9092
    Topics      test
缓冲插件
默认情况下使用内存存储数据,推荐使用文件系统缓冲,提高性能和数据传输可靠性。
更多缓存配置可参考文档:https://docs.fluentbit.io/manual/administration/buffering-and-storage
配置文件示例
[SERVICE]
    Parsers_File /etc/fluent-bit/parsers.conf
    storage.path              /var/log/flb-storage/ # 存储路径
    storage.sync              normal                # 数据存储到文件系统中的同步模式
    storage.checksum          off	                  # 是否检查数据完整性
    storage.backlog.mem_limit 5M	                  # 积压数据最大值

[INPUT]
    name            stdin
    tag             stdin
    parser          json
    storage.type    filesystem # 存储类型

[OUTPUT]
    name                        http
    match                       *
    host                        192.168.2.3
    port                        80
    URI                         /something
    format                      json
    storage.total_limit_size    5M					# 最多保存5M最新数据
Fluent Bit采集解析日志实践
采集方案思路
每个业务容器中通过sidecar方式运行一个fluent-bit日志采集处理容器,通过emptyDir方式挂载同一个日志目录,Fluentd采集业务容器日志后,经过一系列过滤解析处理后写入elasticsearch集群中。
调试fluentd配置
原始日志格式
2023-07-23 09:35:18.987 | INFO | __main__:debug_log:49 - {'access_status': 200, 'request_method': 'GET', 'request_uri': '/account/', 'request_length': 67, 'remote_address': '186.196.110.240', 'server_name': 'cu-36.cn', 'time_start': '2023-07-23T09:35:18.879+08:00', 'time_finish': '2023-07-23T09:35:19.638+08:00', 'http_user_agent': 'Mozilla/5.0 (Macintosh; Intel Mac OS X 10_12_3) AppleWebKit/537.36 (KHTML, like Gecko) Chrome/58.0.2999.0 Safari/537.36'}
- fluentd添加source配置,从文件中读取数据,新增match配置,输出到控制台,fluentd配置文件如下所示
[INPUT]
    name    tail
    path    /opt/log_demo/log/error.log

[OUTPUT]
    name    stdout
    match   *
观察控制台输出内容,已正确采集到了/opt/log_demo/log/info.log文件中的日志内容并添加到了log字段中
[0] tail.0: [[1694592632.087376232, {}], {"log"=>"2023-09-13 16:10:32.086 | ERROR | __main__:debug_log:46 - {'access_status': 504, 'request_method': 'GET', 'request_uri': '/account/', 'request_length': 50, 'remote_address': '141.104.119.202', 'server_name': 'cm-5.cn', 'time_start': '2023-09-13T16:10:31.954+08:00', 'time_finish': '2023-09-13T16:10:32.583+08:00', 'http_user_agent': 'Safari 11\tMozilla/5.0 (Macintosh; Intel Mac OS X 10_13_1) AppleWebKit/604.3.5 (KHTML, like Gecko) Version/11.0.1 Safari/604.3.5'}"}]
- 接下来添加自定义正则解析器,将日志内容解析为logtime、level、class、content四部分,并指定logtime为事件时间字段
[root@huanbao ~]# cat /etc/fluent-bit/my-parsers.conf
[PARSER]
    Name        regex_parser
    Format      regex
    Regex       /^(?<logtime>[^|]+) \| (?<level>[A-Z]*) *\| __main__:(?<class>\D*:\d*) - (?<content>.*)$/
    Time_Key    logtime
    Time_Format %Y-%m-%d %H:%M:%S.%L
    Time_Offset +0800
[root@huanbao ~]# cat /etc/fluent-bit/test.conf
[SERVICE]
    Parsers_File /etc/fluent-bit/my-parsers.conf

[INPUT]
    name    tail
    path    /opt/log_demo/log/info.log
    parser  regex_parser

[OUTPUT]
    name    stdout
    match   *
添加正则解析规则后,控制台输出内容如下,观察可知事件时间已替换为正确的日志生成时间,并提取到了level、class、content相关内容
[0] tail.0: [[1694593084.226000000, {}], {"level"=>"INFO", "class"=>"debug_log:54", "content"=>"{'access_status': 301, 'request_method': 'POST', 'request_uri': '/login/', 'request_length': 77, 'remote_address': '114.190.61.92', 'server_name': 'cm-4.cn', 'time_start': '2023-09-13T16:18:03.366+08:00', 'time_finish': '2023-09-13T16:18:05.205+08:00', 'http_user_agent': 'Firefox 7\tMozilla/5.0 (Windows NT 10.0; Win64; x64; rv:78.0) Gecko/20100101 Firefox/78.0'}"}]
- 由于content内容不是标准的json格式,因此在json解析前我们需要使用lua自定义函数处理插件,将其中的’替换为"。
[root@huanbao ~]# cat /etc/fluent-bit/my.lua
function replace_content(tag, timestamp, record)
    if record["content"] ~= nil then
        local replaced_value = string.gsub(record["content"], "'", "\"")
        record["content"] = replaced_value
    end
    return 1, timestamp, record
end
[root@huanbao ~]# cat /etc/fluent-bit/test.conf
[SERVICE]
    Parsers_File /etc/fluent-bit/my-parsers.conf

[INPUT]
    name    tail
    path    /opt/log_demo/log/info.log
    parser  regex_parser

[FILTER]
    name    lua
    match   *
    script  /etc/fluent-bit/my.lua
    call    replace_content

[OUTPUT]
    name    stdout
    match   *
添加字符替换规则后,控制台输出如下,已成功将content字段的值中的所有’替换为"
[0] tail.0: [[1694701107.963999986, {}], {"level"=>"INFO", "class"=>"debug_log:57", "content"=>"{"access_status": 200, "request_method": "GET", "request_uri": "/management/", "request_length": 87, "remote_address": "124.227.114.50", "server_name": "cu-1.cn", "time_start": "2023-09-14T22:18:27.950+08:00", "time_finish": "2023-09-14T22:18:28.757+08:00", "http_user_agent": "Chrome 9\tMozilla/5.0 (Linux; Android 9; MX10 PRO) AppleWebKit/537.36 (KHTML, like Gecko) Chrome/94.0.4606.71 Safari/537.36"}"}]
- 现在content字段值已经是标准的json格式,接下来可以使用json解析器解析。
[root@huanbao ~]# cat /etc/fluent-bit/my-parsers.conf
[PARSER]
    Name        regex_parser
    Format      regex
    Regex       /^(?<logtime>[^|]+) \| (?<level>[A-Z]*) *\| __main__:(?<class>\D*:\d*) - (?<content>.*)$/
    Time_Key    logtime
    Time_Format %Y-%m-%d %H:%M:%S.%L
    Time_Offset +0800

[PARSER]
    Name        json_parser
    Format      json
[root@huanbao ~]# cat /etc/fluent-bit/test.conf
[SERVICE]
    Parsers_File /etc/fluent-bit/my-parsers.conf

[INPUT]
    name    tail
    path    /opt/log_demo/log/info.log
    parser  regex_parser

[FILTER]
    name    lua
    match   *
    script  /etc/fluent-bit/my.lua
    call    replace_content

[FILTER]
    name        parser
    match       *
    key_Name    content
    parser      json_parser

[OUTPUT]
    name    stdout
    match   *
接下来观察控制台输出,已将content中的内容解析并添加到事件内容中
[0] tail.0: [[1694703901.954999923, {}], {"access_status"=>200, "request_method"=>"GET", "request_uri"=>"/login/", "request_length"=>71, "remote_address"=>"112.201.65.122", "server_name"=>"cu-8.cn", "time_start"=>"2023-09-14T23:05:01.908+08:00", "time_finish"=>"2023-09-14T23:05:02.352+08:00", "http_user_agent"=>"Firefox 7 Mozilla/5.0 (Windows NT 10.0; Win64; x64; rv:78.0) Gecko/20100101 Firefox/78.0"}]
- 我们已经成功解析到了remote_address字段,接下来使用geoip插件从数据库中查询ip的地理位置信息。
[SERVICE]
    Parsers_File /etc/fluent-bit/my-parsers.conf

[INPUT]
    name    tail
    path    /opt/log_demo/log/info.log
    parser  regex_parser

[FILTER]
    name    lua
    match   *
    script  /etc/fluent-bit/my.lua
    call    replace_content

[FILTER]
    name        parser
    match       *
    key_Name    content
    parser      json_parser

[FILTER]
    name        geoip2
    match       *
    database    /etc/fluent-bit/GeoLite2-City.mmdb
    lookup_key  remote_addr
    record      geoip.country remote_addr %{country.names.en}
    record      geoip.isocode remote_addr %{country.iso_code}
    Record      geoip.latitude remote_addr %{location.latitude}
    Record      geoip.longitude remote_addr %{location.longitude}

[OUTPUT]
    name    stdout
    match   *
观察控制台输出,已经成功通过remote_address字段的ip地址获取到了地理位置信息内容。
[0] tail.0: [[1694733689.799000000, {}], {"access_status"=>200, "request_method"=>"GET", "request_uri"=>"/login/", "request_length"=>3, "remote_address"=>"119.39.37.78", "server_name"=>"cu-7.cn", "time_finish"=>"2023-09-14T23:21:30.683+08:00", "http_user_agent"=>"Chrome 9 Mozilla/5.0 (Macintosh; Intel Mac OS X 10_13_2) AppleWebKit/537.36 (KHTML, like Gecko) Chrome/94.0.4606.81 Safari/537.36", "geoip.country"=>"China", "geoip.isocode"=>"CN", "geoip.latitude"=>28.201400, "geoip.longitude"=>112.961100}]
- 数据解析完成后,我们配置match输出到elasticsearch中。
[SERVICE]
    Parsers_File /etc/fluent-bit/my-parsers.conf

[INPUT]
    name    tail
    path    /opt/log_demo/log/info.log
    parser  regex_parser

[FILTER]
    name    lua
    match   *
    script  /etc/fluent-bit/flunt-bit.lua
    call    replace_content

[FILTER]
    name        parser
    match       *
    key_Name    content
    parser      json_parser

[FILTER]
    name        geoip2
    match       *
    database    /etc/fluent-bit/GeoLite2-City.mmdb
    lookup_key  remote_addr
    record      geoip.country remote_addr %{country.names.en}
    record      geoip.isocode remote_addr %{country.iso_code}
    Record      geoip.latitude remote_addr %{location.latitude}
    Record      geoip.longitude remote_addr %{location.longitude}

[OUTPUT]
    name                es
    match               *
    host                172.18.0.100
    port                9200
    HTTP_User           elastic
    HTTP_Passwd         0IgIjSHiIhGWp_TWqoJk
    tls                 On
    tls.verify          Off
    index               fluent-bit.log
    Suppress_Type_Name  On
此时观察kibana索引,日志数据已成功写入es中。
构建fluent-bit镜像
fluent-bit解析地理位置信息时需要用到GeoIP数据库文件,可以提前打包到镜像中,并上传至harbor仓库。
[root@tiaoban fluentbit]# ls
Dockerfile  fluentbit-conf.yaml  fluentbit-lua.yaml  fluentbit-parser.yaml  GeoLite2-City.mmdb  log-demo.yaml
[root@tiaoban fluentbit]# cat Dockerfile
FROM cr.fluentbit.io/fluent/fluent-bit
ADD GeoLite2-City.mmdb /etc/fluent-bit/GeoLite2-City.mmdb
[root@tiaoban fluentbit]# docker build -t harbor.local.com/elk/fluentbit:v2.1.9 .
[root@tiaoban fluentbit]# docker push harbor.local.com/elk/fluentbit:v2.1.9
k8s部署资源
[root@tiaoban fluentbit]# kubectl apply -f .
configmap/fluentbit-conf created
configmap/fluentbit-lua created
configmap/fluentbit-parser created
deployment.apps/log-demo created
[root@tiaoban fluentbit]# kubectl get pod -o wide
NAME                       READY   STATUS        RESTARTS       AGE     IP             NODE      NOMINATED NODE   READINESS GATES
log-demo-64df69674-hkh67   2/2     Running       0              24s     10.244.3.206   work3     <none>           <none>
log-demo-64df69674-s5nkl   2/2     Running       0              24s     10.244.1.243   master2   <none>           <none>
访问验证
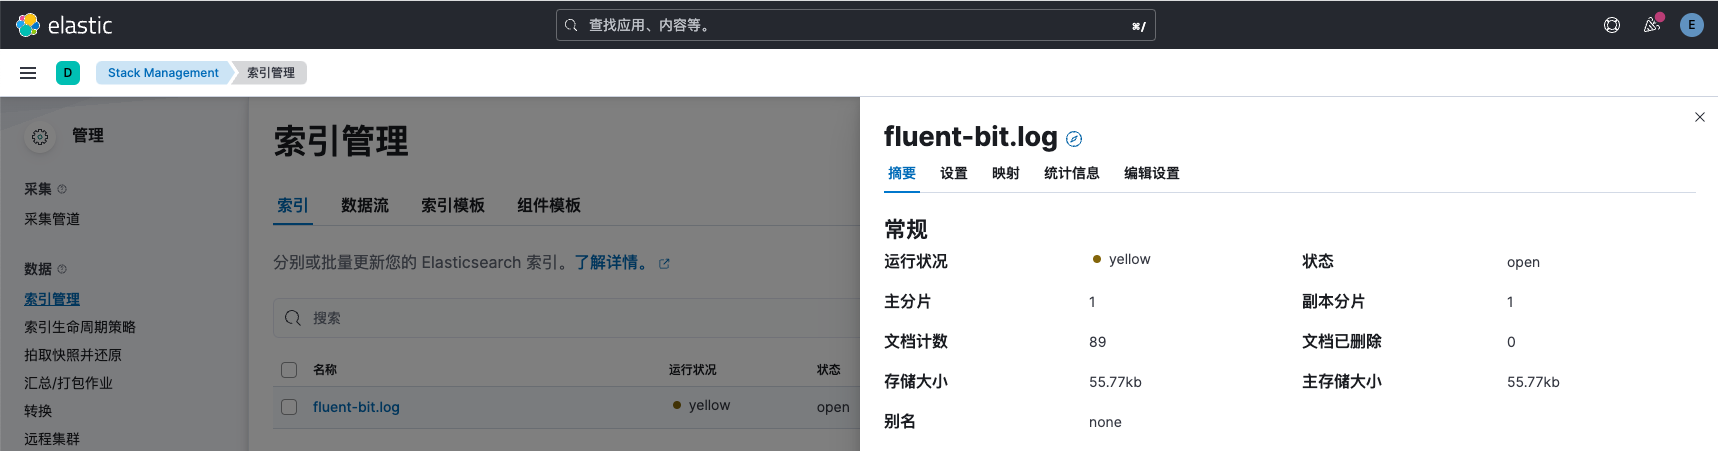
访问kibana索引管理,已创建名为fluent-bit.log的索引
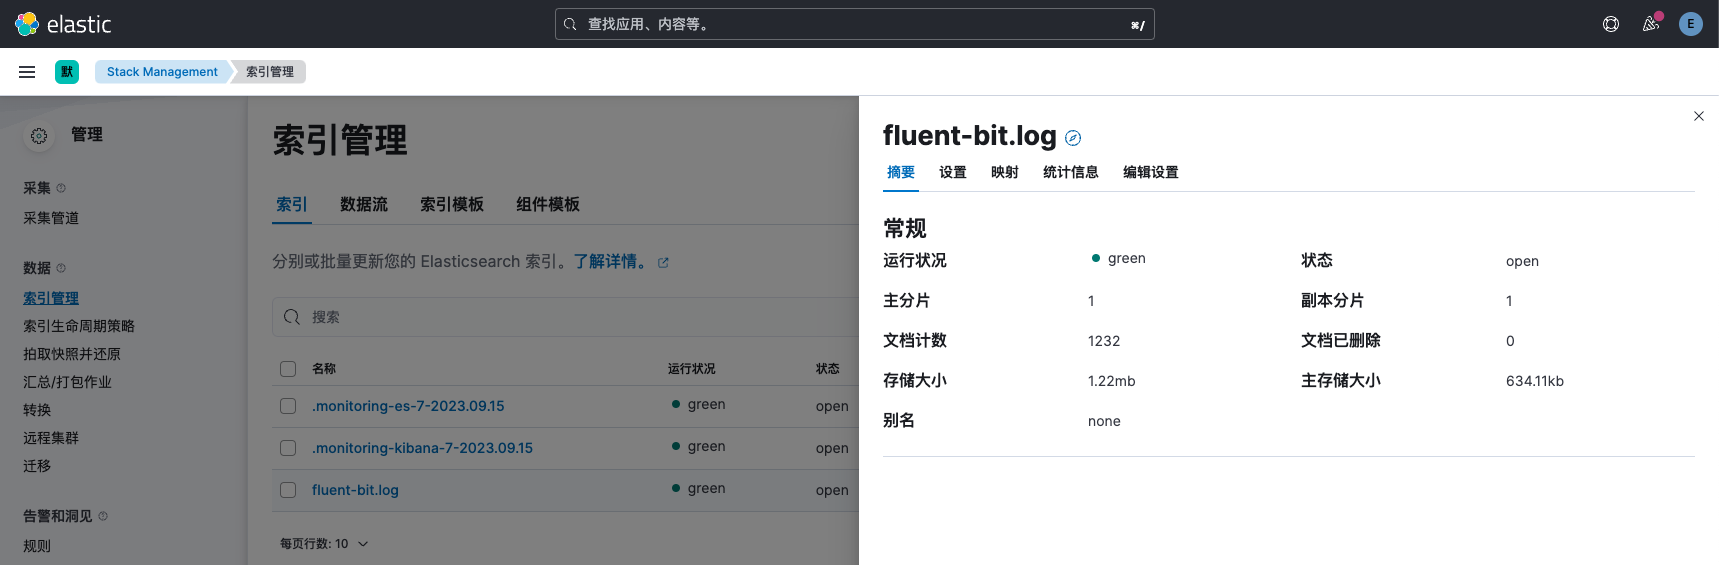
查看索引数据内容,已完成对数据的过滤清洗操作,并成功加载地理位置信息。

接下来调整索引模板setting和mapping以及ILM策略等配置,具体内容可参考文档:https://www.cuiliangblog.cn/detail/article/65。
完整资源清单
本实验案例所有yaml文件已上传至git仓库。访问地址如下:
github
https://github.com/cuiliang0302/blog-demo
gitee
https://gitee.com/cuiliang0302/blog_demo
查看更多
微信公众号
微信公众号同步更新,欢迎关注微信公众号《崔亮的博客》第一时间获取最近文章。
博客网站
崔亮的博客-专注devops自动化运维,传播优秀it运维技术文章。更多原创运维开发相关文章,欢迎访问https://www.cuiliangblog.cn


 被折叠的 条评论
为什么被折叠?
被折叠的 条评论
为什么被折叠?
 到【灌水乐园】发言


