


Fluentd介绍
Fluentd是一个是一个开源的日志收集和传输工具,旨在解决日志数据的收集、传输和处理问题,它可以收集来自于各种系统或应用的日志,转化为用户指定的格式后,转发到用户所指定的日志存储系统之中。
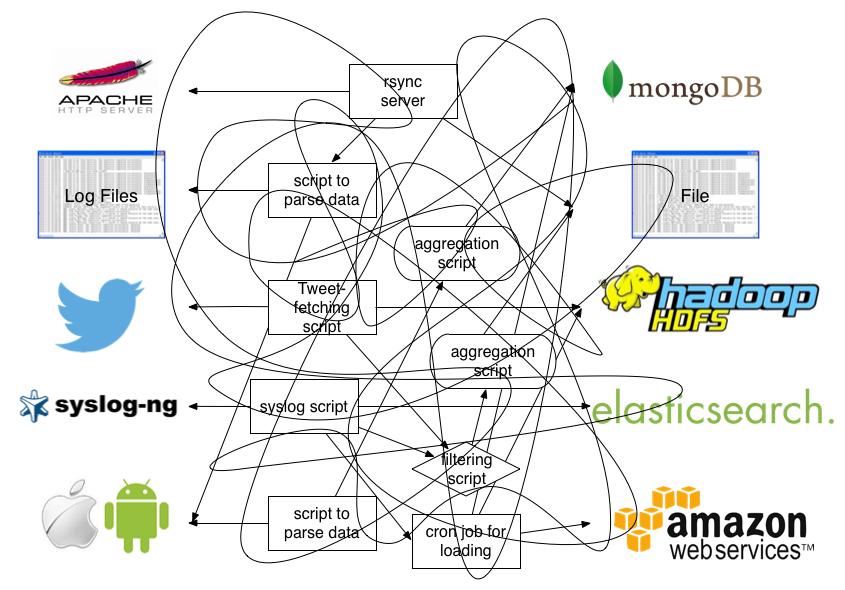
用图来说明问题的话,在没有使用之前Fluentd,日志采集过滤存储流程如下所示:
使用Fluentd之后,日志系统如下所示:
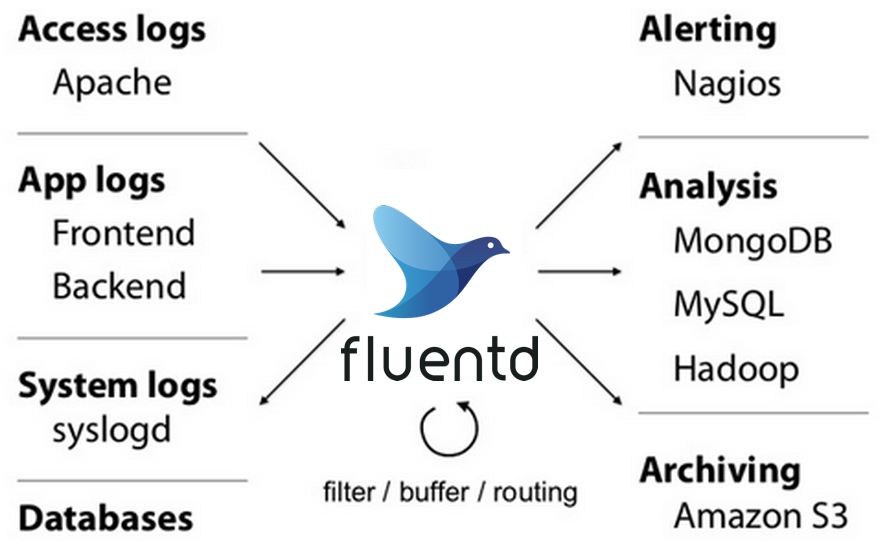
Fluentd负责从服务器收集日志信息,将数据流交给后续存储服务和查询工具。换句话说,Fluentd不负责生产数据、不负责存储数据,只是数据的搬运工。
Fluentd特点
使用JSON进行统一日志记录:Fluentd尝试尽可能地将数据结构化为JSON:这允许Fluentd 统一处理日志数据的所有方面:收集,过滤,缓冲和跨多个源和目标(统一日志层)输出日志。使用JSON可以更轻松地进行下游数据处理,因为它具有足够的结构,可以在保留灵活模式的同时进行访问。
可插拔架构:Fluentd拥有灵活的插件系统,允许社区扩展其功能。我们的500多个社区贡献插件连接了数十个数据源和数据输出。通过利用插件,您可以立即开始更好地使用日志。
所需的资源较少: Fluentd是用C语言和Ruby组合编写的,只需要很少的系统资源。vanilla实例运行30-40MB内存,可处理13,000个事件/秒/核心。
内置可靠性:Fluentd支持基于内存和文件的缓冲,以防止节点间数据丢失。Fluentd还支持强大的故障转移功能,可以设置为高可用性。
Fluentd对比Filebeat
Fluentd 是一个日志收集和聚合的工具,它支持多种数据输入和输出,并提供了丰富的插件和过滤器来处理和转换数据。Fluentd 通过流水线的方式处理日志数据,可以灵活地构建复杂的数据处理流程。Fluentd 还提供了内置的缓存机制,可以减少数据丢失的风险。同时,Fluentd 是一个轻量级的工具,对系统资源的占用较小。
Filebeat 是 Elastic 公司开源的一款轻量级日志数据采集器,旨在收集、解析和转发各种类型的日志数据。它支持多种数据源采集并内置了七十多种场景服务日志过滤处理模块,并且能够自动发现新的日志文件。虽然也支持数据解析,但解析器目前仅有四十多种,仅能完成简单的数据解析操作。Filebeat 具有较低的资源消耗,并且支持高可用性和故障转移。Filebeat 可以将日志数据转发到多个输出目的地,如 Elasticsearch、Logstash 或 Kafka 等。
两者在设计理念上的区别主要在于 Fluentd 更侧重于数据处理和转换,而 Filebeat 更侧重于数据采集和传输。Fluentd 更适用于需要进行复杂数据处理和转换的场景,而 Filebeat 则更适用于简单的日志数据采集和转发场景。如果你需要一个轻量级的工具来处理海量日志数据,Fluentd 可能会更合适;如果你只需要一个简单的日志采集器来快速收集和转发日志数据,那么 Filebeat 可能会更适合你的需求。
Fluentd对比Logstash
- 设计哲学:
- Fluentd的设计目标是简单、可扩展和灵活。它采用轻量级的标签(tag)和记录(record)的概念来处理日志数据。Fluentd提供了丰富的输入和输出插件,可以与各种数据源和目标进行集成。
- Logstash的设计目标是可编排、易使用和功能全面。它使用基于管道(pipeline)的配置模型,通过输入、过滤和输出插件来处理日志数据。Logstash提供了很多内置插件,可以方便地与各种系统进行集成。
- 插件生态系统:
- Fluentd拥有一个庞大的插件生态系统,支持数百种输入和输出插件。这些插件覆盖了各种数据源和目标,包括文件、数据库、消息队列、云服务等。此外,Fluentd还支持自定义插件的开发。
- Logstash也有一个广泛的插件生态系统,包括大量的输入、过滤和输出插件。它支持与许多数据源和目标的集成,如文件、数据库、消息队列、Web服务等。
- 性能和资源消耗:
- Fluentd在性能方面表现出色,它使用事件驱动的架构,能有效地处理大量的日志数据。Fluentd还支持多线程和异步处理,以提高吞吐量和响应性能。
- Logstash在处理大量数据时可能会遇到性能和资源消耗的挑战。它使用JRuby作为运行环境,相对于Fluentd的C扩展,可能需要更多的内存和处理资源。
Fluentd对比FluentBit
Fluent Bit 是一个开源的多平台日志采集器,旨在打造日志采集处理和分发的通用利器。2014 年,Fluentd 团队预测对于嵌入式 Linux 和 Gateways 等受约束的环境,需要更轻量级的日志处理器,于是便开发了Fluent Bit,并把该项目建设成为Fluentd 生态系统的一部分。
| fluentd | fluent-bit | |
|---|---|---|
| 使用范围 | 容器/服务器 | 嵌入式 Linux/容器/服务器 |
| 语言 | C和Ruby | C |
| 大小 | 约60MB | 约1MB |
| 性能 | 中等性能 | 高性能 |
| 依赖关系 | 作为Ruby Gem构建,主要依赖gems | 除了一些安装编译插件(GCC、CMAKE)其它零依赖。 |
| 插件支持 | 超过1000个可用插件 | 大约100个可用插件 |
出于性能和兼容性原因,推荐从Fluentd切换到Fluent Bit。Fluent Bit现在被认为是下一代解决方案。
Fluentd部署与配置
部署调试
下载地址:https://www.fluentd.org/download/fluent_package
# wget https://s3.amazonaws.com/packages.treasuredata.com/lts/5/redhat/8/x86_64/fluent-package-5.0.1-1.el8.x86_64.rpm
# rpm -ivh fluent-package-5.0.1-1.el8.x86_64.rpm
# 添加配置文件,读取/var/log/test.log文件内容,输出到终端
# cat > /etc/fluent/test.conf << EOF
<source>
  @type tail
  path /var/log/test.log
  pos_file /var/log/fluent/test.log.pos
  tag test.logs
  read_from_head true
  <parse>
    @type none
  </parse>
</source>

<match test.logs>
  @type stdout
</match>
EOF
# 指定配置文件启动fluentd
# fluentd -c /etc/fluent/test.conf

# 新建终端追加内容到test.log文件
# echo "hello fluentd" >> /var/log/test.log

# 观察fluentd控制台输出
2023-09-05 15:40:57.992178132 +0800 test.logs: {"message":"hello fluent"}
Fluentd事件
Fluentd是一个日志收集系统,那么一条日志消息,在Fluentd里就认为是一个事件
Fluentd的事件由下面三部分组成
- 标签(
tag): 用于说明这个事件是哪里产生的,可用于后面的事件路由,例如test.logs - 时间(
time): 事件是什么时候发生的,例如2023-09-05 15:40:57.992178132 +0800 - 记录(
record): 事件内容本身,JSON格式,例如{“message”:“hello fluent”}
当fluentd收到一个事件之后,会经过一系列的处理流程:
- 如修改事件的相关字段
- 过滤掉一些不关心的事件
- 路由事件输出到不同的地方
Fluentd配置文件插件组成
- source:指定输入源,可以有一个或多个
- filter:指定事件处理流程
- match:指定输出,可以有一个或多个
- parse:解析器插件,可以在source、match、filter中使用
- format:格式化插件,可以在match、filter中使用
- buffer:缓冲区插件,可以在match中使用
配置文件通配符
在前面的配置中,我们在输入源指定tag test.logs,然后在输出中指定match test.logs,以此实现指定输入与输出关联。fluented主要根据事件的tag来分区不同的处理流程,在filter和match过程中除了可以指定tag名称外,也可以使用通配符匹配
tag通常是一个字符串,由.分隔,比如myapp.access
*: 匹配满足一个tag部分的事件, 比如:a.*, 它将匹配a.b这样的tag, 但是不会处理a或者a.b.c这类tag**: 匹配满足0个或多个tag部分,比如:a.**, 它将匹配a,a.b,a.b.c这三种tag{X, Y, Z}: 匹配满足X,Y或者Z的tag, 比如:{a, b}将匹配a或者b,但是不会匹配c。
这种格式也可以和通配符组合使用,比如a.{b.c}.*或a.{b.c}.**#{...}会把花括号内的字符串当做是ruby的表达式处理。比如
<match "app.#{ENV['FLUENTD_TAG']}">
  @type stdout
</match>
如果设置了环境变量FLUENTD_TAG为dev,那上面等价于app.dev
- 当指定了多个模式时(使用一个或多个空格分开),只要满足其中任意一个就行。
比如:
<match a b>匹配a和b
<match a.** b.*>匹配a,a.b,a.b.c,b.d等
标签路由
fluentd的处理流程是根据我们在配置文件中的定义,从上到下依次执行的。假如我们在配置文件里定义了比较多输入源,同时针对不同的输入源需要使用不同的filters和输出时,如果仍然按照从上到下执行的顺序的话,由于不同的处理需求,我们的配置文件可能变得非常复杂。此时可以通过label标签,使配置文件结构更加清晰便于配置和阅读。
配置文件示例
<source>
  @type http
  bind 0.0.0.0
  port 9999
  @label @STAGING
</source>

<filter test.cycle>
  @type grep
  <exclude>
    key action
    pattern ^login$
  </exclude>
</filter>

<label @STAGING>
  <filter test.cycle>
    @type grep
    <exclude>
      key action
      pattern ^logout$
    </exclude>
  </filter>

  <match test.cycle>
    @type stdout
  </match>
</label>
在source输入中,定义一个名为STAGING的标签,然后在filter中过滤了login事件,接着又在label中过滤了logout事件,接下来访问测试
# curl -i -X POST -d 'json={"action":"login","user":2}' http://localhost:9999/test.cycle
# curl -i -X POST -d 'json={"action":"logout","user":2}' http://localhost:9999/test.cycle
# curl -i -X POST -d 'json={"action":"request","user":2}' http://localhost:9999/test.cycle
控制台打印结果如下:
2023-09-07 10:53:37.288951438 +0800 test.cycle: {"action":"login","user":2}
2023-09-07 10:54:18.860724760 +0800 test.cycle: {"action":"request","user":2}
可以看到,只有logout事件被过滤了,原因是我们为输入设置了label,因此fluentd会在执行时跳过其余的filter,只运行label标签块中的filter规则。
输入插件(source)
输入源可以一次指定多个, @type参数指定使用哪一个输入插件。
fluentd支持各种输入插件, 比如:
- tail:从文本文件读取数据
- forward:从TCP/UDP接收事件流,主要用于从其他fluentd实例接收数据。
- udp:从UDP中接收数据
- tcp:从TCP中接收数据
- unix:从unix中接收数据
- http:通过HTTP请求接收数据
- syslog:通过TCP或UDP接收syslog数据
- exec:执行外部程序来接收事件日志
- sample:接收示例数据,主要用于调试使用
- monitor_agent:通过 REST API 导出 Fluentd 的内部指标
- windows_eventlog:从windows事件日志中读取数据
插件的具体使用可以参考文档:
https://docs.fluentd.org/input
http输入
配置文件如下所示:
- @type http指定输入类型为http
- port和bind:指定监听地址和端口
- 在match中指定了要匹配的标签名称,并将匹配的事件发送到stdout插件进行输出
<source>
  @type http
  port 9999
  bind 0.0.0.0
</source>

<match http.logs>
  @type stdout
</match>
测试验证
# curl -i -X POST -d 'json={"action":"hello","fluent":1}' http://127.0.0.1:9999/http.logs
# 控制台输出如下
2023-09-05 16:08:05.238093979 +0800 http.logs: {"action":"hello","fluent":1}
单个文件输入
<source>
  @type tail
  path /var/log/test.log
  pos_file /var/log/fluent/test.log.pos
  tag test.logs
  read_from_head true
  refresh_interval 5
  <parse>
    @type none
  </parse>
</source>

<match test.logs>
  @type stdout
</match>
- @type tail:插件类型,指定为tail,从文件输入
- path /var/log/test.log:指定要读取的文件路径,可以使用*通配符匹配。
- pos_file /var/log/fluent/test.log.pos:用于跟踪读取位置的位置文件路径
- tag test.logs:为读取的事件设置的标签名称
- read_from_head true:表示读取整个文件,而不只是新的日志行。
- refresh_interval 5:刷新文件以检查新事件的时间间隔(秒),默认为5秒
- parse @type none:事件解析器的类型,none表示不进行解析
多个文件输入
<source>
  @type tail
  path /var/log/test.log
  pos_file /var/log/fluent/test.log.pos
  tag test.logs
  read_from_head true
  refresh_interval 5
  <parse>
    @type none
  </parse>
</source>
<source>
  @type tail
  path /var/log/json.log
  pos_file /var/log/fluent/json.log.pos
  tag json.logs
  read_from_head true
  <parse>
    @type json
    time_format %Y-%m-%dT%H:%M:%S.%NZ
    time_type string
  </parse>
</source>

<match *.logs>
  @type stdout
</match>
- parse @type json:事件解析器的类型,解析为json内容
- time_format、time_type:指定时间戳字段格式和内容
- match *.logs:匹配所有以.logs结尾的事件发送到stdout插件进行输出
测试验证
# echo "123.com" >> /var/log/test.log
# echo '{"time":"2023-9-5T01:01:01.123Z","text":"hello","age":18}' >> /var/log/json.log

# 控制台查看输出
2023-09-05 21:36:15.853468713 +0800 test.logs: {"message":"123.com"}
2023-09-05 01:01:01.123000000 +0800 json.logs: {"text":"hello","age":18}
输出插件(match)
输出也可以一次指定多个, @type参数指定使用哪一个输出插件。
fluentd支持各种输出插件, 比如:
- file:将事件写入文件,默认情况下,每天(大约 00:10)创建文件,首次使用该插件导入记录时,不会立即创建任何文件。
- forward:用于将事件转发到其他fluentd中。
- http:HTTP / HTTPS写入记录
- exec:事件传递给外部程序
- copy:事件复制到多个输出
- relabel:重新标记事件
- roundrobin:加权循环算法将事件分发到多个输出
- stdout:终端输出,主要用于调试
- null:丢弃指定事件
- s3
- kafka
- elasticsearch
- opensearch
- mongo
- mongo_replset
- rewrite_tag_filter
- webhdfs
插件的具体使用可以参考文档:
https://docs.fluentd.org/output
输出到文件
<source>
  @type sample
  sample {"hello":"world"}
  tag sample.logs
</source>

<match sample.logs>
  @type file
  path /var/log/sample.logs
  append true
  compress gzip
</match>
- @type file:输出插件类型,指定为file
- path:输出文件的路径
- append:是否将事件追加到文件末尾,如果设置为false,则会覆盖现有文件,默认为true
- compress:指定文件压缩格式
查看验证
# cat /var/log/sample.logs/buffer.b60498a2519b1bb278da14031742109bc.log
2023-09-05T16:44:25+08:00       sample.logs     {"hello":"world"}
输出到elasticsearch
如果需要输出到elasticsearch需要提前安装插件
fluent-gem install fluent-plugin-elasticsearch
配置文件示例
<source>
  @type sample
  sample {"hello":"world"}
  tag sample.logs
</source>

<match sample.logs>
  @type elasticsearch
  host 172.18.0.100
  port 9200
  default_elasticsearch_version 8
  user elastic
  password 0IgIjSHiIhGWp_TWqoJk
  scheme https
  ssl_verify false
  index_name fluentd-${tag}
  # api_key "ElasticsearchAPIKEY" # 或者使用api_key方式验证
</match>
- host:es主机地址,可以有多个地址,例如:hosts https://customhost.com:443/path,https://username:password@host-failover.com:443
- user、password:连接es的账号和密码
- default_elasticsearch_version:指定es版本
- scheme:连接方式是http还是https
- ssl_verify:跳过ca证书验证
- index_name:指定索引名称
输出到kafka
如果需要输出到kafka需要提前安装插件
fluent-gem install fluent-plugin-kafka
配置文件示例
<source>
  @type sample
  sample {"hello":"world"}
  tag sample.logs
</source>

<match sample.logs>
  @type kafka2

  brokers <broker1_host>:<broker1_port>,<broker2_host>:<broker2_port>
  use_event_time true

  <buffer topic>
    @type file
    path /var/log/td-agent/buffer/td
    flush_interval 3s
  </buffer>

  <format>
    @type json
  </format>

  topic_key topic
  default_topic messages
  required_acks -1
  compression_codec gzip
</match>
- @type kafka2:指定输出到kafka
- brokers:kafka集群broker列表
- use_event_time:将fluentd事件设置为kafka的createTime,默认为false使用当前时间
- topic_key:默认topic名称
- required_acks:请求确认次数,默认-1不确认
- compression_codec:压缩消息编码,默认不压缩
过滤插件(filter)
过滤也可以一次指定多个, @type参数指定使用哪一个过滤插件。
fluentd支持各种输出插件, 比如:
- record_transformer:添加、删除、修改事件内容
- grep:过滤指定字段值的事件
- parser:字段值数据格式化。
- geoip:使用Maxmind GeoIP数据库将地理位置信息添加到日志中
- stdout:将事件打印到标准输出,主要用于调试
插件的具体使用可以参考文档:
https://docs.fluentd.org/filter
字段添加、删除、修改、替换
配置示例:
<source>
  @type sample
  sample {"total":100, "count":10,"message":"hello world!","name":"alex","pod":{"pod_name":"mypod","pod_id":"b1187408"}}
  tag sample.logs
</source>

<filter sample.logs>
  @type record_transformer
  enable_ruby
  <record>
    avg ${record["total"] / record["count"]}
    hostname "#{Socket.gethostname}"
    tag ${tag}
    message fluentd, ${record["message"]}
    name ${record["name"].gsub("alex", "tom")}
  </record>
  remove_keys name,$.pod.pod_id
</filter>

<match sample.logs>
  @type stdout
</match>
- avg ${record[“total”] / record[“count”]}:新增avg字段,值为record[“total”] / record[“count”]
- hostname “#{Socket.gethostname}”:新增hostname字段,值为#{Socket.gethostname}
- message fluentd, ${record[“message”]}:修改message字段,在前面添加fluentd
- remove_keys $.pod.pod_id:删除pod下的pod_id字段
- name ${record[“name”].gsub(“alex”, “tom”)}:将name字段中的alex值替换为tom
执行结果如下:
2023-09-05 18:00:36.097785459 +0800 sample.logs: {"total":100,"count":10,"message":"fluentd, hello world!","name":"tom","pod":{"pod_name":"mypod"},"avg":10,"hostname":"huanbao","tag":"sample.logs"}
过滤事件
配置示例:
<source>
  @type sample
  sample {"message":"I am cool but you are uncool", "hostname":"db001.example.com"}
  sample {"hostname":"web001.example.com"}
  sample {"message":"It's cool outside today"}
  sample {"message":"It's cool outside today", "hostname":"web001.example.com"}
  sample {"message":"That's not cool", "hostname":"web1337.example.com"}
  tag sample.logs
</source>

<filter sample.logs>
  @type grep
  <regexp>
    key message
    pattern /cool/
  </regexp>

  <regexp>
    key hostname
    pattern /^web\d+\.example\.com$/
  </regexp>

  <exclude>
    key message
    pattern /uncool/
  </exclude>
</filter>

<match sample.logs>
  @type stdout
</match>
- key message,pattern /cool/:message字段的值包含 cool
- key hostname:hostname字段的值与 web.example.com 匹配。
- key message,pattern /uncool/:message字段的值不包含 uncool。
执行结果如下:
2023-09-05 18:07:44.097470768 +0800 sample.logs: {"message":"That's not cool","hostname":"web1337.example.com"}
数据解析
利用解析器插件,我们可以将数据解析并格式化为指定格式的内容
配置示例:
<source>
  @type sample
  sample {"log":"192.168.0.1 - - [05/Feb/2023:09:00:00 +0900] \"GET / HTTP/1.1\" 200 777"}
  tag sample.logs
</source>

<filter sample.logs>
  @type parser
  key_name log
  <parse>
    @type regexp
    expression /^(?<host>[^ ]*) [^ ]* (?<user>[^ ]*) \[(?<time>[^\]]*)\] "(?<method>\S+)(?: +(?<path>[^ ]*) +\S*)?" (?<code>[^ ]*) (?<size>[^ ]*)$/
    time_format %d/%b/%Y:%H:%M:%S %z
  </parse>
</filter>

<match sample.logs>
  @type stdout
</match>
- key_name log:解析log字段内容
- @type regexp:使用正则解析器
- expression:解析表达式
- time_format:时间字段格式
执行结果如下:
2023-09-05 11:00:00.000000000 +0800 sample.logs: {"host":"192.168.0.1","user":"-","method":"GET","path":"/","code":"200","size":"777"}
地理位置信息解析
安装地理IP解析库
dnf group install "Development Tools"
dnf yum install geoip-devel --enablerepo=epel
fluentd安装解析插件
fluent-gem install fluent-plugin-geoip
配置示例:
<source>
  @type sample
  sample {"host":"66.102.9.80"}
  tag sample.logs
</source>

<filter sample.logs>
  @type geoip
  geoip_lookup_keys host
  geoip2_database /etc/fluent/GeoLite2-City.mmdb
  backend_library geoip2_c
  <record>
    city            ${city.names.en["host"]}
    latitude        ${location.latitude["host"]}
    longitude       ${location.longitude["host"]}
    country         ${country.iso_code["host"]}
    country_name    ${country.names.en["host"]}
    postal_code     ${postal.code["host"]}
    region_code     ${subdivisions.0.iso_code["host"]}
    region_name     ${subdivisions.0.names.en["host"]}
  </record>
</filter>

<match sample.logs>
  @type stdout
</match>
- geoip_lookup_keys:指定解析ip的字段
- geoip2_database:本地ip数据库地址
- backend_library:ip库类型,可选值为geoip, geoip2_compat, geoip2_c
执行结果:
2023-09-05 20:19:20.099538026 +0800 sample.logs: {"host":"66.102.9.80","city":null,"latitude":37.751,"longitude":-97.822,"country":"US","country_name":"United States","postal_code":null,"region_code":null,"region_name":null}
解析器插件(parse)
在fluentd输入、过滤、输出过程中,均可以使用多种解析器插件,目前支持的解析器插件如下:
- regexp:正则匹配,类似logstash的grok插件
- apache2:解析Apache日志
- apache_error:解析Apache error日志
- nginx:解析NGINX日志
- syslog:解析syslog日志
- csv:解析csv格式数据
- tsv:解析tsv格式数据
- ltsv:解析ltsv格式数据
- json:将字符串解析为json数据
- msgpack:解析MessagePack数据
- multiline:解析多行日志
- none:不解析处理
更多解析器详细信息参考文档:https://docs.fluentd.org/parser
正则匹配解析
在线调试正则地址:http://fluentular.herokuapp.com/
常用正则匹配参数
- 忽略大小写:expression /…/i
- 多行匹配:expression /…/m
- 同时指定参数:expression /…/im
配置示例
<source>
  @type sample
  sample {"log":"[2013-02-28 12:00:00 +0900] alice engineer 1"}
  tag sample.logs
</source>

<filter sample.logs>
  @type parser
  key_name log
  <parse>
    @type regexp
    expression /^\[(?<logtime>[^\]]*)\] (?<name>[^ ]*) (?<title>[^ ]*) (?<id>\d*)$/
    time_key logtime
    time_format %Y-%m-%d %H:%M:%S %z
    types id:integer
  </parse>
</filter>

<match sample.logs>
  @type stdout
</match>
执行结果
2013-02-28 11:00:00.000000000 +0800 sample.logs: {"name":"alice","title":"engineer","id":1}
json解析
配置示例
<source>
  @type sample
  sample {"log":"{\"key1\": \"value1\", \"key2\": 2}"}
  tag sample.logs
</source>

<filter sample.logs>
  @type parser
  key_name log
  reserve_data true
  remove_key_name_field true
  <parse>
    @type json
    json_parser json
  </parse>
</filter>

<match sample.logs>
  @type stdout
</match>
- key_name:需要转换的字段
- reserve_data:是否保留转换前除log之外的其他字段
- remove_key_name_field:是否删除转换前的log字段
- json_parser:json解析器可选oj, yajl, json
执行结果
2023-09-09 09:38:47.016389000 +0800 sample.logs: {"key1":"value1","key2":2}
多行正则解析
多行解析只能在in_tail中使用
例如java异常日志如下
2023-3-03 14:27:33 [main] INFO  Main - Start
2023-3-03 14:27:33 [main] ERROR Main - Exception
javax.management.RuntimeErrorException: null
    at Main.main(Main.java:16) ~[bin/:na]
2023-3-03 14:27:33 [main] INFO  Main - End
配置示例
<source>
  @type tail
  path /var/log/test.log
  pos_file /var/log/fluent/test.log.pos
  tag test.logs
  read_from_head true
  <parse>
    @type multiline
    format_firstline /\d{4}-\d{1,2}-\d{1,2}/
    format1 /^(?<time>\d{4}-\d{1,2}-\d{1,2} \d{1,2}:\d{1,2}:\d{1,2}) \[(?<thread>.*)\] (?<level>[^\s]+)(?<message>.*)/
  </parse>
</source>

<match test.logs>
  @type stdout
</match>
- format_firstline:匹配多行日志起始位置
- formatN:每行日志匹配表达式
执行结果
2023-03-03 14:27:33.000000000 +0800 test.logs: {"thread":"main","level":"INFO","message":"  Main - Start"}
2023-03-03 14:27:33.000000000 +0800 test.logs: {"thread":"main","level":"ERROR","message":" Main - Exception\njavax.management.RuntimeErrorException: null\n    at Main.main(Main.java:16) ~[bin/:na]"}
其他插件
格式化插件(format)
格式化插件配置在match输出中,主要用于将自定义格式输出
目前内置的格式化插件如下:
- out_file:将事件输出格式化为由分隔符分隔的时间、标签和 json 记录
- json:将事件输出格式化为 JSON
- ltsv:将事件输出格式化为ltsv
- csv:将事件输出格式化为csv
- msgpack:将事件输出格式化为msgpack
- hash:将事件输出格式化为哈希值
- single_value:输出单个字段的值,而不是整个记录
- tsv:将事件输出格式化为tsv
更多格式化插件参考文档:https://docs.fluentd.org/formatter
json
输出为标准json格式,需要注意的是json 格式化后结果不包含tag和time字段。
配置示例:
<source>
  @type sample
  sample {"hello":"world"}
  tag sample.logs
</source>

<match sample.logs>
  @type stdout
  <format>
    @type json
  </format>
</match>
执行结果
{"hello":"world"}
缓冲区插件(buffer)
缓冲区插件配置在match输出中,主要用于暂时存储传入流数据,使用buffer插件可有效提高数据传输过程中的性能和可靠性。
目前内置的格式化插件如下:
- memory:使用内存来存储缓冲区块
- file:使用磁盘文件存储缓冲区块
更多格式化插件参考文档:https://docs.fluentd.org/buffer
内存缓冲
配置示例
<source>
  @type sample
  sample {"hello":"world"}
  tag sample.logs
</source>

<match sample.logs>
  @type file
  path /var/log/sample.logs
  append true
  compress gzip
  <buffer>
    @type memory
  </buffer>
</match>
文件缓冲
配置示例
<source>
  @type sample
  sample {"hello":"world"}
  tag sample.logs
</source>

<match sample.logs>
  @type file
  path /var/log/sample.logs
  append true
  compress gzip
  <buffer>
    @type file
    path /var/log/fluent/buf/sample.*
  </buffer>
</match>
结果验证
[root@huanbao buf]# pwd
/var/log/fluent/buf
[root@huanbao buf]# ls
sample.b604bb35d921c75b350f722e963dacbef.log  sample.b604bb35d921c75b350f722e963dacbef.log.meta
存储插件(storage)
有时,输入/过滤器/输出插件需要将其内部状态保存在内存、存储或键值存储中。Fluentd有一个名为Storage的插件,它允许插件存储并重用其内部状态作为键值对。
本地存储
配置示例
<source>
  @type sample
  sample {"hello":"world"}
  tag sample.logs
  <storage>
    @type local
    path /var/log/fluent/storage/sample.json
  </storage>
</source>

<match sample.logs>
  @type stdout
</match>
结果验证
[root@huanbao buf]# cd /var/log/fluent/storage/
[root@huanbao storage]# ls
sample.json
[root@huanbao storage]# cat sample.json
{"increment_value":0,"dummy_index":0}
Fluentd采集解析日志实践
调试fluentd配置
原始日志格式
2023-07-23 09:35:18.987 | INFO | __main__:debug_log:49 - {'access_status': 200, 'request_method': 'GET', 'request_uri': '/account/', 'request_length': 67, 'remote_address': '186.196.110.240', 'server_name': 'cu-36.cn', 'time_start': '2023-07-23T09:35:18.879+08:00', 'time_finish': '2023-07-23T09:35:19.638+08:00', 'http_user_agent': 'Mozilla/5.0 (Macintosh; Intel Mac OS X 10_12_3) AppleWebKit/537.36 (KHTML, like Gecko) Chrome/58.0.2999.0 Safari/537.36'}
- fluentd添加source配置,从文件中读取数据,新增match配置,输出到控制台,fluentd配置文件如下所示
<source>
  @type tail
  path /opt/log_demo/log/info.log
  pos_file /var/log/fluent/demo.logs.pos
  tag demo.logs
  read_from_head true
  <parse>
    @type none
  </parse>
</source>
<match demo.logs>
  @type stdout
</match>
观察控制台输出内容,已正确采集到了/opt/log_demo/log/info.log文件中的日志内容并添加到了message字段中
2023-09-09 09:20:10.439369419 +0800 demo.logs: {"message":"2023-09-09 09:20:10.438 | WARNING | __main__:debug_log:48 - {'access_status': 404, 'request_method': 'POST', 'request_uri': '/login/', 'request_length': 89, 'remote_address': '154.87.205.94', 'server_name': 'cm-3.cn', 'time_start': '2023-09-09T09:20:09.729+08:00', 'time_finish': '2023-09-09T09:20:10.500+08:00', 'http_user_agent': 'Chrome 9\\tMozilla/5.0 (Macintosh; Intel Mac OS X 10_13_2) AppleWebKit/537.36 (KHTML, like Gecko) Chrome/94.0.4606.81 Safari/537.36'}"}
- 接下来添加filter过滤规则,通过regexp正则匹配解析,将日志内容解析为logtime、level、class、content四部分,并指定logtime为事件时间字段
<filter demo.logs>
  @type parser
  key_name message
  <parse>
    @type regexp
    expression /^(?<logtime>[^|]+) \| (?<level>[A-Z]*) *\| __main__:(?<class>\D*:\d*) - (?<content>.*)$/
    time_key logtime
    time_format %Y-%m-%d %H:%M:%S.%L
  </parse>
</filter>
添加正则解析规则后,控制台输出内容如下,观察可知事件时间已替换为正确的日志生成时间,并提取到了level、class、content相关内容
2023-09-09 09:24:20.979000000 +0800 demo.logs: {"level":"INFO","class":"debug_log:53","content":"{'access_status': 200, 'request_method': 'GET', 'request_uri': '/login/', 'request_length': 46, 'remote_address': '213.225.29.116', 'server_name': 'cm-4.cn', 'time_start': '2023-09-09T09:24:20.323+08:00', 'time_finish': '2023-09-09T09:24:21.775+08:00', 'http_user_agent': 'Chrome 9\\tMozilla/5.0 (Windows NT 10.0; Win64; x64) AppleWebKit/537.36 (KHTML, like Gecko) Chrome/91.0.4472.124 Safari/537.36'}"}
- 由于content内容不是标准的json格式,因此在json解析前我们需要使用record_transformer字符处理插件,将其中的’替换为"。
<filter demo.logs>
  @type record_transformer
  enable_ruby
  <record>
    content ${record["content"].gsub("'", '"')}
  </record>
</filter>
添加字符替换规则后,控制台输出如下,已成功将content字段的值中的所有’替换为"
2023-09-09 09:27:44.646000000 +0800 demo.logs: {"level":"INFO","class":"debug_log:71","content":"{\"access_status\": 301, \"request_method\": \"DELETE\", \"request_uri\": \"/login/\", \"request_length\": 54, \"remote_address\": \"128.46.31.93\", \"server_name\": \"cu-8.cn\", \"time_start\": \"2023-09-09T09:27:44.331+08:00\", \"time_finish\": \"2023-09-09T09:27:45.052+08:00\", \"http_user_agent\": \"Firefox 7\\tMozilla/5.0 (Windows NT 10.0; Win64; x64; rv:78.0) Gecko/20100101 Firefox/78.0\"}"}
- 现在content字段值已经是标准的json格式,接下来可以使用json解析器解析。
<filter demo.logs>
  @type parser
  key_name content
  <parse>
    @type json
  </parse>
</filter>
接下来观察控制台输出,已将content中的内容解析并添加到事件内容中
2023-09-09 09:39:29.342134038 +0800 demo.logs: {"level":"INFO","class":"debug_log:71","access_status":200,"request_method":"GET","request_uri":"/account/","request_length":12,"remote_address":"170.4.117.203","server_name":"cu-4.cn","time_start":"2023-09-09T09:39:28.871+08:00","time_finish":"2023-09-09T09:39:30.303+08:00","http_user_agent":"Firefox 7\tMozilla/5.0 (Windows NT 10.0; Win64; x64; rv:78.0) Gecko/20100101 Firefox/78.0"}
- 我们已经成功解析到了remote_address字段,接下来使用geoip插件从数据库中查询ip的地理位置信息。
<filter demo.logs>
  @type geoip
  geoip_lookup_keys remote_address
  geoip2_database /etc/fluent/GeoLite2-City.mmdb
  backend_library geoip2_c
  <record>
    geoip_city            ${city.names.en["remote_address"]}
    geoip_latitude        ${location.latitude["remote_address"]}
    geoip_longitude       ${location.longitude["remote_address"]}
    geoip_country         ${country.iso_code["remote_address"]}
    geoip_country_name    ${country.names.en["remote_address"]}
    geoip_postal_code     ${postal.code["remote_address"]}
    geoip_region_name     ${subdivisions.0.names.en["remote_address"]}
  </record>
</filter>
观察控制台输出,已经成功通过remote_address字段的ip地址获取到了地理位置信息内容。
2023-09-09 09:45:17.910753124 +0800 demo.logs: {"level":"INFO","class":"debug_log:54","access_status":200,"request_method":"GET","request_uri":"/account/","request_length":94,"remote_address":"176.146.11.173","server_name":"cm-4.cn","time_start":"2023-09-09T09:45:17.727+08:00","time_finish":"2023-09-09T09:45:18.115+08:00","http_user_agent":"Safari 11\tMozilla/5.0 (Macintosh; Intel Mac OS X 10_13_1) AppleWebKit/604.3.5 (KHTML, like Gecko) Version/11.0.1 Safari/604.3.5","geoip_city":"Chassieu","geoip_latitude":45.743,"geoip_longitude":4.97,"geoip_country":"FR","geoip_country_name":"France","geoip_postal_code":"69680","geoip_region_name":"Auvergne-Rhone-Alpes"}
- 数据解析完成后,我们配置match输出到elasticsearch中。
<match demo.logs>
  @type elasticsearch
  host 172.18.0.100
  port 9200
  default_elasticsearch_version 8
  user elastic
  scheme https
  password 0IgIjSHiIhGWp_TWqoJk
  ssl_verify false
  index_name fluentd-${tag}
  <buffer>
    @type file
    path /fluentd/buf/demo.logs.*
  </buffer>
</match>
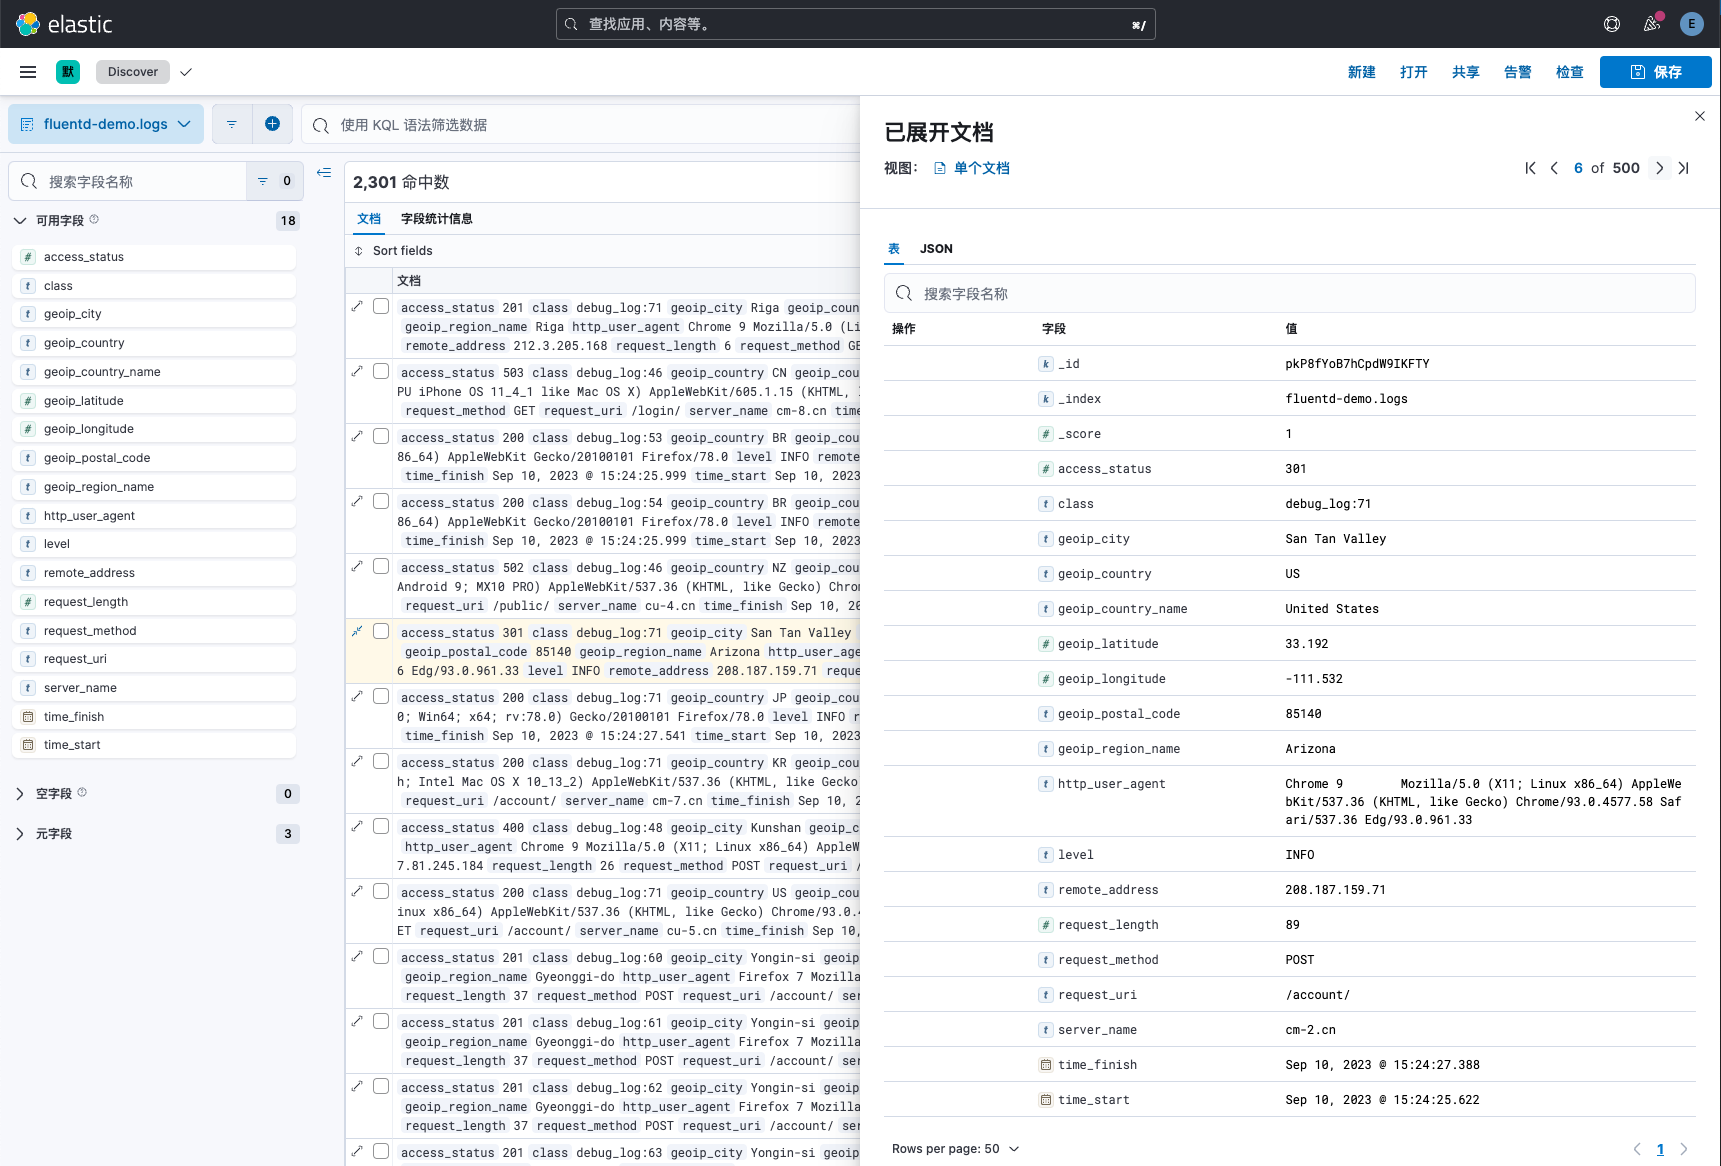
此时观察kibana索引,日志数据已成功写入es中。
构建fluentd镜像
由于fluentd镜像未安装elasticsearch和geoip插件,如果在pod的init阶段在线安装插件经常会导致拉取超时无法正常启动。因此需要提前构建包含elasticsearch和geoip插件的fluentd镜像,并上传至harbor仓库中。
[root@tiaoban fluent]# ls
Dockerfile  fluentd-conf.yaml  GeoLite2-City.mmdb  log-demo.yaml
[root@tiaoban fluent]# cat Dockerfile
FROM fluentd:v1.16-debian-1
USER root
RUN apt-get update && apt-get install -y build-essential libgeoip-dev autoconf automake libtool libffi-dev && apt-get autoclean
ADD GeoLite2-City.mmdb /fluentd/GeoLite2-City.mmdb
RUN fluent-gem install fluent-plugin-elasticsearch && fluent-gem install fluent-plugin-geoip && rm -rf /var/lib/apt/lists/* /var/cache/debconf/* /var/log/* /var/tmp/*
[root@tiaoban fluent]# docker build -t harbor.local.com/elk/fluentd:v1.16 .
[root@tiaoban fluent]# docker push harbor.local.com/elk/fluentd:v1.16
k8s部署资源
[root@tiaoban fluentd]# kubectl apply -f .
configmap/fluentd-conf created
deployment.apps/log-demo created
[root@tiaoban fluentd]# kubectl get pod -o wide
NAME                        READY   STATUS    RESTARTS      AGE     IP             NODE    NOMINATED NODE   READINESS GATES
log-demo-59b8687b8c-428qv   2/2     Running   0             5m11s   10.244.3.186   work3   <none>           <none>
log-demo-59b8687b8c-rft4f   2/2     Running   0             5m11s   10.244.4.210   work2   <none>           <none>
访问验证
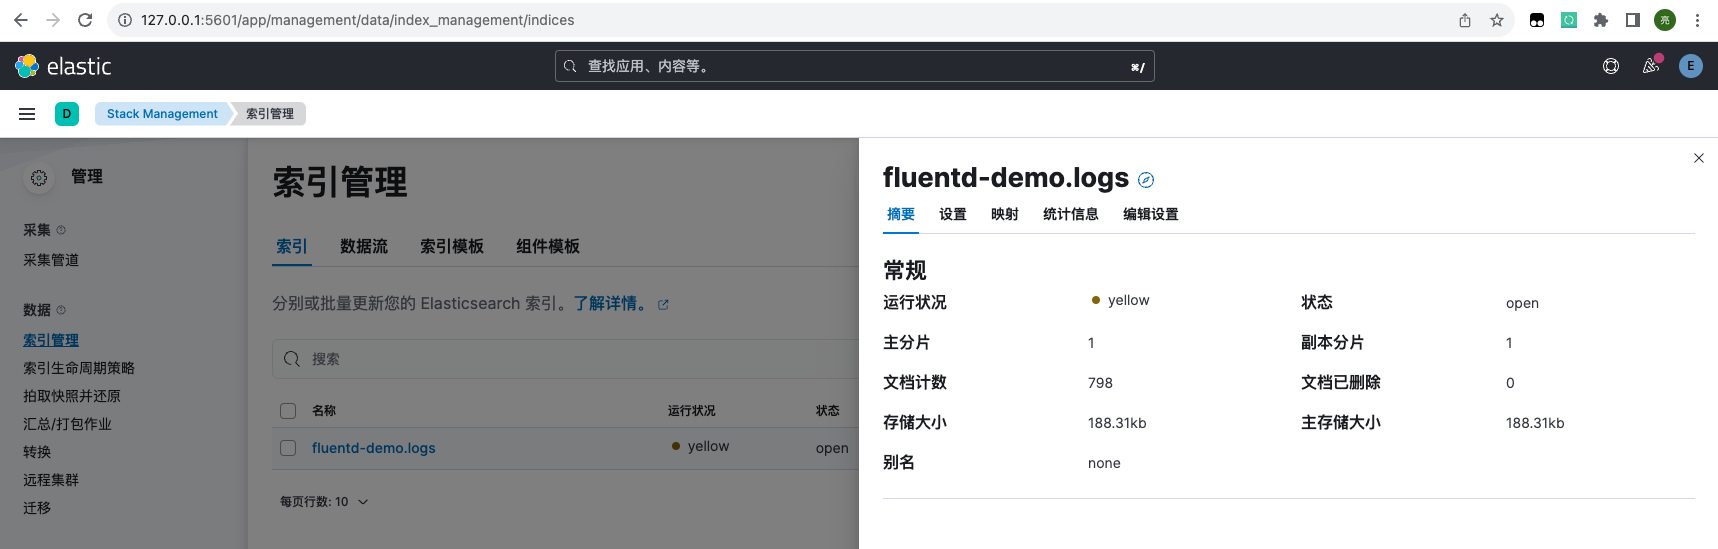
访问kibana索引管理,已创建名为fluentd-demo.logs的索引
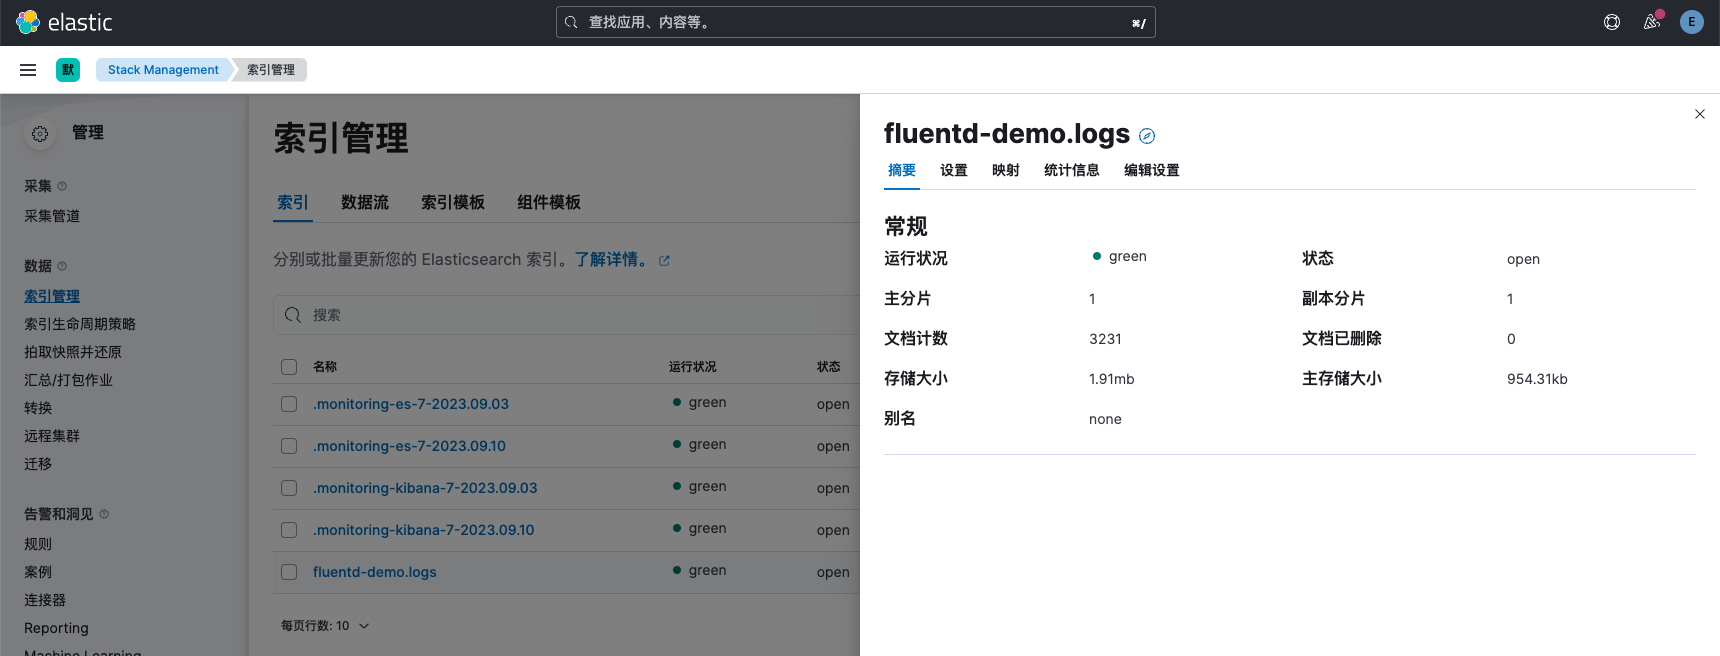
查看索引数据内容,已完成对数据的过滤清洗操作,并成功加载地理位置信息。
接下来调整索引模板setting和mapping以及ILM策略等配置,具体内容可参考文档:https://www.cuiliangblog.cn/detail/article/65。
完整资源清单
本实验案例所有yaml文件已上传至git仓库。访问地址如下:
github
https://github.com/cuiliang0302/blog-demo
gitee
https://gitee.com/cuiliang0302/blog_demo
参考文档
fluentd输入插件:https://docs.fluentd.org/input
fluentd输出插件:https://docs.fluentd.org/output
fluentd过滤插件:https://docs.fluentd.org/filter
查看更多
微信公众号
微信公众号同步更新,欢迎关注微信公众号《崔亮的博客》第一时间获取最近文章。
博客网站
崔亮的博客-专注devops自动化运维,传播优秀it运维技术文章。更多原创运维开发相关文章,欢迎访问https://www.cuiliangblog.cn


 1470
1470


 被折叠的 条评论
为什么被折叠?
被折叠的 条评论
为什么被折叠?
 到【灌水乐园】发言


