


HTTP登陆的Harbor部署方式请参照以下链接
https://blog.csdn.net/qq_33868661/article/details/127379197?spm=1001.2014.3001.5502
下面我们将以上述链接中部署的Harbor为基础,增加HTTPS登陆方式
实现利用 https://域名 的方式登陆和访问Harbor
完成一下配置之后,最直观的感受就是在Pod的image信息中我们可以使用https来拉取镜像了
生成认证文件
1. 创建CA认证信息
$ openssl genrsa -out ca.key 4096

$ openssl req -x509 -new -nodes -sha512 -days 3650 \
 -subj "/C=CN/ST=Beijing/L=Beijing/O=example/OU=Personal/CN=harbor.example.com" \
 -key ca.key \
 -out ca.crt
2. 生成服务器认证信息
$ openssl genrsa -out harbor.example.com.key 4096

$ openssl req -sha512 -new \
    -subj "/C=CN/ST=Beijing/L=Beijing/O=example/OU=Personal/CN=harbor.example.com" \
    -key harbor.example.com.key \
    -out harbor.example.com.csr
3. 生成一个x509 v3扩展文件
$ cat > v3.ext <<-EOF
authorityKeyIdentifier=keyid,issuer
basicConstraints=CA:FALSE
keyUsage = digitalSignature, nonRepudiation, keyEncipherment, dataEncipherment
extendedKeyUsage = serverAuth
subjectAltName = @alt_names

[alt_names]
DNS.1=harbor.example.com
DNS.2=harbor.example
DNS.3=harbor
EOF
4. 使用v3.ext文件为你的Harbor主机生成认证信息
$ openssl x509 -req -sha512 -days 3650 \
    -extfile v3.ext \
    -CA ca.crt -CAkey ca.key -CAcreateserial \
    -in harbor.example.com.csr \
    -out harbor.example.com.crt
将生成的认证文件放置在正确的位置上
1. 首先创建以下两个目录(已经存在的请忽略)
$ mkdir /data/cert/
$ mkdir /etc/docker/certs.d/harbor.example.com/
2. 将生成的Harbor主机的crt和key文件复制到/data/cert/下
$ cp harbor.example.com.crt /data/cert/
$ cp harbor.example.com.key /data/cert/
3. 将crt文件转换成cert文件,供Docker使用
$ openssl x509 -inform PEM -in harbor.example.com.crt -out harbor.example.com.cert
4. 复制Docker需要的认证文件
$ cp arbor.example.com.cert /etc/docker/certs.d/arbor.example.com/
$ cp arbor.example.com.key /etc/docker/certs.d/arbor.example.com/
$ cp ca.crt /etc/docker/certs.d/harbor.example.com/
5. 最终认证文件分布如下
root@harbor:/etc/docker/certs.d# tree
.
└── harbor.example.com
    ├── ca.crt
    ├── harbor.example.com.cert
    └── harbor.example.com.key

1 directory, 3 files
root@harbor:/data/cert# tree
.
├── harbor.example.com.crt
└── harbor.example.com.key

0 directories, 2 files
6. 最后重启Docker
$ systemctl daemon-reload
$ systemctl restart docker
重新配置Harbor
1. 检查Docker的daemon.json文件
配置文件中不可以将harbor.example.com这个域名放在insecure-registries这个参数中
这样一来我们才能通过443端口访问该域名

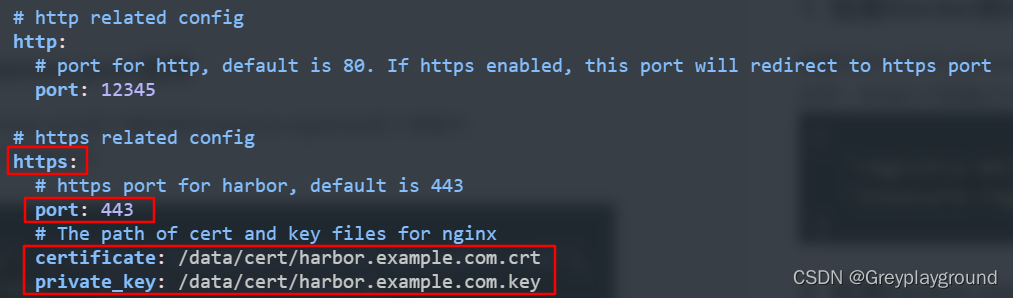
2. 检查harbor.yml文件
root@harbor:/usr/local/harbor# vim harbor.yml
如下配置需要根据实际情况加以修改,端口号默认为443,certificate和private_key的存放路径要正确
3. 重新启动Harbor
#首先要进入到Harbor的安装目录下
$ cd /usr/local/harbor/
$ ./prepare
$ docker compose down -v
$ docker compose up -d
验证Harbor HTTPS是否生效
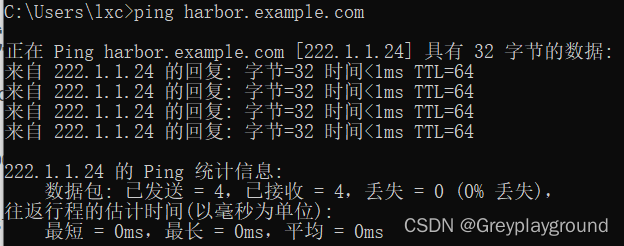
1. 首先测试主机上是否存在Harbor主机的域名解析信息
在我的环境中,Windows的hosts.txt文件中需要包harbor.example.com的域名和对应IP地址
# Copyright (c) 1993-2009 Microsoft Corp.
#
# This is a sample HOSTS file used by Microsoft TCP/IP for Windows.
#
# This file contains the mappings of IP addresses to host names. Each
# entry should be kept on an individual line. The IP address should
# be placed in the first column followed by the corresponding host name.
# The IP address and the host name should be separated by at least one
# space.
#
# Additionally, comments (such as these) may be inserted on individual
# lines or following the machine name denoted by a '#' symbol.
#
# For example:
#
#      102.54.94.97     rhino.acme.com          # source server
#       38.25.63.10     x.acme.com              # x client host
222.1.1.24     harbor.example.com
# localhost name resolution is handled within DNS itself.
#	127.0.0.1       localhost
#	::1             localhost
然后Ping测一下
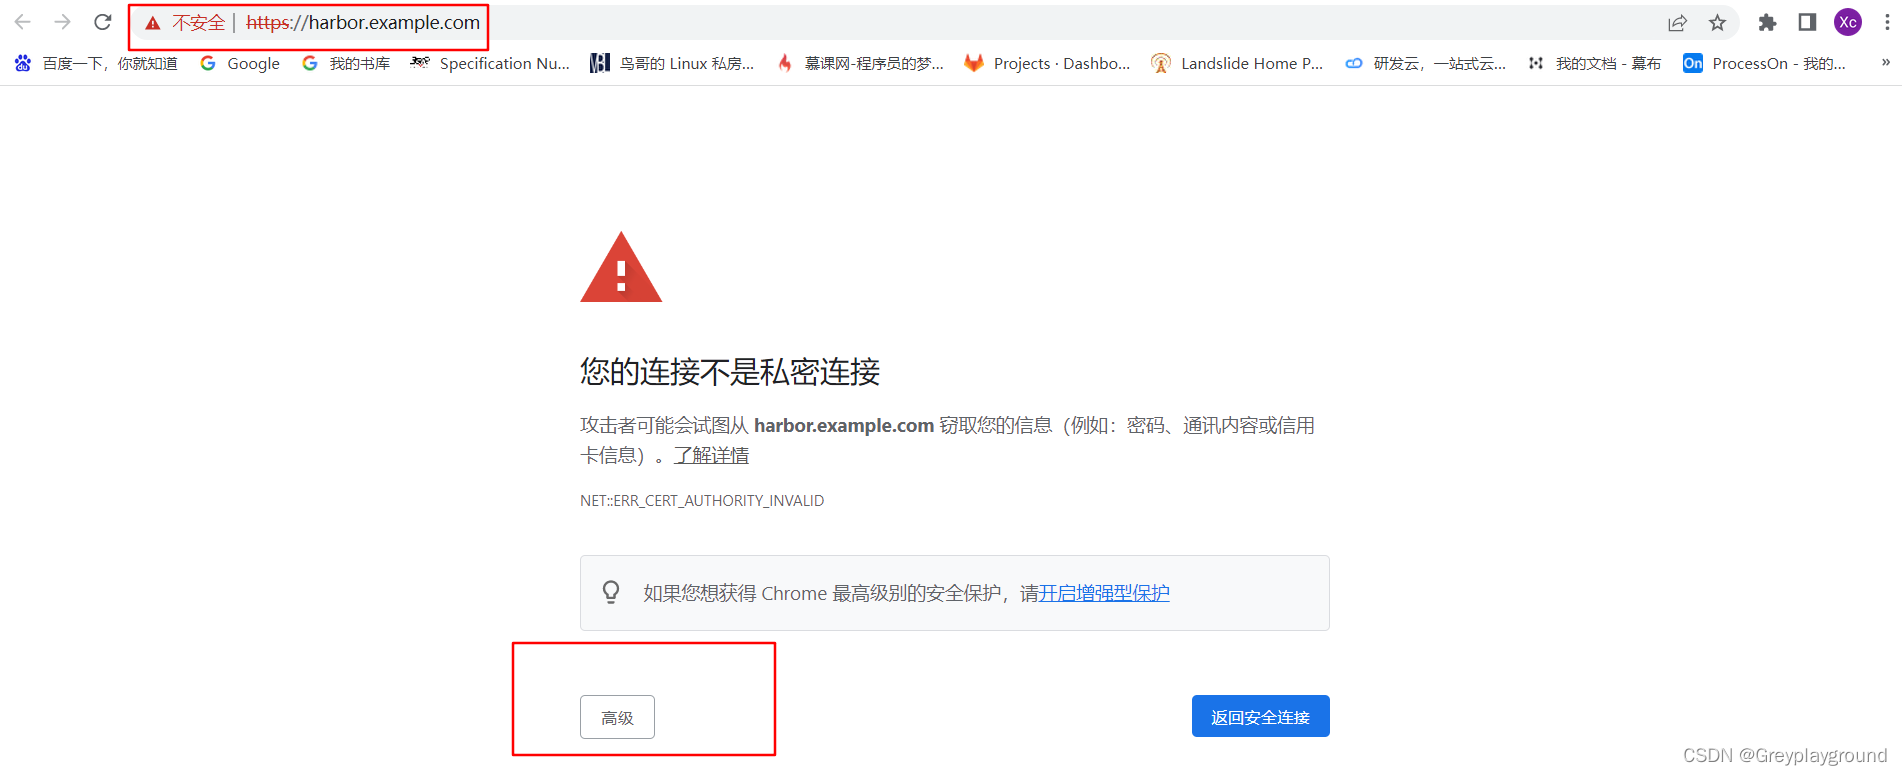
2. 通过浏览器HTTPS访问Harbor
由于是自签名证书,浏览器会报错,点击“高级”-“继续前往”即可
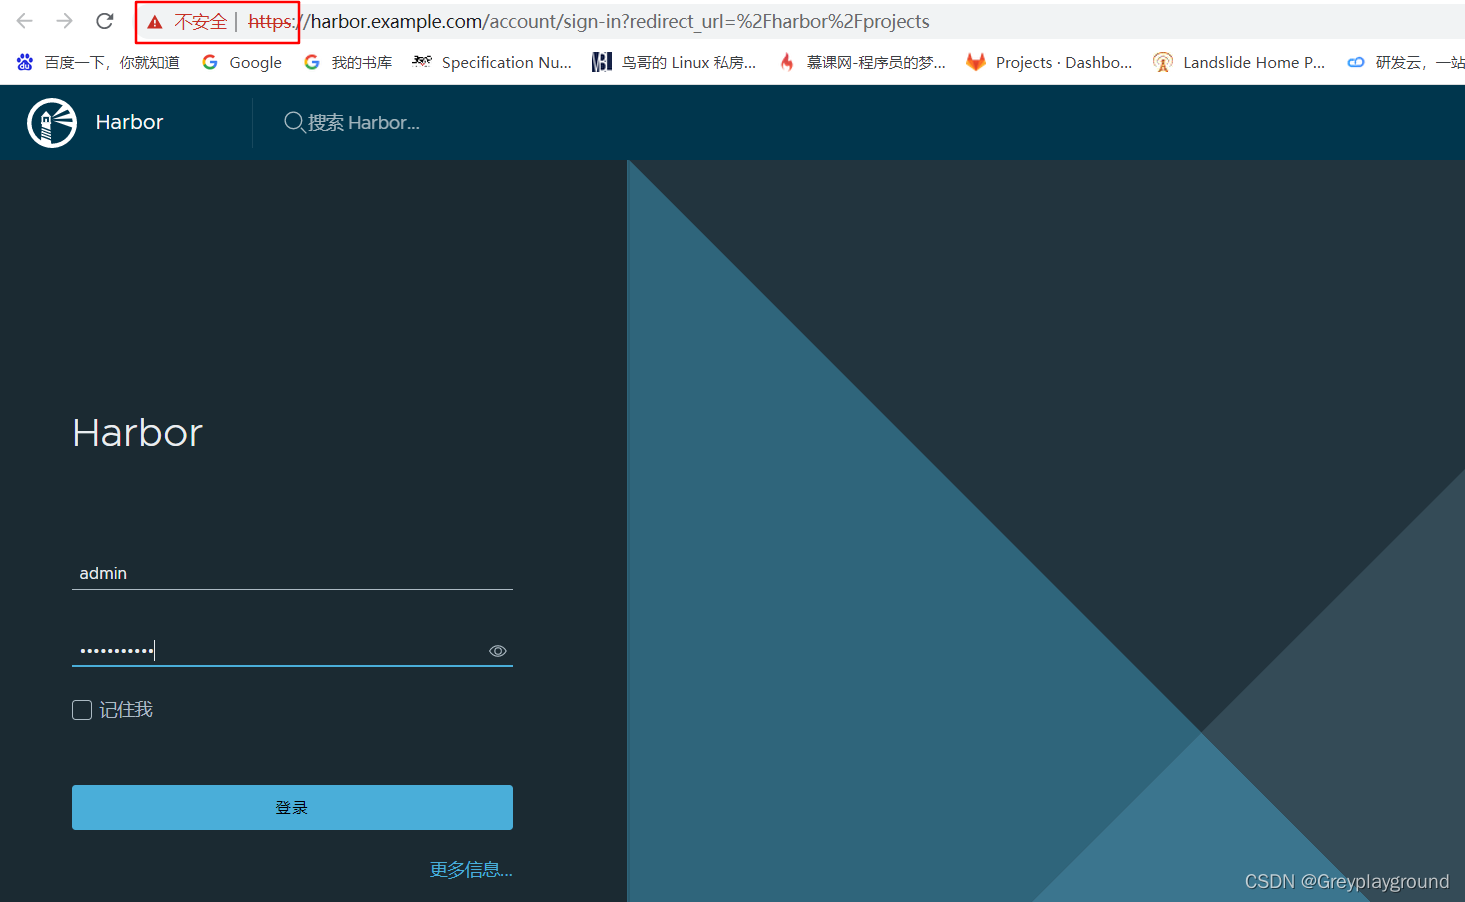
成功通过HTTPS登陆到了Harbor


 2047
2047


 被折叠的 条评论
为什么被折叠?
被折叠的 条评论
为什么被折叠?
 到【灌水乐园】发言


