


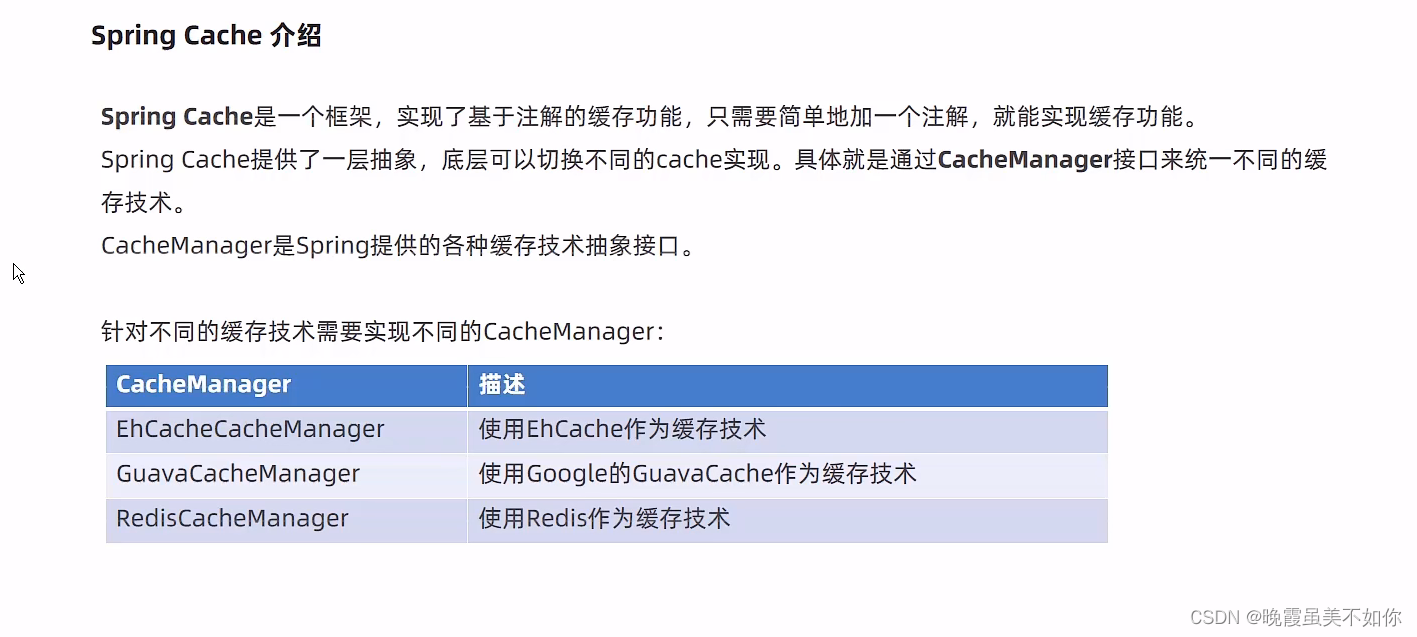
介绍
常用注解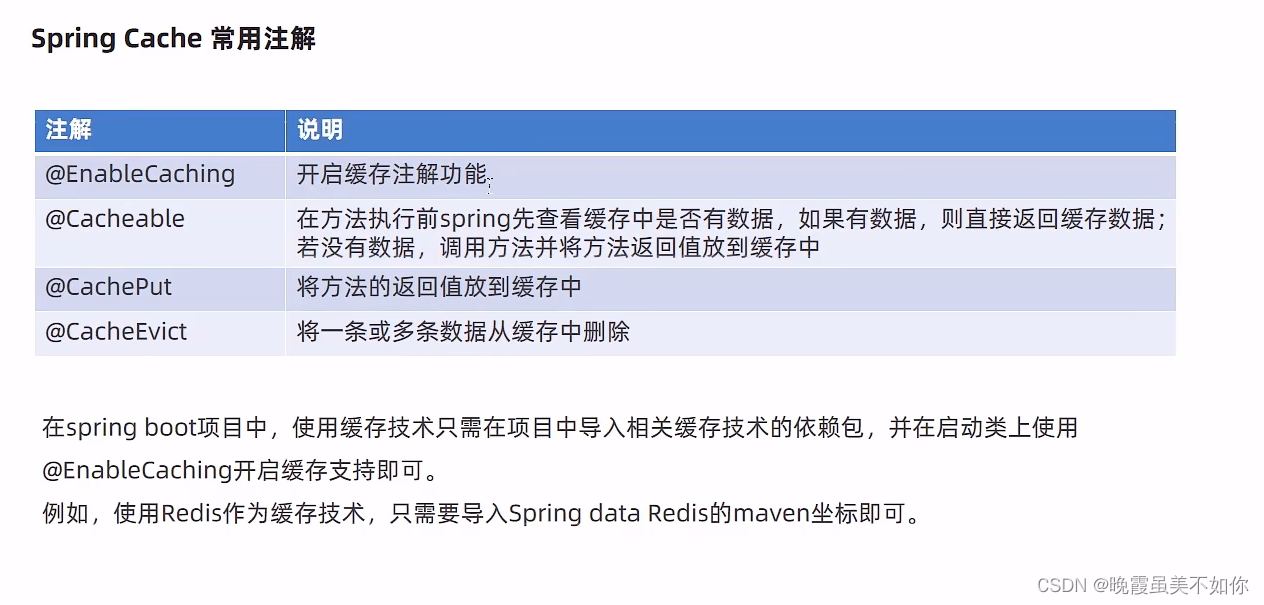
@Cacheable
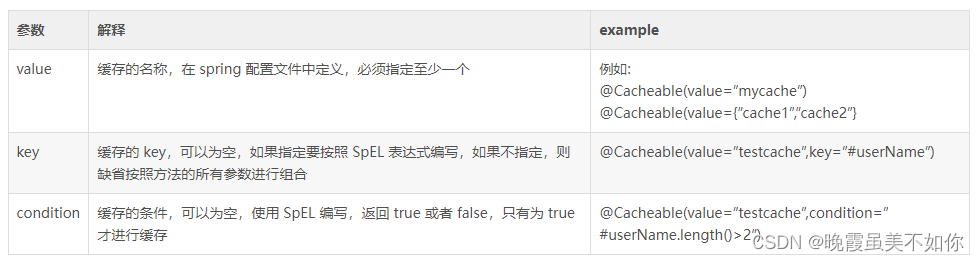
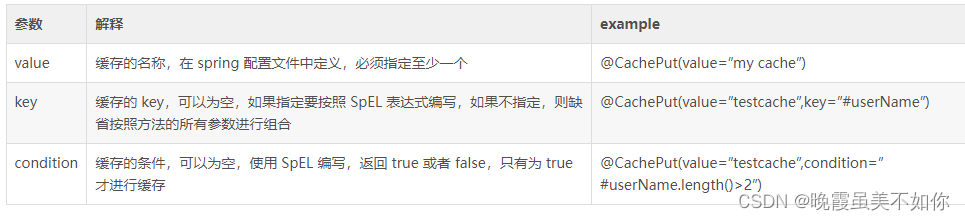
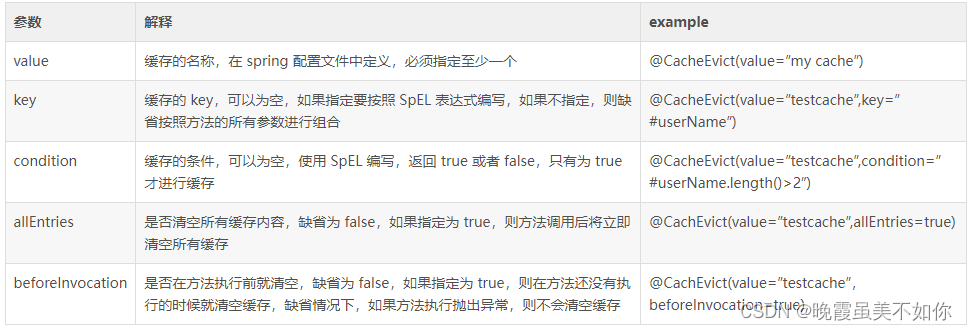
- value、cacheNames:两个等同的参数(cacheNames为Spring 4新增,作为value的别名),用于指定缓存存储的集合名。由于Spring 4中新增了@CacheConfig,因此在Spring 3中原本必须有的value属性,也成为非必需项了
- key:缓存对象存储在Map集合中的key值,非必需,缺省按照函数的所有参数组合作为key值,若自己配置需使用SpEL表达式,比如:@Cacheable(key = "#p0"):使用函数第一个参数作为缓存的key值,更多关于SpEL表达式的详细内容可参考官方文档
- condition:缓存对象的条件,非必需,也需使用SpEL表达式,只有满足表达式条件的内容才会被缓存,比如:@Cacheable(key = "#p0", condition = "#p0.length() < 3"),表示只有当第一个参数的长度小于3的时候才会被缓存,若做此配置上面的AAA用户就不会被缓存,读者可自行实验尝试。
- unless:另外一个缓存条件参数,非必需,需使用SpEL表达式。它不同于condition参数的地方在于它的判断时机,该条件是在函数被调用之后才做判断的,所以它可以通过对result进行判断。
- keyGenerator:用于指定key生成器,非必需。若需要指定一个自定义的key生成器,我们需要去实现org.springframework.cache.interceptor.KeyGenerator接口,并使用该参数来指定。需要注意的是:该参数与key是互斥的
- cacheManager:用于指定使用哪个缓存管理器,非必需。只有当有多个时才需要使用
- cacheResolver:用于指定使用那个缓存解析器,非必需。需通过org.springframework.cache.interceptor.CacheResolver接口来实现自己的缓存解析器,并用该参数指定。
作用和配置方法:
    /** * 根据ID获取Tasklog * @param id * @return */
    @Cacheable(value = CACHE_KEY, key = "#id",condition = "#result != null")
    public Tasklog findById(String id){
        System.out.println("FINDBYID");
        System.out.println("ID:"+id);
        return taskLogMapper.selectById(id);
    }
@CachePut
@CachePut 的作用 主要针对方法配置,能够根据方法的请求参数对其结果进行缓存,和 @Cacheable 不同的是,它每次都会触发真实方法的调用
作用和配置方法
    /** * 添加tasklog * @param tasklog * @return */
    @CachePut(value = CACHE_KEY, key = "#tasklog.id")
    public Tasklog create(Tasklog tasklog){
        System.out.println("CREATE");
        System.err.println (tasklog);
        taskLogMapper.insert(tasklog);
        return tasklog;
    }
@CacheEvict
@CachEvict 的作用 主要针对方法配置,能够根据一定的条件对缓存进行清空
    /** * 根据ID删除Tasklog * @param id */
    @CacheEvict(value = CACHE_KEY, key = "#id")
    public void delete(String id){
        System.out.println("DELETE");
        System.out.println("ID:"+id);
        taskLogMapper.deleteById(id);
    }
@CacheConfig
所有的@Cacheable()里面都有一个value=“xxx”的属性,这显然如果方法多了,写起来也是挺累的,如果可以一次性声明完 那就省事了, 所以,有了@CacheConfig这个配置,@CacheConfig is a class-level annotation that allows to share the cache names,如果你在你的方法写别的名字,那么依然以方法的名字为准。
@CacheConfig是一个类级别的注解。
/** * 测试服务层 */
@Service
@CacheConfig(value = "taskLog")
public class TaskLogService {

    @Autowired  private TaskLogMapper taskLogMapper;
    @Autowired  private net.sf.ehcache.CacheManager cacheManager;

    /** * 缓存的key */
    public static final String CACHE_KEY   = "taskLog";

    /** * 添加tasklog * @param tasklog * @return */
    @CachePut(key = "#tasklog.id")
    public Tasklog create(Tasklog tasklog){
        System.out.println("CREATE");
        System.err.println (tasklog);
        taskLogMapper.insert(tasklog);
        return tasklog;
    }

    /** * 根据ID获取Tasklog * @param id * @return */
    @Cacheable(key = "#id")
    public Tasklog findById(String id){
        System.out.println("FINDBYID");
        System.out.println("ID:"+id);
        return taskLogMapper.selectById(id);
    }
}
@Caching
有时候我们可能组合多个Cache注解使用;比如用户新增成功后,我们要添加id–>user;username—>user;email—>user的缓存;此时就需要@Caching组合多个注解标签了。
@Caching(put = {
@CachePut(value = "user", key = "#user.id"),
@CachePut(value = "user", key = "#user.username"),
@CachePut(value = "user", key = "#user.email")
})
public User save(User user) {
}
自定义缓存注解
比如之前的那个@Caching组合,会让方法上的注解显得整个代码比较乱,此时可以使用自定义注解把这些注解组合到一个注解中,如
@Caching(put = {
    @CachePut(value = "user", key = "#user.id"),
    @CachePut(value = "user", key = "#user.username"),
    @CachePut(value = "user", key = "#user.email")
})
@Target({ElementType.METHOD, ElementType.TYPE})
@Retention(RetentionPolicy.RUNTIME)
@Inherited
public @interface UserSaveCache {
}
这样我们在方法上使用如下代码即可,整个代码显得比较干净。
@UserSaveCache
public User save(User user){}
如何使用
使用默认内存缓存
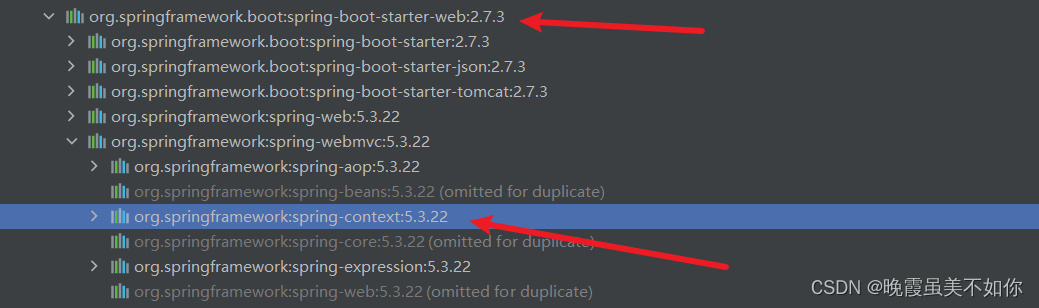
spring-boot-starter-web自带依赖
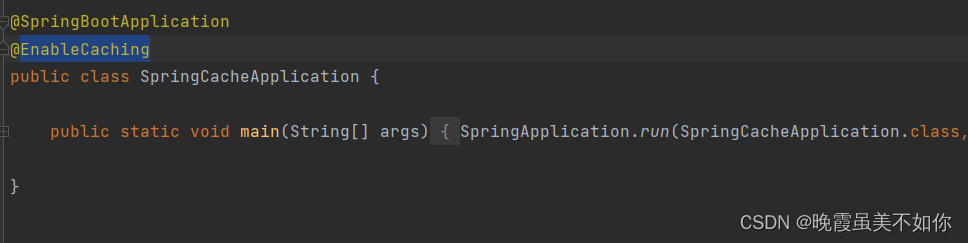
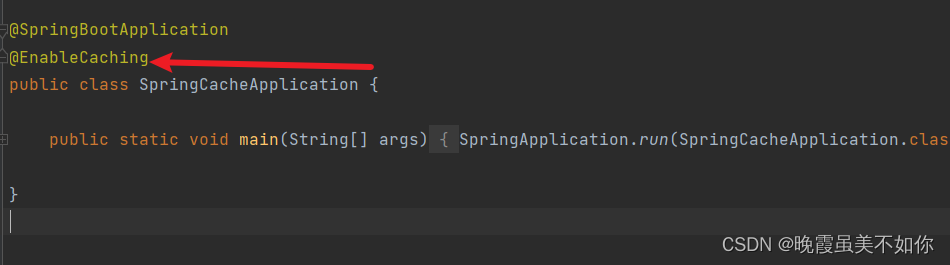
1.Springboot启动类添加注解@EnableCaching(开启缓存)
2.在对应的controller层使用缓存
@RestController
@RequestMapping("/user")
public class UserController {
    @Autowired
    private TUserService userService;
    @Autowired
    private CacheManager cacheManager;

    @RequestMapping("tset01")
    @CachePut(value = "UserCache",key = "#user.id")
    public TUser testo1(@RequestBody TUser user) {
        System.out.println("缓存");
        userService.save(user);
        return user;
    }
}
测试结果
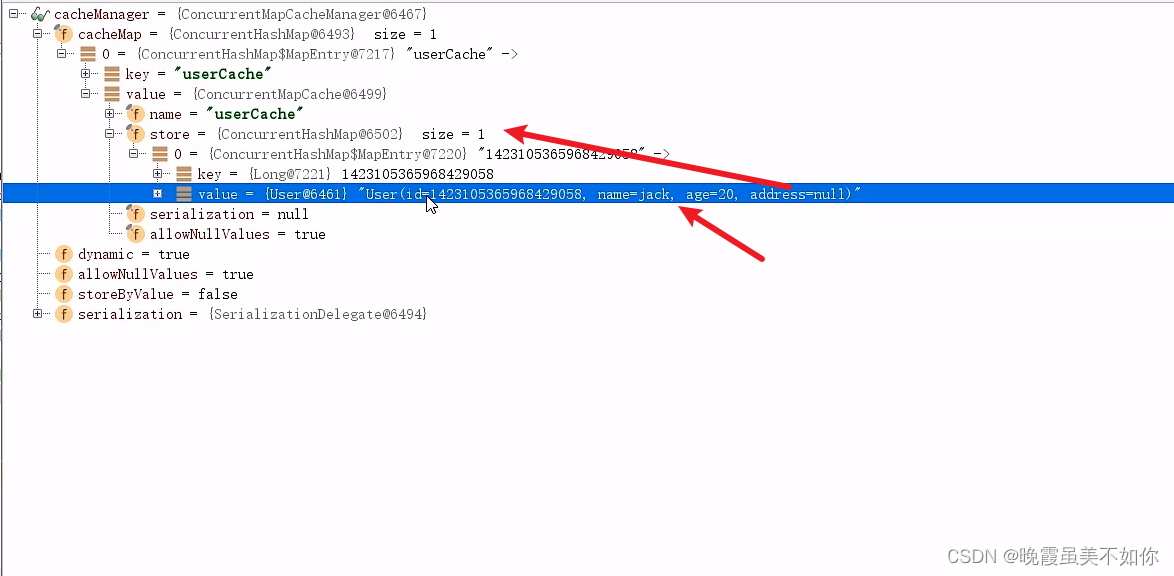
默认缓存(ConcurrentMapCacheManager)
没缓存时
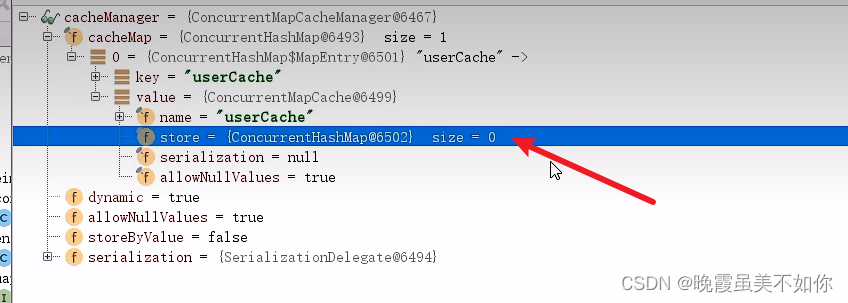
缓存后
使用redis缓存
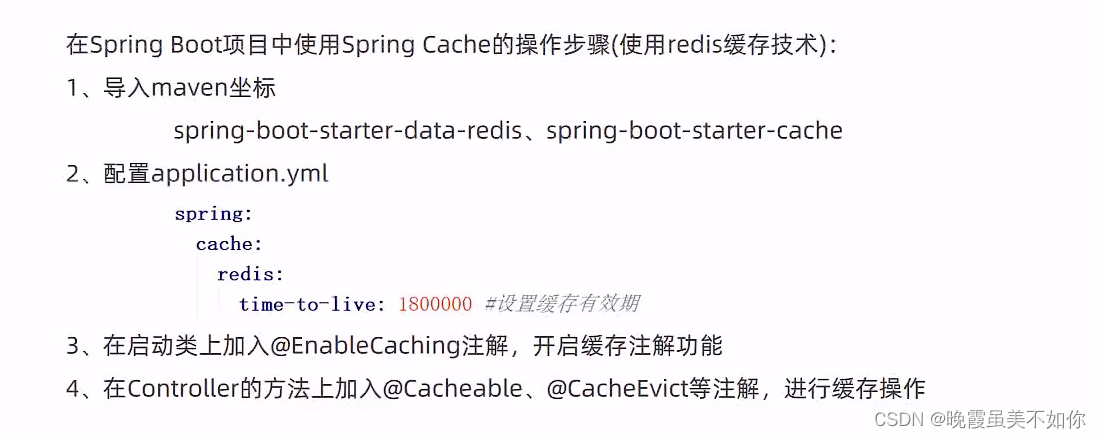
依赖
     <!-- https://mvnrepository.com/artifact/org.springframework.boot/spring-boot-starter-cache -->
        <dependency>
            <groupId>org.springframework.boot</groupId>
            <artifactId>spring-boot-starter-cache</artifactId>
            <version>2.7.3</version>
        </dependency>
        <!-- https://mvnrepository.com/artifact/org.springframework.boot/spring-boot-starter-data-redis -->
        <dependency>
            <groupId>org.springframework.boot</groupId>
            <artifactId>spring-boot-starter-data-redis</artifactId>
            <version>2.7.3</version>
        </dependency>
yml配置
spring:
  datasource:
    username: root
    password: root
    url: jdbc:mysql://localhost:3306/test?useSSL=true&useUnicode=true&characterEncoding=utf8&serverTimezone=Asia/Shanghai
    driver-class-name: com.mysql.cj.jdbc.Driver
  redis:
    host: 192.168.126.129
    port: 6379
    database: 0
  cache:
    redis:
      time-to-live: 180000
开启缓存
使用
@RestController
@RequestMapping("/user")
public class UserController {
    @Autowired
    private TUserService userService;
    @Autowired
    private RedisCacheManager cacheManager;

    @RequestMapping("tset01")
    @CachePut(value = "UserCache",key = "#user.id")
    public TUser testo1(@RequestBody TUser user) {
        System.out.println("缓存");
        userService.save(user);
        return user;
    }
}
测试结果
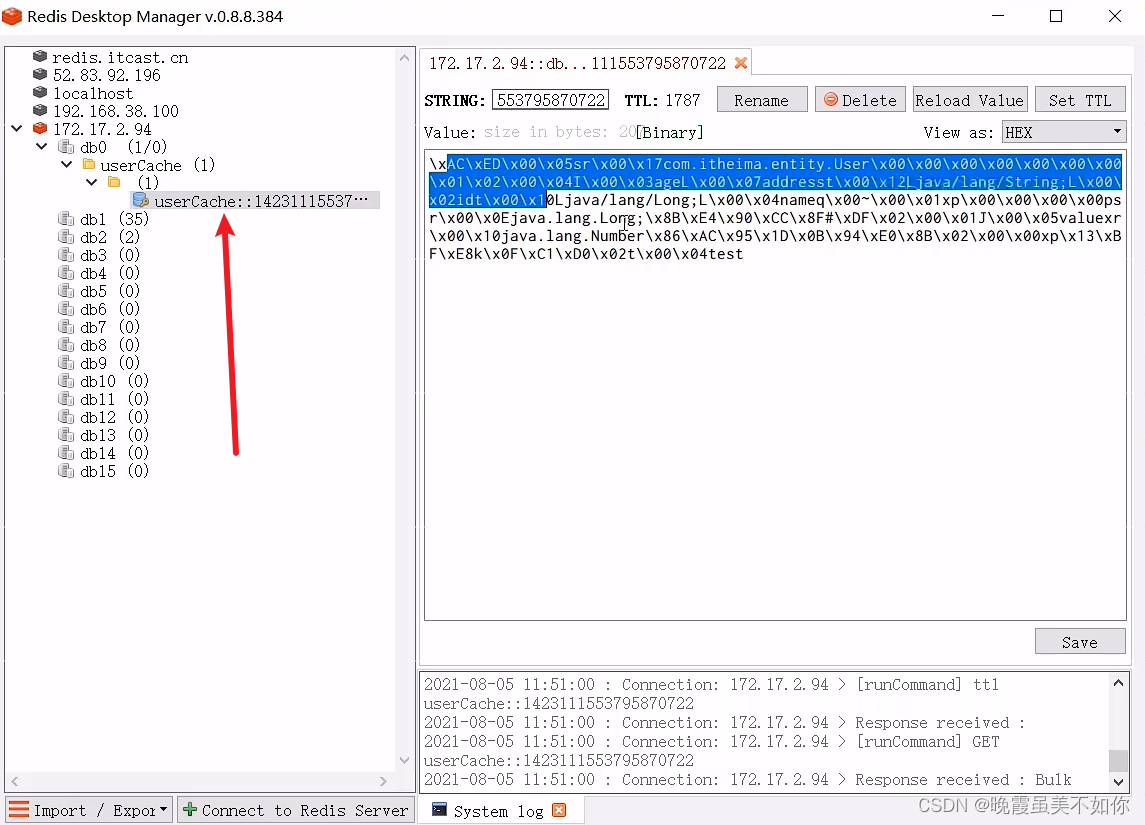


 1678
1678

 被折叠的 条评论
为什么被折叠?
被折叠的 条评论
为什么被折叠?
 到【灌水乐园】发言


