


We all know,编写的应用程序都是有一定内存限制的,程序占用了过高的内存就容易出现OOM(OutOfMemory)异常。因此在展示高分辨率图片的时候,最好先将图片进行压缩,压缩后的图片大小应该和用来展示它的控件大小相近,这样可以协调显示效果和内存占用。
BitmapFactory.Options这个类,有一个字段叫做 inJustDecodeBounds 。SDK中对这个成员的说明是这样的: If set to true, the decoder will return null (no bitmap), but the out… 也就是说,如果我们把它设为true,那么BitmapFactory.decodeFile(String path, Options opt)并不会真的返回一个Bitmap给你,它仅仅会把它的宽,高取回来给你,这样就不会占用太多的内存,也就不会那么频繁的发生OOM了。
下面通过具体实例来展示怎么实现缩略图。
1.布局文件:
<?xml version="1.0" encoding="utf-8"?>
<RelativeLayout xmlns:android="http://schemas.android.com/apk/res/android"
    android:layout_width="match_parent"
    android:layout_height="match_parent"
    android:orientation="vertical" >
    <ImageView
        android:id="@+id/imageView1"
        android:layout_width="match_parent"
        android:layout_height="wrap_content"
        android:src="@drawable/mei" />
    <ImageView
        android:id="@+id/imageView2"
        android:layout_width="wrap_content"
        android:layout_below="@+id/imageView1"
        android:layout_height="wrap_content"
        android:layout_marginTop="10dp"
        android:src="@drawable/mei" />
</RelativeLayout>
2.MainActivity.java代码如下:
package org.yayun.demo;
//省略导入包
public class MainActivity extends Activity {
    private ImageView imageView1;
    private ImageView imageView2;
    Bitmap mBitmap;
    @Override
    protected void onCreate(Bundle savedInstanceState) {
        super.onCreate(savedInstanceState);
        setContentView(R.layout.main);
        initView();
    }
    private void initView(){
        imageView1=(ImageView)findViewById(R.id.imageView1);
        imageView2=(ImageView)findViewById(R.id.imageView2);
        //读取资源图片
        mBitmap=readBitMap();
        //对资源图片进行缩放
        imageView2.setImageBitmap(zoomBitmap(mBitmap, mBitmap.getWidth()/4, mBitmap.getHeight()/4));
    }
    /**
     * 读取资源图片
     * @return
     */
    private Bitmap readBitMap(){
        BitmapFactory.Options opt=new BitmapFactory.Options();
        /*
         * 设置让解码器以最佳方式解码
         */
        opt.inPreferredConfig=Bitmap.Config.RGB_565;
        //下面两个字段需要组合使用
        opt.inPurgeable=true;
        opt.inInputShareable=true;
        /*
         * 获取资源图片
         */
        InputStream is=this.getResources().openRawResource(R.drawable.mei);
        return BitmapFactory.decodeStream(is, null, opt);
    }
    /**
     * 缩放图片
     * @param bitmap
     * @param w
     * @param h
     * @return
     */
    public  Bitmap zoomBitmap(Bitmap bitmap, int w, int h) {
        int width = bitmap.getWidth();
        int height = bitmap.getHeight();
        Matrix matrix = new Matrix();
        float scaleWidht = ((float) w / width);
        float scaleHeight = ((float) h / height);
        /*
         * 通过Matrix类的postScale方法进行缩放
         */
        matrix.postScale(scaleWidht, scaleHeight);
        Bitmap newbmp = Bitmap.createBitmap(bitmap, 0, 0, width, height, matrix, true);
        return newbmp;
    }
}
定义了两个ImageView,第一个ImageView不进行任何操作,直接显示图片,第二个图片进行了压缩显示。上面代码中主要包含了两个方法,readBitMap和zoomBitmap方法。readBitMap先通过流的方式将资源文件读入,然后调用了BitmapFactory的decodeStream方法将流转换成Bitmap对象返回。zoomBitmap是实现图片缩放的方法,需要三个参数,bitmap,w 和h,bitmap就是前一个方法获取的对象,w和h是压缩比。这里将原图片的宽高压缩至原来的1/4。调用Matrix类的postScale方法进行了图片的压缩,最后将压缩后的bitmap对象返回,设置在imageview中,工作就结束了。
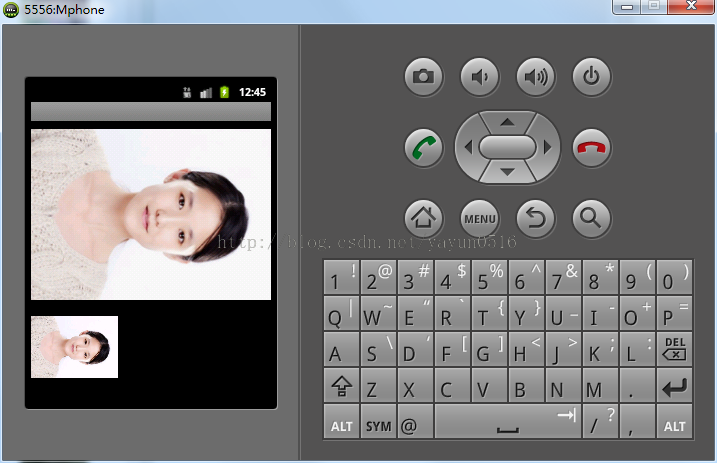
3.运行实例:


 2232
2232

 被折叠的 条评论
为什么被折叠?
被折叠的 条评论
为什么被折叠?
 到【灌水乐园】发言


