前面内容转载至(支持原创)0:http://blog.csdn.net/xxdddail/article/details/19537145
在Android开发时,有时因为需求,需要跳转到系统的一些页面,比如从UI中跳转到系统设置项、WIFI设置等,那要如何返回到原来的Activity中呢?
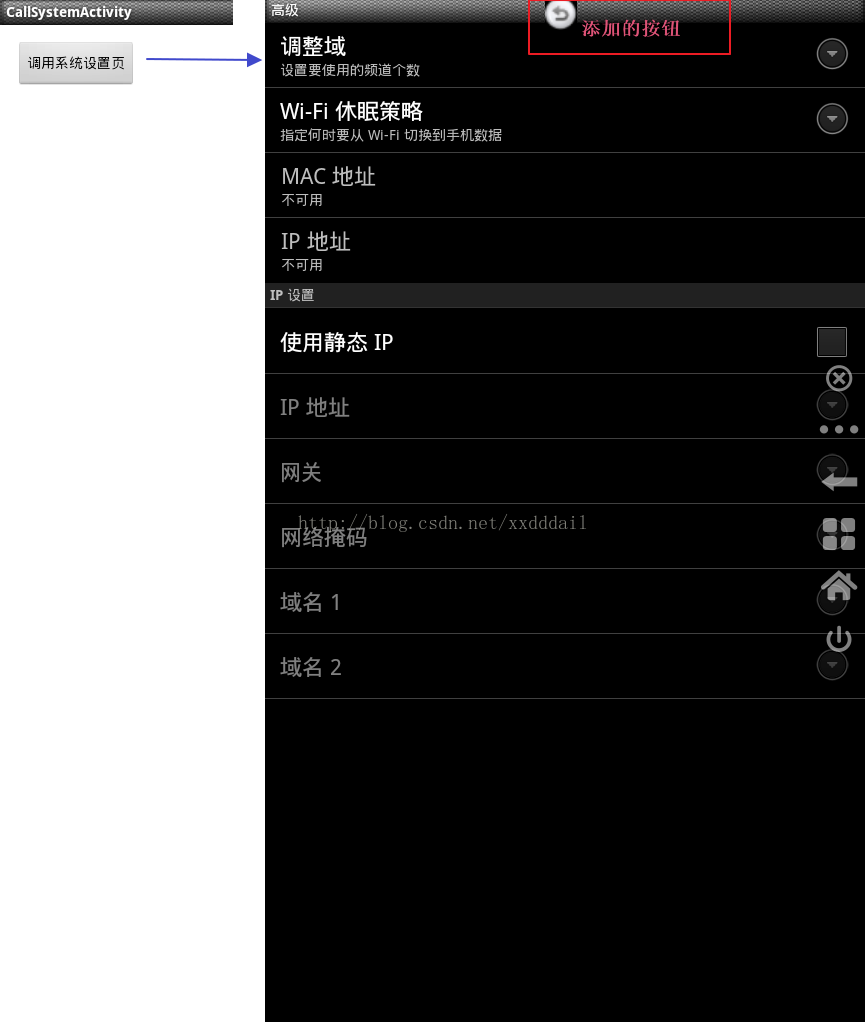
我们可以通过WindowManager来实现。原理可以简单的理解为在跳转到系统的Activity中后,在该Activity的上方添加一个按钮,然后对这个按钮添加事件。
先看看效果图
实现代码如下
CallSystemActivity.Java
- package com.example.callsystemactivity;
-
- import android.app.Activity;
- import android.os.Bundle;
- import android.view.View;
- import android.view.View.OnClickListener;
- import android.widget.Button;
-
- public class MainActivity extends Activity {
-
- @Override
- protected void onCreate(Bundle savedInstanceState) {
- super.onCreate(savedInstanceState);
- setContentView(R.layout.activity_main);
- Init();
- }
-
- private void Init()
- {
- Button callSystemSet_button=(Button)findViewById(R.id.CallSystemSet_button);
-
- callSystemSet_button.setOnClickListener(new OnClickListener() {
-
- @Override
- public void onClick(View v) {
-
- WindowManagerSp windowManagerSp=new WindowManagerSp(MainActivity.this);
- windowManagerSp.AddBackButton();
- IntentSp.StartActivity(MainActivity.this, android.provider.Settings.ACTION_WIFI_IP_SETTINGS,false);
- }
- });
- }
-
- }
注:
1、需要在activity_main.xml中添加一个按钮callSystemSet_button
2、WindowManager需要相应的权限,所以需要在AndroidManifest.xml中添加权限,如下
<uses-permission android:name="android.permission.SYSTEM_ALERT_WINDOW" />
<uses-permission android:name="android.permission.SYSTEM_OVERLAY_WINDOW" />
WindowManagerSp.java
- package com.example.callsystemactivity;
-
- import android.app.Activity;
- import android.content.Context;
- import android.view.Gravity;
- import android.view.View;
- import android.view.View.OnClickListener;
- import android.view.WindowManager;
- import android.widget.ImageView;
-
- public class WindowManagerSp {
-
- WindowManager _winManager = null;
- Activity _activity = null;
- Context _context = null;
-
- public WindowManagerSp(Activity activity) {
- if (activity == null) {
- return;
- }
- _activity = activity;
- _context = _activity.getBaseContext();
-
- _winManager = (WindowManager) _activity.getApplicationContext()
- .getSystemService(_activity.WINDOW_SERVICE);
- }
-
- public void AddBackButton() {
-
- if (_winManager == null) {
- return;
- }
- WindowManager.LayoutParams layoutParams = new WindowManager.LayoutParams();
-
- layoutParams.gravity = Gravity.TOP | Gravity.LEFT;
-
- layoutParams.flags = WindowManager.LayoutParams.FLAG_NOT_TOUCH_MODAL
- | WindowManager.LayoutParams.FLAG_NOT_FOCUSABLE;
-
- layoutParams.type = WindowManager.LayoutParams.TYPE_SYSTEM_ALERT
- | WindowManager.LayoutParams.TYPE_SYSTEM_OVERLAY;
-
-
- layoutParams.width = 32;
- layoutParams.height = 32;
-
- layoutParams.x = 280;
- layoutParams.y = 0;
-
- final ImageView backButton = new ImageView(_context);
- backButton.setBackgroundResource(R.drawable.back);
-
- backButton.setOnClickListener(new OnClickListener() {
-
- @Override
- public void onClick(View v) {
-
- IntentSp.RestartActivity(_activity, false);
- if (_winManager != null) {
- _winManager.removeView(backButton);
- }
- _winManager = null;
- }
- });
-
- _activity.finish();
- _winManager.addView(backButton, layoutParams);
- }
- }
IntentSp.java
- package com.kitsp.contentsp;
-
- import android.app.Activity;
- import android.content.ComponentName;
- import android.content.Context;
- import android.content.Intent;
- import android.net.Uri;
-
- public class IntentSp {
-
-
-
-
-
-
-
-
- public static void RestartActivity(Activity activity,
- boolean isSaveActivityToHistory) {
- if (activity == null) {
- return;
- }
- Intent intent = new Intent();
- String packageName = activity.getPackageName();
- String className = activity.getLocalClassName();
- String componentClassName = packageName + "." + className;
- if (className != null && className.split(".").length > 0) {
- componentClassName = className;
- }
- ComponentName componentName = new ComponentName(packageName,
- componentClassName);
-
- intent.setComponent(componentName);
- if (!isSaveActivityToHistory) {
- intent.addFlags(Intent.FLAG_ACTIVITY_NO_HISTORY);
- }
- activity.startActivity(intent);
- activity.finish();
- return;
- }
-
-
-
-
-
-
-
-
-
- public static void StartActivity(Context context, String action,
- boolean isSaveActivityToHistory) {
- if (context == null || action == null) {
- return;
- }
-
-
- Intent intent = new Intent(action);
- if (!isSaveActivityToHistory) {
- intent.addFlags(Intent.FLAG_ACTIVITY_NO_HISTORY);
- }
- context.startActivity(intent);
- }
- }
-
注:
intent.addFlags(Intent.FLAG_ACTIVITY_NO_HISTORY)是为了不让系统的activity在开启后一直存在,如果不这样处理,在点硬返回键时,才不会返回到系统的activity中。因为由A应用开启B应用的Activity,正常是无法从A中关闭B应用的Activity的,对于我们启动系统的Activity也是一样的道理。所以为了避免该问题,我们增加了flag,这样启动后的activity就不会保存到activity的堆栈中,自然在点返回时,也就不会返回到该activity中了。
所以:如果不想保存系统界面,跳转时,记得加
intent.addFlags(Intent.FLAG_ACTIVITY_NO_HISTORY)
另外:在跳转到系统界面时,如:亮度设置,还有弹出系统的dialog时,需要权限,以及wifi设置等等,跳转后,可以添加两个按钮,来手动的返回.添加后的
![]()
//wifi未连接
Intent wifiSettingsIntent = new Intent("android.settings.WIFI_SETTINGS");
wifiSettingsIntent.putExtra("extra_prefs_show_button_bar", true);
wifiSettingsIntent.putExtra("wifi_enable_next_on_connect", true);
startActivity(wifiSettingsIntent);
添加上面的内容即可
intent.addFlags(Intent.FLAG_ACTIVITY_NO_HISTORY)
settings源码(Settings\src\com\android\settings\wifi\WifiSettings.java和WifiPickerActivity.java)找到了如下信息:
private static final String EXTRA_PREFS_SHOW_BUTTON_BAR = "extra_prefs_show_button_bar";
private static final String EXTRA_PREFS_SET_NEXT_TEXT = "extra_prefs_set_next_text";
private static final String EXTRA_PREFS_SET_BACK_TEXT = "extra_prefs_set_back_text";
private static final String EXTRA_ENABLE_NEXT_ON_CONNECT = "wifi_enable_next_on_connect";
Intent intent = new Intent();
intent.setAction("android.net.wifi.PICK_WIFI_NETWORK");
intent.putExtra("extra_prefs_show_button_bar", true);
//intent.putExtra("extra_prefs_set_next_text", "完成"); //设置下一步按钮得文字.默认为下一步
//intent.putExtra("extra_prefs_set_back_text", "返回");//设置上一步按钮得文字,默认为上一步
intent.putExtra("wifi_enable_next_on_connect", true);
startActivity(intent);


 1096
1096


 被折叠的 条评论
为什么被折叠?
被折叠的 条评论
为什么被折叠?
 到【灌水乐园】发言


