🎈个人主页:靓仔很忙i
💻B 站主页:👉B站👈
🎉欢迎 👍点赞✍评论⭐收藏
🤗收录专栏:SptringBoot
🤝希望本文对您有所裨益,如有不足之处,欢迎在评论区提出指正,让我们共同学习、交流进步!
1.搭建springboot项目,准备环境
1.1 创建springboot项目 (略)
可参考上篇博客:[springboot快速搭建web系统_spring boot 快速搭建 web-CSDN博客]
1.2 新建ShiroTestController,代码如下
package com.xlwang.shiro_test.controller;

import org.springframework.stereotype.Controller;
import org.springframework.web.bind.annotation.RequestMapping;

/**
 * @ClassName ShiroTestController
 * @Description TODO
 * @Author xlwang
 * @Date 2019-05-29 17:51
 * @Version 1.0
 **/

@Controller
public class ShiroTestController {

    @RequestMapping("/")
    public String index(){
        return "hello.html";
    }

    @RequestMapping("/login")
    public String hello(){
        return "login.html";
    }

    @RequestMapping("/add")
    public String add(){
        return "add.html";
    }

    @RequestMapping("/update")
    public String update(){
        return "update.html";
    }
}
1.3 准备前端界面
前端界面文件位置如下:

具体代码如下:
<!--login.html-->
<form action="log">
    <span>用户名:</span><input type="text" name="username">
    <br/>
    <span>密码:</span><input type="password" name="password">
    <br/>
    <input type="submit" name="提交" id="">
</form>

<!--hello.html-->
    <a href="add">添加页面</a>
    <a href="update">更新页面</a>

<!--add.html-->
    <h1>这是添加页面</h1>

<!--update.html-->
    <h1>这是更新页面</h1>
至此准备工作已完成,此时可以测试页面跳转是否正常,此次省略测试截图。
2.springboot集成并使用shiro
2.1 引入shiro的依赖
        <!--shiro-->
		<dependency>
			<groupId>org.apache.shiro</groupId>
			<artifactId>shiro-spring</artifactId>
			<version>1.2.5</version>
		</dependency>
2.2 新建ShiroRealm
package com.xlwang.shiro_test.config;

import org.apache.shiro.authc.AuthenticationException;
import org.apache.shiro.authc.AuthenticationInfo;
import org.apache.shiro.authc.AuthenticationToken;
import org.apache.shiro.authz.AuthorizationInfo;
import org.apache.shiro.realm.AuthorizingRealm;
import org.apache.shiro.subject.PrincipalCollection;

/**
 * @ClassName ShiroRealm
 * @Description TODO
 * @Author xlwang
 * @Date 2019-05-29 17:35
 * @Version 1.0
 **/
public class ShiroRealm extends AuthorizingRealm {
    @Override
    protected AuthorizationInfo doGetAuthorizationInfo(PrincipalCollection principalCollection) {
        System.out.println("授权");
        return null;
    }

    @Override
    protected AuthenticationInfo doGetAuthenticationInfo(AuthenticationToken authenticationToken) throws AuthenticationException {
        System.out.println("认证");
        return null;
    }
}
2.3 建立shiro的最基本的配置类
package com.xlwang.shiro_test.config;

import org.apache.shiro.spring.web.ShiroFilterFactoryBean;
import org.apache.shiro.web.mgt.DefaultWebSecurityManager;
import org.springframework.beans.factory.annotation.Qualifier;
import org.springframework.context.annotation.Bean;
import org.springframework.context.annotation.Configuration;

/**
 * @ClassName ShiroConfigue
 * @Description TODO
 * @Author xlwang
 * @Date 2019-05-29 17:34
 * @Version 1.0
 **/
@Configuration
public class ShiroConfigue {

    @Bean
    public ShiroFilterFactoryBean shiroFilterFactoryBean(@Qualifier("securityManager")DefaultWebSecurityManager securityManager){
        ShiroFilterFactoryBean shiroFilter=new ShiroFilterFactoryBean();

        //关联securityManager
        shiroFilter.setSecurityManager(securityManager);

        return shiroFilter;
    }

    @Bean(name = "securityManager")
    public DefaultWebSecurityManager securityManager(@Qualifier("shiroRealm")ShiroRealm shiroRealm){
        DefaultWebSecurityManager securityManage=new DefaultWebSecurityManager();

        //关联realm
        securityManage.setRealm(shiroRealm);

        return securityManage;
    }

    @Bean(name = "shiroRealm")
    public ShiroRealm shiroRealm(){
        return new ShiroRealm();
    }
}
2.4 shiro实现拦截页面
实现页面拦截,需先了解shiro的内置过滤器

修改shiroFilterFactoryBean,代码如下
@Bean
    public ShiroFilterFactoryBean shiroFilterFactoryBean(@Qualifier("securityManager")DefaultWebSecurityManager securityManager){
        ShiroFilterFactoryBean shiroFilter=new ShiroFilterFactoryBean();

        //关联securityManager
        shiroFilter.setSecurityManager(securityManager);


        Map<String,String> filterMap=new LinkedHashMap<>();  //注意此处使用的是LinkedHashMap,不能使用HashMap
        //放行请求
        filterMap.put("/","anon");
        //拦截请求
        filterMap.put("/*","authc");
        shiroFilter.setFilterChainDefinitionMap(filterMap);

        //设置拦截登录页面的路径
        shiroFilter.setLoginUrl("/login");

        return shiroFilter;
    }
2.5 shiro实现登录
2.5.1 引入thymeleaf,依赖如下
<!--thymeleaf-->
		<dependency>
			<groupId>org.springframework.boot</groupId>
			<artifactId>spring-boot-starter-thymeleaf</artifactId>
		</dependency>
2.5.2 重构前端页面结构
变更前端页面布局,前端页面如下:

login页面代码变更如下如下:
<!--login.html-->
<form action="hello">
    <h3 th:text="${msg}" style="color: red"></h3>
    <span>用户名:</span><input type="text" name="username">
    <br/>
    <span>密码:</span><input type="password" name="password">
    <br/>
    <input type="submit" name="提交" id="">
</form>
2.5.3 变更ShiroTestController
package com.xlwang.shiro_test.controller;

import org.apache.shiro.SecurityUtils;
import org.apache.shiro.authc.IncorrectCredentialsException;
import org.apache.shiro.authc.UnknownAccountException;
import org.apache.shiro.authc.UsernamePasswordToken;
import org.apache.shiro.subject.Subject;
import org.springframework.stereotype.Controller;
import org.springframework.ui.Model;
import org.springframework.web.bind.annotation.RequestMapping;

/**
 * @ClassName ShiroTestController
 * @Description TODO
 * @Author xlwang
 * @Date 2019-05-29 17:51
 * @Version 1.0
 **/

@Controller
public class ShiroTestController {

    @RequestMapping("/")
    public String index(){
        return "hello";
    }

    @RequestMapping("/hello")
    public String hello(String username, String password, Model model){
        Subject subject= SecurityUtils.getSubject();
        UsernamePasswordToken token=new UsernamePasswordToken(username,password);
        try {
            subject.login(token);
        } catch (UnknownAccountException e) {
            model.addAttribute("msg","用户不存在");
            return "/login";
        }catch (IncorrectCredentialsException e){
            model.addAttribute("msg","密码错误");
            return "/login";
        }

        return "hello";
    }

    @RequestMapping("/login")
    public String login(){
        return "login";
    }

    @RequestMapping("/add")
    public String add(){
        return "user/add";
    }

    @RequestMapping("/update")
    public String update(){
        return "user/update";
    }

}
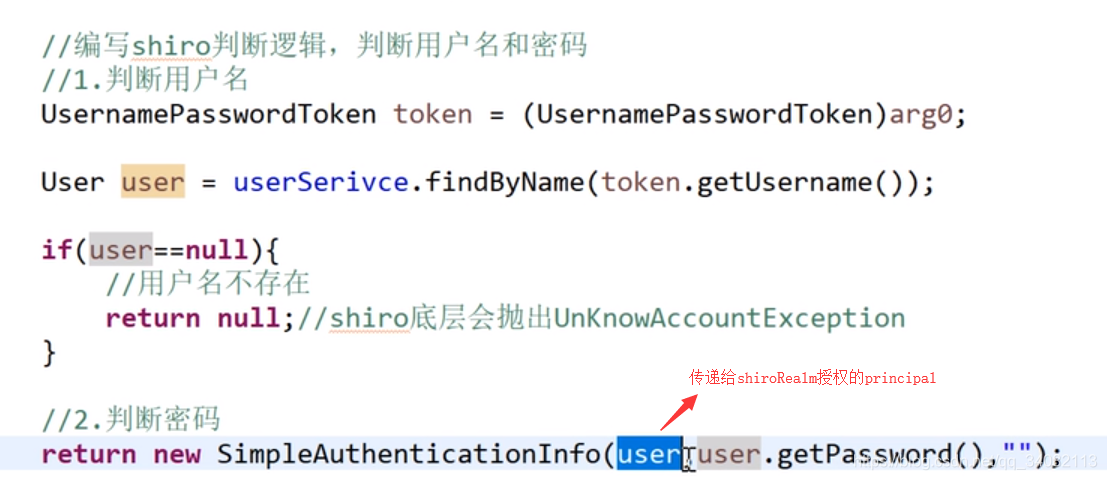
2.5.4 shiroRealm的doGetAuthenticationInfo的内容如下:
@Override
    protected AuthenticationInfo doGetAuthenticationInfo(AuthenticationToken authenticationToken) throws AuthenticationException {
        String username="aaa";
        String password="aaa";
        UsernamePasswordToken token=(UsernamePasswordToken) authenticationToken;
        if(!token.getUsername().equals(username)){
            return null;
        }
        System.out.println("认证");
        return new SimpleAuthenticationInfo("",password,"");
    }
若要实现和数据库的交互,只需在上述方法注入用户的service,通过token.getUsername(),判断其是否为空,若不为空,密码是否相同进行校验。
2.5.5 页面效果
至此登录已实现,效果如下:


2.6 shiro授权
2.6.1 过滤授权页面
修改shiroFilterFactoryBean函数,如下:
@Bean
    public ShiroFilterFactoryBean shiroFilterFactoryBean(@Qualifier("securityManager")DefaultWebSecurityManager securityManager){
        ShiroFilterFactoryBean shiroFilter=new ShiroFilterFactoryBean();

        //关联securityManager
        shiroFilter.setSecurityManager(securityManager);

        Map<String,String> filterMap=new LinkedHashMap<>();  //注意此处使用的是LinkedHashMap,不能使用HashMap
        //放行请求
        filterMap.put("/","anon");
        filterMap.put("/hello","anon");
        //授权
        filterMap.put("/update","perms[update]");
        //拦截请求
        filterMap.put("/*","authc");
        shiroFilter.setFilterChainDefinitionMap(filterMap);

        //设置拦截登录页面的路径
        shiroFilter.setLoginUrl("/login");
        //设置授权页面路径
        shiroFilter.setUnauthorizedUrl("/unauthor");

        return shiroFilter;
    }
在templates根路径下建立unauthor.html页面,内容如下
<h1>对不起,您没有权限访问该页面</h1>Controller中加入下面的代码
 @RequestMapping("/unauthor")
    public String unauthor(){
        return "unauthor";
    }
页面效果如下:


2.6.2 实现授权
更新doGetAuthorizationInfo函数,如下
@Override
    protected AuthorizationInfo doGetAuthorizationInfo(PrincipalCollection principalCollection) {
        SimpleAuthorizationInfo authentication=new SimpleAuthorizationInfo();
        authentication.addStringPermission("update");
        System.out.println("授权");
        return authentication;
    }
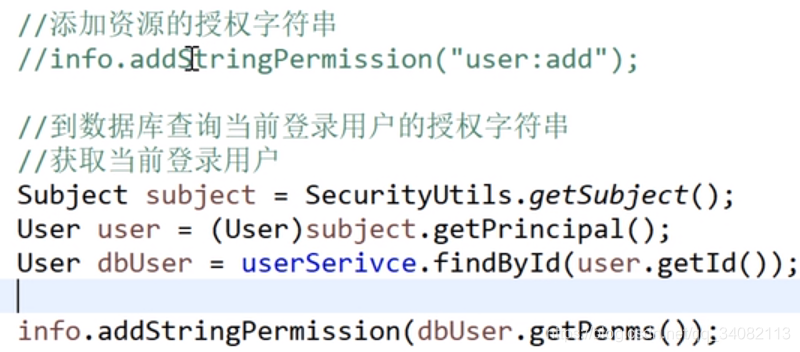
数据库表用户实现授权:
1.数据库用户表添加一张授权字符串
2.获取当前用户并将其传递给授权函数的principal
3.查找用户相应的授权字符串


2.7 thymeleaf整合shiro
引入pom文件
<!-- thymeleaf对shiro的扩展 -->
		<dependency>
			<groupId>com.github.theborakompanioni</groupId>
			<artifactId>thymeleaf-extras-shiro</artifactId>
			<version>2.0.0</version>
		</dependency>
在shoiroConfigue中添加shiroDialect
@Bean
    public ShiroDialect shiroDialect(){
        return new ShiroDialect();
    }
在前端页面中配置权限
<!--hello.html-->
    <div shiro:hasPermission="add">
         <a href="add" >添加页面</a>
    </div>
    <div shiro:hasPermission="update">
         <a href="update">更新页面</a>
    </div>


 3581
3581

 被折叠的 条评论
为什么被折叠?


