


tomcat的类加载机制遵循了java类加载机制中经典的双亲委派模型。所以要了解tomcat的类加载机制需要先了解双亲委派模型。
在程序中用到的类需要由类加载器将类的class文件加载到内存中,然后经由JVM验证、解析、初始化后才能使用,如下段代码:
public static void main(String[] args) throws Exception {
	User user = new User();
	user.setUsername("tom");
	user.setPhone("110");
	user.setSex("man");
	System.out.println(user);
}// Invoked by the VM to record every loaded class with this loader.
void addClass(Class<?> c) {
classes.addElement(c);
}//定义自己的类加载器
ClassLoader cl = new ClassLoader() {
@Override
public Class<?> loadClass(String name) throws ClassNotFoundException {
try {
//违背双亲委派模型,先自己加载,自己不能加载再交给父加载器加载
String str = name.substring(name.lastIndexOf(".") + 1) + ".class";
InputStream is = getClass().getResourceAsStream(str);
if (is == null) {
return super.loadClass(name);
}
byte[] b = new byte[is.available()];
is.read(b);
return defineClass(name, b, 0, b.length);
} catch (IOException e) {
throw new ClassNotFoundException(name);
}
}
};
Object obj = cl.loadClass("cn.yamikaze.java.basic.HelloJava").newInstance();
System.out.println(obj.getClass()); // Class cn.yamikaze.java.basic.HelloJava
// 结果为false
// 为什么? 因为obj是自定义的类加载器加载产生的对象,而HelloJava是由系统加载器加载的
System.out.println(obj instanceof cn.yamikaze.java.basic.HelloJava);
至于为什么java不采用单一加载器的原因,我想可能是那样做职责不明确吧!但具体什么原因我也不知,如果知道的小伙伴请在下面留言谢谢!
1、双亲委派模型
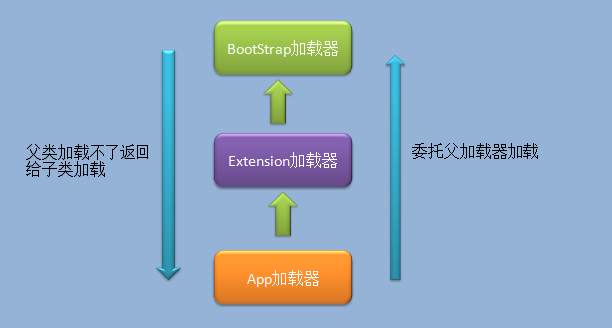
Bootstrap类加载器:负责加载jre/lib下的jar,例如rt.jar是java的核心类库,Object、String、System等常用类都存在于rt.jar中。这个加载器存在于虚拟机中,如果是HotSpot虚拟机,这个类加载器是C++语言编写,如果虚拟机本身就是由纯java语言实现,那就是由java编写。如果想要使用这个加载器,可以使用参数-Xbootclasspath指定加载路径,但boostrap类加载器只会加载虚拟机识别的类库,例如rt.jar,否则即使名字不符合,放在lib中也不会被加载。
Extension类加载器:扩展类加载器,负责加载jre/lib/ext中的jar,或者java.ext.dirs系统变量指定路径的类库。
Application类加载器:负责加载用户类路径上指定的类库,由于是ClassLoader的getSystemClassLoader方法的返回值,所以也叫作系统类加载器。
2、tomcat的类加载器
2.1、为什么tomcat要实现自己的类加载器?
2.2、tomcat的类加载器设计
tomcat的类加载器设计如下图所示:

ps: 其中蓝色的类加载器为tomcat自己实现的类加载器。
Common类加载器:负责加载/common目录的类库,这儿存放的类库可被tomcat以及所有的应用使用。
Catalina类加载器:负责加载/server目录的类库,只能被tomcat使用。
Shared类加载器:负载加载/shared目录的类库,可被所有的web应用使用,但tomcat不可使用。
WebApp类加载器:负载加载单个Web应用下classes目录以及lib目录的类库,只能当前应用使用。
Jsp类加载器:负责加载Jsp,每一个Jsp文件都对应一个Jsp加载器。
Tomcat运行期间,Webapp类加载器与Jsp类加载器个数为复数。通过上图的设计,可以解决掉2.1中的问题。
可能看到这儿你会翻出tomcat目录结构查看一下,然后你会发现根本没有common、shared、server目录。这是因为只有在conf目录下的catalina.properties指定了server.loader 以及 share.loader两个属性tomcat才会建立CatalinaClassLoader和SharedClassLoader实例,而默认情况下都没指定,所以CatalinaClassLoader以及SharedClassLoader都会使用CommonClassLoader来代替,所以tomcat6.x以上顺理成章地把上述三个目录合并成了一个lib目录。这个目录相当于/common目录的作用。
来看看源码中关于这三个类加载器的创建吧,如下代码:
private void initClassLoaders() {
    try {
        commonLoader = createClassLoader("common", null);
        if( commonLoader == null ) {
            // no config file, default to this loader - we might be in a 'single' env.
            commonLoader=this.getClass().getClassLoader();
        }
        catalinaLoader = createClassLoader("server", commonLoader);
        sharedLoader = createClassLoader("shared", commonLoader);
    } catch (Throwable t) {
        handleThrowable(t);
        log.error("Class loader creation threw exception", t);
        System.exit(1);
    }
}


private ClassLoader createClassLoader(String name, ClassLoader parent)
        throws Exception {

    String value = CatalinaProperties.getProperty(name + ".loader");
    //默认情况下为空,直接返回parent,这儿的parent就是CommonLoader
    if ((value == null) || (value.equals("")))
        return parent;

    value = replace(value);

    List<Repository> repositories = new ArrayList<Repository>();

    StringTokenizer tokenizer = new StringTokenizer(value, ",");
    //这儿是对类加载器定义加载的路径解析
    while (tokenizer.hasMoreElements()) {
        String repository = tokenizer.nextToken().trim();
        if (repository.length() == 0) {
            continue;
        }

        // 不是本地类库
        try {
            @SuppressWarnings("unused")
            URL url = new URL(repository);
            repositories.add(
                    new Repository(repository, RepositoryType.URL));
            continue;
        } catch (MalformedURLException e) {
            // Ignore
        }

        // Local repository
        if (repository.endsWith("*.jar")) {
            repository = repository.substring
                (0, repository.length() - "*.jar".length());
            repositories.add(
                    new Repository(repository, RepositoryType.GLOB));
        } else if (repository.endsWith(".jar")) {
            repositories.add(
                    new Repository(repository, RepositoryType.JAR));
        } else {
            repositories.add(
                    new Repository(repository, RepositoryType.DIR));
        }
    }
    //使用工厂创建
    return ClassLoaderFactory.createClassLoader(repositories, parent);
}创建完成后会将ShareClassLoader通过反射调用Catalina类setParentClassLoader方法设置到parentClassLoader属性中,然后在解析方法中再设置到Engine容器中去,部分代码如下:
// Add RuleSets for nested elements
digester.addRuleSet(new NamingRuleSet("Server/GlobalNamingResources/"));
digester.addRuleSet(new EngineRuleSet("Server/Service/"));
digester.addRuleSet(new HostRuleSet("Server/Service/Engine/"));
digester.addRuleSet(new ContextRuleSet("Server/Service/Engine/Host/"));
addClusterRuleSet(digester, "Server/Service/Engine/Host/Cluster/");
digester.addRuleSet(new NamingRuleSet("Server/Service/Engine/Host/Context/"));

// When the 'engine' is found, set the parentClassLoader.
digester.addRule("Server/Service/Engine",
                new SetParentClassLoaderRule(parentClassLoader));
2.3、Tomcat类加载器的实现

protected String[] repositories = new String[0];

protected URL[] repositoryURLs = null;

/**
 * Repositories translated as path in the work directory (for Jasper
 * originally), but which is used to generate fake URLs should getURLs be
 * called.
 */
protected File[] files = new File[0];


/**
 * The list of JARs, in the order they should be searched
 * for locally loaded classes or resources.
 */
protected JarFile[] jarFiles = new JarFile[0];


/**
 * The list of JARs, in the order they should be searched
 * for locally loaded classes or resources.
 */
protected File[] jarRealFiles = new File[0];


/**
 * The path which will be monitored for added Jar files.
 */
protected String jarPath = null;


/**
 * The list of JARs, in the order they should be searched
 * for locally loaded classes or resources.
 */
protected String[] jarNames = new String[0];public synchronized Servlet loadServlet() throws ServletException {
if (unloading) {
throw new ServletException(
sm.getString("standardWrapper.unloading", getName()));
}
// Nothing to do if we already have an instance or an instance pool
if (!singleThreadModel && (instance != null))
return instance;
PrintStream out = System.out;
if (swallowOutput) {
SystemLogHandler.startCapture();
}
Servlet servlet;
try {
long t1=System.currentTimeMillis();
// Complain if no servlet class has been specified
if (servletClass == null) {
unavailable(null);
throw new ServletException
(sm.getString("standardWrapper.notClass", getName()));
}
/**
* 交给父容器(Context)加载,父容器再交给InstanceManager加载。
* InstanceManager中的ClassLoader是在StandardContext的startInternal方法设置进去的
*/
InstanceManager instanceManager = ((StandardContext)getParent()).getInstanceManager();
try {
servlet = (Servlet) instanceManager.newInstance(servletClass);
} catch (ClassCastException e) {
unavailable(null);
// Restore the context ClassLoader
throw new ServletException
(sm.getString("standardWrapper.notServlet", servletClass), e);
} catch (Throwable e) {
e = ExceptionUtils.unwrapInvocationTargetException(e);
ExceptionUtils.handleThrowable(e);
unavailable(null);
// Added extra log statement for Bugzilla 36630:
// http://bz.apache.org/bugzilla/show_bug.cgi?id=36630
if(log.isDebugEnabled()) {
log.debug(sm.getString("standardWrapper.instantiate", servletClass), e);
}
// Restore the context ClassLoader
throw new ServletException
(sm.getString("standardWrapper.instantiate", servletClass), e);
}
if (multipartConfigElement == null) {
MultipartConfig annotation =
servlet.getClass().getAnnotation(MultipartConfig.class);
if (annotation != null) {
multipartConfigElement =
new MultipartConfigElement(annotation);
}
}
processServletSecurityAnnotation(servlet.getClass());
// Special handling for ContainerServlet instances
if ((servlet instanceof ContainerServlet) &&
(isContainerProvidedServlet(servletClass) ||
((Context) getParent()).getPrivileged() )) {
((ContainerServlet) servlet).setWrapper(this);
}
classLoadTime=(int) (System.currentTimeMillis() -t1);
if (servlet instanceof SingleThreadModel) {
if (instancePool == null) {
instancePool = new Stack<Servlet>();
}
singleThreadModel = true;
}
initServlet(servlet);
fireContainerEvent("load", this);
loadTime=System.currentTimeMillis() -t1;
} finally {
if (swallowOutput) {
String log = SystemLogHandler.stopCapture();
if (log != null && log.length() > 0) {
if (getServletContext() != null) {
getServletContext().log(log);
} else {
out.println(log);
}
}
}
}
return servlet;
}对于jsp类加载器,每一个jsp文件都对应了一个jsp类加载器。 在tomcat中,jsp也是一个servlet, 也会被StandardWrapper包装。那jsp文件修改后可以直接将改变展示在浏览器中,无须重启tomcat,也无需reload容器,那这是怎么做的呢?
对于容器,在ContainerBase类的startInternal方法中,会调用这段代码:
protected void threadStart() {

    if (thread != null)
        return;
    if (backgroundProcessorDelay <= 0)
        return;

    threadDone = false;
    String threadName = "ContainerBackgroundProcessor[" + toString() + "]";
    thread = new Thread(new ContainerBackgroundProcessor(), threadName);
    thread.setDaemon(true);
    thread.start();

}public void run() {
Throwable t = null;
String unexpectedDeathMessage = sm.getString(
"containerBase.backgroundProcess.unexpectedThreadDeath",
Thread.currentThread().getName());
try {
while (!threadDone) {
try {
Thread.sleep(backgroundProcessorDelay * 1000L);
} catch (InterruptedException e) {
// Ignore
}
if (!threadDone) {
Container parent = (Container) getMappingObject();
ClassLoader cl =
Thread.currentThread().getContextClassLoader();
if (parent.getLoader() != null) {
cl = parent.getLoader().getClassLoader();
}
processChildren(parent, cl);//关键是这句
}
}
} catch (RuntimeException e) {
t = e;
throw e;
} catch (Error e) {
t = e;
throw e;
} finally {
if (!threadDone) {
log.error(unexpectedDeathMessage, t);
}
}
}
protected void processChildren(Container container, ClassLoader cl) {
try {
if (container.getLoader() != null) {
Thread.currentThread().setContextClassLoader
(container.getLoader().getClassLoader());
}
container.backgroundProcess();
} catch (Throwable t) {
ExceptionUtils.handleThrowable(t);
log.error("Exception invoking periodic operation: ", t);
} finally {
Thread.currentThread().setContextClassLoader(cl);
}
Container[] children = container.findChildren();
for (int i = 0; i < children.length; i++) {
if (children[i].getBackgroundProcessorDelay() <= 0) {
processChildren(children[i], cl);
}
}
}ps:这个方法在ContainerBase有默认实现,但只有StandardContext以及StandardWrapper方法,这个默认实现主要是为StandardContext准备的,它检查java类文件是否有所改变,然后调用reload方法重启容器,或者为容器设置ClassLoader。
下面是StandardWrapper的backgroundProcess方法:
/**
 * Execute a periodic task, such as reloading, etc. This method will be
 * invoked inside the classloading context of this container. Unexpected
 * throwables will be caught and logged.
 */
@Override
public void backgroundProcess() {
    super.backgroundProcess();

    if (!getState().isAvailable())
        return;

    if (getServlet() != null && (getServlet() instanceof PeriodicEventListener)) {
        ((PeriodicEventListener) getServlet()).periodicEvent();
    }
}@Override
public void periodicEvent() {
rctxt.checkUnload();
rctxt.checkCompile();
} 以上就是我对tomcat类加载机制的学习与理解,如果不足或错误,欢迎在下面评论指正。最后,感谢你的阅读! ( ̄▽ ̄)~*


 126
126


 被折叠的 条评论
为什么被折叠?
被折叠的 条评论
为什么被折叠?
 到【灌水乐园】发言


