


前言
本文主要记录了在统信UOS操作系统下安装Scrcpy实现Android手机投屏的过程,在安装过程中,笔者参考了多篇文章,但发现它们都没有完整地介绍。经过不断地尝试和摸索,最终才成功实现投屏。因此,这篇文章最初的目的只是为了记录在安装过程中遇到的各种问题,方便自己以后参考,也希望为其他跟我有相同需求的读者提供一些参考。
一、软件介绍
Scrcpy是一款开源的安卓手机投屏软件,可以将手机屏幕投影到电脑上,并且在电脑上进行操作。
二、安装方法
1、应用商店搜索“安卓”,找到【Scrcpy安卓手机投屏】,点击【安装】;
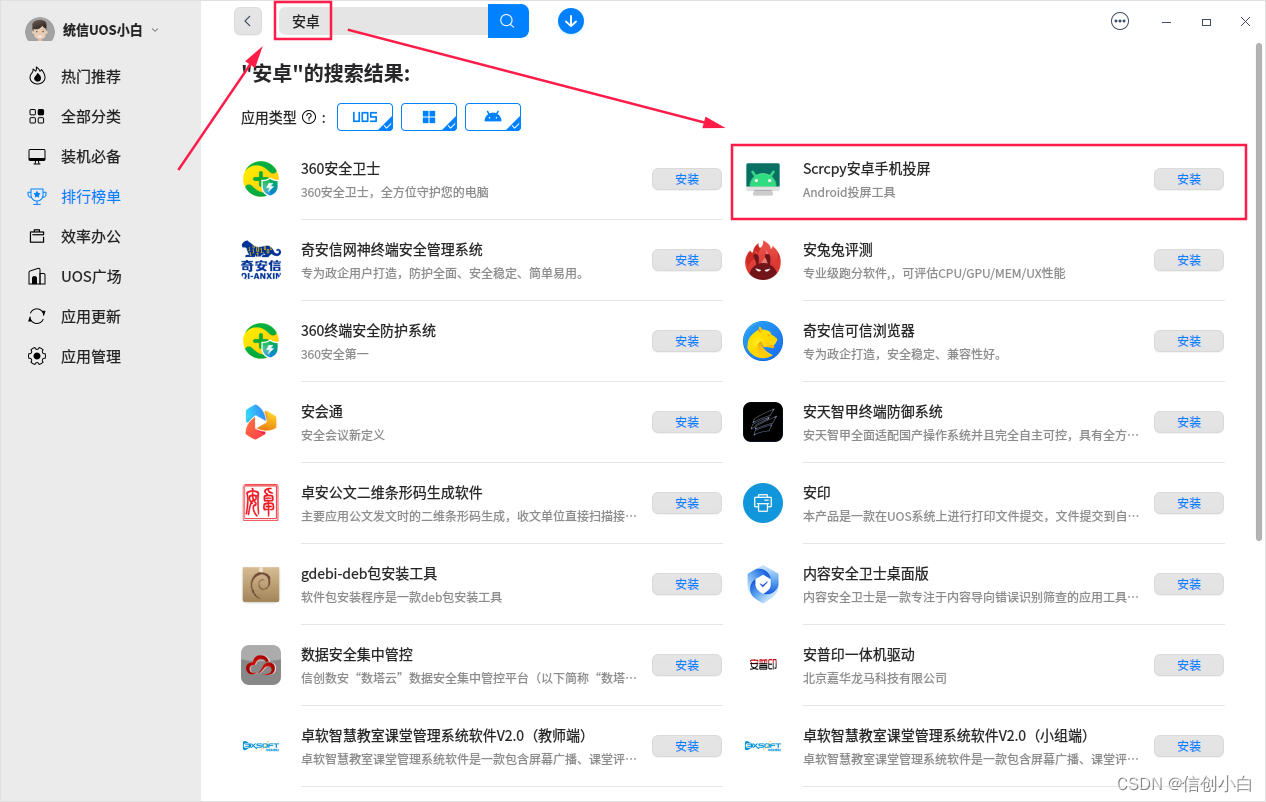
2、安装完成后在左下角启动器搜索“安卓”即可找到【Scrcpy安卓手机投屏】。

三、使用方法
1、手机连接电脑:将手机使用数据线连接电脑,选择【传输文件 / Android Atuo】;

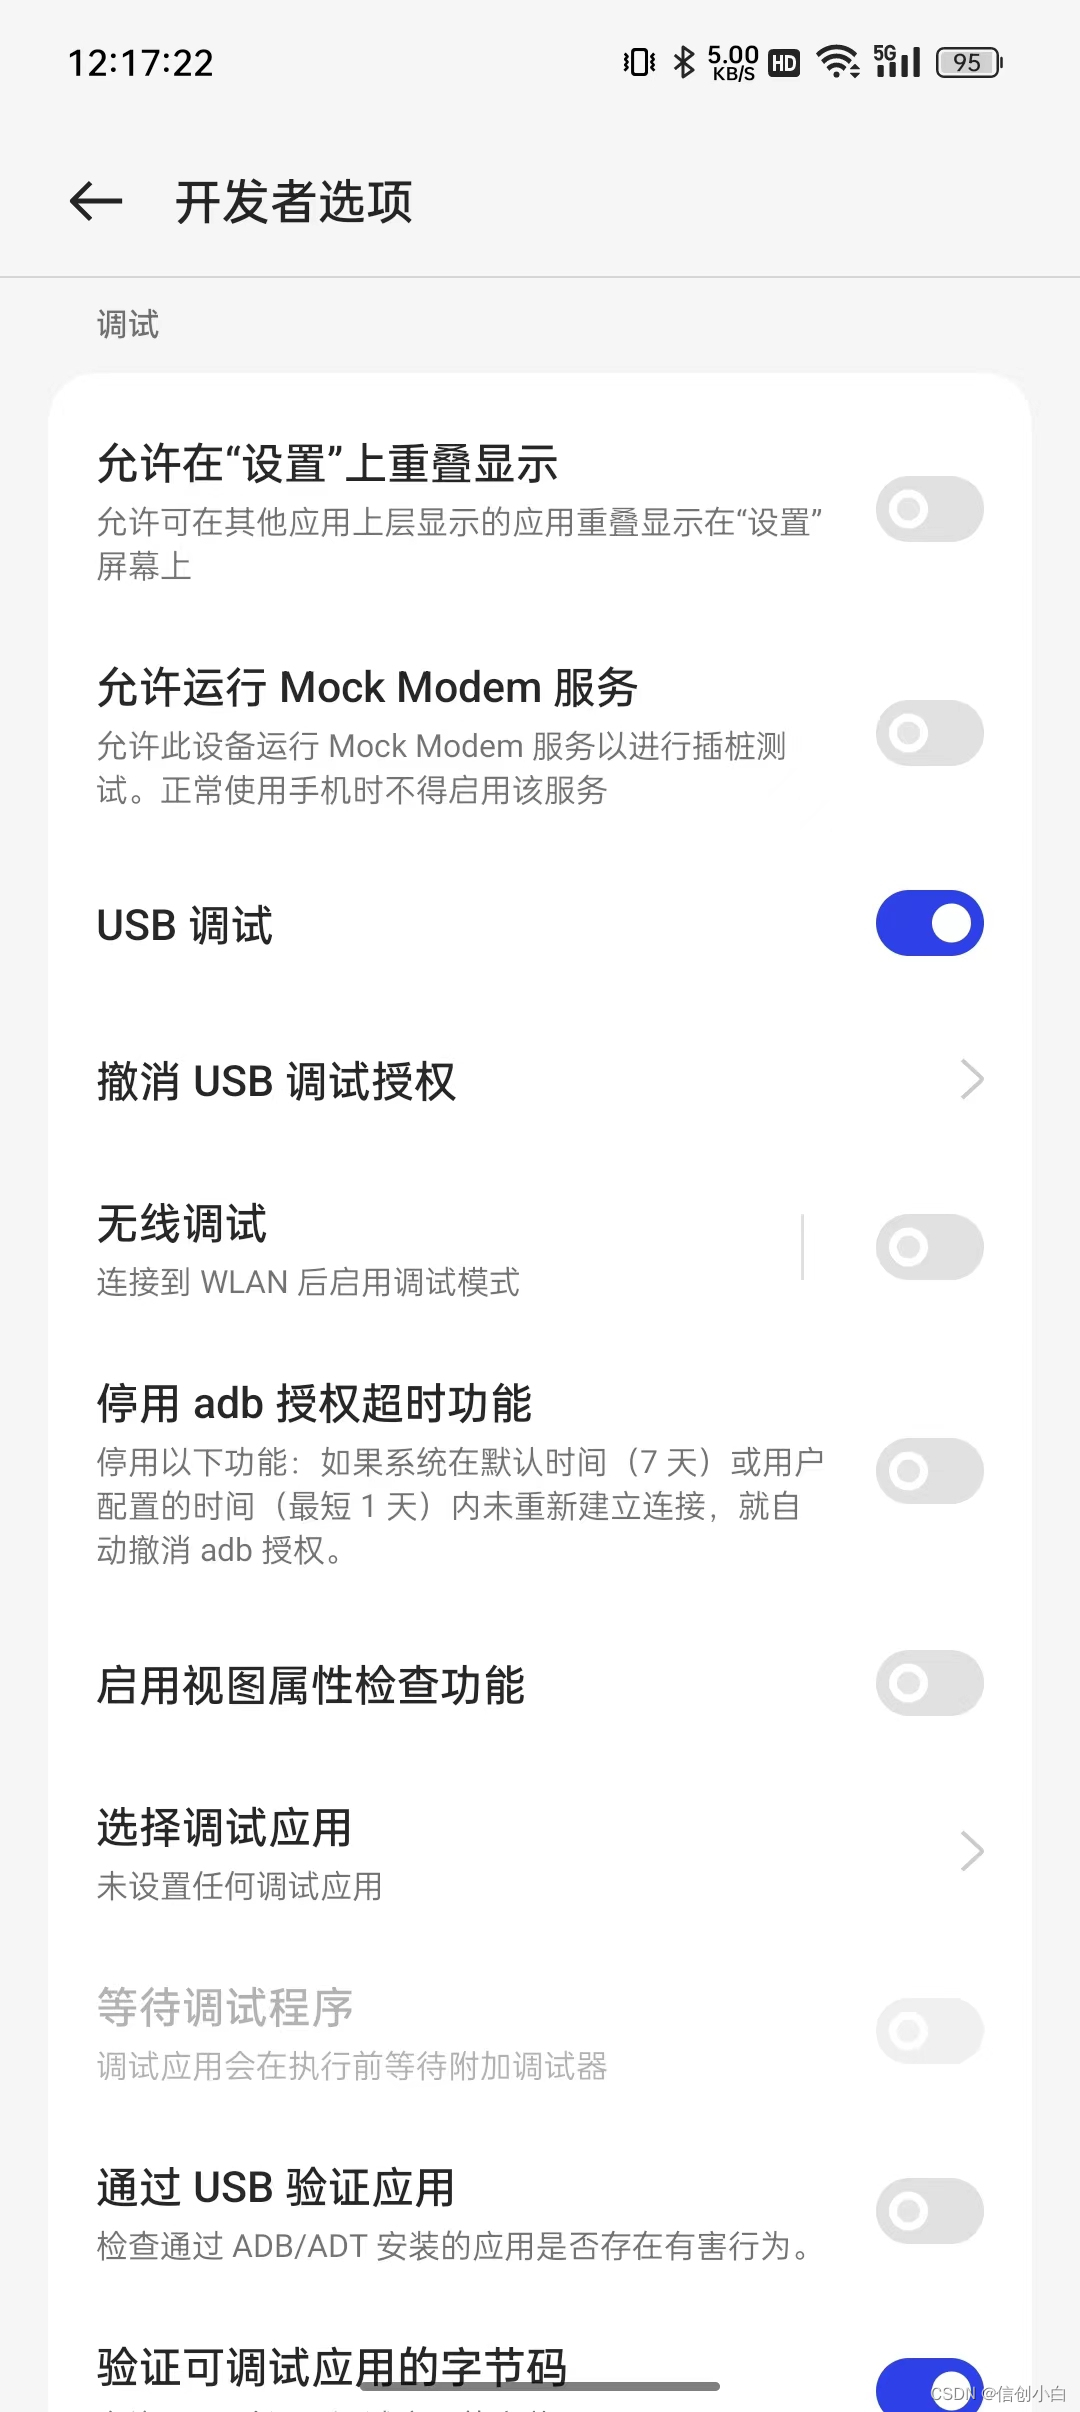
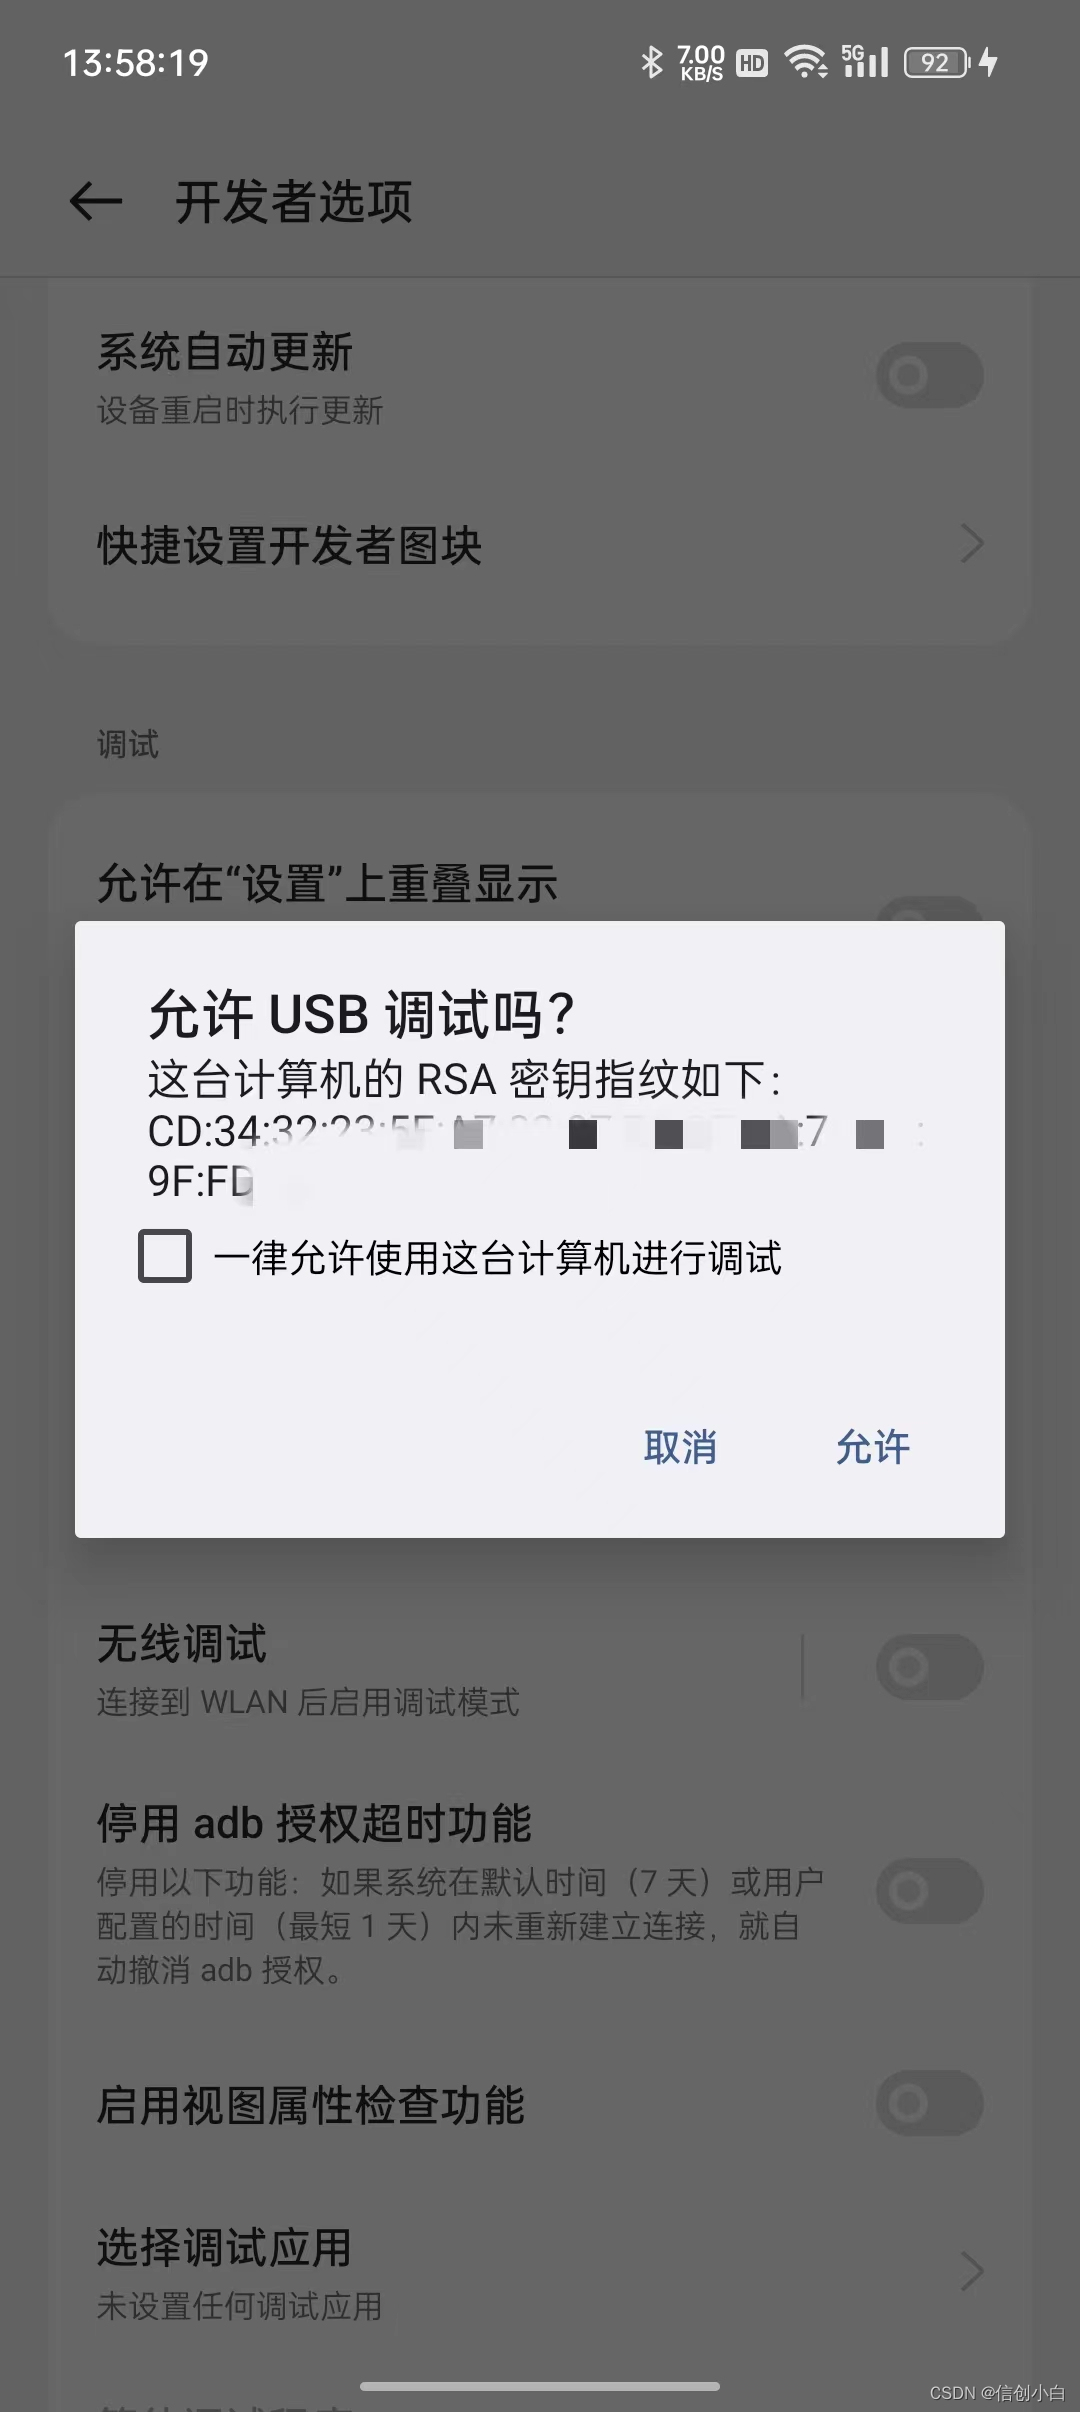
2、开启USB调试:打开手机的开发者模式,进入开发者选项,启用 【USB调试】 ,启用后会出现弹窗提示是否允许USB调试,选择【允许】(可以根据自己需求选择是否勾选“一律允许这台计算机进行调试”)
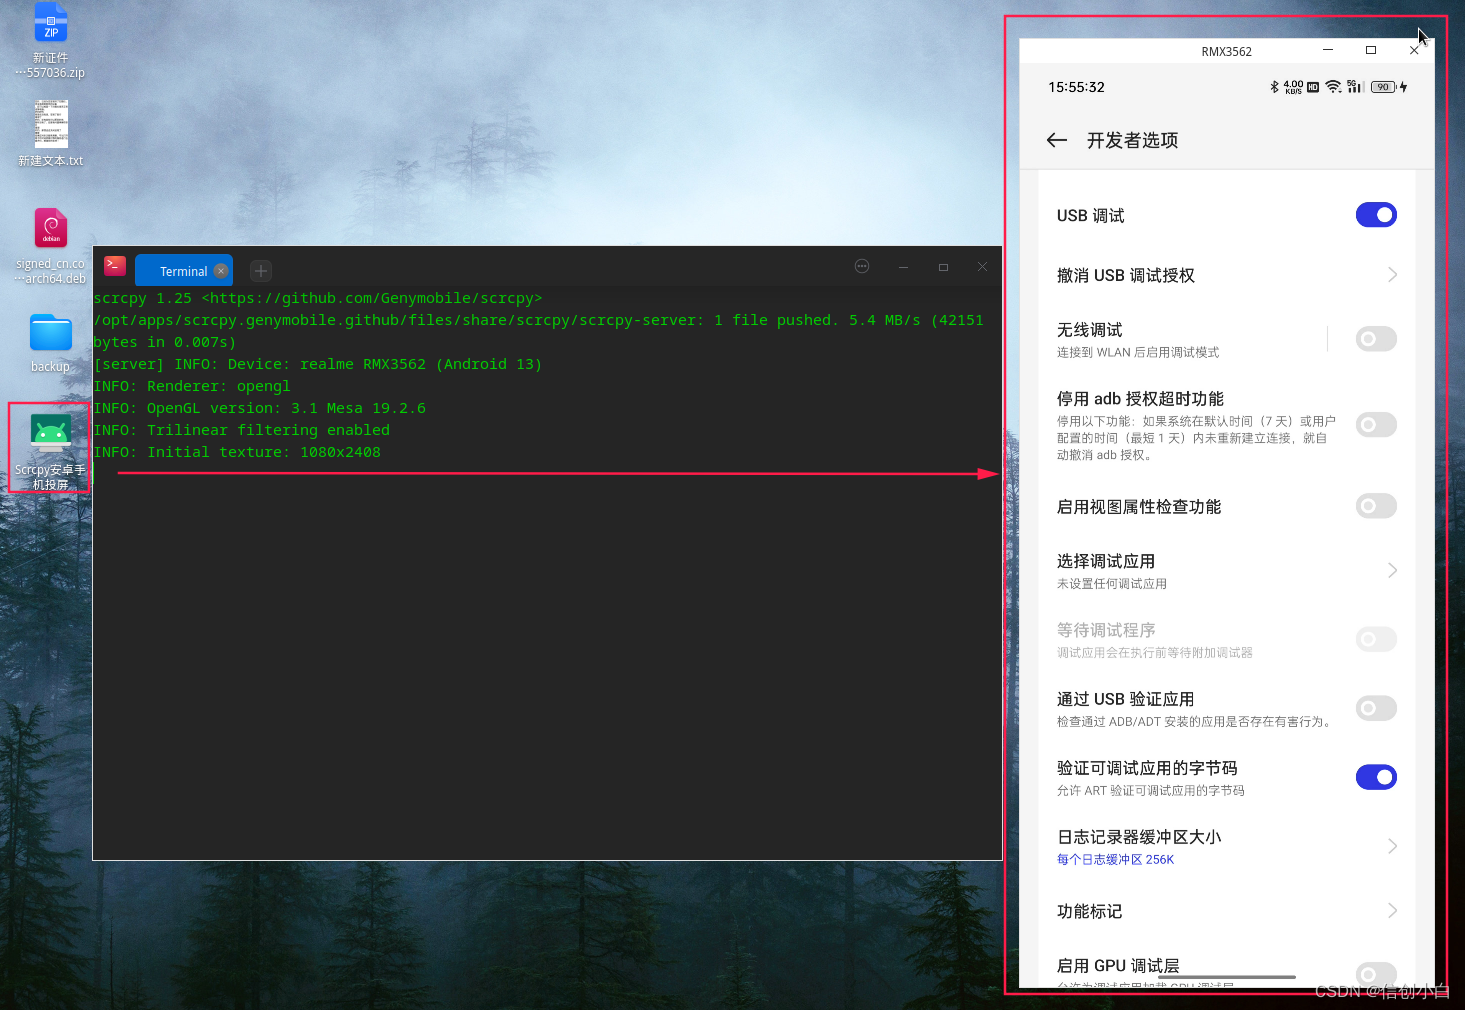
3、打开Scrcpy安卓手机投屏,即可成功投屏。
四、常见问题
(一)如何开启开发者模式 ?
每个安卓设备开启开发者模式的方法不太一样,其余型号可自行百度,也可参考官方文档启用开发者选项,下面是以真我realme GT NEO3为例开启开发者模式的方法。
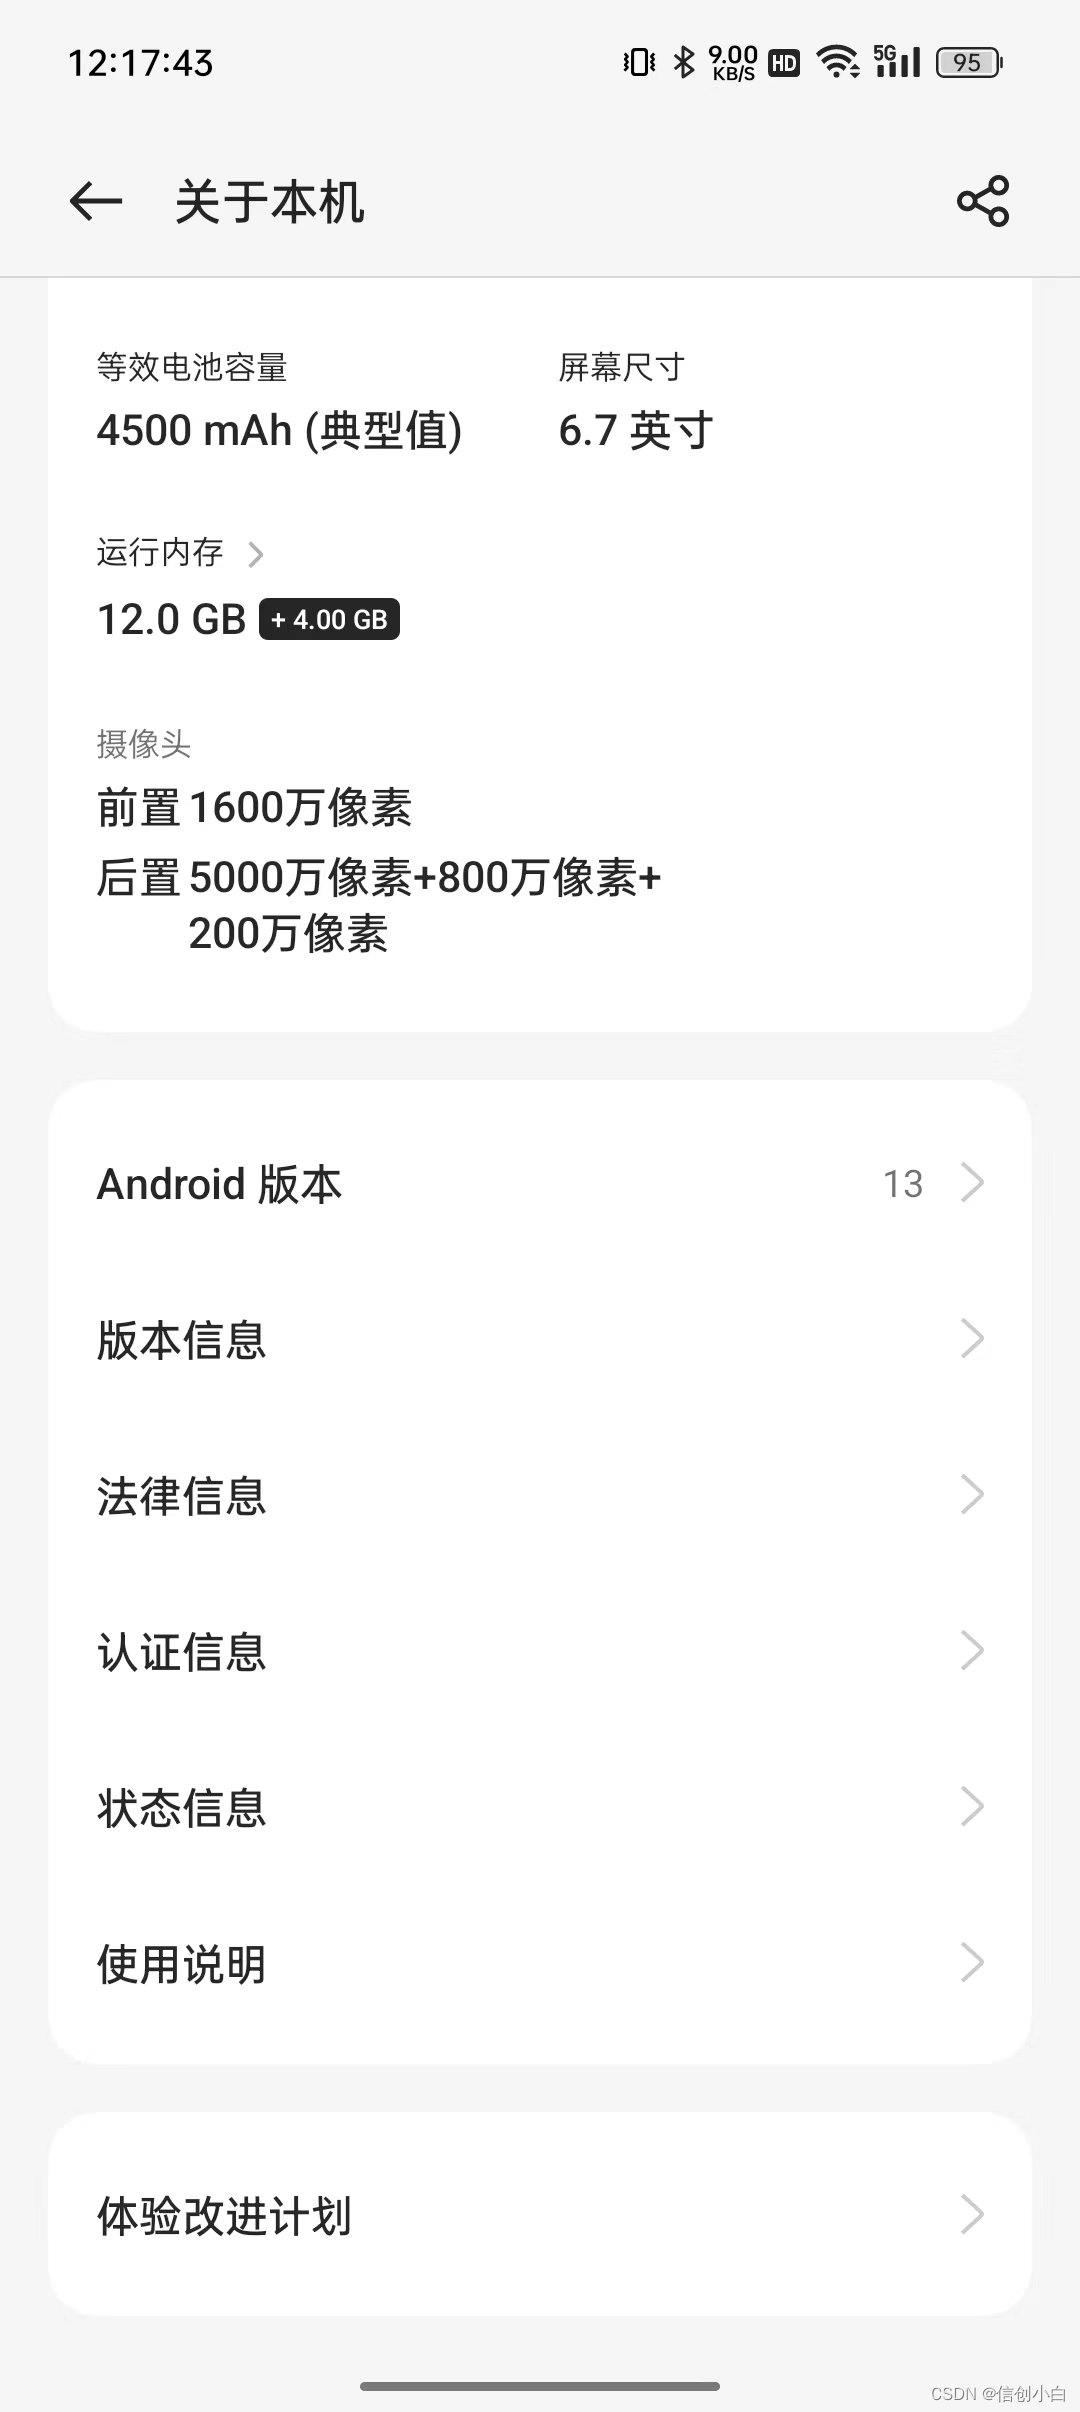
1、打开手机设置,找到【关于本机】,再选择【版本信息】进入;
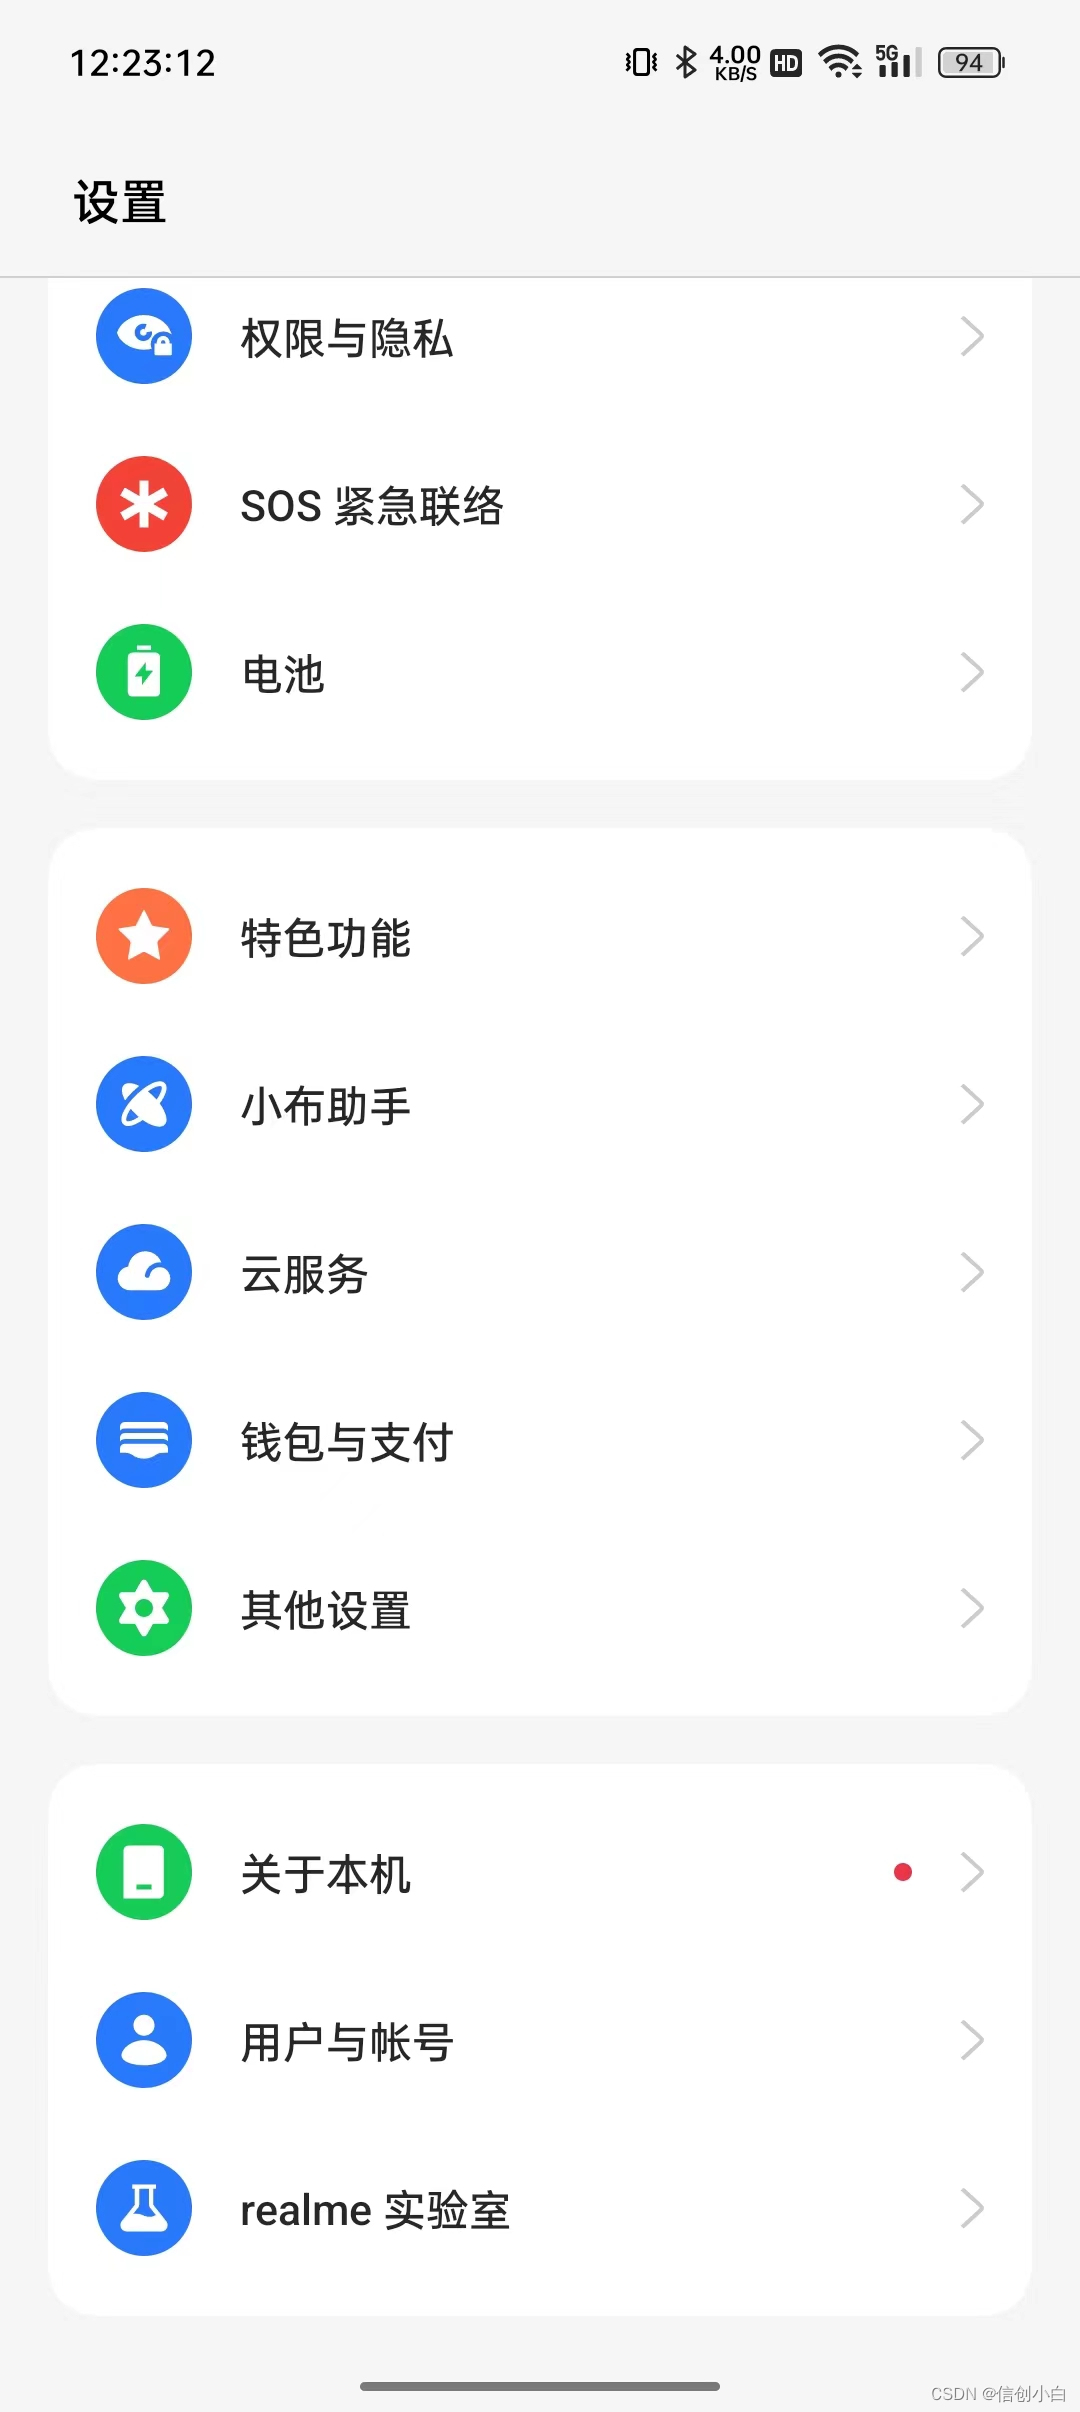
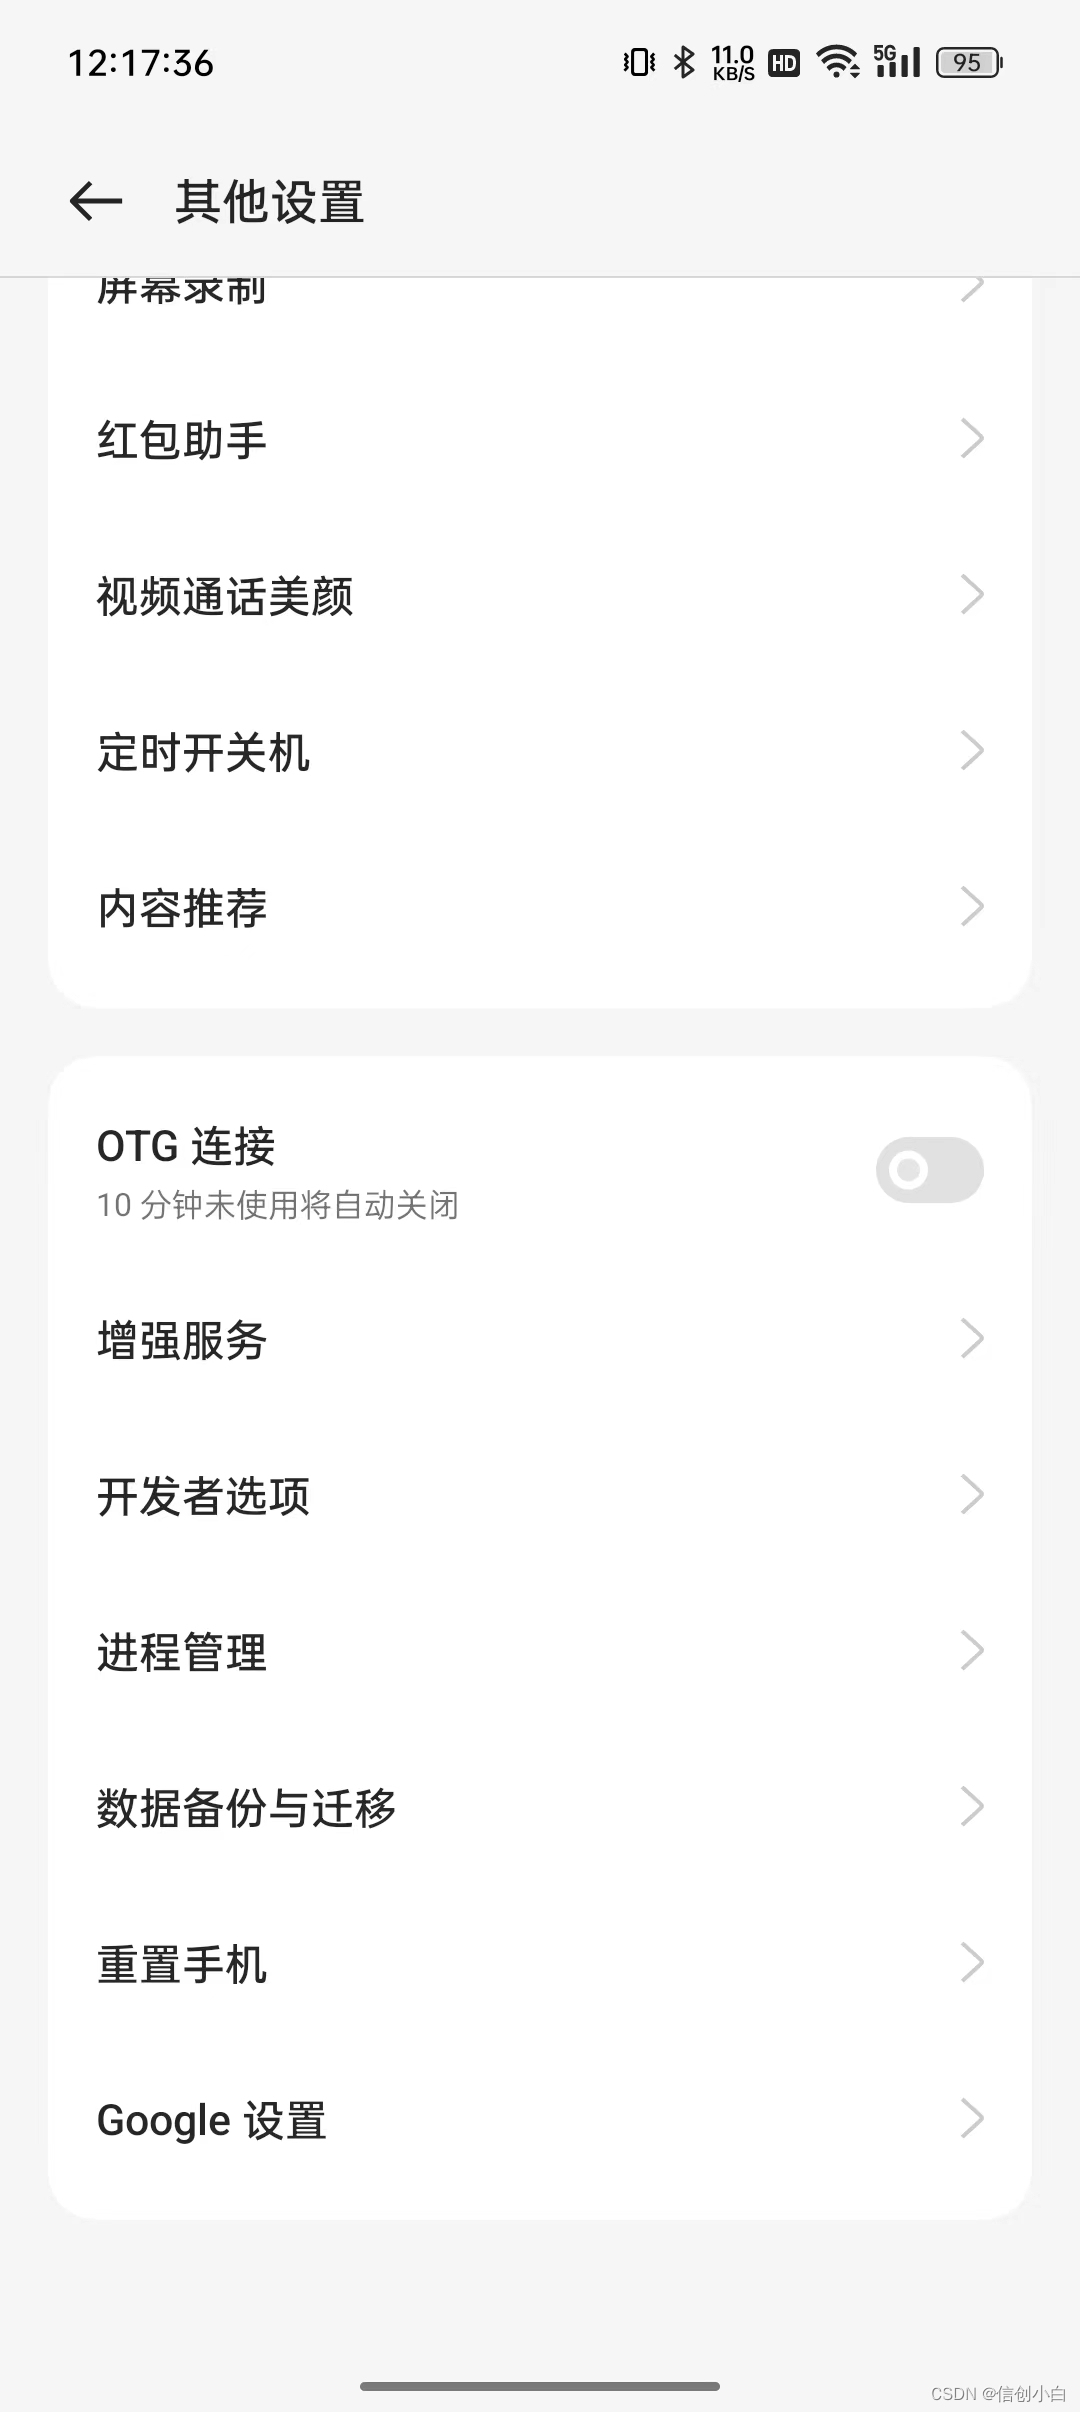
2、连续点按【版本号】选项 7 次,可能会让输入锁屏密码,验证成功后即可成功打开开发者模式,返回到设置界面,找到【其他设置】,往下滑即可找到【开发者选项】;

3、在开发者选项中往下滑,调试版块里面可以控制【USB调试】和【无线调试】的开关。
(二)如何设置无线投屏?
手机一直使用数据线连接电脑有着诸多限制,比如占用了电脑的U口,手机的操作不太方便,同时也无法使用快充功能。为了解决这些问题,可以通过以下方法使用无线投屏功能。
由于使用无线投屏功能需要用到 adb 命令来进行管理,而Linux系统希望使用 adb 的每个用户都需要位于
plugdev群组中,否则会出现报错,所以按照以下方法操作即可。
前提:
①手机和电脑在同一局域网(能ping通);
②设置无线连接功能时需要先开启USB调试;
1、添加 plugdev 群组:打开终端,进入root,使用命令将当前用户添加至plugdev群组;
usermod -aG plugdev $USER
uos@uos:~/Desktop$ su
请输入密码:
验证成功
root@uos:/home/uos/Desktop# usermod -aG plugdev $USER
2、 查看群组是否添加成功:使用命令查看当前用户所在群组是否有 plugdev;
id $USER
root@uos:/home/uos/Desktop# id $USER
uid=1000(uos) gid=1000(uos) 组=1000(uos),7(lp),27(sudo),46(plugdev),100(users),109(netdev),119(scanner),123(sambashare),994(nopasswdlogin),993(autologin)
3、查看当前连接设备:根据【三、使用方法】先进行USB连接,退出root模式,使用命令
查看设备连接状态;
adb devices
返回信息的第一列是设备名称,第二列是状态提示,下面是各状态对应的情况:
| 状态列 | 对应情况 | 解决方法 |
| 无返回信息 | 未检测到设备 | 使用数据线将设备连接到电脑 |
| no permissions (user uos is not in the plugdev group) | 未加入 plugdev 群组 | 重新添加 plugdev 群组,若还不行注销电脑重新登录 |
| no permissions (user in plugdev group; are your udev rules wrong?) | 已加入 plugdev 群组,但是数据线连接时选择的是“仅充电” | 通知栏找到“正在通过USB充电”,改成“传输文件”,或重新插拔数据线选择“传输文件” |
| unauthorized | 开启【USB调试】出现弹窗后没有点击【允许】,提示未经授权 | 关闭【USB调试】再重新开启,出现弹窗点击【允许】 |
| device | 设备正常连接 | -- |
uos@uos:~/Desktop$ adb devices
List of devices attached
NR6DIF59KN85CEDM device4、查看手机IP:使用命令查看手机IP地址,可能会输出两个地址,第二个地址就是手机的IP地址(当然也可以在手机设置--WLAN--已连接的WIFI详细信息中查看IPv4地址)
adb shell ip route | awk '{print $9}'
uos@uos:~/Desktop$ adb shell ip route | awk '{print $9}'
10.76.37.136
10.135.7.92
5、启动守护进程,监听端口:使用命令启动一个ADB守护进程,该进程监听5555端口(默认为5555,也可以设置为其他端口);
adb tcpip 5555
①返回 “restarting in TCP mode port: 5555” 表明启动成功;
②返回 “error: no devices/emulators found” 表明设备未连接;
解决方法:根据【三、使用方法】重新开启USB连接;
uos@uos:~/Desktop$ adb tcpip 5555
restarting in TCP mode port: 5555
①启动成功时手机可能会出现是否允许进行USB调试的弹窗,选择【允许】即可;
②如果点击了【取消】,已连接的设备状态会变成“unauthorized”(未经授权);
解决方法:关闭【USB调试】再重新开启,出现弹窗点击【允许】,再重新执行第5步操作;
6、进行无线连接:拔掉数据线,使用命令进行无线连接,连接时手机会出现是否允许进行USB调试的弹窗,选择【允许】即可;
adb connect IP:端口
如:adb connect 10.135.7.92:5555
- 返回 “connected to 10.135.7.92:5555” 表明连接成功;
- 返回 “already connected to 10.135.7.92:5555” 表明已经成功连接过,无需再次连接;
uos@uos:~/Desktop$ adb connect 10.135.7.92:5555
connected to 10.135.7.92:5555
7、查看当前连接设备:再次使用命令 adb devices 查看设备连接状态,状态正常则进行下一步操作 ;
uos@uos:~/Desktop$ adb devices
List of devices attached
10.135.7.92:5555        devices
- 如果第6步出现弹窗点击了【取消】,已连接的设备状态会变成“unauthorized”(未经授权);
- 解决方法:关闭【USB调试】再重新开启,重新执行第6步操作,出现弹窗点击【允许】;
8、打开投屏软件进行投屏:打开Scrcpy安卓手机投屏,成功实现无线投屏。
(三)如何实现熄屏控制?
熄屏控制就是指电脑在控制手机时,手机屏幕不用一直亮着,不仅可以节省手机电量,也
1、安装所需的软件包:打开终端,进入root,输入命令安装;
apt install ffmpeg libsdl2-2.0-0 adb wget gcc git pkg-config meson ninja-build libsdl2-dev libavcodec-dev libavdevice-dev libavformat-dev libavutil-dev libswresample-dev libusb-1.0-0 libusb-1.0-0-dev -y
uos@uos:~/Desktop$ su
请输入密码:
验证成功
root@uos:/home/uos/Desktop# apt install ffmpeg libsdl2-2.0-0 adb wget gcc git pkg-config meson ninja-build libsdl2-dev libavcodec-dev libavdevice-dev libavformat-dev libavutil-dev libswresample-dev libusb-1.0-0 libusb-1.0-0-dev -y
2、 克隆repo并执行安装脚本:可以退出root模式,进入存放scrcpy软件的文件夹,再使用命令克隆,下载成功后进入目录执行脚本进行安装;
git clone https://github.com/Genymobile/scrcpy
uos@uos:~/Downloads$ git clone https://github.com/Genymobile/scrcpy
正克隆到 'scrcpy'...
remote: Enumerating objects: 28342, done.
remote: Counting objects: 100% (1281/1281), done.
remote: Compressing objects: 100% (436/436), done.
remote: Total 28342 (delta 778), reused 1077 (delta 648), pack-reused 27061
接收对象中: 100% (28342/28342), 5.52 MiB | 3.00 MiB/s, 完成.
处理 delta 中: 100% (18117/18117), 完成.
cd scrcpy
uos@uos:~/Downloads$ cd scrcpy./install_release.sh
注意: 在配置最后一个文件时会提示输入开机密码,输入开机密码回车即可(若提示当前用户不在sudoers中,进入root再重新执行脚本即可);
uos@uos:~/Downloads/scrcpy$ ./install_release.sh
[scrcpy] Downloading prebuilt server...
--2023-10-10 12:54:37--  https://github.com/Genymobile/scrcpy/releases/download/v2.1.1/scrcpy-server-v2.1.1
正在连接 127.0.0.1:7890... 已连接。
已发出 Proxy 请求,正在等待回应... 302 Found
位置:https://objects.githubusercontent.com/github-production-release-asset-2e65be/111583593/ecb6f5da-9e0d-4f0a-a475-666fd905b94e?X-Amz-Algorithm=AWS4-HMAC-SHA256&X-Amz-Credential=AKIAIWNJYAX4CSVEH53A%2F20231010%2Fus-east-1%2Fs3%2Faws4_request&X-Amz-Date=20231010T045438Z&X-Amz-Expires=300&X-Amz-Signature=8f8c19c5a4d84b9d9e769d384a08cfc69c7a1a7fa7892f957e4128fcc1eab2a5&X-Amz-SignedHeaders=host&actor_id=0&key_id=0&repo_id=111583593&response-content-disposition=attachment%3B%20filename%3Dscrcpy-server-v2.1.1&response-content-type=application%2Foctet-stream [跟随至新的 URL]
--2023-10-10 12:54:38--  https://objects.githubusercontent.com/github-production-release-asset-2e65be/111583593/ecb6f5da-9e0d-4f0a-a475-666fd905b94e?X-Amz-Algorithm=AWS4-HMAC-SHA256&X-Amz-Credential=AKIAIWNJYAX4CSVEH53A%2F20231010%2Fus-east-1%2Fs3%2Faws4_request&X-Amz-Date=20231010T045438Z&X-Amz-Expires=300&X-Amz-Signature=8f8c19c5a4d84b9d9e769d384a08cfc69c7a1a7fa7892f957e4128fcc1eab2a5&X-Amz-SignedHeaders=host&actor_id=0&key_id=0&repo_id=111583593&response-content-disposition=attachment%3B%20filename%3Dscrcpy-server-v2.1.1&response-content-type=application%2Foctet-stream
正在连接 127.0.0.1:7890... 已连接。
已发出 Proxy 请求,正在等待回应... 200 OK
长度:56995 (56K) [application/octet-stream]
正在保存至: “scrcpy-server”

scrcpy-server            100%[===============================>]  55.66K   320KB/s  用时 0.2s

2023-10-10 12:54:39 (320 KB/s) - 已保存 “scrcpy-server” [56995/56995])

[scrcpy] Verifying prebuilt server...
scrcpy-server: 成功
[scrcpy] Building client...
The Meson build system
Version: 0.56.2
Source dir: /home/uos/Downloads/scrcpy
Build dir: /home/uos/Downloads/scrcpy/build-auto
Build type: native build
Project name: scrcpy
Project version: 2.1.1
C compiler for the host machine: cc (gcc 8.3.0 "cc (Uos 8.3.0.10-deepin1) 8.3.0")
C linker for the host machine: cc ld.bfd 2.31.1
Host machine cpu family: aarch64
Host machine cpu: aarch64
Found pkg-config: /usr/bin/pkg-config (0.29)
Run-time dependency libavformat found: YES 58.20.100
Run-time dependency libavcodec found: YES 58.35.100
Run-time dependency libavutil found: YES 56.22.100
Run-time dependency libswresample found: YES 3.3.100
Run-time dependency sdl2 found: YES 2.0.9
Run-time dependency libavdevice found: YES 58.5.100
Run-time dependency libusb-1.0 found: YES 1.0.22
Checking for function "strdup" : YES
Checking for function "asprintf" : YES
Checking for function "vasprintf" : YES
Checking for function "nrand48" : YES
Checking for function "jrand48" : YES
Checking for function "reallocarray" : YES
Header <sys/socket.h> has symbol "SOCK_CLOEXEC" : YES
Configuring config.h using configuration
Build targets in project: 3

Found ninja-1.8.2 at /usr/bin/ninja
[64/64] Linking target app/scrcpy
[scrcpy] Installing (sudo)...
请输入密码:
验证成功
[0/1] Installing files.
Installing app/scrcpy to /usr/local/bin
Stripping target 'app/scrcpy' using strip.
Installing server/scrcpy-server to /usr/local/share/scrcpy
Installing /home/uos/Downloads/scrcpy/app/scrcpy.1 to /usr/local/share/man/man1
Installing /home/uos/Downloads/scrcpy/app/data/icon.png to /usr/local/share/icons/hicolor/256x256/apps
Installing /home/uos/Downloads/scrcpy/app/data/zsh-completion/_scrcpy to /usr/local/share/zsh/site-functions
Installing /home/uos/Downloads/scrcpy/app/data/bash-completion/scrcpy to /usr/local/share/bash-completion/completions
Installing /home/uos/Downloads/scrcpy/app/data/scrcpy.desktop to /usr/local/share/applications
Installing /home/uos/Downloads/scrcpy/app/data/scrcpy-console.desktop to /usr/local/share/applications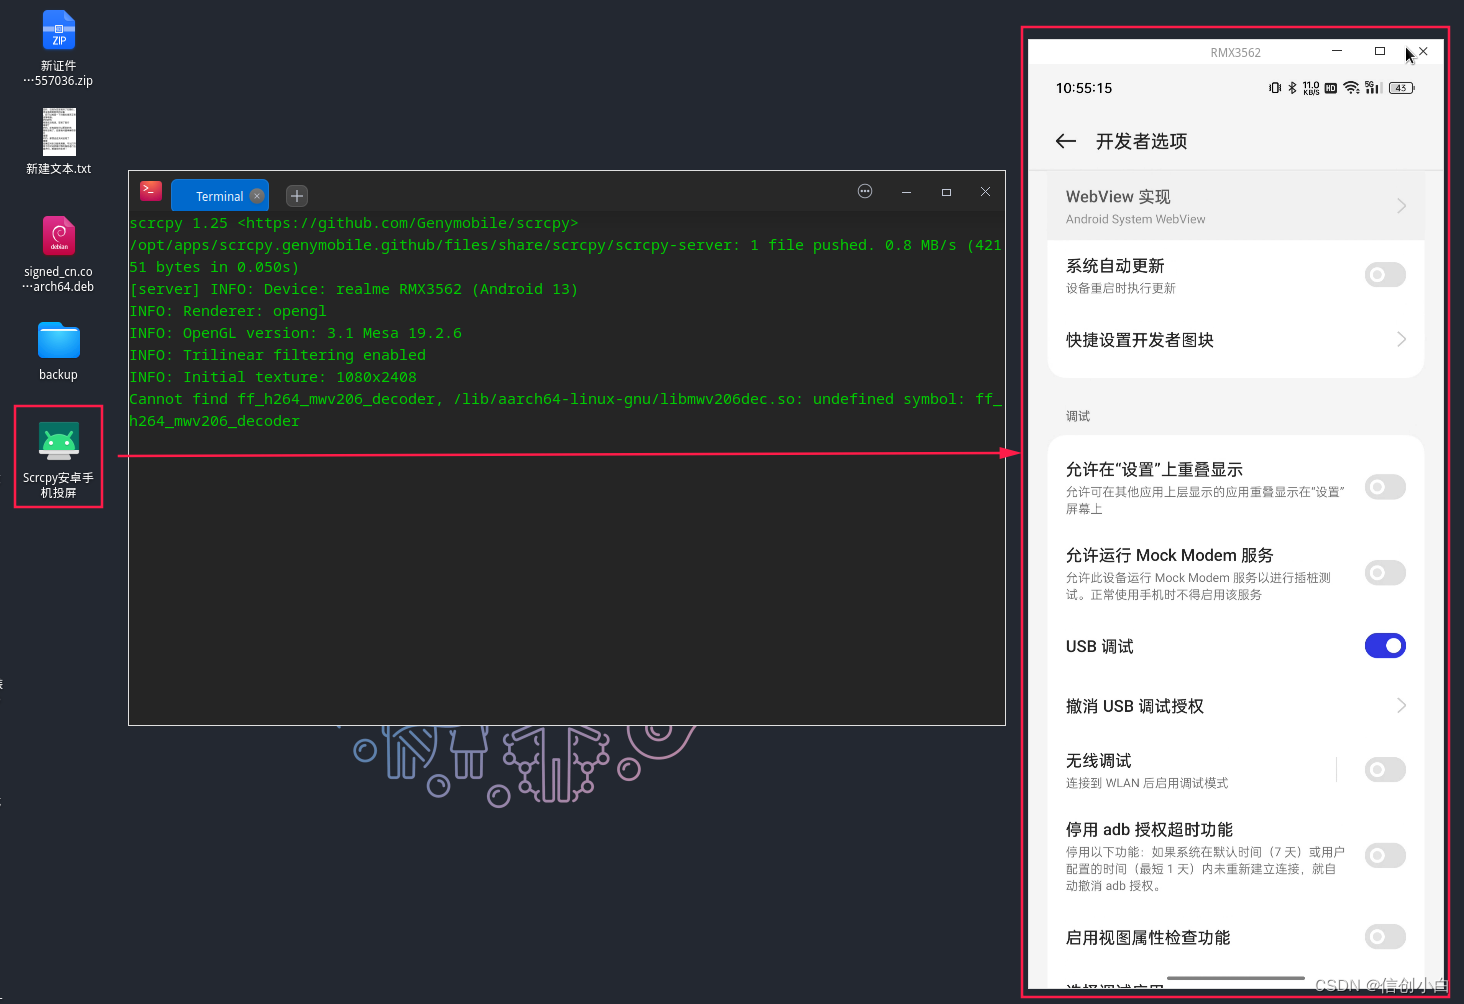
uos@uos:~/Downloads/scrcpy$3、熄屏控制连接设备:使用命令scrcpy -Sw可实现无线连接设备并且熄屏控制;
scrcpy -Sw
uos@uos:~/Downloads/scrcpy$ scrcpy -Sw
scrcpy 2.1.1 <https://github.com/Genymobile/scrcpy>
INFO: ADB device found:
INFO:     --> (tcpip)  10.135.7.92:5555                device  RMX3562
/usr/local/share/scrcpy/scrcpy-server: 1 file pushed. 0.7 MB/s (56995 bytes in 0.075s)
[server] INFO: Device: [realme] realme RMX3562 (Android 13)
[server] ERROR: Could not change "stay_on_while_plugged_in"
com.genymobile.scrcpy.SettingsException: Could not access settings: put global stay_on_while_plugged_in 7
        at com.genymobile.scrcpy.Settings.execSettingsPut(Settings.java:24)
        at com.genymobile.scrcpy.Settings.putValue(Settings.java:59)
        at com.genymobile.scrcpy.Settings.getAndPutValue(Settings.java:78)
        at com.genymobile.scrcpy.Server.initAndCleanUp(Server.java:63)
        at com.genymobile.scrcpy.Server.lambda$startInitThread$2(Server.java:168)
        at com.genymobile.scrcpy.Server$$ExternalSyntheticLambda3.run(Unknown Source:2)
        at java.lang.Thread.run(Thread.java:1012)
Caused by: java.io.IOException: Command [settings, put, global, stay_on_while_plugged_in, 7] returned with value 255
        at com.genymobile.scrcpy.Command.exec(Command.java:16)
        at com.genymobile.scrcpy.Settings.execSettingsPut(Settings.java:22)
        ... 6 more
INFO: Renderer: opengl
INFO: OpenGL version: 3.1 Mesa 19.2.6
INFO: Trilinear filtering enabled
Cannot find ff_h264_mwv206_decoder, /lib/aarch64-linux-gnu/libmwv206dec.so: undefined symbol: ff_h264_mwv206_decoder
INFO: Texture: 1080x2408
[server] INFO: Device screen turned off
如果只连接一台设备,直接使用 scrcpy -Sw 就可以连接,如果有多台设备,则需要指定设备:
①指定USB连接的设备:scrcpy -Sw --serial=设备名称
如: scrcpy -Sw --serial=NR6DIF59KN85CEDM
②指定无线连接的设备:scrcpy -Sw --tcpip=IP:端口
如: scrcpy -Sw --tcpip=10.135.7.92:5555
五、总结
本篇文章介绍了统信UOS系统通过Scrcpy实现安卓手机投屏,可以通过USB有线连接和WiFi无线连接,并且可以实现熄屏控制。Scrcpy的更多玩法可以参考最后一篇文章。
参考文章
https://developer.android.com/studio/run/device?hl=zh-cn![]() https://developer.android.com/studio/run/device?hl=zh-cn
https://developer.android.com/studio/run/device?hl=zh-cn
https://github.com/Genymobile/scrcpy/blob/master/doc/linux.md![]() https://github.com/Genymobile/scrcpy/blob/master/doc/linux.md
https://github.com/Genymobile/scrcpy/blob/master/doc/linux.md
https://github.com/Genymobile/scrcpy/blob/master/doc/connection.md![]() https://github.com/Genymobile/scrcpy/blob/master/doc/connection.md
https://github.com/Genymobile/scrcpy/blob/master/doc/connection.md
Mac—Scrcpy在Macbook上实现同屏/多屏协同操作安卓手机界面(支持 Win、Mac、Linux) ![]() https://www.cnblogs.com/Formulate0303/p/16055424.html
https://www.cnblogs.com/Formulate0303/p/16055424.html


 761
761


 被折叠的 条评论
为什么被折叠?
被折叠的 条评论
为什么被折叠?
 到【灌水乐园】发言


