


前言
分布式协调服务,我们主要讲四个方面
- 初步认识Zookeeper
- 了解Zookeeper的核心原理
- Zookeeper实践及与原理分析
- Zookeeper实践之配合注册中心完成RPC手写
本节我们就讲最后一个部分 Zookeeper实践之配合注册中心完成RPC手写
使用zookeeper原生API实现分布式锁
我们在面试专题讲过,实现分布式锁的方式有很多种,《JAVA多线程面试总结之分布式锁的实现原理》
比如使用
- 数据库
- redis
- zookeeper
本节,我们通过zookeeper实现分布式锁
使用zookeeper实现,我们发现一个弊端:同一时间,只有一个节点可以获取到锁,而其他的客户端需要通过watcher来不断的订阅 ,以监听lock节点下的变化,这就会造成惊群效应
惊群效应:如果当占用的节点释放了锁,其他节点就会同时去watcher这个锁,这样就会在短时间内产生大量变更,如果访问节点比较多,我们不建议采取这样的形式。
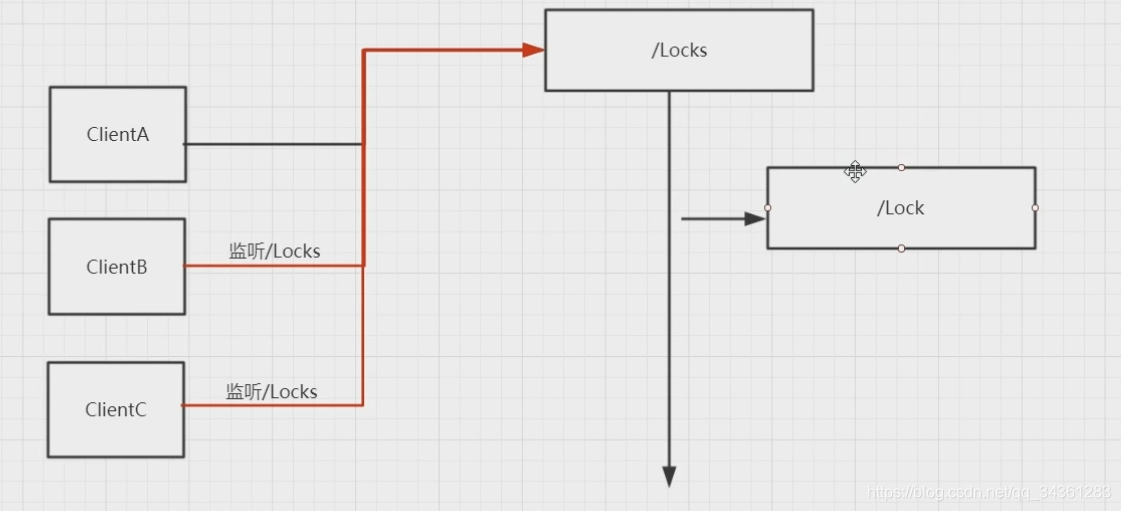
针对上面的情况,我们可以采用zookeeper的有序节点的特性来实现分布式锁。
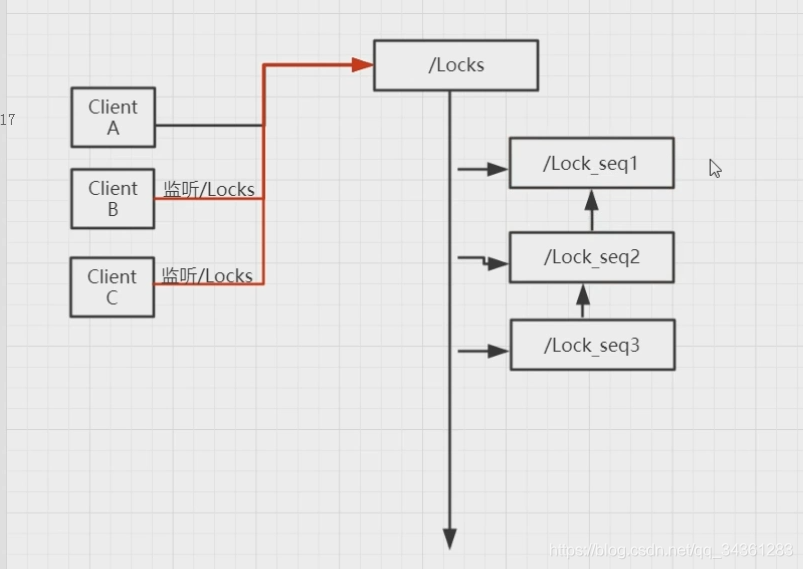
我们对每个客户端都在zookeeper注册一个带有seq的节点,获得锁时,让每个节点去监听比它小1的节点,只需要在lock下获取一个最小值获得锁。
这里我们写一个demo,通过客户端注册有序节点,实现分布式锁:
public class DistributedLock implements Lock,Watcher {

    private ZooKeeper zk=null;
    /**
     * 定义根节点
     */
    private String ROOT_LOCK="/locks";
    /**
     * 等待前一个锁
     */
    private String WAIT_LOCK;
    /**
     * 表示当前的锁
     */
    private String CURRENT_LOCK;

    //控制
    private CountDownLatch countDownLatch;


    public DistributedLock() {

        try {
            zk=new ZooKeeper("192.168.200.111:2181",
                    4000,this);
            //判断根节点是否存在
            Stat stat=zk.exists(ROOT_LOCK,false);
            if(stat==null){
                zk.create(ROOT_LOCK,"0".getBytes(),
                        ZooDefs.Ids.OPEN_ACL_UNSAFE,CreateMode.PERSISTENT);
            }
        } catch (IOException e) {
            e.printStackTrace();
        } catch (InterruptedException e) {
            e.printStackTrace();
        } catch (KeeperException e) {
            e.printStackTrace();
        }

    }

    @Override
    public boolean tryLock() {

        try {
            //创建临时有序节点
            CURRENT_LOCK=zk.create(ROOT_LOCK+"/","0".getBytes(),
                    ZooDefs.Ids.OPEN_ACL_UNSAFE,CreateMode.EPHEMERAL_SEQUENTIAL);
            System.out.println(Thread.currentThread().getName()+"->"+
                    CURRENT_LOCK+",尝试竞争锁");
            //获取根节点下的所有子节点
            List<String> childrens=zk.getChildren(ROOT_LOCK,false);
            //定义一个集合进行排序
            SortedSet<String> sortedSet=new TreeSet();
            for(String children:childrens){
                sortedSet.add(ROOT_LOCK+"/"+children);
            }
            //获得当前所有子节点中最小的节点
            String firstNode=sortedSet.first();
            SortedSet<String> lessThenMe=(sortedSet).headSet(CURRENT_LOCK);
            //通过当前的节点和子节点中最小的节点进行比较,如果相等,表示获得锁成功
            if(CURRENT_LOCK.equals(firstNode)){
                return true;
            }
            if(!lessThenMe.isEmpty()){
                //获得比当前节点更小的最后一个节点,设置给WAIT_LOCK
                WAIT_LOCK=lessThenMe.last();
            }
        } catch (KeeperException e) {
            e.printStackTrace();
        } catch (InterruptedException e) {
            e.printStackTrace();
        }
        return false;
    }


    @Override
    public void lock() {
        //如果获得锁成功
        if(this.tryLock()){
            System.out.println(Thread.currentThread().getName()+"->"+CURRENT_LOCK+"->获得锁成功");
            return;
        }
        try {
            //没有获得锁,继续等待获得锁
            waitForLock(WAIT_LOCK);
        } catch (KeeperException e) {
            e.printStackTrace();
        } catch (InterruptedException e) {
            e.printStackTrace();
        }
    }

    private boolean waitForLock(String prev) throws KeeperException, InterruptedException {
        //监听当前节点的上一个节点
        Stat stat=zk.exists(prev,true);
        if(stat!=null){
            System.out.println(Thread.currentThread().getName()+"->等待锁"+ROOT_LOCK+"/"+prev+"释放");
            countDownLatch=new CountDownLatch(1);
            countDownLatch.await();
            //TODO  watcher触发以后,还需要再次判断当前等待的节点是不是最小的
            System.out.println(Thread.currentThread().getName()+"->获得锁成功");
        }
        return true;
    }

    @Override
    public void lockInterruptibly() throws InterruptedException {

    }

    @Override
    public boolean tryLock(long time, TimeUnit unit) throws InterruptedException {
        return false;
    }

    @Override
    public void unlock() {
        System.out.println(Thread.currentThread().getName()+"->释放锁"+CURRENT_LOCK);
        try {
            zk.delete(CURRENT_LOCK,-1);
            CURRENT_LOCK=null;
            zk.close();
        } catch (InterruptedException e) {
            e.printStackTrace();
        } catch (KeeperException e) {
            e.printStackTrace();
        }
    }

    @Override
    public Condition newCondition() {
        return null;
    }

    @Override
    public void process(WatchedEvent event) {
        if(this.countDownLatch!=null){
            this.countDownLatch.countDown();
        }
    }
}
测试类:
public static void main( String[] args ) throws IOException {
        CountDownLatch countDownLatch=new CountDownLatch(10);
        for(int i=0;i<10;i++){
            new Thread(()->{
                try {
                    countDownLatch.await();
                    DistributedLock distributedLock=new DistributedLock();
                    //获得锁
                    distributedLock.lock();
                } catch (InterruptedException e) {
                    e.printStackTrace();
                }
            },"Thread-"+i).start();
            countDownLatch.countDown();
        }
        System.in.read();
    }
开始测试:
先看看节点:

启动:
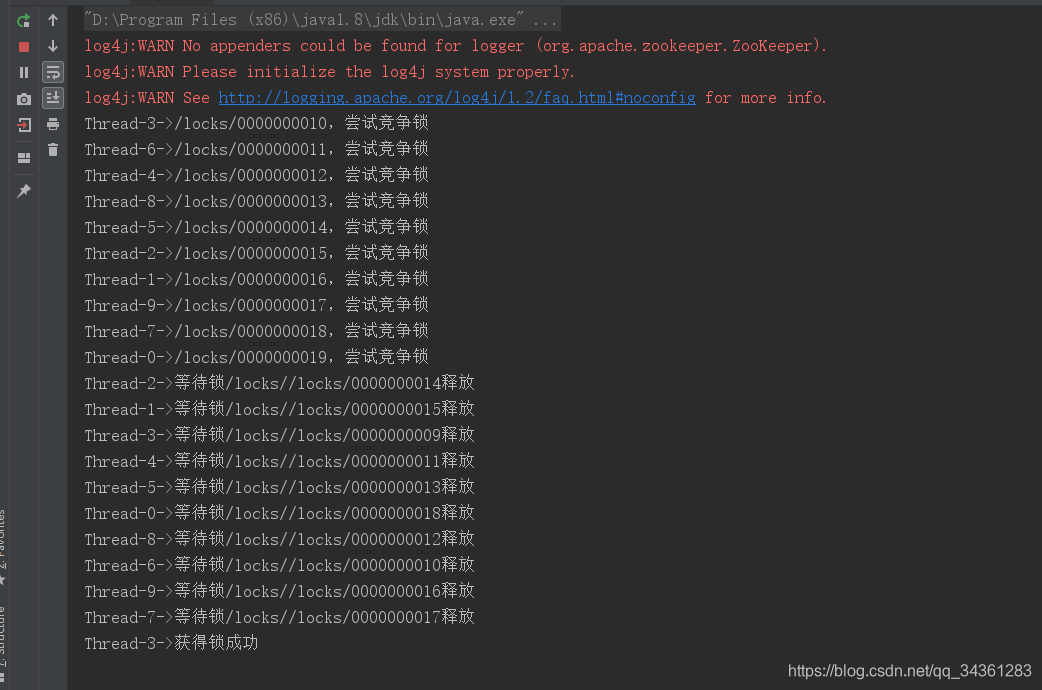
我们看控制台输出:
Thread-6->等待锁/locks//locks/0000000010释放

现在我们释放/locks//locks/0000000010(删掉此节点)
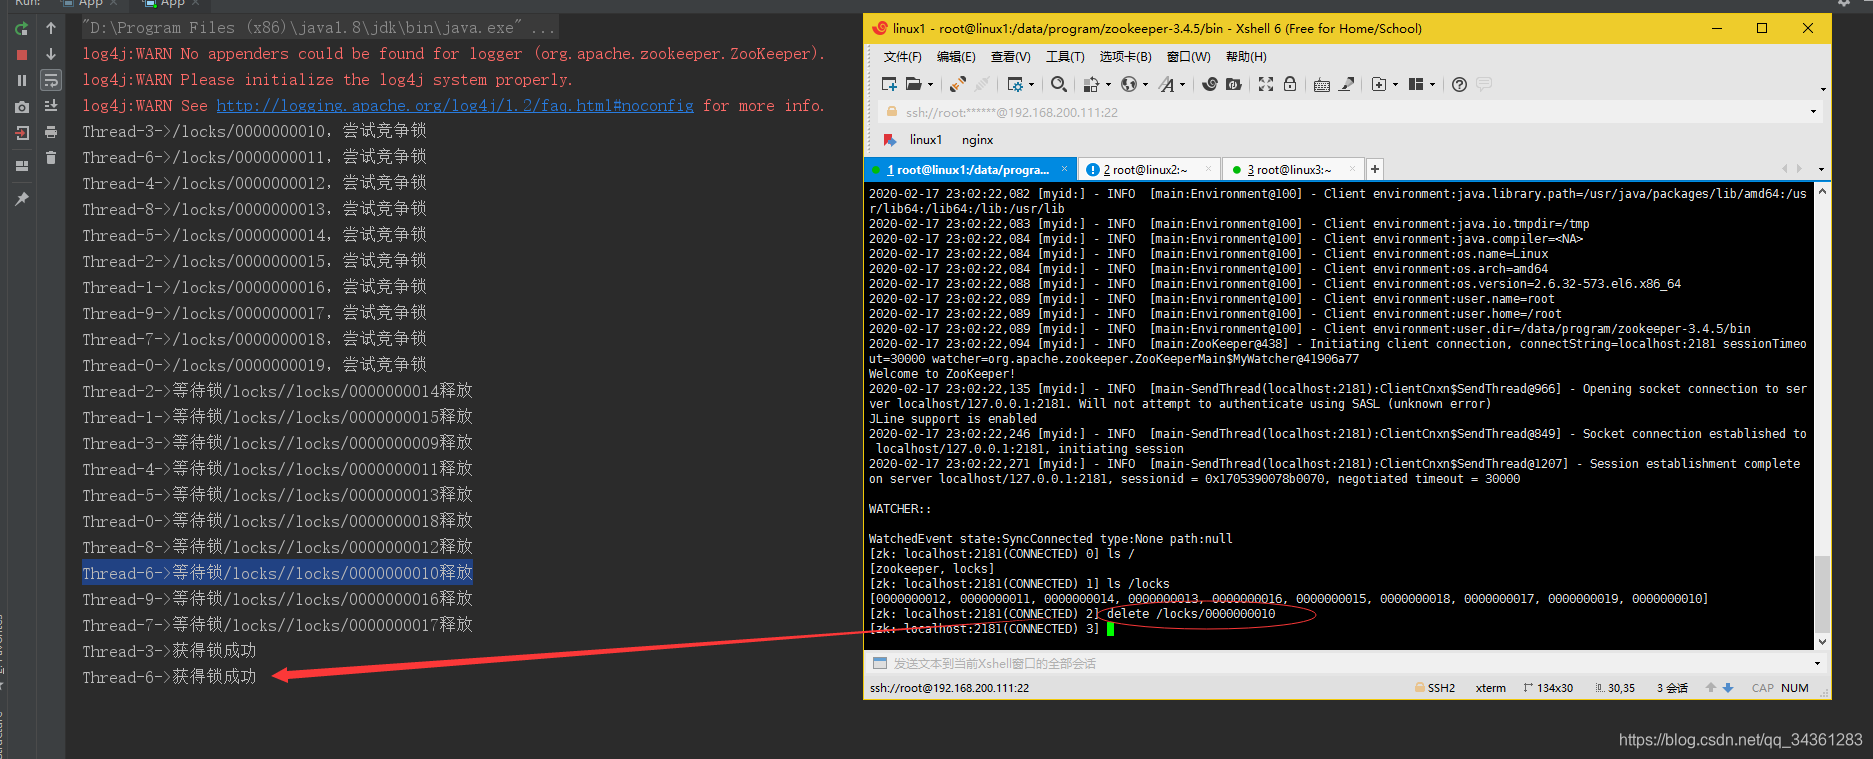
这就是分布式锁!
分析Curator实现分布式锁的原理
上述内容,我们通过zookeeper的API实现了分布式锁,实际上,zookeeper通过Curator封装了这个过程,只需要调用几个类即可完成
 public static void main(String[] args) {
        CuratorFramework curatorFramework=CuratorFrameworkFactory.builder().build();
        InterProcessMutex interProcessMutex=new InterProcessMutex(curatorFramework,"/locks");
        try {
            interProcessMutex.acquire();
        } catch (Exception e) {
            e.printStackTrace();
        }
    }
所以,Curator源码究竟是怎么实现的呢?
我们先看new InterProcessMutex都做了什么事情?
    InterProcessMutex(CuratorFramework client, String path, String lockName, int maxLeases, LockInternalsDriver driver)
    {
        basePath = PathUtils.validatePath(path);
        internals = new LockInternals(client, driver, path, lockName, maxLeases);
    }
首先在初始化的过程中构造了LockInternals,回过头来看我们调用的acquir()方法:
    @Override
    public void acquire() throws Exception
    {
        if ( !internalLock(-1, null) )
        {
            throw new IOException("Lost connection while trying to acquire lock: " + basePath);
        }
    }
通过internalLock获得锁:
这是一个可重入锁,
    private boolean internalLock(long time, TimeUnit unit) throws Exception{

        Thread currentThread = Thread.currentThread();

        LockData lockData = threadData.get(currentThread);
        if ( lockData != null ){
            // 获得锁了就递增
            lockData.lockCount.incrementAndGet();
            return true;
        }

		//否则尝试获得锁
        String lockPath = internals.attemptLock(time, unit, getLockNodeBytes());
        if ( lockPath != null ){
            LockData newLockData = new LockData(currentThread, lockPath);
            threadData.put(currentThread, newLockData);
            return true;
        }

        return false;
    }
看获得锁代码块:attemptLock
   String attemptLock(long time, TimeUnit unit, byte[] lockNodeBytes) throws Exception
    {
        final long      startMillis = System.currentTimeMillis();
        final Long      millisToWait = (unit != null) ? unit.toMillis(time) : null;
        final byte[]    localLockNodeBytes = (revocable.get() != null) ? new byte[0] : lockNodeBytes;
        int             retryCount = 0;

        String          ourPath = null;
        boolean         hasTheLock = false;
        boolean         isDone = false;
        while ( !isDone )
        {
            isDone = true;

            try
            {
            //创建锁
                ourPath = driver.createsTheLock(client, path, localLockNodeBytes);
                //
                hasTheLock = internalLockLoop(startMillis, millisToWait, ourPath);
            }
            catch ( KeeperException.NoNodeException e )
            {

                if ( client.getZookeeperClient().getRetryPolicy().allowRetry(retryCount++, System.currentTimeMillis() - startMillis, RetryLoop.getDefaultRetrySleeper()) )
                {
                    isDone = false;
                }
                else
                {
                    throw e;
                }
            }
        }

        if ( hasTheLock )
        {
            return ourPath;
        }

        return null;
    }
看一下这个创建锁的过程createsTheLock
 @Override
    public String createsTheLock(CuratorFramework client, String path, byte[] lockNodeBytes) throws Exception
    {
        String ourPath;
        if ( lockNodeBytes != null )
        {
        //创建一个临时有序节点
            ourPath = client.create().creatingParentContainersIfNeeded().withProtection().withMode(CreateMode.EPHEMERAL_SEQUENTIAL).forPath(path, lockNodeBytes);
        }
        else
        {
            ourPath = client.create().creatingParentContainersIfNeeded().withProtection().withMode(CreateMode.EPHEMERAL_SEQUENTIAL).forPath(path);
        }
        return ourPath;
    }
退出此方法,继续看获得锁代码块:attemptLock,在创建锁后internalLockLoop:
获得锁的超时机制
    private boolean internalLockLoop(long startMillis, Long millisToWait, String ourPath) throws Exception
    {
        boolean     haveTheLock = false;
        boolean     doDelete = false;
        try
        {
            if ( revocable.get() != null )
            {
                client.getData().usingWatcher(revocableWatcher).forPath(ourPath);
            }

//如果获得锁
            while ( (client.getState() == CuratorFrameworkState.STARTED) && !haveTheLock )
            {
            //获得当前子节点下所有的锁getSortedChildren
                List<String>        children = getSortedChildren();
                String              sequenceNodeName = ourPath.substring(basePath.length() + 1); // +1 to include the slash

                PredicateResults    predicateResults = driver.getsTheLock(client, children, sequenceNodeName, maxLeases);
                if ( predicateResults.getsTheLock() )
                {
                    haveTheLock = true;
                }
                else
                {
                    String  previousSequencePath = basePath + "/" + predicateResults.getPathToWatch();

                    synchronized(this)
                    {
                        try
                        {
      client.getData().usingWatcher(watcher).forPath(previousSequencePath);
                            if ( millisToWait != null )
                            {
                                millisToWait -= (System.currentTimeMillis() - startMillis);
                                startMillis = System.currentTimeMillis();
                                if ( millisToWait <= 0 )
                                {
                                    doDelete = true;    // timed out - delete our node
                                    break;
                                }

                                wait(millisToWait);
                            }
                            else
                            {
                                wait();
                            }
                        }
                        catch ( KeeperException.NoNodeException e )
                        {
                            // it has been deleted (i.e. lock released). Try to acquire again
                        }
                    }
                }
            }
        }
        catch ( Exception e )
        {
            ThreadUtils.checkInterrupted(e);
            doDelete = true;
            throw e;
        }
        finally
        {
            if ( doDelete )
            {
                deleteOurPath(ourPath);
            }
        }
        return haveTheLock;
    }
这里面有个方法:获得当前子节点下所有的锁getSortedChildren
    public static List<String> getSortedChildren(CuratorFramework client, String basePath, final String lockName, final LockInternalsSorter sorter) throws Exception
    {
        List<String> children = client.getChildren().forPath(basePath);
        List<String> sortedList = Lists.newArrayList(children);
        //排序
        Collections.sort
        (
            sortedList,
            new Comparator<String>()
            {
                @Override
                public int compare(String lhs, String rhs)
                {
                    return sorter.fixForSorting(lhs, lockName).compareTo(sorter.fixForSorting(rhs, lockName));
                }
            }
        );
        //返回有序的节点列表
        return sortedList;
    }
退出此方法,接下来看getsTheLock
    @Override
    public PredicateResults getsTheLock(CuratorFramework client, List<String> children, String sequenceNodeName, int maxLeases) throws Exception
    {
    //获取到在children里面的索引
        int             ourIndex = children.indexOf(sequenceNodeName);
        validateOurIndex(sequenceNodeName, ourIndex);
//是不是当前最小的序号
        boolean         getsTheLock = ourIndex < maxLeases;
        //监控上一个节点
        String          pathToWatch = getsTheLock ? null : children.get(ourIndex - maxLeases);

        return new PredicateResults(pathToWatch, getsTheLock);
    }
层层递进,拿得到最小的节点返回,实现分布式锁。
实现带注册中心的RPC框架
我们在《分布式专题-分布式通信框架RMI原理分析》实现了基于RMI的远程调用,接下来,我们通过以zookeeper注册中心的形式,实现带注册中心的RPC框架
首先在服务端:
我们先创建一个注册中心的接口:
public interface IRegisterCenter {

    /**
     * 注册服务名称和服务地址
     * @param serviceName
     * @param serviceAddress
     */
    void register(String serviceName,String serviceAddress);
}
注册中心实现类:
public class RegisterCenterImpl implements IRegisterCenter{

    private CuratorFramework curatorFramework;

    {
        curatorFramework=CuratorFrameworkFactory.builder().
                connectString(ZkConfig.CONNNECTION_STR).
                sessionTimeoutMs(4000).
                retryPolicy(new ExponentialBackoffRetry(1000,
                        10)).build();
        curatorFramework.start();
    }

    @Override
    public void register(String serviceName, String serviceAddress) {
        //注册相应的服务
        String servicePath=ZkConfig.ZK_REGISTER_PATH+"/"+serviceName;

        try {
            //判断 /registrys/product-service是否存在,不存在则创建
            if(curatorFramework.checkExists().forPath(servicePath)==null){
                curatorFramework.create().creatingParentsIfNeeded().
                        withMode(CreateMode.PERSISTENT).forPath(servicePath,"0".getBytes());
            }

            String addressPath=servicePath+"/"+serviceAddress;
            String rsNode=curatorFramework.create().withMode(CreateMode.EPHEMERAL).
                    forPath(addressPath,"0".getBytes());
            System.out.println("服务注册成功:"+rsNode);

        } catch (Exception e) {
            e.printStackTrace();
        }
    }
}
zkConfig:
public class ZkConfig {

    public final static String CONNNECTION_STR="192.168.200.111:2181,192.168.200.112:2181,192.168.200.113:2181";

    public final static String ZK_REGISTER_PATH="/registrys";


}
用于发布一个远程服务:
public class RpcServer {
    //创建一个线程池
    private static final ExecutorService executorService=Executors.newCachedThreadPool();

    //注册中心
    private IRegisterCenter registerCenter;
    //服务发布地址
    private String serviceAddress;

    // 存放服务名称和服务对象之间的关系
    Map<String,Object> handlerMap=new HashMap<>();

    public RpcServer(IRegisterCenter registerCenter, String serviceAddress) {
        this.registerCenter = registerCenter;
        this.serviceAddress = serviceAddress;
    }

    /**
     * 绑定服务名称和服务对象
     * @param services
     */
    public void bind(Object... services){
        for(Object service:services){
            RpcAnnotation annotation=service.getClass().getAnnotation(RpcAnnotation.class);
            String serviceName=annotation.value().getName();
            String version=annotation.version();
            if(version!=null&&!version.equals("")){
                serviceName=serviceName+"-"+version;
            }
            //绑定服务接口名称对应的服务
            handlerMap.put(serviceName,service);
        }
    }

    public void publisher(){
        ServerSocket serverSocket=null;
        try{
            String[] addrs=serviceAddress.split(":");
            //启动一个服务监听
            serverSocket=new ServerSocket(Integer.parseInt(addrs[1]));

            for(String interfaceName:handlerMap.keySet()){
                registerCenter.register(interfaceName,serviceAddress);
                System.out.println("注册服务成功:"+interfaceName+"->"+serviceAddress);
            }

            //循环监听
            while(true){
                //监听服务
                Socket socket=serverSocket.accept();
                //通过线程池去处理请求
                executorService.execute(new ProcessorHandler(socket,handlerMap));
            }
        } catch (IOException e) {
            e.printStackTrace();
        }finally {
            if(serverSocket!=null){
                try {
                    serverSocket.close();
                } catch (IOException e) {
                    e.printStackTrace();
                }
            }

        }
    }
}
注解:
@Target(ElementType.TYPE)
@Retention(RetentionPolicy.RUNTIME)
public @interface RpcAnnotation {

    /**
     * 对外发布的服务的接口地址
     * @return
     */
    Class<?> value();

    String version() default "";

}
注解注入:
首先是接口:
public interface IGpHello {

    String sayHello(String msg);
}
再来两个实现类:
@RpcAnnotation(IGpHello.class)
public class GpHelloImpl implements IGpHello{
    @Override
    public String sayHello(String msg) {
        return "I'm 8080 Node , "+msg;
    }
}
@RpcAnnotation(value = IGpHello.class)
public class GpHelloImpl2 implements IGpHello{
    @Override
    public String sayHello(String msg) {
        return "I'm 8081 node :"+msg;
    }
}
测试类:
public class ServerDemo {
public static void main(String[] args) throws IOException {
IGpHello iGpHello=new GpHelloImpl();
IGpHello iGpHello1=new GpHelloImpl2();
IRegisterCenter registerCenter=new RegisterCenterImpl();
RpcServer rpcServer=new RpcServer(registerCenter,"127.0.0.1:8080");
rpcServer.bind(iGpHello,iGpHello1);
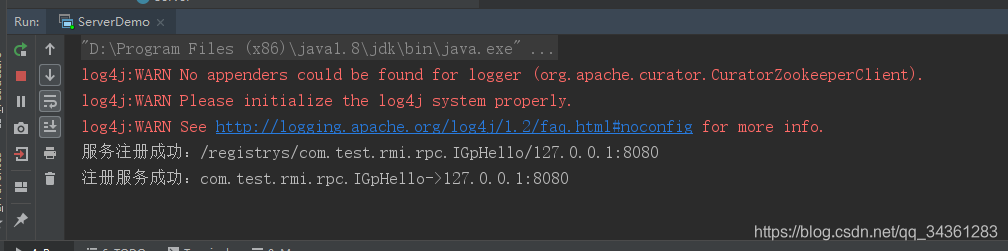
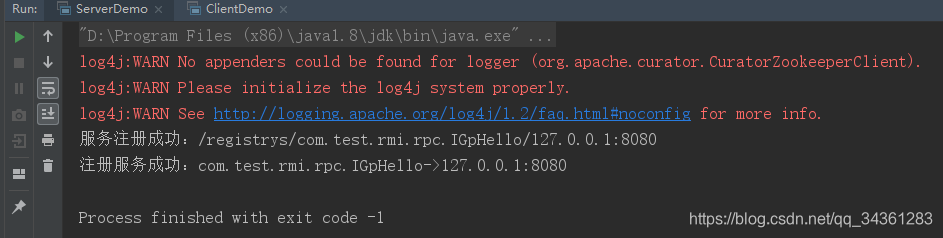
rpcServer.publisher();
System.in.read();
}
}
走你!

注册成功,接下来我们写客户端:
首先写一个发现服务的接口:
public interface IServiceDiscovery {

    /**
     * 根据请求的服务地址,获得对应的调用地址
     * @param serviceName
     * @return
     */
    String discover(String serviceName);
}
发现服务实现类:
public class ServiceDiscoveryImpl implements IServiceDiscovery{

    List<String> repos=new ArrayList<>();

    private String address;

    private CuratorFramework curatorFramework;

    public ServiceDiscoveryImpl(String address) {
        this.address = address;

        curatorFramework=CuratorFrameworkFactory.builder().
                connectString(address).
                sessionTimeoutMs(4000).
                retryPolicy(new ExponentialBackoffRetry(1000,
                        10)).build();
        curatorFramework.start();
    }

    @Override
    public String discover(String serviceName) {
        String path=ZkConfig.ZK_REGISTER_PATH+"/"+serviceName;
        try {
            repos=curatorFramework.getChildren().forPath(path);

        } catch (Exception e) {
            throw new RuntimeException("获取子节点异常:"+e);
        }
        //动态发现服务节点的变化
        registerWatcher(path);

        //负载均衡机制
        LoadBanalce loadBanalce=new RandomLoadBanalce();

        return loadBanalce.selectHost(repos); //返回调用的服务地址
    }

    private void registerWatcher(final String path){
        PathChildrenCache childrenCache=new PathChildrenCache
                (curatorFramework,path,true);

        PathChildrenCacheListener pathChildrenCacheListener=new PathChildrenCacheListener() {
            @Override
            public void childEvent(CuratorFramework curatorFramework, PathChildrenCacheEvent pathChildrenCacheEvent) throws Exception {
                repos=curatorFramework.getChildren().forPath(path);
            }
        };
        childrenCache.getListenable().addListener(pathChildrenCacheListener);
        try {
            childrenCache.start();
        } catch (Exception e) {
           throw new RuntimeException("注册PatchChild Watcher 异常"+e);
        }


    }
}
Zkconfig同server端,这里我就不写了
然后在客户端实现负载均衡机制
public interface LoadBanalce {

    String selectHost(List<String> repos);
}
抽象工厂:
public abstract class AbstractLoadBanance implements LoadBanalce{

    @Override
    public String selectHost(List<String> repos) {
        if(repos==null||repos.size()==0){
            return null;
        }
        if(repos.size()==1){
            return repos.get(0);
        }
        return doSelect(repos);
    }

    protected  abstract String doSelect(List<String> repos);
}
随机数算法-负载均衡实现类,当然还有很多算法,这里为了演示注册中心负载均衡,暂时不加:
public class RandomLoadBanalce extends AbstractLoadBanance{

    @Override
    protected String doSelect(List<String> repos) {
        int len=repos.size();
        Random random=new Random();
        return repos.get(random.nextInt(len));
    }
}
RemoteInvocationHandler发现地址:
public class RemoteInvocationHandler implements InvocationHandler {
    private IServiceDiscovery serviceDiscovery;

    private String version;

    public RemoteInvocationHandler(IServiceDiscovery serviceDiscovery,String version) {
        this.serviceDiscovery=serviceDiscovery;
        this.version=version;
    }

    @Override
    public Object invoke(Object proxy, Method method, Object[] args) throws Throwable {
        //组装请求
        RpcRequest request=new RpcRequest();
        request.setClassName(method.getDeclaringClass().getName());
        request.setMethodName(method.getName());
        request.setParameters(args);
        request.setVersion(version);

        //根据接口名称得到对应的服务地址
        String serviceAddress=serviceDiscovery.discover(request.getClassName());
        //通过tcp传输协议进行传输
        TCPTransport tcpTransport=new TCPTransport(serviceAddress);
        //发送请求
        return tcpTransport.send(request);
    }
}
测试类:
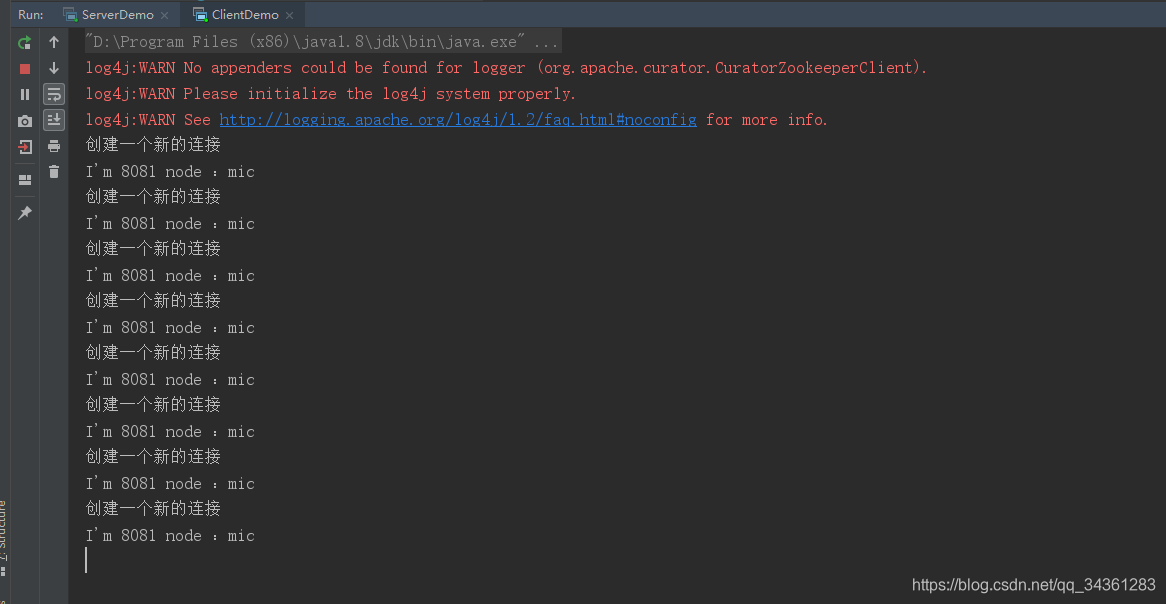
    public static void main(String[] args) throws InterruptedException {
        IServiceDiscovery serviceDiscovery=new
                ServiceDiscoveryImpl(ZkConfig.CONNNECTION_STR);

        RpcClientProxy rpcClientProxy=new RpcClientProxy(serviceDiscovery);

        for(int i=0;i<10;i++) {
            IGpHello hello = rpcClientProxy.clientProxy(IGpHello.class, null);
            System.out.println(hello.sayHello("mic"));
            Thread.sleep(1000);
        }
    }
走你!
那我们现在停到服务端试一下:
看客户端:
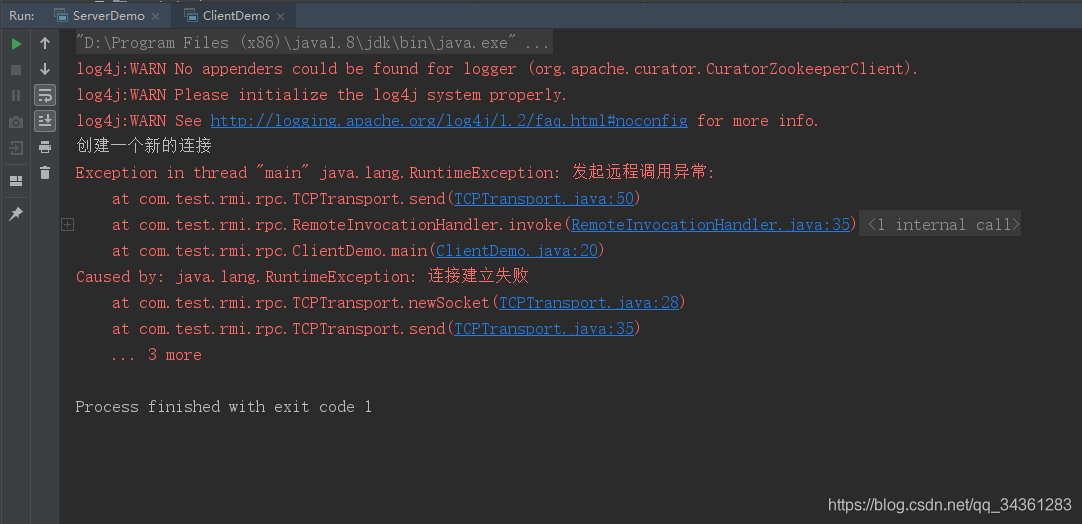
建立连接失败,说明注册中心没有问题!
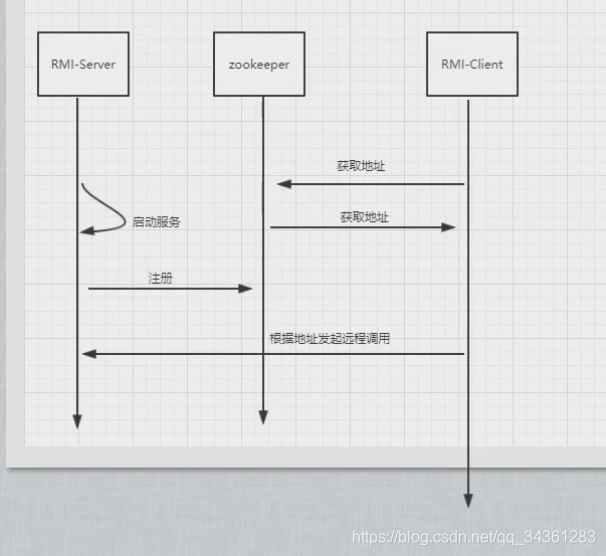
我们看一下基于zookeeper的注册中心时序图
后记
本小节代码地址:手写RPC框架
下一小节预告:
分布式服务治理
- 解开Dubbo的神秘面纱
- Dubbo常用配置
- Dubbo源码分析


 6189
6189


 被折叠的 条评论
为什么被折叠?
被折叠的 条评论
为什么被折叠?
 到【灌水乐园】发言


