


文章目录
该篇文章介绍使用Idea进行jenkins插件开发的步骤(只涉及基本环境搭建和调试)
Jenkins插件开发环境搭建
基础环境
| 软件名称 | 版本 | 备注 |
|---|---|---|
| Maven | Apache Maven 3.6.1 | |
| JAVA | 1.8.0_131 | |
| IDEA | 2019.2 |
配置maven的环境
修改maven目录下的settings.xml文件。
<settings>
  <pluginGroups>
    <pluginGroup>org.jenkins-ci.tools</pluginGroup>
  </pluginGroups>

  <profiles>
    <!-- Give access to Jenkins plugins -->
    <profile>
      <id>jenkins</id>
      <activation>
        <activeByDefault>true</activeByDefault> <!-- change this to false, if you don't like to have it on per default -->
      </activation>
      <repositories>
        <repository>
          <id>repo.jenkins-ci.org</id>
          <url>https://repo.jenkins-ci.org/public/</url>
        </repository>
      </repositories>
      <pluginRepositories>
        <pluginRepository>
          <id>repo.jenkins-ci.org</id>
          <url>https://repo.jenkins-ci.org/public/</url>
        </pluginRepository>
      </pluginRepositories>
    </profile>
  </profiles>
  <mirrors>
    <mirror>
      <id>repo.jenkins-ci.org</id>
      <url>https://repo.jenkins-ci.org/public/</url>
      <mirrorOf>m.g.o-public</mirrorOf>
    </mirror>
  </mirrors>
</settings>
使用maven的命令创建一个创建
使用如下命令创建一个新的插件
mvn org.jenkins-ci.tools:maven-hpi-plugin:create (或者 mvn hpi:create)
设置idea中运行插件的方式
mvn hpi:run -Djetty.port =8090
基础配置项:
-Djetty.port 设置端口
-DJENKINS_HOME 设置jenkins的数据目录
配置插件的pom.xml文件使得idea可以运行
设置pom.xml文件
如果引入高版本jenkins需要设置日志的版本
  <properties>
    <java.level>8</java.level>
    <jenkins.version>2.190.1</jenkins.version>
    <slf4jVersion>1.7.26</slf4jVersion>
  </properties>
完整的pom.xml如下
<?xml version="1.0" encoding="UTF-8"?>
<project xmlns="http://maven.apache.org/POM/4.0.0" xmlns:xsi="http://www.w3.org/2001/XMLSchema-instance"
         xsi:schemaLocation="http://maven.apache.org/POM/4.0.0 http://maven.apache.org/maven-v4_0_0.xsd">
  <modelVersion>4.0.0</modelVersion>

  <parent>
    <groupId>org.jenkins-ci.plugins</groupId>
    <artifactId>plugin</artifactId>
    <!-- Baseline Jenkins version you use to build and test the plugin. Users must have this version or newer to run. -->
    <version>3.50</version>
    <relativePath/>
  </parent>
  <groupId>com.szkingdom.cicd.plugins</groupId>
  <artifactId>wStatistics</artifactId>
  <version>1.0.0-RELEASE</version>
  <packaging>hpi</packaging>
  <name>TODO Plugin</name>
  <description>TODO</description>
  <url>https://wiki.jenkins-ci.org/display/JENKINS/TODO+Plugin</url>
  <licenses>
    <license>
      <name>MIT License</name>
      <url>http://opensource.org/licenses/MIT</url>
    </license>
  </licenses>

  <properties>
    <java.level>8</java.level>
    <jenkins.version>2.190.1</jenkins.version>
    <slf4jVersion>1.7.26</slf4jVersion>
    <workflow-support.version>3.2</workflow-support.version>
  </properties>

  <repositories>
    <repository>
      <id>repo.jenkins-ci.org</id>
      <url>http://repo.jenkins-ci.org/public/</url>
    </repository>
  </repositories>
  <pluginRepositories>
    <pluginRepository>
      <id>repo.jenkins-ci.org</id>
      <url>http://repo.jenkins-ci.org/public/</url>
    </pluginRepository>
  </pluginRepositories>
  <!-- If you want to depend on other plugins:
  <dependencies>
    <dependency>
      <groupId>org.jenkins-ci.plugins</groupId>
      <artifactId>credentials</artifactId>
      <version>1.9.4</version>
    </dependency>
  </dependencies>
  -->


  <dependencies>
  </dependencies>

</project>
访问的路径
继承Plugin类 可以通过/plugin/(插件名称)/ 访问
@ExportedBean
public class wPlugin extends Plugin {
    @WebMethod(name = "test")
    public HttpResponse doTest(){
        return HttpResponses.errorJSON("dd");
    }
}
启动与调试插件
使用Hpi启动
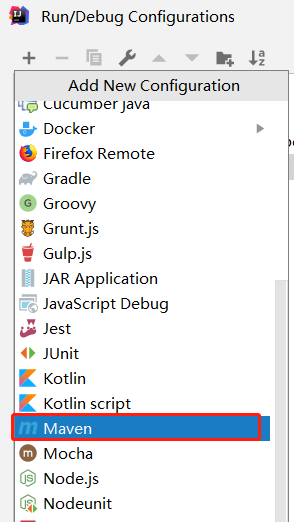
1、添加maven启动项

2、修改maven的配置项

Working directory: 工作目录,也就是插件的根目录
Command line: 命令行,mvn hpi:run -Djetty.port =8090
基础配置项:
-Djetty.port 设置端口
-DJENKINS_HOME 设置jenkins的数据目录
使用Tomcat启动
1、添加maven启动项
2、修改maven的配置项

Working directory: 工作目录,也就是插件的根目录
Command line: 命令行,-Dmaven.tomcat.path=/ -DJENKINS_HOME=E:\WS\CompanyWS\ktmp\kt\main\jenkins\release\cicd-data -Dmaven.tomcat.port=8087 -Dmaven.tomcat.uriEncoding=UTF-8 tomcat:run
基础配置项
-Dmaven.tomcat.path : 访问路径
-DJENKINS_HOME :jenkins数据目录
-Dmaven.tomcat.port :tomcat启动的端口
-Dmaven.tomcat.uriEncoding :tomcat请求编码格式
远程调式方式
1、将打包好的插件放在jenkins数据目录的plugins目录下
2、在使用以下的指令启动jenkins
# 在插件的目录启动
set MAVEN_OPTS=-agentlib:jdwp=transport=dt_socket,server=y,suspend=n,address=8095
mvn -Djetty.port=8090 hpi:run

# 或者在已有的jenkins.war目录下运行
java -Xdebug -Xrunjdwp:transport=dt_socket,server=y,suspend=n,address=8095 -Dfile.encoding=GBK -Dpermissive-script-security.enabled=true -jar jenkins.war --ajp13Port=-1 --httpPort=8787
3、IDEA中使用remote进行调试


 555
555


 被折叠的 条评论
为什么被折叠?
被折叠的 条评论
为什么被折叠?
 到【灌水乐园】发言


