


1.1 DataX
DataX 是阿里巴巴集团内被广泛使用的离线数据同步工具/平台,实现包括 MySQL、SQL Server、Oracle、PostgreSQL、HDFS、Hive、HBase、OTS、ODPS 等各种异构数据源之间高效的数据同步功能。
软件依赖:
Linux
JDK(1.8以上,推荐1.8)
Python(推荐Python2.7.X)
Apache Maven 3.x (Compile DataX)
安装DataX
wget https://datax-opensource.oss-cn-hangzhou.aliyuncs.com/202309/datax.tar.gz
[root@srs-server job]#  cd  /jesong/datax/bin
[root@MySQL-1 ~]# rm -rf /jesong/datax/plugin/*/._*
当未删除时,可能会输出:[/usr/local/datax/plugin/reader/._drdsreader/plugin.json] 不存在. 请检查您的配置文件.
检查安装是否完整
[root@srs-server bin]#python datax.py /usr/local/datax/job/job.json
###修改byte大小,2M
root@test19-server08 bin]# vim /jesong/datax/conf/core.json
        "transport": {
            "channel": {
                "class": "com.alibaba.datax.core.transport.channel.memory.MemoryChannel",
                "speed": {
                    "byte": 2000000,
                    "record": -1
                }
1.2 datax-web安装
maven安装
[root@test19-server08 jesong]# cd /jesong/
[root@test19-server08 jesong]# tar xvf apache-maven-3.8.6-bin.tar.gz
[root@test19-server08 jesong]# mv apache-maven-3.8.6/ maven-3.8.6/
[root@test19-server08 jesong]# cd maven-3.8.6/
[root@test19-server08 jesong]# vim conf/settings.xml
#添加仓库存储位置:
  <localRepository>/jesong/maven-3.8.6/repository</localRepository>
#修改镜像地址
    <mirror>
      <id>alimaven</id>
      <mirrorOf>central</mirrorOf>
      <name>aliyun maven</name>
      <url>http://maven.aliyun.com/nexus/content/groups/public/</url>
    </mirror>
  </mirrors>

[root@test19-server08 jesong]# vim /etc/profile
> export MAVEN_HOME=/jesong/maven-3.8.6
> export PATH=$PATH:$MAVEN_HOME/bin
[root@test19-server08 jesong]# source /etc/profile

GitHup地址:
https://github.com/WeiYe-Jing/datax-web/blob/master/doc/datax-web/datax-web-deploy.md

源码编译方式:
https://github.com/WeiYe-Jing/datax-web/archive/refs/tags/v-2.1.2.zip
[root@test19-server08 datax-web]#cd /jesong/datax-web
[root@test19-server08 datax-web]# unzip v-2.1.2.zip    此安装包20M
[root@test19-server08 datax-web]# cd datax-web-v-2.1.2
[root@test19-server08 datax-web-v-2.1.2]#  mvn clean install     ///执行大概10分钟
[root@test19-server08 datax-web-v-2.1.2]# cd build/

安装包在百度网盘
###解压后直接可用的安装包,如果有此安装包就不需要上面的操作了 ,
[root@test19-server08 build]# ls
datax-web-2.1.2.tar.gz    此安装包208M
[root@test19-server08 build]#  tar xvf datax-web-2.1.2.tar.gz -C /jesong/
[root@test19-server08 build]# cd /jesong/datax-web-2.1.2/bin
[root@test19-server08 build]# ./bin/install.sh --force
安装的机器上安装有mysql命令,在执行安装脚本的过程中则会出现以下提醒:
Scan out mysql command, so begin to initalize the database
Do you want to initalize database with sql: [{INSTALL_PATH}/bin/db/datax-web.sql]? (Y/N)y
Please input the db host(default: 127.0.0.1): 10.10.9.7
Please input the db port(default: 3306): 3366
Please input the db username(default: root): dbaadmin
Please input the db password(default: ): nfghrh!fgmbkGHN56nEFGF
Please input the db name(default: dataxweb)                  //回车

#接下来配置mysql地址,需确认
[root@test19-server08 build]# vim /jesong/datax-web-2.1.2/modules/datax-admin/conf/bootstrap.properties
#Database
DB_HOST=10.10.9.7
DB_PORT=3366
DB_USERNAME=dbaadmin
DB_PASSWORD=nfghrh!fgmbkGHN56nEFGF
DB_DATABASE=dataxweb

###配置邮件通知
[root@test19-server08 build]# vim /jesong/datax-web-2.1.2/modules/datax-admin/bin/env.properties
# mail account
MAIL_USERNAME=""
MAIL_PASSWORD=""

####配置datax的执行文件
[root@test19-server08 build]# vim /jesong/datax-web-2.1.2/modules/datax-executor/bin/env.properties
## PYTHON脚本执行位置
PYTHON_PATH=/jesong/datax/bin/datax.py

启动服务:
[root@test19-server08 build]# cd /jesong/datax-web-2.1.2/bin
./bin/start-all.sh

中途可能发生部分模块启动失败或者卡住,可以退出重复执行,如果需要改变某一模块服务端口号,则:
vi ./modules/{module_name}/bin/env.properties

找到SERVER_PORT配置项,改变它的值即可。 当然也可以单一地启动某一模块服务:
./bin/start.sh -m {module_name}

- 一键取消所有服务
./bin/stop-all.sh

当然也可以单一地停止某一模块服务:
./bin/stop.sh -m {module_name}

查看日志:
如果项目启动失败,请检查启动日志:modules/datax-admin/bin/console.out或者modules/datax-executor/bin/console.out

部署完成后,在浏览器中输入 http://ip:port/index.html 就可以访问对应的主界面(ip为datax-admin部署所在服务器ip,port为为datax-admin 指定的运行端口)
输入用户名 admin 密码 123456 就可以直接访问系统
web页面操作(忽略)
http://10.10.9.8:9527/index.html
admin/123456
文档地址:
https://github.com/WeiYe-Jing/datax-web/blob/master/doc/datax-web/increment-desc.md
增量写入ID:
建立好的任务进行增量配置
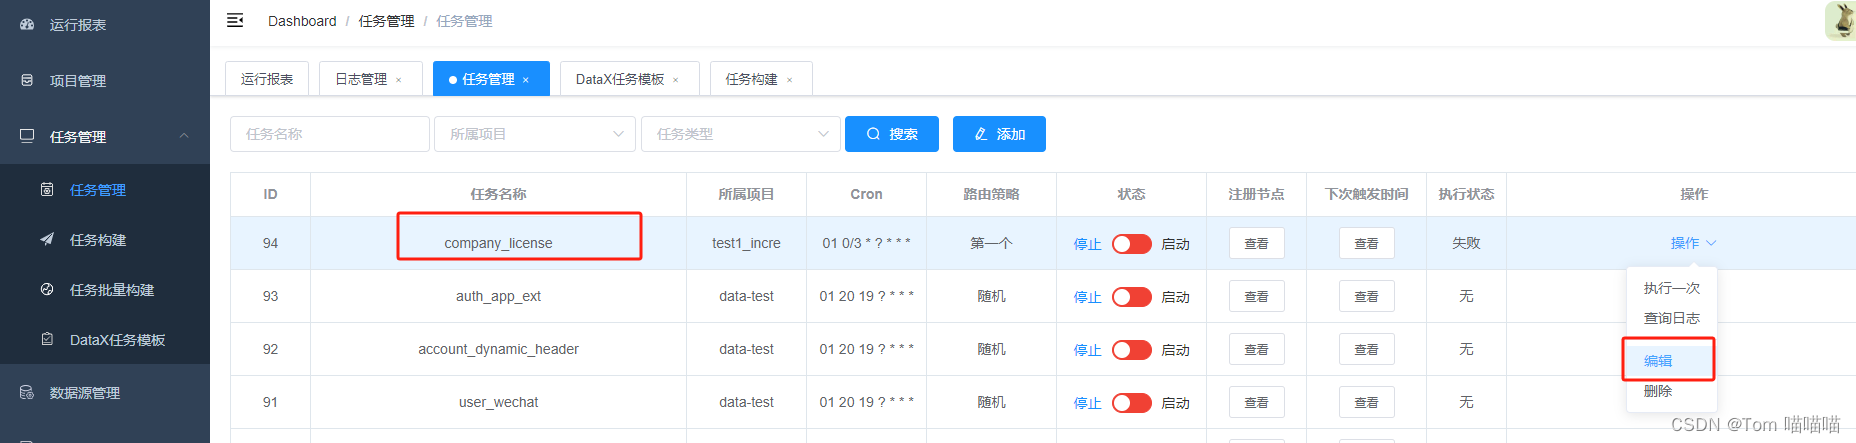
第一次的迁移增量主键开始为0,ID增量参数固定-DstartId='%s' -DendId='%s'
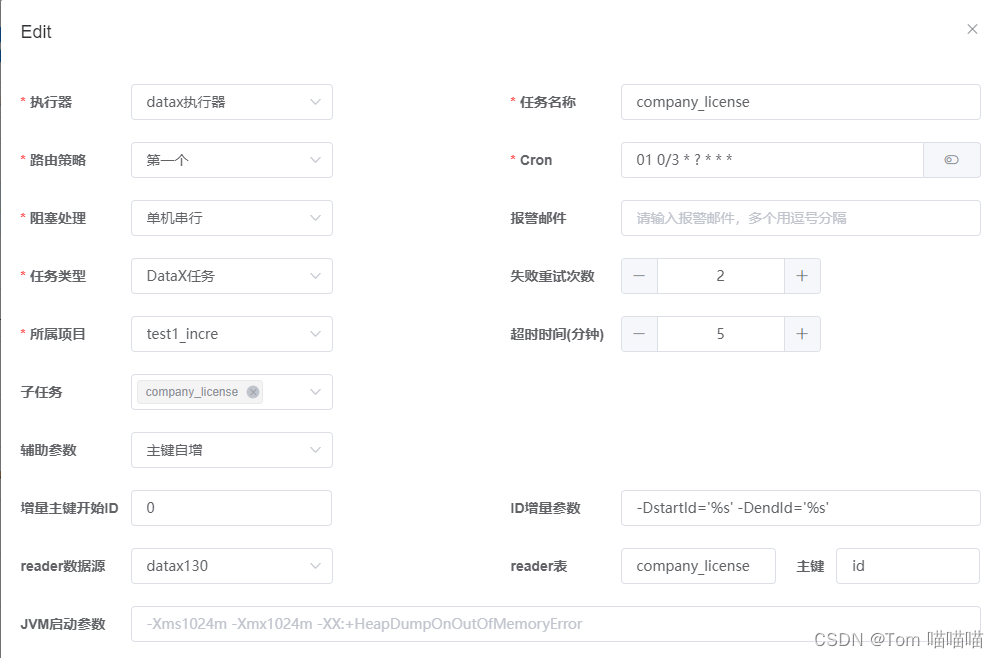
将之前的column、table删掉,添加红框内字段

id> ${startId} and id<= ${endId}

select * from company_license where id> '130227' and id<= '130228'

如果数据无新数据写入,到任务时间就会报主键冲突130228,因为一直在重复写入最后那条数据。(数据完整)
id>= ${startId} and id< ${endId}
select * from company_license where id>= '130227' and id< '130228'
如果数据无新数据写入,任务会一直轮训,但是会一直有一条数据不会同步。(数据一致会差一条数据130228)日期进行增量数据抽取 
1.任务类型选DataX任务
2.辅助参数选择时间自增
3.增量开始时间选择,即sql中查询时间的开始时间,用户使用此选项方便第一次的全量同步。第一次同步完成后,该时间被更新为上一次的任务触发时间,任务失败不更新。
4.增量时间字段,-DlastTime='%s' -DcurrentTime='%s' 先来解析下这段字符串
1.-D是DataX参数的标识符,必配
2.-D后面的lastTime和currentTime是DataX json中where条件的时间字段标识符,必须和json中的变量名称保持一致
3.='%s'是项目用来去替换时间的占位符,比配并且格式要完全一致
4.注意-DlastTime='%s'和-DcurrentTime='%s'中间有一个空格,空格必须保留并且是一个空格
5.时间格式,可以选择自己数据库中时间的格式,也可以通过json中配置sql时间转换函数来处理


{
  "job": {
    "setting": {
      "speed": {
        "channel": 16
      }
    },
    "content": [
      {
        "reader": {
          "name": "mysqlreader",
          "parameter": {
            "splitPk": "id",
            "username": "root",
            "password": "root",
            "column": [
              "*"

            ],
            "connection": [
              {

                "jdbcUrl": [
                  "jdbc:mysql://localhost:3306/test?characterEncoding=utf8"
                ],
				"querySql": [
        "select * from test_list where operationDate >= FROM_UNIXTIME(${lastTime}) and operationDate < FROM_UNIXTIME(${currentTime})"
                                ]
              }
            ]
          }
        },
        "writer": {
          "name": "mysqlwriter",
          "parameter": {

            "username": "root",
            "password": "123456",
            "column": [
              "*"
            ],
            "batchSize": "4096",
            "connection": [
              {
                "jdbcUrl": "jdbc:mysql://localhost:3307/test?characterEncoding=utf8",
                "table": [
                  "test_list"
                ]
              }
            ]
          }
        }
      }
    ]
  }
}


querySql解析
select * from test_list where operationDate >= ${lastTime} and operationDate < ${currentTime}

1.此处的关键点在${lastTime},${currentTime},${}是DataX动态参数的固定格式,lastTime,currentTime就是我们页面配置中 -DlastTime='%s' -DcurrentTime='%s'中的lastTime,currentTime,注意字段一定要一致。
2.如果任务配置页面,时间类型选择为时间戳但是数据库时间格式不是时间戳,例如是:2019-11-26 11:40:57 此时可以用FROM_UNIXTIME(${lastTime})进行转换。
select * from test_list where operationDate >= FROM_UNIXTIME(${lastTime}) and operationDate < FROM_UNIXTIME(${currentTime})
数据库技术交流群:


 2569
2569


 被折叠的 条评论
为什么被折叠?
被折叠的 条评论
为什么被折叠?
 到【灌水乐园】发言


