


 本文详细介绍了如何在Nginx中配置SSL证书以启用HTTPS,包括安装Nginx、配置SSL模块、设置SSL证书路径等步骤。同时,解决了在配置过程中遇到的错误提示,如HTTPS协议需要SSL支持、未知指令stream等问题,并分享了处理HTTP Status 400错误的经验。
最近在nginx中配置一个443端口
文章目录
一、安装nginx
首先得先安装个nginx
1、安装依赖包
	# 一键安装上面四个依赖
	[root@dex ~]#  yum -y install gcc zlib zlib-devel pcre-devel openssl openssl-devel
2、下载并解压nginx安装包
	# 创建一个文件夹
	[root@dex ~]#  cd /usr/local

	[root@dex local]#  mkdir nginx

	[root@dex local]#  cd nginx

	# 下载tar包
	[root@dex nginx]#  wget http://nginx.org/download/nginx-1.13.7.tar.gz

	# 解压 nginx 包
	[root@dex nginx]# tar -xvf nginx-1.13.7.tar.gz
手动下载nginx http://nginx.org/en/download.html
3、执行安装nginx
	#进入nginx目录
	[root@dex nginx]# cd nginx-1.13.7

	#执行编译命令
	[root@dex nginx-1.13.7]# ./configure

	#执行make命令
	[root@dex nginx-1.13.7]#  make

	#执行make install命令
	[root@dex nginx-1.13.7]# make install
【注意】如果出现如下错误src/os/unix/ngx_user.c:26:7: 错误:‘struct crypt_data’没有名为‘current_salt’的成员
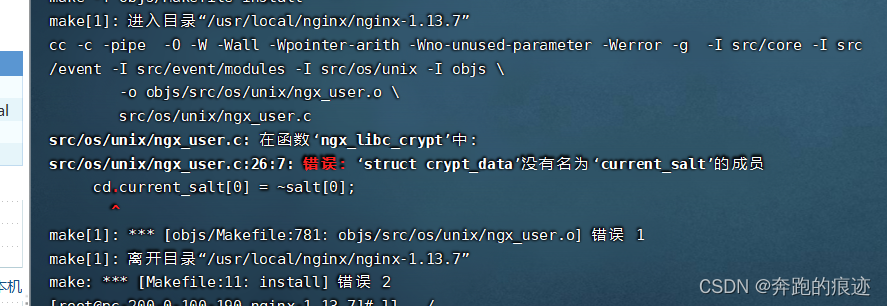
修改src/os/unix/ngx_user.c 文件注释掉 cd.current_salt[0] = ~salt[0];
vi /usr/local/nginx/nginx-1.13.7/src/os/unix/ngx_user.c
![注释掉cd.current_salt[0] = ~salt[0];](https://i-blog.csdnimg.cn/blog_migrate/38e54700f1599b7dc1c620481ea85ad7.png)
再执行make 又提示
![[-Werror=cast-function-type]异常](https://i-blog.csdnimg.cn/blog_migrate/a0ae87cb92d20e4f1d4da8c2ad947f5d.png)
提示**-Werror=cast-function-type]异常**
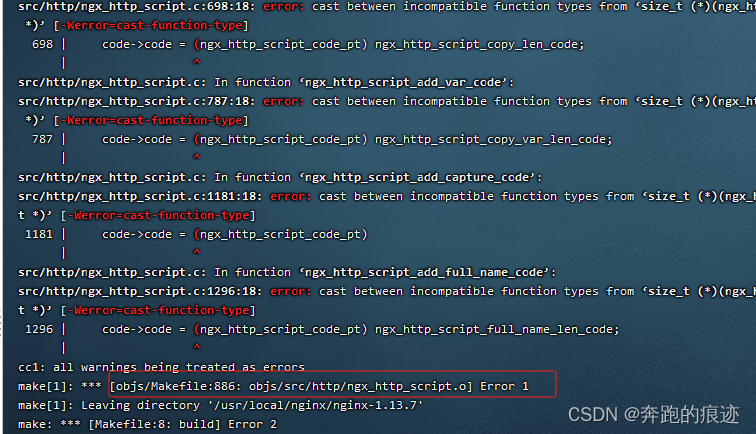
根据错误提示
make[1]: *** [objs/Makefile:886: objs/src/http/ngx_http_script.o] Error 1
vi objs/Makefile
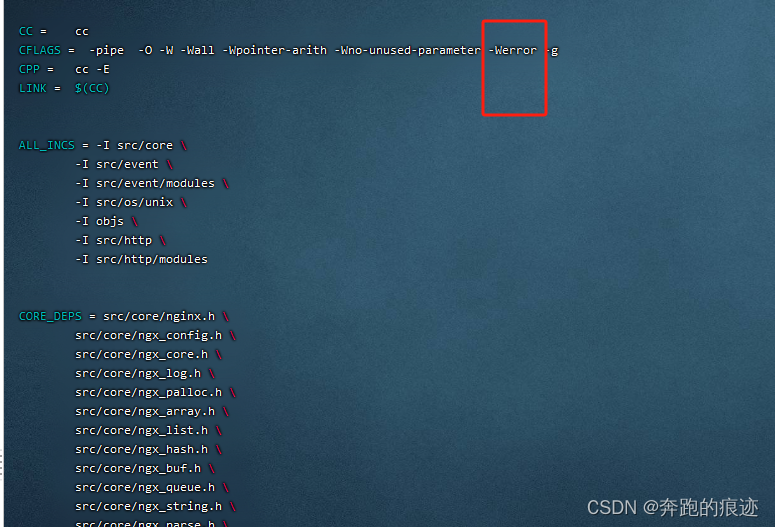
删除掉** -Werror **
4、配置nginx
	# 打开配置文件
	[root@dex ~]# vi /usr/local/nginx/conf/nginx.conf
5、启动nginx
[root@dex ~]#/usr/local/nginx/sbin/nginx
6、查看nginx进程
	[root@dex nginx-1.13.7]# ps -ef|grep nginx
	root     22988     1  0 Dec20 ?        00:00:00 nginx: master process /usr/local/nginx/sbin/nginx
	nobody   22989 22988  0 Dec20 ?        00:00:00 nginx: worker process
	root     23638 23598  0 09:06 pts/0    00:00:00 grep --color=auto nginx
	[root@dex nginx-1.13.7]#
二、下载ssl证书
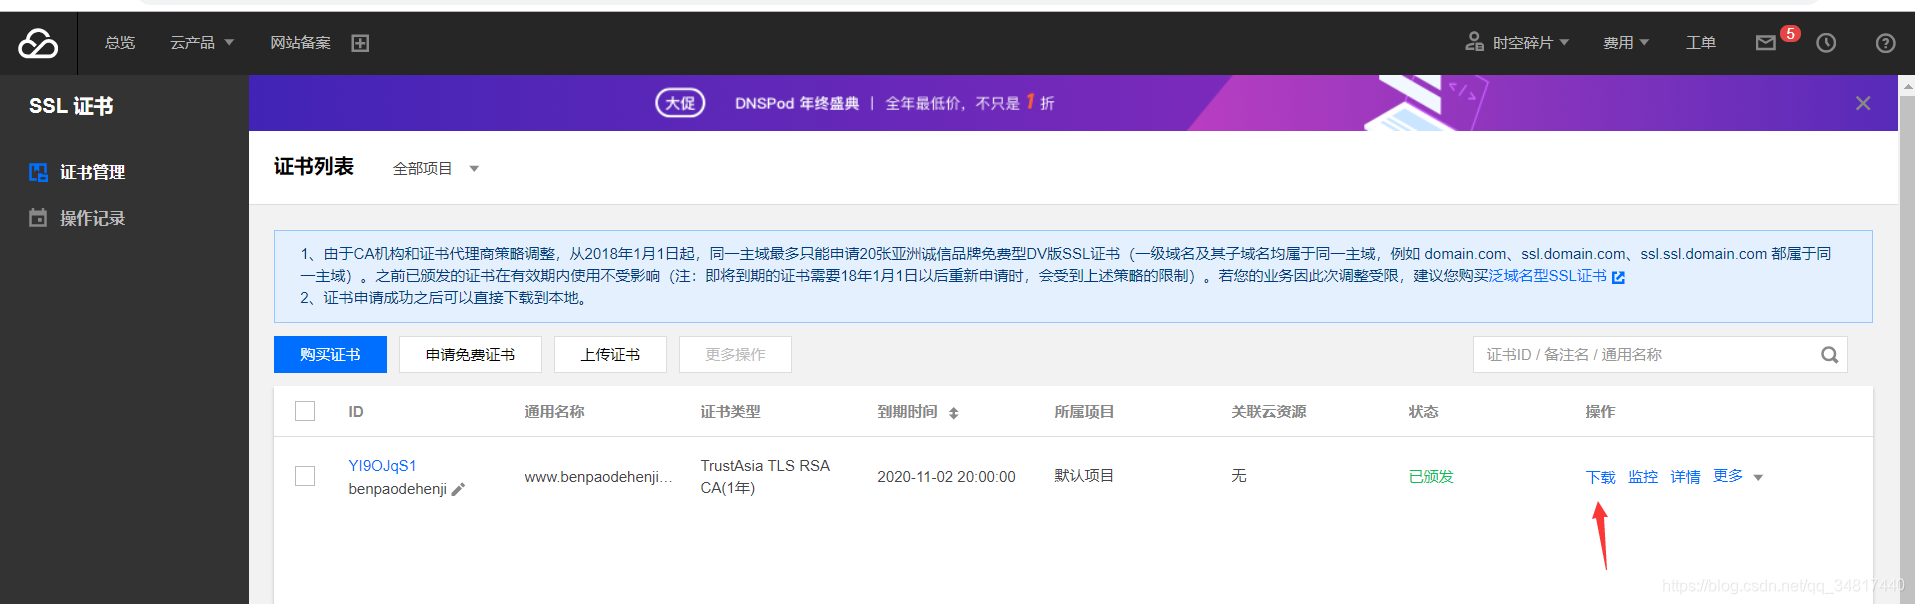
然后解压下载的 证书zip

会得到三个文件,我们打开nginx 的文件夹
三、配置ssl
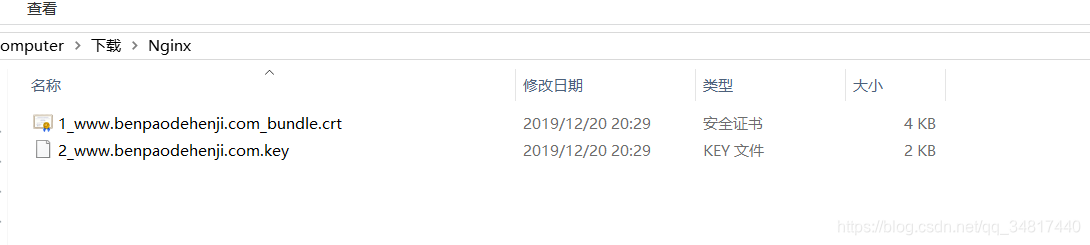
然后将这个两个文件上传到linux(我是上传到 /opt/sslCertificate/)目录下
	[root@dex ~]# ll /opt/sslCertificate/
	total 8
	-rw-r--r-- 1 root root 3733 Dec 20 21:25 1_www.benpaodehenji.com_bundle.crt
	-rw-r--r-- 1 root root 1704 Dec 20 21:25 2_www.benpaodehenji.com.key
ssl配置如下
    server {
        listen       443 ssl;
        server_name  www.benpaodehenji.com;

        ssl_certificate     /opt/sslCertificate/1_www.benpaodehenji.com_bundle.crt;
        ssl_certificate_key  /opt/sslCertificate/2_www.benpaodehenji.com.key;

        ssl_session_cache    shared:SSL:1m;
        ssl_session_timeout  5m;

        #ssl_ciphers  HIGH:!aNULL:!MD5;
        #ssl_prefer_server_ciphers  on;

        location / {
            root  /opt/html;
            index  index.html index.htm;
      }
        location /vueapp/ {
	    proxy_pass http://127.0.0.1:8191/;
       }

   }
然后监听80强制反向代理到https
    server {
        listen       80;
        server_name www.benpaodehenji.com ;
        #charset koi8-r;
        #access_log  logs/host.access.log  main;

	    rewrite ^(.*)$ https://${server_name}$1 permanent;
		location  / {
			proxy_pass https://benpaodehenji.com;
		}
}
配置完成后运行/usr/local/nginx/sbin/nginx -t 时提示 如下错误
	[root@dex sbin]# ./nginx -t
	nginx: [emerg] https protocol requires SSL support in /usr/local/nginx/conf/nginx.conf:50
	nginx: configuration file /usr/local/nginx/conf/nginx.conf test failed
这个是nginx 不支持 https,接下来得进入如下配置,让其支持ssl
四、配置nginx 支持ssl
1、首先cd /usr/local/nginx/nginx-1.13.7 然后执行如下命令
	[root@dex nginx-1.13.7]# ./configure --prefix=/usr/local/nginx --with-http_ssl_module --with-stream
	checking for OS
	 + Linux 3.10.0-957.21.3.el7.x86_64 x86_64
	checking for C compiler ... found
	 + using GNU C compiler
	 + gcc version: 4.8.5 20150623 (Red Hat 4.8.5-39) (GCC)
	.....省略
	  nginx http uwsgi temporary files: "uwsgi_temp"
	  nginx http scgi temporary files: "scgi_temp"
【注意】如果是ubuntun系统需要加上 --with-cc-opt="-Wno-error -Wno-deprecated-declarations"否则会有其他异常提示
如上这是在Ubuntu系统中make编译提示的,执行如下配置操作然后再执行make 就行了
./configure --prefix=/usr/local/nginx --with-http_ssl_module --with-stream --with-cc-opt="-Wno-error -Wno-deprecated-declarations"
2、 重新make
接下来依次执行 make 与 make install 即可
 [root@VM-4-17-centos nginx]#  make
  [root@VM-4-17-centos nginx]# make install
3、 在执行一下nginx -t 进行验证
然后验证是否配置成功
[root@VM-4-17-centos nginx]# /usr/local/nginx/sbin/nginx -t
nginx: the configuration file /usr/local/nginx/conf/nginx.conf syntax is ok
nginx: configuration file /usr/local/nginx/conf/nginx.conf test is successful
看见successful 证明已经成功了
3、启动nginx
	[root@dex nginx-1.13.7]# /usr/local/nginx/sbin/nginx

	# 看看哈进程
	[root@dex nginx-1.13.7]# ps -ef|grep nginx
	root     22988     1  0 22:45 ?        00:00:00 nginx: master process /usr/local/nginx/sbin/nginx
	nobody   22989 22988  0 22:45 ?        00:00:00 nginx: worker process
	root     23014 20315  0 22:51 pts/0    00:00:00 grep --color=auto nginx
	[root@dex nginx-1.13.7]#
综上所述,到此我们所有的nginx 安装与ssl 配置已经全部完成,现在可以开心的使用了…。
在此顺便 – 记录下其他nginx相关命令
	./nginx 启动nginx
	./nginx -s quit:此方式停止步骤是待nginx进程处理任务完毕进行停止。
	./nginx -s stop:此方式相当于先查出nginx进程id再使用kill命令强制杀掉进程。

	./nginx -s reload 重新加载配置
linux 进程查询、 关闭
	[root@dex sbin]# ps -ef|grep nginx
	nobody    6715 14665  0 Dec12 ?        00:00:00 nginx: worker process
	root     14665     1  0 Nov03 ?        00:00:00 nginx: master process /usr/local/nginx/sbin/nginx -c /usr/local/nginx/conf/nginx.conf
	root     22551 20315  0 22:06 pts/0    00:00:00 grep --color=auto nginx
	[root@dex sbin]# kill -9 14665
	[root@dex sbin]# kill -9 22551
	-bash: kill: (22551) - No such process
window查询进程和关闭
1、 按键盘win+r 打开运行界面,输入cmd,确定,打开管理员界
2 、输入netstat -aon | findstr :80
查找端口占用情况,找到提示占用的端口号0.0.0.0:80,

3 、 输入tasklist|findstr “14024”
找到14024端口对应的服务名称

需要使用管理员kill
taskkill /F /pid 14024

五、 HTTP Status 400 – Bad Request
今日使用nginx 代理端口,发布了一个springboot 项目
先试用了一个 upstream 进行负载均衡
http{
   upstream hehubackserver_test {
        server 127.0.0.1:8532 max_fails=1 fail_timeout=10s;
    }
}
然后使用了 ssl 进行转发
http{
  server {
        listen       443 ssl;
         location /hhBk_test/ {
                proxy_pass http://hehubackserver_test/;
                proxy_connect_timeout 1;
        }
  }
}
在测试的时候发现一致是400
HTTP Status 400 – Bad Request
不管怎么修改都是一样,甚至重新打包发布,任然不能解决该问题
后来看日志发现
The host [hehubackserver_test] is not valid
才幡然大悟,原来是这个名字中下划线的错误!!!
于是将这个名字中的下划线去掉
修改后访问正常了,最后的nginx 是这样的
http{
   upstream hehubackserverTest {
        server 127.0.0.1:8532 max_fails=1 fail_timeout=10s;
    }
  server {
        listen       443 ssl;
         location /hhBk_test/ {
                proxy_pass http://hehubackserverTest/;
                proxy_connect_timeout 1;
        }
  }
}
原本以为我已经很了解她了,看来是自己想多了…


 775
775

 被折叠的 条评论
为什么被折叠?
被折叠的 条评论
为什么被折叠?
 到【灌水乐园】发言


