Android kotlin (仿微博App分享界面)用RecyclerView(androidx+BRVAH3.0.6+AnyLayer)实现从底部弹出菜单栏对话框功能

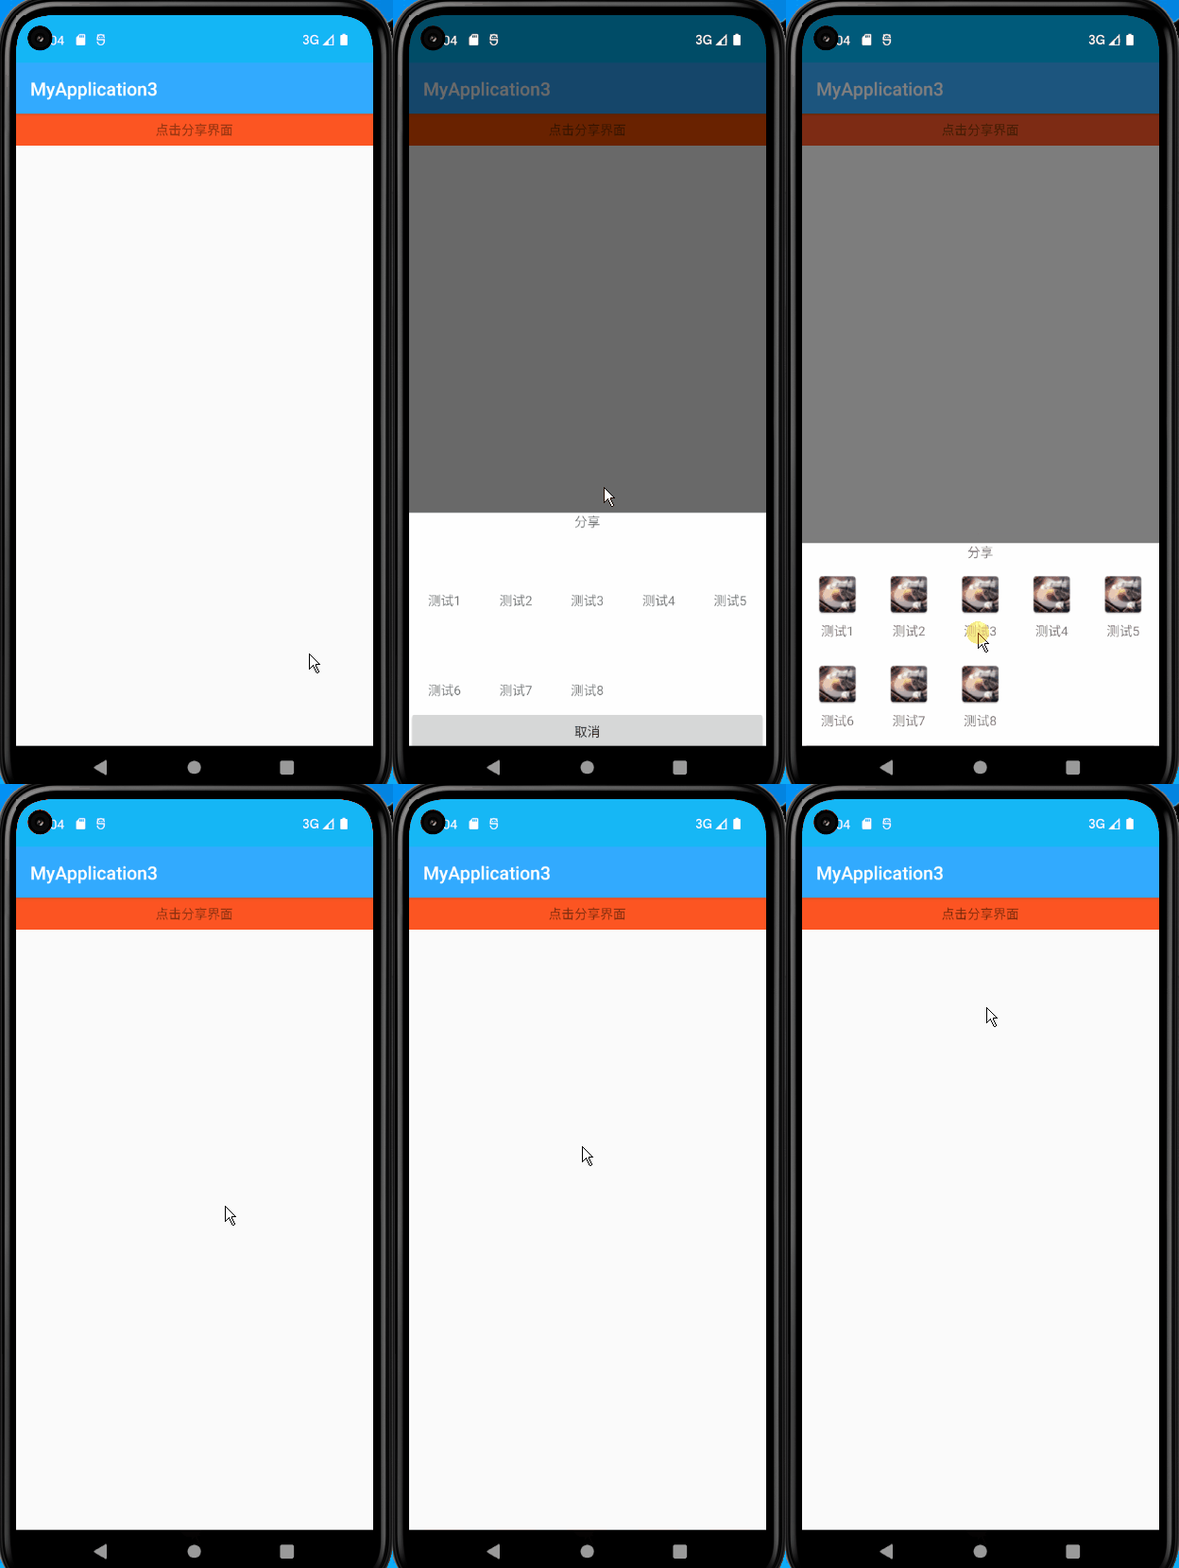
一、实现效果

二、引入依赖

appbuild.gradle在添加以下代码
1、图片加载 coil:implementation("io.coil-kt:coil:1.2.1")
2、框架弹窗AnyLayer(github官网):implementation "com.github.goweii:AnyLayer:4.1.4-androidx"
3、implementation 'com.github.CymChad:BaseRecyclerViewAdapterHelper:3.0.6',这个里面带的适配器,直接调用就即可

BaseRecyclerViewAdapterHelper简称BRVAH

Android SDK是否支持BaseRecyclerViewAdapterHelper:3.0.6
android compileSdkVersion 29
android compileSdkVersion 30
android compileSdkVersion 31
android compileSdkVersion 32
android compileSdkVersion 33

这依赖包还需要得到要添加,在Projectbuild.gradle在添加以下代码,不添加就不行

allprojects {
    repositories {
        ...
        maven { url "https://jitpack.io" }//加上
    }
}

三、实现源码

1、适配器

RvAdapter.kt

package com.example.myapplication3.adapter

import coil.load
import com.chad.library.adapter.base.BaseQuickAdapter
import com.chad.library.adapter.base.viewholder.BaseViewHolder
import com.example.myapplication3.R
import kotlinx.android.synthetic.main.rv_item.view.*

class RvAdapter(layoutResId: Int = R.layout.rv_item) :
    BaseQuickAdapter<MutableMap<Int, String>, BaseViewHolder>(layoutResId){
    override fun convert(helper: BaseViewHolder, item: MutableMap<Int, String>) {
        helper.itemView.run {
            item.entries.forEach {

                iv_item.load(it.key)
                tv_item.text = it.value
            }
        }
    }
}

布局rv_item.xml

<?xml version="1.0" encoding="utf-8"?>
<RelativeLayout xmlns:android="http://schemas.android.com/apk/res/android"
    android:layout_width="match_parent"
    android:layout_height="wrap_content">

    <RelativeLayout
        android:id="@+id/rl"
        android:layout_width="match_parent"
        android:layout_height="wrap_content"
        android:background="#FFFFFF"
        android:padding="12.0dip">

        <ImageView
            android:id="@+id/iv_item"
            android:layout_width="50dp"
            android:layout_height="50dp"
            android:layout_centerHorizontal="true"
            android:src="@mipmap/ic_c" />

        <TextView
            android:id="@+id/tv_item"
            android:layout_width="wrap_content"
            android:layout_height="wrap_content"
            android:layout_below="@id/iv_item"
            android:layout_centerHorizontal="true"
            android:layout_marginTop="5.0dip"
            android:text="测试"
            android:textSize="@dimen/sp_14" />
    </RelativeLayout>
</RelativeLayout>

在这里插入图片描述
这图标样式这是在android studio系统中添加资源图标

3、框架弹窗AnyLayer

DialogUtil.kt

package com.example.myapplication3.util

import android.view.Gravity
import android.widget.TextView
import androidx.recyclerview.widget.RecyclerView
import com.example.myapplication3.R
import com.example.myapplication3.adapter.RvAdapter
import per.goweii.anylayer.AnyLayer
import per.goweii.anylayer.widget.SwipeLayout


/**
 * 底部弹出的菜单栏对话框
 */
fun showRadioListDialog(
    textView: TextView,
    list: MutableList<MutableMap<Int, String>>,
    callback: OnResultCallback<Int>
) {
    val dialog = AnyLayer.dialog()
        .contentView(R.layout.recyclerview)
        .backgroundDimDefault()
        .gravity(Gravity.BOTTOM)
        .swipeDismiss(SwipeLayout.Direction.BOTTOM)
        .onClickToDismiss(R.id.button)

    dialog.show()

    val mAdapter = RvAdapter().apply {

        setOnItemClickListener { adapter, view, position ->
//            val dict = getItem(position)
            callback.onResult(position)
        }
    }
//    dialog.getView<TextView>(R.id.title)?.text = title?:""
    dialog.getView<RecyclerView>(R.id.mRecyclerView)?.apply {
        adapter = mAdapter
        mAdapter.setList(list)
//        val pos = mAdapter.getSelectIndex()
//        scrollToPosition(pos)
    }
}

interface OnResultCallback<T> {
    fun onResult(t: T)
}

recyclerview.xml

<?xml version="1.0" encoding="utf-8"?>
<LinearLayout xmlns:android="http://schemas.android.com/apk/res/android"
    xmlns:app="http://schemas.android.com/apk/res-auto"
    xmlns:tools="http://schemas.android.com/tools"
    android:layout_width="match_parent"
    android:layout_height="wrap_content"
    android:background="#FFFFFF"
    android:orientation="vertical">

    <TextView
        android:layout_width="match_parent"
        android:layout_height="wrap_content"
        android:gravity="center"
        android:text="分享"/>

    <androidx.recyclerview.widget.RecyclerView
        android:id="@+id/mRecyclerView"
        android:layout_width="wrap_content"
        android:layout_height="wrap_content"
        app:layoutManager="androidx.recyclerview.widget.GridLayoutManager"
        app:spanCount="5"
        tools:listitem="@layout/rv_item"/>

    <Button
        android:id="@+id/button"
        android:layout_width="match_parent"
        android:layout_height="wrap_content"
        android:text="取消"/>
</LinearLayout>

在这里插入图片描述
注意:recyclerview.xml布局的android:layout_height="wrap_content"不要设置为match_parent,自己试试就知道

5、实现视图

MainActivity.kt

package com.example.myapplication3

import android.os.Bundle
import androidx.appcompat.app.AppCompatActivity
import com.example.myapplication3.util.OnResultCallback
import com.example.myapplication3.util.showRadioListDialog
import kotlinx.android.synthetic.main.activity_main.*

class MainActivity : AppCompatActivity()
{

    var list = mutableListOf<MutableMap<Int, String>>()

    override fun onCreate(savedInstanceState: Bundle?) {
        super.onCreate(savedInstanceState)
        setContentView(R.layout.activity_main)
        initView()
        initData()
    }

    private fun initView() {
        textView.setOnClickListener {
        
			//从底部弹出菜单栏对话框
            showRadioListDialog(textView,list,object : OnResultCallback<Int> {
                override fun onResult(position: Int) {

                }
            })
        }
    }

    private fun initData() {
        setResources()
    }

    private fun setResources() {
        disableGroup()
    }

    private fun disableGroup() {
    
    	//图标和它对应的标签
        addItemResources(R.mipmap.ic_c, getString(R.string.test1))//<string name="test1">测试1</string>
        addItemResources(R.mipmap.ic_c, getString(R.string.test2))//<string name="test1">测试2</string>
        addItemResources(R.mipmap.ic_c, getString(R.string.test3))//<string name="test1">测试3</string>
        addItemResources(R.mipmap.ic_c, getString(R.string.test4))//<string name="test1">测试4</string>
        addItemResources(R.mipmap.ic_c, getString(R.string.test5))//<string name="test1">测试5</string>
        addItemResources(R.mipmap.ic_c, getString(R.string.test6))//<string name="test1">测试6</string>
        addItemResources(R.mipmap.ic_c, getString(R.string.test7))//<string name="test1">测试7</string>
        addItemResources(R.mipmap.ic_c, getString(R.string.test8))//<string name="test1">测试8</string>
    }

    private fun addItemResources(key: Int, value: String) {
        list.add(mutableMapOf<Int, String>(key to value))
    }
}
  • 0
    点赞
  • 2
    收藏
    觉得还不错? 一键收藏
  • 打赏
    打赏
  • 0
    评论
好的,这里是 Kotlin 代码示例: ```kotlin import androidx.compose.foundation.Text import androidx.compose.foundation.gestures.detectTapGestures import androidx.compose.foundation.gestures.detectTapOrLongPress import androidx.compose.foundation.gestures.waitForUpOrCancellation import androidx.compose.foundation.layout.Row import androidx.compose.material.AlertDialog import androidx.compose.material.Button import androidx.compose.material.MaterialTheme import androidx.compose.runtime.Composable import androidx.compose.runtime.mutableStateOf import androidx.compose.runtime.remember import androidx.compose.ui.Modifier import androidx.compose.ui.graphics.Color import androidx.compose.ui.input.pointer.pointerInput import androidx.compose.ui.platform.LocalContext import androidx.compose.ui.platform.LocalDensity import androidx.compose.ui.text.AnnotatedString import androidx.compose.ui.text.SpanStyle import androidx.compose.ui.text.buildAnnotatedString import androidx.compose.ui.text.style.TextAlign import androidx.compose.ui.unit.dp import androidx.core.content.ContextCompat import androidx.core.content.ContextCompat.getSystemService import android.content.ClipboardManager import android.content.Context import android.content.Intent import android.provider.Settings import android.text.style.ClickableSpan import android.view.ContextMenu import android.view.MenuItem import android.view.View import android.widget.TextView @Composable fun LongPressText( text: String, modifier: Modifier = Modifier ) { val context = LocalContext.current val showDialog = remember { mutableStateOf(false) } val dialogText = remember { mutableStateOf("") } fun onContextMenuClick(item: MenuItem): Boolean { when (item.itemId) { 1 -> { val clipboard = getSystemService(context, ClipboardManager::class.java) val clip = android.content.ClipData.newPlainText("text", dialogText.value) clipboard?.setPrimaryClip(clip) } 2 -> { val sendIntent: Intent = Intent().apply { action = Intent.ACTION_SEND putExtra(Intent.EXTRA_TEXT, dialogText.value) type = "text/plain" } val shareIntent = Intent.createChooser(sendIntent, null) context.startActivity(shareIntent) } } return true } fun showContextMenu(view: View, text: String) { val menu = ContextMenu(context) menu.apply { add(0, 1, 0, "复制") add(0, 2, 0, "分享") setOnMenuItemClickListener { item -> onContextMenuClick(item) } } dialogText.value = text menu.show(view, view.x.toInt(), view.y.toInt()) } val annotatedString = buildAnnotatedString { append(text) addStyle(SpanStyle(color = Color.Blue), 0, text.length) addStringAnnotations(text = text, onClick = { showDialog.value = true dialogText.value = it }, onLongClick = { val textView = TextView(context) textView.text = it textView.setTextColor(ContextCompat.getColor(context, android.R.color.black)) textView.textSize = 18f showContextMenu(textView, it) }) } Text(text = annotatedString, modifier = modifier) if (showDialog.value) { AlertDialog( onDismissRequest = { showDialog.value = false }, title = { Text(text = "闲聊") }, text = { Text(text = dialogText.value) }, confirmButton = { Button(onClick = { showDialog.value = false }) { Text("关闭") } } ) } } fun AnnotatedString.Builder.addStringAnnotations(text: String, onClick: (String) -> Unit, onLongClick: (String) -> Unit) { var startIndex = 0 var spaceIndex = text.indexOf(' ', startIndex) var newestSpace = text.length while (startIndex < text.length) { if (spaceIndex == -1) spaceIndex = text.length val word = text.substring(startIndex, spaceIndex) val clickableSpan = object : ClickableSpan() { override fun onClick(widget: View) { onClick(word) } } val range = startIndex until spaceIndex val color = Color.Blue val style = SpanStyle(color = color, textDecoration = null, background = null, fontWeight = null) addStyle(style, range.start, range.end) addStringAnnotation("Clickable", word, clickableSpan) if (word != text.substring(range.last)) { addStringAnnotation("LongClickable", word, LongClickableSpan(onLongClick)) } newestSpace = spaceIndex startIndex = spaceIndex + 1 spaceIndex = text.indexOf(' ', startIndex) } } class LongClickableSpan(private val onClick: (String) -> Unit) : ClickableSpan() { override fun updateDrawState(ds: TextPaint) { ds.color = ds.linkColor // changes the actual color of the clickable text, default is link blue ds.isUnderlineText = false // removes the underline from the clickable text, default is true } override fun onClick(view: View) { val textView = TextView(view.context) textView.text = (view as TextView).text textView.setTextColor(view.textColors) textView.textSize = view.textSize onClick(view.text.toString()) } } ``` 这个示例代码演示了如何使用 Jetpack Compose 开发 Android 应用程序,并在 Text 组件中实现长按文本菜单。这里使用了 AnnotatedString 组件来渲染富文本和交互元素。同时,示例代码还包含了一个 AlertDialog 组件,用于显示与用户的交互过程。请注意,示例代码中的一些实现细节可能需要根据您的特定需求进行修改。
评论
添加红包

请填写红包祝福语或标题

红包个数最小为10个

红包金额最低5元

当前余额3.43前往充值 >
需支付:10.00
成就一亿技术人!
领取后你会自动成为博主和红包主的粉丝 规则
hope_wisdom
发出的红包

打赏作者

彬sir哥

你的鼓励将是我创作的最大动力

¥1 ¥2 ¥4 ¥6 ¥10 ¥20
扫码支付:¥1
获取中
扫码支付

您的余额不足,请更换扫码支付或充值

打赏作者

实付
使用余额支付
点击重新获取
扫码支付
钱包余额 0

抵扣说明:

1.余额是钱包充值的虚拟货币,按照1:1的比例进行支付金额的抵扣。
2.余额无法直接购买下载,可以购买VIP、付费专栏及课程。

余额充值