


0.需求
后端定时向前端看板推送数据,每10秒或者30秒推送一次。
1.前言知识
HTTP协议是一个应用层协议,它的特点是无状态、无连接和单向的。在HTTP协议中,客户端发起请求,服务器则对请求进行响应。这种请求-响应的模式意味着服务器无法主动向客户端发送消息。
这种单向通信的缺点在于,如果服务器有持续的状态变化,客户端要获取这些变化就很困难。为了解决这个问题,许多Web应用采用了一种叫做长轮询的技术,即频繁地通过AJAX和XML发起异步请求来检查服务器的状态。但这种方式效率较低,也很浪费资源,因为需要不断地建立连接或保持连接打开。
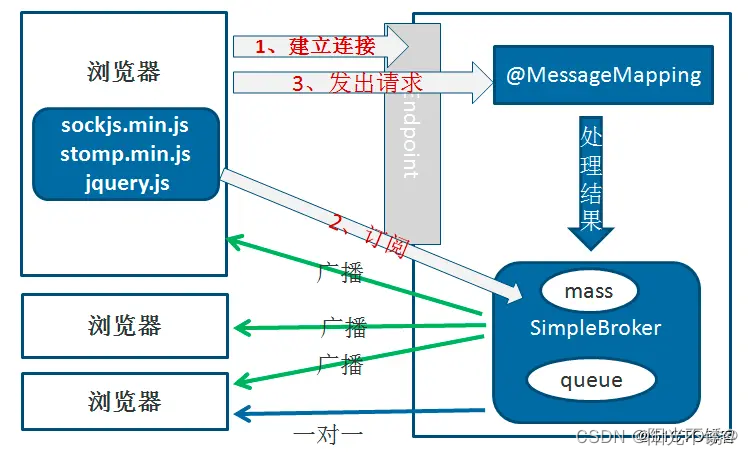
而WebSocket则是一种不同的通信协议,它允许客户端和服务器之间进行全双工通信。这意味着无论是客户端还是服务器,都可以随时通过已经建立的连接向对方发送数据。而且,WebSocket只需要建立一次连接就可以保持通信状态,无需频繁地建立和断开连接,因此效率大大提高。
总结一下,HTTP协议虽然广泛应用,但因其单向通信的局限性,在处理服务器状态持续变化的情况时显得力不从心。而WebSocket协议则通过全双工通信的方式,有效地解决了这个问题,提高了通信效率。
2.后端实现
2.1不带参数
2.1.1添加依赖:
 <dependency>
        <groupId>org.springframework.boot</groupId>
        <artifactId>spring-boot-starter-websocket</artifactId>
    </dependency>
2.1.2websocket配置:
/**
 * 通过EnableWebSocketMessageBroker
 * 开启使用STOMP协议来传输基于代理(message broker)的消息,
 * 此时浏览器支持使用@MessageMapping 就像支持@RequestMapping一样。
 */

//WebSocket的配置类
@Configuration
//开启对WebSocket的支持
@EnableWebSocketMessageBroker
public class WebSocketConfig implements WebSocketMessageBrokerConfigurer{

    /**
     * 注册stomp的端点
     * 注册一个STOMP协议的节点,并映射到指定的URL
     */
    @Override
    public void registerStompEndpoints(StompEndpointRegistry registry) {
        //endPoint 注册协议节点,并映射指定的URl点对点-用
        //注册一个名字为"/endpointSocket" 的endpoint,并指定 SockJS协议。
        //允许使用socketJs方式访问,访问点为webSocketServer,允许跨域
        //连接前缀
          //配置客户端尝试连接地址
        //广播
        registry.addEndpoint("/ws/public").setAllowedOriginPatterns("*").withSockJS();
        //点对点
        registry.addEndpoint("/ws/private").setAllowedOriginPatterns("*").withSockJS();
    }


   /**
     * 通过实现 WebSocketMessageBrokerConfigurer 接口和加上 @EnableWebSocketMessageBroker 来进行 stomp 的配置与注解扫描。
     * 其中覆盖 registerStompEndpoints 方法来设置暴露的 stomp 的路径,其它一些跨域、客户端之类的设置。
     * 覆盖 configureMessageBroker 方法来进行节点的配置。
     * 其中 enableSimpleBroker配置的广播节点,也就是服务端发送消息,客户端订阅就能接收消息的节点。
     * 覆盖setApplicationDestinationPrefixes方法,设置客户端向服务端发送消息的节点。
     * 覆盖 setUserDestinationPrefix 方法,设置一对一通信的节点。
     *
     * @param registry
     */
    @Override
    public void configureMessageBroker(MessageBrokerRegistry registry) {
        //配置消息代理,即设置广播节点
        registry.enableSimpleBroker("/topic","/user");
        //后端接收的主题前缀,即客户端向服务端发送消息需要有/client前缀
//        registry.setApplicationDestinationPrefixes("/client");
        //指定用户发送(一对一)的前缀/user/
//        registry.setUserDestinationPrefix("/user/");
    }
}
2.1.3后端代码
一个是订阅请求接口,一个是关闭定时任务接口。这段代码实现了一个基于WebSocket的定时推送机制,允许通过发送WebSocket消息来启动和关闭定时任务,从而每30秒推送一次数据。
  /**
     * 看板接口-不带参数
     * 定时任务(每30秒推送一次)
     */
    @MessageMapping("/backend/produce/summary")
    public void pushProduceSummary() {
        log.info("服务端接收到消息: {}");
        if (scheduledTask.get("pushProduceSummary") == null) {
            ScheduledFuture<?> future = executorService.scheduleAtFixedRate(() -> {
                ProgressVO progressVO = progressSummaryService.summary();
                String destination = "/topic/backend/produce/summary";
                template.convertAndSend(destination, progressVO);
                log.info("已推送信息,每30秒推送一次:{}");
            }, 1, 30, TimeUnit.SECONDS);
            scheduledTask.put("pushProduceSummary", future);
        } else {
            log.info("定时任务已开始!");
        }

    }
/**
* 关闭/backend/produce/summary接口的定时任务
*
* @author weiq
*/
@MessageMapping("/close/backend/produce/summary")
public void cancelPushProduceSummary() {
scheduledTask.forEach((StringKey, future) -> {
if (future != null && !future.isCancelled() && StringKey.equals("pushProduceSummary")) {
// 清除定时任务的引用
scheduledTask.remove("pushProduceSummary");
boolean cancel = future.cancel(true);
if (cancel) {
log.info("已关闭定时任务Key={}",StringKey);
}else{
log.info("失败关闭定时任务Key={}",StringKey);
}
}
});
}2.2带参数
一个是订阅请求接口,一个是关闭定时任务接口。
- 当客户端向
/backend/produce/runEfficiency/{startTime}/{endTime}这个 WebSocket 地址发送消息时,pushProduceRunEfficiency方法会被调用。 - 这个方法会检查是否已有一个定时任务在运行。如果没有,它会创建一个新的定时任务,该任务会每30秒从
runEfficiencyService获取运行效率数据,并通过 WebSocket 发送到指定的主题(destination)。 - 前端(或任何监听该主题的 WebSocket 客户端)需要事先订阅这个主题,以便能够接收后端发送的数据。
 /**
     * (看板)
     *定时任务(每30秒推送一次)
     * @param startTime
     * @param endTime
     */
    @MessageMapping("/backend/produce/runEfficiency/{startTime}/{endTime}")
    public void pushProduceRunEfficiency(@DestinationVariable Long startTime, @DestinationVariable Long endTime) {
        log.info("服务端接收到消息: startTime={},endTime={}", startTime, endTime);
        if (scheduledTask.get("pushProduceRunEfficiency") == null) {
            ScheduledFuture<?> future = executorService.scheduleAtFixedRate(() -> {
                List<RunVO> runVOList = runEfficiencyService.run(startTime, endTime);
                String destination = "/topic/backend/produce/runEfficiency" + "/" + startTime + "/" + endTime;
                template.convertAndSend(destination, runVOList);
                log.info("已推送信息,每30秒推送一次:{}");
            }, 1, 30, TimeUnit.SECONDS);
            scheduledTask.put("pushProduceRunEfficiency", future);
        }else{
            log.info("定时任务已开启!");
        }

    }
    /**
     * 关闭/backend/produce/runEfficiency/{startTime}/{endTime}接口的定时任务
     *
     * @author weiq
     */
    @MessageMapping("/close/backend/produce/runEfficiency")
    public void cancelPushProduceRunEfficiency() {
        scheduledTask.forEach((StringKey, future) -> {
            if (future != null && !future.isCancelled() && StringKey.equals("pushProduceRunEfficiency")) {
                // 清除定时任务的引用
                scheduledTask.remove("pushProduceRunEfficiency");
                boolean cancel = future.cancel(true);
                if (cancel) {
                    log.info("已关闭定时任务Key={}",StringKey);
                } else {
                    log.info("失败定时任务Key={}",StringKey);
                }
            }
        });
    }
3.前端验证
<!DOCTYPE html>
<html lang="en">
<head>
    <meta charset="UTF-8">
    <title>Title</title>
    <script src="https://cdn.bootcss.com/sockjs-client/1.1.4/sockjs.min.js"></script>
    <script src="https://cdn.bootcss.com/stomp.js/2.3.3/stomp.min.js"></script>
    <script src="https://code.jquery.com/jquery-3.2.0.min.js"
            integrity="sha256-JAW99MJVpJBGcbzEuXk4Az05s/XyDdBomFqNlM3ic+I=" crossorigin="anonymous"></script>

    <script type="text/javascript">
        var stompClient = null;

        function setConnected(connected) {
            document.getElementById("connect").disabled = connected;
            document.getElementById("disconnect").disabled = !connected;
            $("#response").html();
        }

        function connect() {
            console.log("开始连接吧")
            var socket = new SockJS("http://localhost:8501/ws/public");
            stompClient = Stomp.over(socket);
            stompClient.connect({}, function (frame) {
                setConnected(true);
                console.log('Connected: ' + frame);
                //前端连接完成后,开始订阅主题
                // stompClient.subscribe('/topic/all', function (response) {
                stompClient.subscribe('/topic/backend/produce/summary', function (response) {
                    var responseData = document.getElementById('responseData');
                    var p = document.createElement('p');
                    p.style.wordWrap = 'break-word';
                    p.appendChild(document.createTextNode(response.body));
                    responseData.appendChild(p);
                });
            }, {});
        }

        function disconnect() {
            if (stompClient != null) {
                stompClient.disconnect();
            }
            setConnected(false);
            console.log("Disconnected");
        }

        //请求地址,向WebSocket 地址发送消息
        function sendMsg() {
            var content = document.getElementById('content').value;
            // stompClient.send("/all", {}, JSON.stringify({'content': content}));
            stompClient.send("/backend/produce/summary", {}, JSON.stringify({'content': content }));
        }
        //关闭WebSocket 请求的定时任务
        function sendMsg1() {
            var content = document.getElementById('content').value;
            // stompClient.send("/all", {}, JSON.stringify({'content': content}));
            stompClient.send("/close/backend/produce/summary", {}, JSON.stringify({'content': content }));
        }
        // function sendMsg1() {
        //     var content = document.getElementById('content').value;
        //     // stompClient.send("/all", {}, JSON.stringify({'content': content}));
        //     stompClient.send("/close/scene/stepActualTime/128", {}, JSON.stringify({'content': content }));
        // }
        //
        // function sendMsg2() {
        //     var content = document.getElementById('content').value;
        //     // stompClient.send("/all", {}, JSON.stringify({'content': content}));
        //     stompClient.send("/close/scene/stepActualTime/219", {}, JSON.stringify({'content': content }));
        // }
    </script>
</head>

<body notallow="disconnect()">
<noscript>
    <h2 style="color: #ff0000">
        Seems your browser doesn't support Javascript! Websocket relies on Javascript being
        enabled. Please enable
        Javascript and reload this page!
    </h2>
</noscript>
<div>
    <div>
        <labal>连接广播频道</labal>
        <button id="connect" onclick="connect()">Connect</button>
        <labal>取消连接</labal>
        <button id="disconnect" disabled="disabled" onclick="disconnect()">Disconnect</button>
    </div>

    <div id="conversationDiv">
        <labal>广播消息</labal>
        <input type="text" id="content"/>
        <button id="sendMsg" onclick="sendMsg();">Send</button>

    </div>
    <div id="conversationDiv1">
        <labal>广播消息1</labal>
        <input type="text" id="content1"/>
        <button id="sendMsg1" onclick="sendMsg1();">Send</button>

    </div>

<!--    <div id="conversationDiv2">-->
<!--        <labal>广播消息2</labal>-->
<!--        <input type="text" id="content2"/>-->
<!--        <button id="sendMsg2" onclick="sendMsg2();">Send</button>-->

<!--    </div>-->

    <div>
        <labal>接收到的消息:</labal>
        <p id="responseData"></p>
    </div>
</div>

</body>
</html>
后端启动,打开HTML测试页面,可看到运行结果!


 5706
5706


 被折叠的 条评论
为什么被折叠?
被折叠的 条评论
为什么被折叠?
 到【灌水乐园】发言


