


人眼看到的流畅画面,大概是40帧到60帧左右,最佳的fps(画面每秒传输帧数)60fps左右。
android系统通过VSYNC信号触发对UI进行渲染,间隔是16ms。也就是说1000ms(1秒)显示60帧,那么看到的画面将是流畅的,但这也需要程序逻辑在16ms中执行完。
那为什么会造成卡顿呢?无非就是VSYNC每16ms触发对UI的渲染和重绘,而渲染或者绘制在16ms内没有完成,这就造成了掉帧。当前该绘制的UI被没完成绘制UI阻塞。
比如:一次绘制要17ms,那么16ms系统发出VSYNC信号时无法绘制,该帧被掉弃,等待下次信号才开始绘制,导致16*2ms内完成绘制表示同一帧。
,
既然说到UI渲染,android系统已经提供了工具检UI渲染时间的工具,开发者模式-GPU呈现模式分析(这是我在红米4上找到的),然后就会显示这样一些条形图,蓝色代表display list的时间,红色代表opengl渲染display list所需要的时间黄色代表cpu等待gpu处理的时间,中间绿色横线代表vsync时间16ms,需要尽量把这些条形图控制在这条绿线之下,
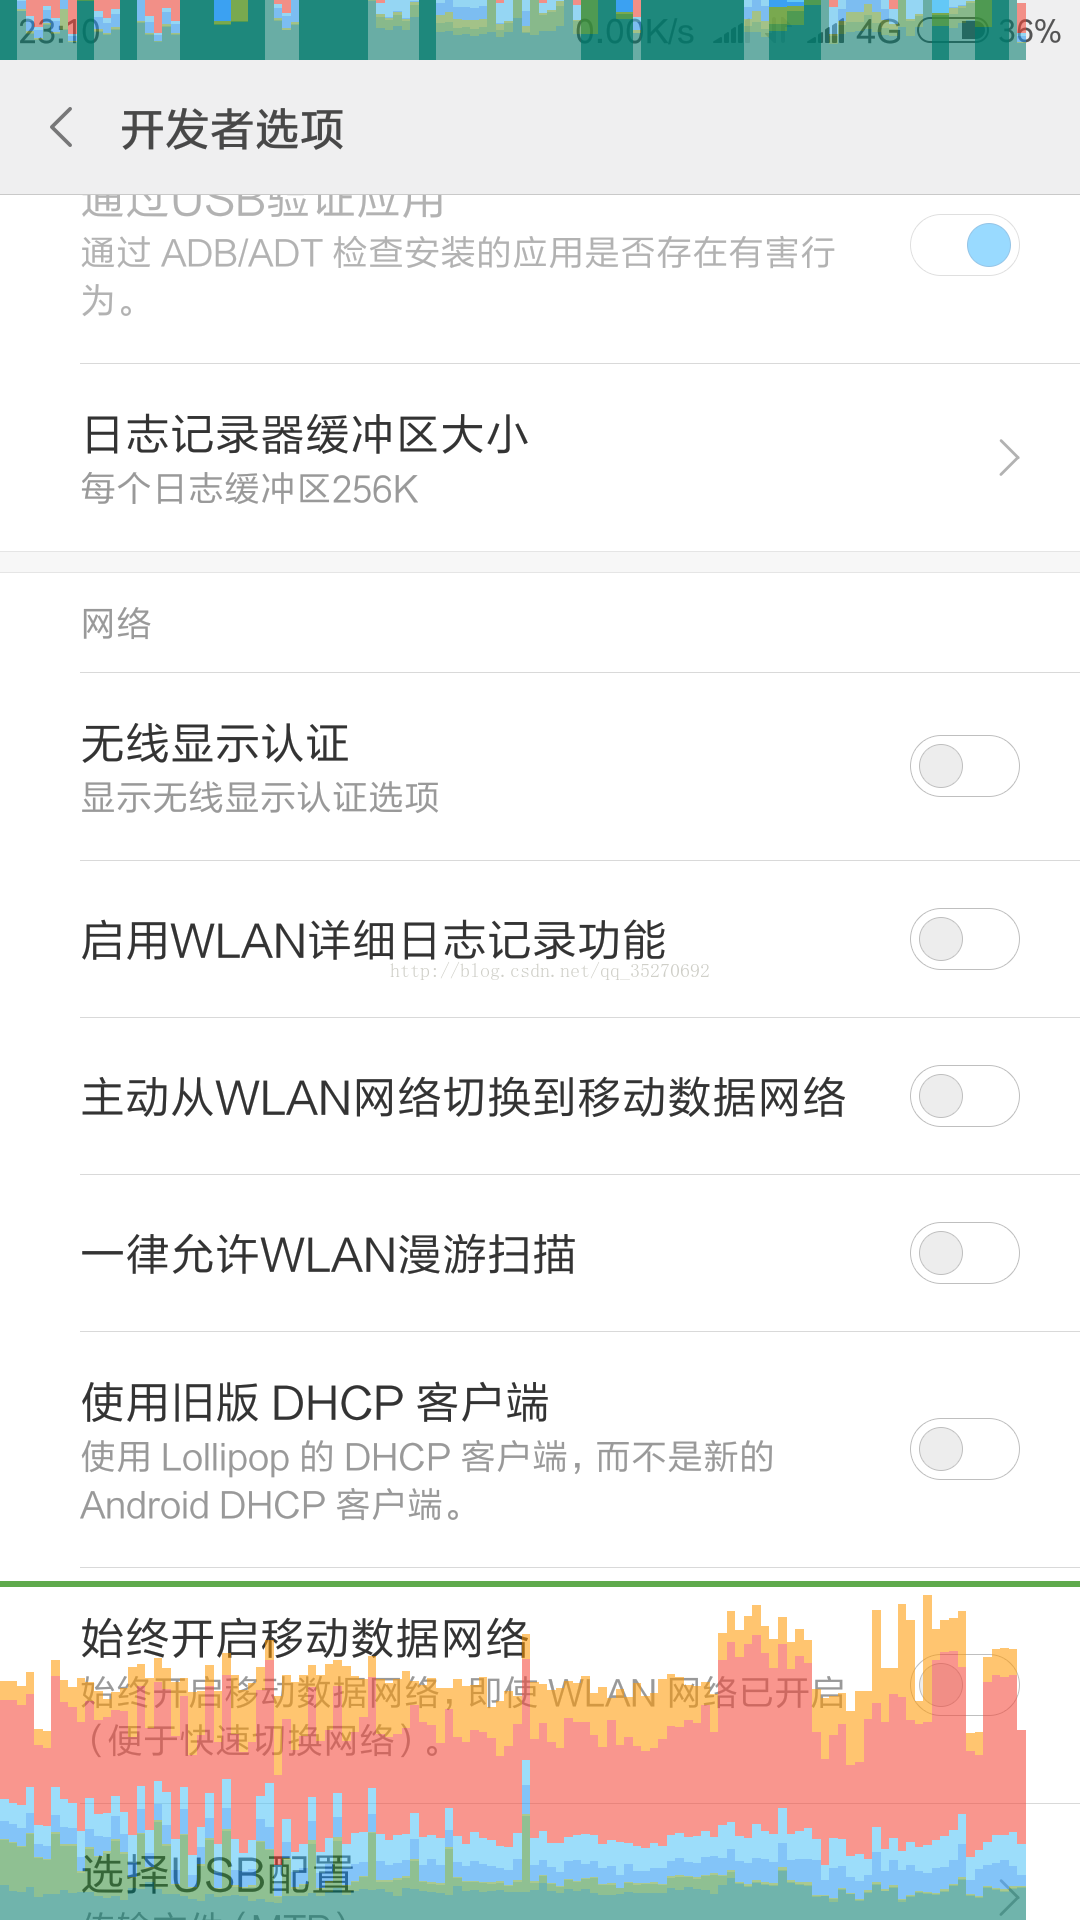
观察了一下,在系统界面中,上下滑动,一般不会超出横线的绿色的线,而其他的一些软件很多是超出的,即使是企鹅,也一般只能保持在绿色的线上下,切换界面的时候就大大超出了,所以呢?我们也就是尽量保持大概在绿色线附近就好了,是不能够保证的。或者强迫症(世界很美好,不要为难自己)
理论已经了解了,图也看了,但好像还不知道应该怎么优化布局吧!我的感觉就是这样的。。。
1,
避免Overdraw
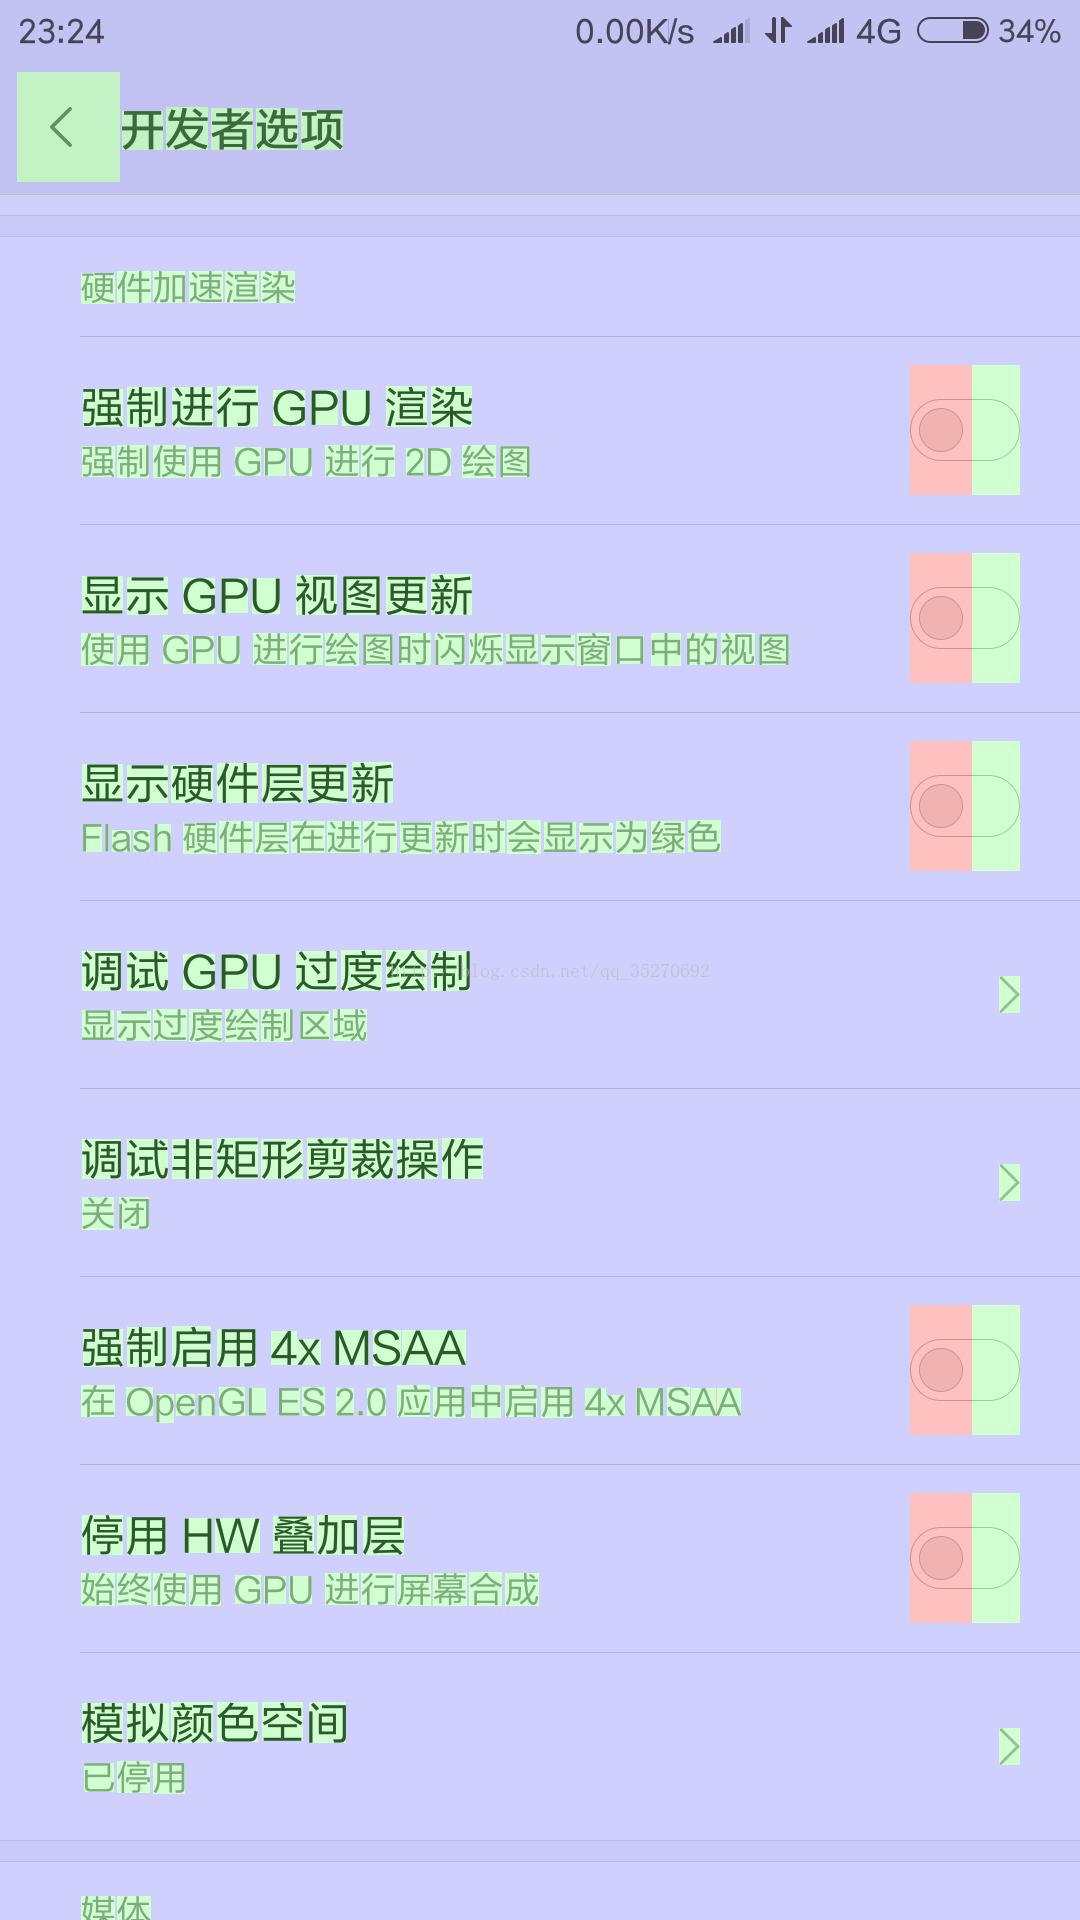
过度绘制浪费cpu和gpu的资源,系统默认绘制Activity的背景色,如果布局也绘制背景色,那么默认的activity背景属于无效的过度绘制,系统同样给我们提供了一个工具 个人开发者-调试gpu过度绘制
下面请欣赏:
可以看到如果是自己写的布局,大概都可以看出那个区域过度绘制比较严重的。图中过度绘制高到低,砖红色-萤光色-浅紫色。网上有google的一个图片的,请自行百度or google。既然可以看到当前区域中的过度绘制。那么尽量优化绘图层次即可。
2,优化布局层次
对于View测量,布局和绘制,都是通过对View树的遍历来操作的,如果一个View树太高,就会影响View的测量,布局,绘制速度,也就是说减低View树的高度,可以达到优化布局的目的,google建议View树的高度不宜超过10层,RelativLayout通过扁平化就比linealayout嵌套所产生的高度小。避免嵌套过多无用的布局。
使用include标签共用一个布局,也便于维护和缓解代码冗余。也可以使用ViewStub标签实现引用,并且延迟加载,(用于某些情况下才需要显示出来)
大少为0,并且不可视
既然说到布局那就得说说HierarchyViewer工具了,HierarchyView优化Android布局的方法,可以参考官方的这篇文章:http://developer.android.com/training/improving-layouts/optimizing-layout.html
但是该工具并不支持直接连接真机进行检测,为了能够让该工具能够对真机使用,Android SDK开发团队提供了VIewServer开源库,项目地址https://github.com/romainguy/ViewServer
引入该库:
allprojects {
repositories {
...
maven { url 'https://jitpack.io' }
}
}
dependencies {
compile 'com.github.romainguy:ViewServer:-SNAPSHOT'
}
将该库引入项目后
如何使用该库:可以参考:https://stackoverflow.com/a/45055690/6521116
大体如下:
a). check if the device have open the view server
bogon:~ roofe$ adb shell service call window 3
Result: Parcel(00000000 00000000 '........')
Note: if you get
cannot find command adb
adb is usually in the path of sdk, mine is at /Users/roofe/Library/Android/sdk/platform-tools/adb. Then you can add it to path or make a alias for it.
I put alias adb='/Users/roofe/Library/Android/sdk/platform-tools/adb' in the .bash_profile under the user path, then source ./.bash_profile. Here adb command should works.
output info:
View Server off: Result: Parcel(00000000 00000000 '........')
View Server on: Result: Parcel(00000000 00000001 '........')
If the view server is on, you hierarchy viewer should works well. And you needn't to read below.
Unfortunately, if your view server is off, go on. Both view server of my simulator and read device are off.
b). Start View server
bogon:~ roofe$ adb shell service call window 1 i32 4939
Result: Parcel(00000000 00000001 '........')
If the result is Result: Parcel(00000000 00000001 '........'), the view server has been started. While if the result is Result: Parcel(00000000 00000000 '........'), the view server cannot be started.
You also can shutdown the view server with
adb shell service call window 2 i32 4939
Here execute the command two times to shutdown it, maybe there is a execution time here.
bogon:~ roofe$ adb shell service call window 2 i32 4939
Result: Parcel(00000000 00000001 '........')
bogon:~ roofe$ adb shell service call window 2 i32 4939
Result: Parcel(00000000 00000000 '........')
Most of the real device cannot start the view server. For security, Android on real device have restrict on this. You can find the relative code in file WindowManageService.java source code of Andorid
if (!checkCallingPermission(Manifest.permission.DUMP, "startViewServer")) {
return false;
}
So if you're a genius cracker, you can root your device to remove this restrict. I've not make it. If your try successfull, show me it. I'll be very appreciated on your smart work.
Here my simulator works. While real device not. If your view server is still off, go on.
c). Using the ddm protocol, one method from the doc of Android studio doc Profile Your Layout with Hierarchy Viewer
If you're using the Android Emulator, you can skip this section. Otherwise, you need to set up your device as follows.
Note: Your device must be running Android 4.1 or higher.
Enable Developer Options on your device.
Set the environment variable ANDROID_HVPROTO=ddm on your development machine.
This variable tells Hierarchy Viewer to connect to the device using the ddm protocol, which is the same as the DDMS protocol. The caveat is that there can be only one process on the host that connects to the device, so you must kill any other DDMS session to run Hierarchy Viewer.
Add export ANDROID_HVPROTO=ddm to your .bash_profile then source ./.bash_profile.
Remove the installed app, and restart Android Studio, then install your app and you can hierarchy view it now.
Note: I set the ddm without restart Android Studio a, I cannot hierarchy view it. One day later, I realise it, and do some test. I founds after set the ppm, it's better to restart the android studio. I guess when android studio start it will read that config, can cache it.
I didn't test it without uninstall the app.
d). set up a view server
Please don't fell frustrated here. To start a view server is very easy.
Tool: ViewServer on github
add this to your build.gradle
allprojects {
repositories {
jcenter()
maven {url "https://jitpack.io"}
}
}
dependencies {
...
compile 'com.github.romainguy:ViewServer:017c01cd512cac3ec054d9eee05fc48c5a9d2de'
}
Add INTERNET permission in the manifest file
<uses-permission android:name="android.permission.INTERNET" />
Then regiester the viewserver to the activity you want to inspect
public class MyActivity extends Activity {
public void onCreate(Bundle savedInstanceState) {
super.onCreate(savedInstanceState);
// Set content view, etc.
ViewServer.get(this).addWindow(this);
}
public void onDestroy() {
super.onDestroy();
ViewServer.get(this).removeWindow(this);
}
public void onResume() {
super.onResume();
ViewServer.get(this).setFocusedWindow(this);
}
}
By now, I can run the Hierarchy view on my real device.
本打算写的,网上已经有很多工具了,就转载吧!
地址:
http://www.jianshu.com/p/71c9c7113c60?utm_campaign=haruki&utm_content=note&utm_medium=reader_share&utm_source=qq
Hierarchy Viewer
Hierarchy Viewer是Android SDK自带的可视化的调试工具,用来检查布局嵌套和绘制的时间。需要注意的是在在Android的官方文档中提到:出于安全考虑,Hierarchy Viewer只能连接Android开发版手机或是模拟器。
首先我们在Android Studio中选择Tools->Android->Android Device Monitor,在Android Device Monitor中选择Hierarchy Viewer ,如下图所示:
选择Hierarchy Viewer后会进出Hierarchy Viewer窗口,如下图所示。
Hierarchy Viewer中有4个四个子窗口,它们的的作用为:
- Windows:当前设备所有界面列表。
- Tree View:将当前Activity的所有View的层次按照高层到低层从左到右显示出来。
- Tree Overview:全局概览,以缩略的形式显示。
- Layout View:整体布局图,以手机屏幕上真实的位置呈现出来。单击某一个控件,会在Tree Overview窗口中显示出对应的控件。
根据上面讲到的Hierarchy Viewer的4个四个子窗口,我们可以很容易的查看我们布局控件的层级关系。当然Hierarchy Viewer还可以查看某一个View的耗时,我们可以选择某一个View,然后单击下图红色箭头标识的按钮,这里我们把他简称为Layout Time按钮。
从图中可以看出被选中的RelativeLayout自身的Measure、Layout和Draw的耗时数据都为n/a。单击Layout Time按钮后,就可以查看View的耗时情况了,如下图所示。
从图中可以看出,被选中的LinearLayout给出了自身Measure、Layout和Draw的耗时,并且它所包含的View中都有了三个指示灯,分别代表当前View在Measure、Layout和Draw的耗时,绿色代表比其他50%View的同阶段(比如Measure阶段)速度要快,黄色则代表比其他50%View同阶段速度要慢,红色则代表比其他View同阶段都要慢,则需要注意了。如果想要看View的具体耗时,则点击该View就可以了。
Android Lint
Android lint是在ADT 16提供的新工具,它是一个代码扫描工具,通过代码静态检查来发现代码出现的潜在问题,并给出优化建议。检查的范围主要有以下几点:
- Correctness 正确性
- Security 安全性
- Performance 性能
- Usability 可用性
- Accessibility 可达性
- Internationalization 国际化
Android Lint功能十分强大,这里我们只关注XML布局检查,我们可以通过Android Studio的Analyze->Inspect Code来配置检查的范围,如下图所示。
点击上图的OK按钮后,就会进行代码检查,检查的结果如下图所示。
图中列出了项目中出现的问题种类,以及每个问题种类的个数,问题种类包括我们前面提到的Correctness 、Internationalization 、Performance等。我们点击展开最后的XML一项,点击一个问题,就会出现如下图的提示。
可以看出给出了Namespace declaration is never used的提示,并指出了问题所在的文件和行数,我们点击数字3,直接跳入到问题的代码,发现如下代码:
<?xml version="1.0" encoding="utf-8"?>
<RelativeLayout xmlns:android="http://schemas.android.com/apk/res/android"
    xmlns:tools="http://schemas.android.com/tools"
    android:id="@+id/activity_main"
    android:layout_width="match_parent"
    android:layout_height="match_parent">
    ...
第三行的Namespace 确实没有被用到。如果想要自定义Android Lint的检查提示,可以通过File->Settings->Editor->Inspections中来配置Android Lint,如下图所示。
从图中可以发现,我们可以配置Android Lint检查的范围以及问题的严重等级。
2.布局优化方法
布局的优化方法很多,主要包括合理运用布局、Include、Merge、ViewStub,下面我们来一一对这些内容进行讲解。
合理运用布局
我们常用的布局主要有LinearLayout、RelativeLayout和FrameLayout等,合理的使用它们可以使得Android绘制工作量变少,性能得到提高。我们来举个简单的例子。
<?xml version="1.0" encoding="utf-8"?>
<LinearLayout xmlns:android="http://schemas.android.com/apk/res/android"
    android:layout_width="match_parent"
    android:layout_height="match_parent"
    android:orientation="horizontal">
    <TextView
        android:layout_width="wrap_content"
        android:layout_height="wrap_content"
        android:text="布局优化" />
    <LinearLayout
        android:layout_width="wrap_content"
        android:layout_height="wrap_content"
        android:layout_marginLeft="10dp"
        android:orientation="vertical">
        <TextView
            android:layout_width="wrap_content"
            android:layout_height="wrap_content"
            android:text="Merge" />
        <TextView
            android:layout_width="wrap_content"
            android:layout_height="wrap_content"
            android:text="ViewStub" />
    </LinearLayout>
</LinearLayout>
上面的代码用了两个LinearLayout来进行布局,运行效果如下图所示。
我们用Hierarchy Viewer来查看层级情况,如下图所示。
可以看到我们的布局共有3层,一共含有5个View。如果我们用RelativeLayout来进行改写呢?代码如下所示。
<?xml version="1.0" encoding="utf-8"?>
<RelativeLayout xmlns:android="http://schemas.android.com/apk/res/android"
    android:layout_width="match_parent"
    android:layout_height="match_parent">
    <TextView
        android:id="@+id/tv_text1"
        android:layout_width="wrap_content"
        android:layout_height="wrap_content"
        android:text="布局优化" />
    <TextView
        android:id="@+id/tv_text2"
        android:layout_width="wrap_content"
        android:layout_height="wrap_content"
        android:layout_marginLeft="10dp"
        android:layout_toRightOf="@id/tv_text1"
        android:text="Merge" />
    <TextView
        android:id="@+id/tv_text3"
        android:layout_width="wrap_content"
        android:layout_height="wrap_content"
        android:layout_below="@id/tv_text2"
        android:layout_marginLeft="10dp"
        android:layout_toRightOf="@+id/tv_text1"
        android:text="ViewStub" />
</RelativeLayout>
我们只用了一个RelativeLayout来进行布局。用Hierarchy Viewer来查看层级情况,如下图所示。
布局共有两层,一共含有4个View。从这里我们就可以看出我们用RelativeLayout减少了一层的布局,当然这只是一个简单例子,如果布局复杂,那么合理的用RelativeLayout来替代LinearLayout会减少很多层布局。
一般情况下,RelativeLayout的性能是比LinearLayout低,因为RelativeLayout中的View的排列方式是基于彼此依赖的。但是如果布局层数较多时,如果能用RelativeLayout来实现,还是推荐用RelativeLayout。
使用Include标签来进行布局复用
一个很常见的场景就是,多个布局需要复用一个相同的布局,比如一个TitleBar。如果这些界面都要加上这个相同布局TitleBar,维护起来就就很麻烦,我们需要复制TitleBar的布局到每个需要添加的界面,这样容易发生遗漏。如果需要修改TitleBar则需要去每个引用TitleBar的布局进行修改。为了解决这些问题,我们可以用Include标签来解决。
首先我们先来写一个简单的TitleBar布局:titlebar.xml 如下所示。
<?xml version="1.0" encoding="utf-8"?>
<LinearLayout xmlns:android="http://schemas.android.com/apk/res/android"
    android:layout_width="match_parent"
    android:layout_height="40dp"
    android:background="@android:color/darker_gray">
    <ImageView
        android:layout_width="30dp"
        android:layout_height="30dp"
        android:src="@drawable/ico_left"
        android:padding="3dp"
        android:layout_gravity="center"/>

    <TextView
        android:layout_width="match_parent"
        android:layout_height="wrap_content"
        android:layout_gravity="center"
        android:gravity="center"
        android:text="绘制优化" />
</LinearLayout>
这个TitleBar由ImageView和TextView组成,下面我们将TitleBar引入到我们此前用过的布局中,如下所示。
<?xml version="1.0" encoding="utf-8"?>
<LinearLayout xmlns:android="http://schemas.android.com/apk/res/android"
    android:layout_width="match_parent"
    android:layout_height="match_parent"
    android:orientation="vertical">
    <include layout="@layout/titlebar" />
    <RelativeLayout
        android:layout_width="match_parent"
        android:layout_height="match_parent"
        android:orientation="horizontal">

        <TextView
            android:id="@+id/tv_text1"
            android:layout_width="wrap_content"
            android:layout_height="wrap_content"
            android:text="布局优化" />
     ...
    </RelativeLayout>
</LinearLayout>
可以看到我们用include标签引入了titlebar布局,运行效果如下图所示。
用Merge标签去除多余层级
Merge意味着合并,在合适的场景使用Merge标签可以减少多余的层级。Merge标签一般和Include标签搭配使用,上面的例子,我们用Hierarchy Viewer来查看布局层级,如下图所示。
可以看到我们用Include标签引用的布局的根布局是一个LinearLayout。如果我们使用Merge标签来替换LinearLayout呢?titlebar.xml 的代码如下所示。
<?xml version="1.0" encoding="utf-8"?>
<merge xmlns:android="http://schemas.android.com/apk/res/android"
    android:layout_width="match_parent"
    android:layout_height="40dp"
    android:background="@android:color/darker_gray
   >
    <ImageView
        android:layout_width="30dp"
        android:layout_height="30dp"
        android:src="@drawable/ico_left"
        android:padding="3dp"
        android:layout_gravity="center"/>

    <TextView
        android:layout_width="match_parent"
        android:layout_height="wrap_content"
        android:layout_gravity="center"
        android:gravity="center"
        android:text="绘制优化" />
</merge>
这时我们再用Hierarchy Viewer来查看布局层级,如下图所示。
可以看到此前的根布局LinearLayout没有了,但是我们用merge标签来替代LinearLayout导致LinearLayout失效,因此布局就错乱了,因此可以得知merge标签最好是来替代FrameLayout,或者是布局一致的LinearLayout,比如当前布局的LinearLayout是垂直方向的,被包含的布局的LinearLayout也是垂直方向的则可以用merge标签,本场景包含的LinearLayout是水平的,显然并不符合这一要求。但是如果执意想要在本场景使用merge标签也是可以的,就是用继承自LinearLayout的自定义View,代码如下所示。
<?xml version="1.0" encoding="utf-8"?>
<LinearLayout xmlns:android="http://schemas.android.com/apk/res/android"
    android:layout_width="match_parent"
    android:layout_height="match_parent"
    android:orientation="vertical">
    <com.example.liuwangshu.moonlayout.TitleBar
        android:layout_width="wrap_content"
        android:layout_height="wrap_content"
        android:orientation="horizontal"
        android:background="@android:color/darker_gray">
    </com.example.liuwangshu.moonlayout.TitleBar>
    <RelativeLayout
        android:layout_width="match_parent"
        android:layout_height="match_parent"
        android:orientation="horizontal">
    <TextView
            android:id="@+id/tv_text1"
            android:layout_width="wrap_content"
            android:layout_height="wrap_content"
            android:text="布局优化" />
      ...
    </RelativeLayout>
</LinearLayout>
上面布局中TitleBar就是一个自定义View,它继承LinearLayout。我们在TitleBar标签中添加此前的LinearLayout的属性:android:orientation和android:background。
使用ViewStub来提高加载速度
一个很常见的开发场景就是我们想要一个布局时,并不是所有的控件都需要显示出来,而是显示出一部分,对于这种情况,我们一般采用的方法就是使用View的GONE和INVISIBLE,但是这种方法效率不高,虽然是达到了隐藏的目的,但是仍在布局当中,系统仍然会解析它们,我们可以用ViewStub来解决这一问题。
ViewStub是轻量级的View,不可见并且不占布局位置。当ViewStub调用inflate方法或者设置可见时,系统会加载ViewStub指定的布局,然后将这个布局添加到ViewStub中,因此,在对ViewStub调用inflate方法或者设置可见时,它是不占布局空间和系统资源的,它主要的目的就是为目标视图占用一个位置。因此,使用ViewStub可以提高界面初始化的性能,从而提高界面的加载速度。
我们首先在布局中加入ViewStub标签,布局代码如下所示。
<?xml version="1.0" encoding="utf-8"?>
<LinearLayout xmlns:android="http://schemas.android.com/apk/res/android"
    android:layout_width="match_parent"
    android:layout_height="match_parent"
    android:orientation="vertical">
  <ViewStub
      android:id="@+id/viewsub"
      android:layout_width="match_parent"
      android:layout_height="40dp"
      android:layout="@layout/titlebar"/>
   ...
</LinearLayout>
ViewStub标签中用android:layout引用了此前写好的布局titlebar.xml。这时我们运行程序,ViewStub标签所引用的布局是显示不出来的,因为引该局还没有加载到ViewStub中,接下来在代码中使用ViewStub:
public class MainActivity extends AppCompatActivity {
    private ViewStub viewsub;
    @Override
    protected void onCreate(Bundle savedInstanceState) {
        super.onCreate(savedInstanceState);
        setContentView(R.layout.activity_main);
        viewsub= (ViewStub) findViewById(R.id.viewsub);
//        viewsub.inflate();//1
        viewsub.setVisibility(View.VISIBLE);//2
    }
}
可以使用注释1和注释2处的代码来将ViewStub引用的布局加载到ViewStub中,这样引用的布局就显示了出来。
在使用ViewStub时需要主要以下问题:
- ViewStub只能加载一次,加载后ViewStub对象会被置为空,这样当ViewStub引用的布局被加载后,就不能用ViewStub来控制引用的布局了。因此,如果一个控件需要不断的显示和隐藏,还是要使用View的Visibility属性。
- ViewStub不能嵌套Merge标签。
- ViewStub操作的是布局文件,如果只是想操作具体的View,还是要使用View的Visibility属性。
3.避免GPU过度绘制
什么是过度绘制呢?我们来打个比方,假设你要粉刷房子的墙壁,一开始刷了绿色,接着又刷了黄色,这样黄色就将绿色盖住,也就说明第一次的大量粉刷工作白做了。同样手机屏幕绘制也是如此,过度绘制是指在屏幕上某个像素在同一帧的时间内被绘制多次,从而浪费了GPU和CPU的资源。产生这一原因主要有两个原因:
- 在XML布局中,控件有重叠且都有设置背景。
- View的OnDraw中同一区域绘制多次。
过度绘制是不可避免的,但是过多的过度绘制会浪费很多资源,并且导致性能问题,因此,避免过度绘制是十分必要的。我们可以用Android系统中自带的工具来检测过度绘制。首先要保证系统版本在Android 4.1以上,接着在开发者选项中打开调试GPU过度绘制选项就可以进入GPU过度绘制模式,如下图所示。
这时屏幕会出现出各种颜色,主要有以下几种,如下图所示。
各个颜色的定义为:
- 原色: 没有过度绘制 – 每个像素在屏幕上绘制了一次。
- 蓝色: 一次过度绘制 – 每个像素点在屏幕上绘制了两次。
- 绿色: 两次过度绘制 – 每个像素点在屏幕上绘制了三次。
- 粉色: 三次过度绘制 – 每个像素点在屏幕上绘制了四次。
- 红色: 四次或四次以上过度绘制 – 每个像素点在屏幕上绘制了五次或者五次以上。
最理想的是蓝色,一个像素只绘制一次,合格的页面绘制是白色、蓝色为主,绿色以上区域不能超过整个的三分之一,颜色越浅越好。
避免过度绘制主要有以下几个方案:
1.移除不需要的background。
2.在自定义View的OnDraw方法中,用canvas.clipRect来指定绘制的区域,防止重叠的组件发生过度绘制。
作者:刘望舒
链接:http://www.jianshu.com/p/71c9c7113c60
來源:简书
著作权归作者所有。商业转载请联系作者获得授权,非商业转载请注明出处。


 883
883


 被折叠的 条评论
为什么被折叠?
被折叠的 条评论
为什么被折叠?
 到【灌水乐园】发言


