


0 前言
在 Vue学习笔记6:分别使用纯JavaScript和Vue的v-if 指令来有条件地渲染网页元素_PurpleEndurer@5lcto的技术博客_51CTO博客 中,我们直接使用了<>来显示用户选择的水果名称列表。当我们增加一种新的水果时,需要手动增加<P>代码来显示新的水果名称。如果要增加的水果很多时,这个工作就费时费力了。
在在Vue中,提供了v-for指令,让我们可以类似JavaScript的for循环一样输出(渲染)<LI>列表项。
1 用Vue指令改写代码
我们在 Vue学习笔记6:分别使用纯JavaScript和Vue的v-if 指令来有条件地渲染网页元素_PurpleEndurer@5lcto的技术博客_51CTO博客 中的JavaScript代码
基础上进行改造。
1.1 改造脚本
1.1.1 将<script>改为<script setup>
使用 script setup 语法糖,组件只需引入不用注册,属性和方法也不用返回,也不用写setup函数,也不用写export default ,甚至是自定义指令也可以在我们的template中自动获得。
1.1.2 增中语句 import { ref } from 'vue'
这条语句的作用是声明一个响应式引用 (ref)。
在<script setup>中,我们拥有ref和reactive俩个api去创建一个响应式变量,这俩者存在的区别是ref是针对基本类型的响应,而reactive是针对引用类型的响应。 ref使用更广泛一些。
1.1.3 改造水果列表
1.1.31从水果列表中提取有效信息
为了使用v-for指令循环输出列表,我们先要把列表1:
和列表2
中的每个水果中的有效信息提取出来。
对于列表1
来说,这里面的有效信息有1项:
1. value:如pApple
对于列表2
来说,其中的有效信息有3项:
- id :如pApple
- style :如 color:red
- value :如 苹果
综合列表1和列表2中的有效信息项,其中最主要的信息项是value。
我们可以将它声名为一个名字为aFruits的数组:
或者
1.2 使用v-for指定改成水果列表描述代码
从水果列表中提取出有效信息并定义成数组后,我们就可以改造水果列表了。
1.2.1 改造用户可选水果列表
原始的描述代码:
改为
这里,我们使用Vue提供的v-for指令来循环输出<p>...</p>代码。
我们把 v-for指令写在<p>里面,即:
指定根据前面定义的数组aFruits来循环输出<p>...</p>代码,用value来代表数组中的成员。
数组aFruits有多少个元素,就输出多少个<p>...</p>代码。
这样改造以后,我们的代码精简了很多,不必手工输入每一种水果的网页元素描述代码了。
为了观察Vue生成的代码的情况,我们可以增加<textarea></textarea>来显示Vue生成的代码,即:
这样,vue生成的代码会在<textarea></textarea>里显示出来:
在这里,我们使用vue的v-for指令来循环输出水果选项时,不能像之前那样,直接使用checked属性来指定哪个选项被默认选中了。
需要指定那个选项被预定选中的话,我们可以在后面使用JavaScript来操作。
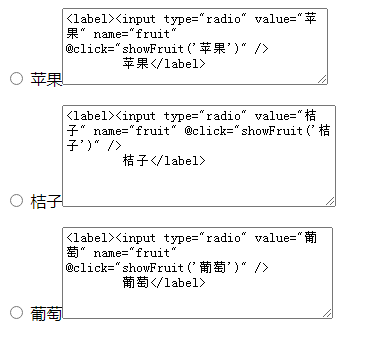
1.2.2 改造显示用户选定水果列表
原始的描述代码:
改为
这里我们同样把v-for指令写在<p>里面。
1.3 修改技术改进说明
将
改为
1.4 增加<template></template>
用<template></template>把所有网页元素描述代码包括起来。
2 修改后的最终代码
综合以上修改后的最终代码如下:
3 代码运行的效果
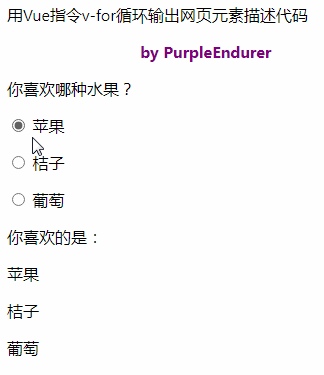
从代码运行的效果来看,存在2个问题:
1.用户选定水果列表中的水果名称没有保留之前设定的颜色,全部以黑色来显示,不够亮丽醒目。
2.当用户选定喜欢的水果后,在选定水果列表这里没有作出响应,把用户选定的水果名称显示出来,把其它水果名称隐藏起来。
出现第1个问题的原因是我们没有把水果的颜色提取到 水果信息数组aFruit中并输出。
出现第2个问题的原因是我们没有把水果的id提取到 水果信息数组aFruit中并输出,而showFruit(v)函数是需要使用id来控制网页元素的。
4 小结
我们使用Vue的v-for指令来改造代码,两个水果列表的网页元素描述代码都得到了大幅度的精简,代码变得更清晰,更便于维护。
与此同时,这次改造也引出了两个新的问题,我们在后面将围绕如何解决这两个新出现的问题进行研究。


 543
543

 被折叠的 条评论
为什么被折叠?
被折叠的 条评论
为什么被折叠?
 到【灌水乐园】发言


