


本篇文章采用的是单机模式,具体可以参考官网redisson介绍。
Redisson源码分析
Redisson实现了Lock接口,对比Lock而言,是可重入锁,功能强大,源码复杂。
加锁
用代码举例子
public static void main(String[] args) {
    Config config = new Config();
    config.useSingleServer().setAddress("redis://127.0.0.1:6379");
    RedissonClient client = Redisson.create(config);
    RLock lock = client.getLock("lock1");
    try {
        // 加锁
        lock.lock();
    } finally {
        // 解锁
       lock.unlock();
    }
}
RLock lock = client.getLock("lock1");这句代码就是为了获取锁的实例。
查看 lock.lock(); 的源码
@Override
public void lock() {
    try {
        lockInterruptibly();
    } catch (InterruptedException e) {
        Thread.currentThread().interrupt();
    }
}
查看 lockInterruptibly 方法
@Override
public void lockInterruptibly(long leaseTime, TimeUnit unit) throws InterruptedException {
    // 获取当前线程的id
    long threadId = Thread.currentThread().getId();
    // 尝试获取锁
    Long ttl = tryAcquire(leaseTime, unit, threadId);
    // lock acquired ,ttl为空,说明成功获取锁,返回
    if (ttl == null) {
        return;
    }

    // 如果获取锁失败,则订阅到对应这个锁的channel
    RFuture<RedissonLockEntry> future = subscribe(threadId);
    commandExecutor.syncSubscription(future);

    try {
        //
        while (true) {
        	// 再次尝试获取锁
            ttl = tryAcquire(leaseTime, unit, threadId);
            // lock acquired , ttl为空,说明成功获取锁,返回
            if (ttl == null) {
                break;
            }

            // waiting for message , ttl大于0 则等待ttl时间后继续尝试获取
            if (ttl >= 0) {
                getEntry(threadId).getLatch().tryAcquire(ttl, TimeUnit.MILLISECONDS);
            } else {
                getEntry(threadId).getLatch().acquire();
            }
        }
    } finally {
        // 取消对channel的订阅
        unsubscribe(future, threadId);
    }
	// get(lockAsync(leaseTime, unit));
}
流程图:

查看 tryAcquireAsync 方法
private <T> RFuture<Long> tryAcquireAsync(long leaseTime, TimeUnit unit, final long threadId) {
    // 如果存在过期时间,按照正常费那事获取锁
    if (leaseTime != -1) {
        return tryLockInnerAsync(leaseTime, unit, threadId, RedisCommands.EVAL_LONG);
    }
    // 读取配置的默认加锁时间30秒执行获取锁的  private long lockWatchdogTimeout = 30 * 1000;
    RFuture<Long> ttlRemainingFuture = tryLockInnerAsync(commandExecutor.getConnectionManager().getCfg().getLockWatchdogTimeout(), TimeUnit.MILLISECONDS, threadId, RedisCommands.EVAL_LONG);
    // 如果一直持有这个锁,开启监听通过定时任务不断刷新锁的过期时间
    ttlRemainingFuture.addListener(new FutureListener<Long>() {
        @Override
        public void operationComplete(Future<Long> future) throws Exception {
            if (!future.isSuccess()) {
                return;
            }

            Long ttlRemaining = future.getNow();
            // lock acquired
            if (ttlRemaining == null) {
                scheduleExpirationRenewal(threadId);
            }
        }
    });
    return ttlRemainingFuture;
}
继续看 tryLockInnerAsync 方法,采用LUA脚本代码加锁。
<T> RFuture<T> tryLockInnerAsync(long leaseTime, TimeUnit unit, long threadId, RedisStrictCommand<T> command) {
// 设置过期时间
internalLockLeaseTime = unit.toMillis(leaseTime);
return commandExecutor.evalWriteAsync(getName(), LongCodec.INSTANCE, command,
// 如果锁不存在,则通过hset设置它的值,并设置过期时间
"if (redis.call('exists', KEYS[1]) == 0) then " +
"redis.call('hset', KEYS[1], ARGV[2], 1); " +
"redis.call('pexpire', KEYS[1], ARGV[1]); " +
"return nil; " +
"end; " +
// 如果锁已存在,并且锁的是当前线程,则通过hincrby给数值递增1
"if (redis.call('hexists', KEYS[1], ARGV[2]) == 1) then " +
"redis.call('hincrby', KEYS[1], ARGV[2], 1); " +
"redis.call('pexpire', KEYS[1], ARGV[1]); " +
"return nil; " +
"end; " +
// //如果锁已存在,但并非本线程,则返回过期时间ttl
"return redis.call('pttl', KEYS[1]);",
Collections.<Object>singletonList(getName()), internalLockLeaseTime, getLockName(threadId));
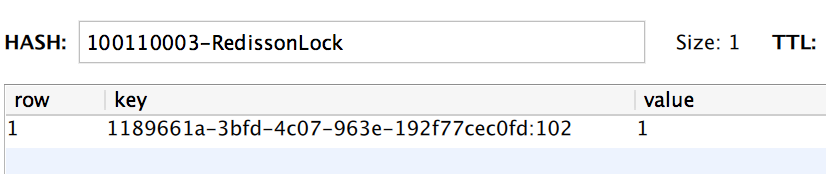
}加锁成功后,redis会存在加锁的hash结构数据,key为随机字符串+线程ID;value值为1。如果同一线程多次调用lock方法,值递增1。
解锁
@Override
public RFuture<Void> unlockAsync(final long threadId) {
    final RPromise<Void> result = new RedissonPromise<Void>();

    // 解锁方法
    RFuture<Boolean> future = unlockInnerAsync(threadId);

    future.addListener(new FutureListener<Boolean>() {
        @Override
        public void operationComplete(Future<Boolean> future) throws Exception {
            if (!future.isSuccess()) {
                cancelExpirationRenewal(threadId);
                result.tryFailure(future.cause());
                return;
            }

            Boolean opStatus = future.getNow();
            // 如果返回值为空,说明解锁个当前加锁不是一个线程,抛出异常
            if (opStatus == null) {
                IllegalMonitorStateException cause = new IllegalMonitorStateException("attempt to unlock lock, not locked by current thread by node id: "
                        + id + " thread-id: " + threadId);
                result.tryFailure(cause);
                return;
            }
            // 解说成功,取消刷新过期时间的定时任务
            if (opStatus) {
                cancelExpirationRenewal(null);
            }
            result.trySuccess(null);
        }
    });

    return result;
}
核心解锁代码
protected RFuture<Boolean> unlockInnerAsync(long threadId) {
    return commandExecutor.evalWriteAsync(getName(), LongCodec.INSTANCE, RedisCommands.EVAL_BOOLEAN,
    		// 如果锁已经不存在, 发布锁释放的消息
            "if (redis.call('exists', KEYS[1]) == 0) then " +
                "redis.call('publish', KEYS[2], ARGV[1]); " +
                "return 1; " +
            "end;" +
            // 如果释放锁的线程和已存在锁的线程不是同一个线程,返回null
            "if (redis.call('hexists', KEYS[1], ARGV[3]) == 0) then " +
                "return nil;" +
            "end; " +
            // 通过hincrby递减1的方式,释放一次锁
            // 若剩余次数大于0 ,则刷新过期时间
            "local counter = redis.call('hincrby', KEYS[1], ARGV[3], -1); " +
            "if (counter > 0) then " +
                "redis.call('pexpire', KEYS[1], ARGV[2]); " +
                "return 0; " +
            // 否则证明锁已经释放,删除key并发布锁释放的消息
            "else " +
                "redis.call('del', KEYS[1]); " +
                "redis.call('publish', KEYS[2], ARGV[1]); " +
                "return 1; "+
            "end; " +
            "return nil;",
            Arrays.<Object>asList(getName(), getChannelName()), LockPubSub.unlockMessage, internalLockLeaseTime, getLockName(threadId));

}
代码部分
pom依赖
<dependency>
    <groupId>org.redisson</groupId>
    <artifactId>redisson</artifactId>
    <version>3.10.1</version>
</dependency>
其他的辅助util依赖
<dependency>
    <groupId>com.alibaba</groupId>
    <artifactId>fastjson</artifactId>
    <version>1.2.58</version>
</dependency>

<dependency>
    <groupId>org.apache.commons</groupId>
    <artifactId>commons-collections4</artifactId>
    <version>4.3</version>
</dependency>

<dependency>
    <groupId>org.apache.commons</groupId>
    <artifactId>commons-lang3</artifactId>
    <version>3.4</version>
</dependency>

<dependency>
    <groupId>com.google.guava</groupId>
    <artifactId>guava</artifactId>
    <version>19.0</version>
</dependency>

<dependency>
    <groupId>org.projectlombok</groupId>
    <artifactId>lombok</artifactId>
    <version>1.18.8</version>
    <scope>provided</scope>
</dependency>
application.properties
redis.config.host=redis://localhost:6379Redisson配置类
package com.wjx.config;

import org.redisson.Redisson;
import org.redisson.api.RedissonClient;
import org.redisson.config.Config;
import org.springframework.beans.factory.annotation.Value;
import org.springframework.context.annotation.Bean;
import org.springframework.context.annotation.Configuration;

/**
 * Created by dingguo on 2020/5/15 下午3:47
 */

@Configuration
public class RedisConfig {


    @Value("${redis.config.host}")
    private String address;


    @Bean
    public RedissonClient getRedissonClient() {
        // 创建 Config
        Config config = new Config();
        // 设置为单节点redis
        config.useSingleServer().setAddress(this.address);
        // 通过Redisson创建client实例
        return Redisson.create(config);
    }
}
Service秒杀处理类
package com.wjx.service;

import com.google.common.collect.Lists;
import org.apache.commons.collections4.MapUtils;
import org.redisson.api.RLock;
import org.redisson.api.RedissonClient;
import org.springframework.beans.factory.annotation.Autowired;
import org.springframework.stereotype.Service;

import java.util.List;
import java.util.Random;
import java.util.concurrent.ConcurrentHashMap;
import java.util.concurrent.TimeUnit;
import java.util.concurrent.atomic.AtomicInteger;

/**
 * Created by dingguo on 2020/5/15 下午3:53
 * 使用 Redission 分布式锁,实现秒杀商品功能
 */

@Service
public class KillItmsService {


    @Autowired
    private RedissonClient redissonClient;


    /**
     * 模拟多线程每次请求的用户id
     */
    private static List<Integer> userIds;

    /**
     * 初始秒杀商品的库存,实际情况可能存在redis
     */
    private static ConcurrentHashMap<Integer, AtomicInteger> killQuantityMap = new ConcurrentHashMap<>();

    /**
     * 记录秒杀成功的用户,实际情况可能存在redis
     */
    private static ConcurrentHashMap<Integer, Integer> killUserIdMaps = new ConcurrentHashMap<>();

    static {
        userIds = Lists.newArrayList(10001, 10002, 10003, 10004, 10005, 10006, 10007, 10008, 10009, 10010);
        killQuantityMap.put(1001, new AtomicInteger(6));
    }

    /**
     * 秒杀抢商品
     */
    public Boolean killItem(Integer killId) {

        // 随机获取访问的用户,模拟不同用户请求
        int index = new Random().nextInt(9);
        Integer userId = userIds.get(index);

        boolean result = false;

        final String lockKey = String.valueOf(killId) + userId + "-RedissonLock";
        // 加锁
        RLock lock = redissonClient.getLock(lockKey);

        try {
            // TODO: 2020/5/15 第一个参数为 30, 尝试获取锁的的最大等待时间为30s
            // TODO: 2020/5/15 第二个参数为 60,  上锁成功后60s后锁自动失效
            // 尝试获取锁(可重入锁,不会造成死锁)
            boolean lockFlag = lock.tryLock(30, 60, TimeUnit.SECONDS);
            if (lockFlag) {
                // 做幂等性处理
                if (MapUtils.isNotEmpty(killUserIdMaps) && killUserIdMaps.get(userId) != null) {
                    System.err.println("用户:" + userId + "---已抢到商品:" + killId + ",不可以重新领取");
                    return false;
                }

                /*
                 * ***************************************************************
                 *                          处理核心内容
                 * ***************************************************************
                 */
                AtomicInteger quantity = killQuantityMap.get(killId);
                if (quantity.get() > 0) {
                    quantity.decrementAndGet();
                    // TODO: 2020/5/15 killUserIdMaps 实际业务场景,秒杀抢到商品的用户可以存入redis缓存
                    killUserIdMaps.put(userId, killId);
                    // TODO: 2020/5/15 killQuantityMap 实际业务场景,读取数据库或者缓存的商品库存,判断是否被抢完了
                    killQuantityMap.put(killId, quantity);
                    System.out.println("用户:" + userId + "---抢到商品:" + killId);
                } else {
                    System.err.println("用户:" + userId + "---未抢到商品:" + killId);
                }
                result = true;
            } else {
                System.out.println("当前锁资源被占用<<<<<<<<<<<<<<<<<<<<<<<<<<<<<<<<<<<<<<未获取到锁");
            }
        } catch (Exception e) {
            System.err.println(">>>>>>>>>>>>>>>>>>>>>>>>>>>>>>>>>>>>.出现了错误");
        } finally {
            // 解锁
            lock.unlock();
        }
        return result;
    }

    public void init() {
        killQuantityMap.put(1001, new AtomicInteger(6));
        killUserIdMaps.clear();
    }
}
参考文章:


 3001
3001


 被折叠的 条评论
为什么被折叠?
被折叠的 条评论
为什么被折叠?
 到【灌水乐园】发言


