 Vue-Router模式解析:HashMode与HTML5Mode


 文章详细介绍了Vue-Router的两种工作模式:HashMode和HTML5Mode。HashMode利用url中的#进行路由,不刷新页面但能监听hash变化;HTML5Mode则监听浏览器的history状态,提供更自然的URL,但需要后端配合处理首次访问。文章还提供了代码示例展示如何在Vue项目中使用和替换Vue-Router。
目录
路由
路由(routing)就是通过互联的网络把信息从源地址传输到目的地址的活动。
——wikipedia
Vue-Router
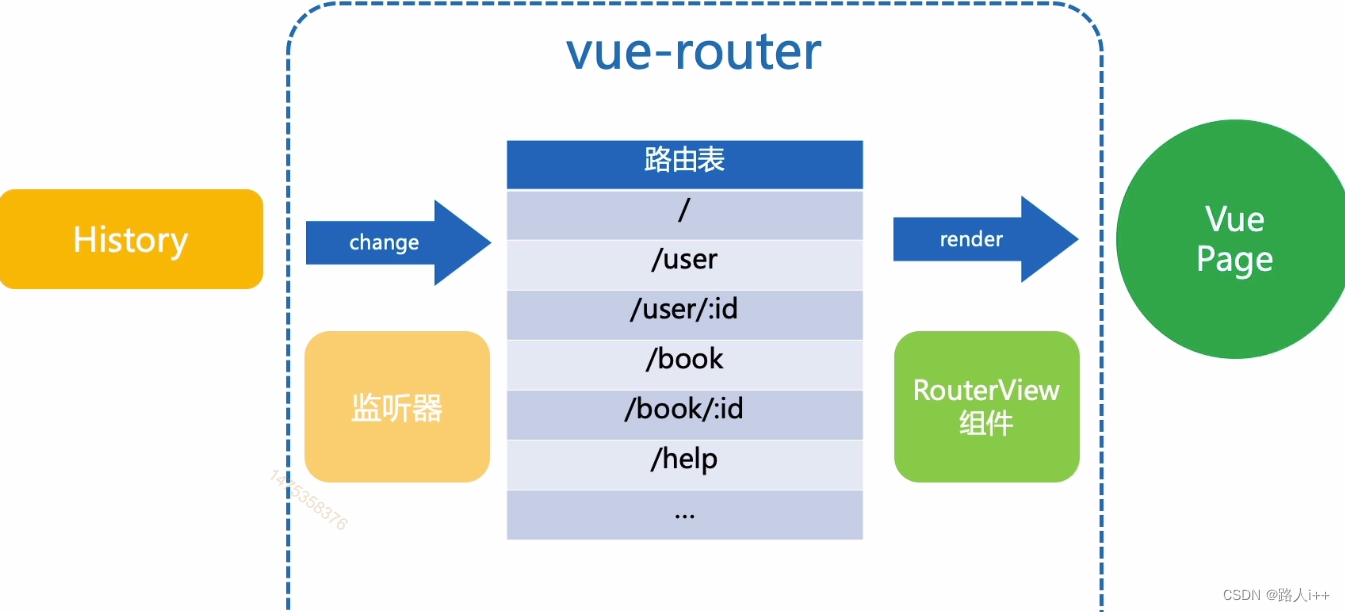
传统web开发路由是后端控制的
随着ajax技术的普及页面无刷新,有了更好的用户体验
在单页面应用中路由开始由后端走向前端,前端需要自己管理路由了
Mode
监听浏览器History变化
window中有2个监听事件:
- onhashchange:监听url中的hash变化
- onpopstate: 监听history栈的改变
Hash Mode
指url中#开始到后面的部分
如:http://www.baidu.com#/hash【#/hash】
当url中的hash改变时页面不会刷新,但是会触发onhashchange事件
// 监听
window.onhashchange = function() {
    console.log(location.hash);
}
// 修改
location.hash = '/anotherhashtag'
// /anotherhashtag
HTML5 Mode
// 监听
window.addEventListener("popstate", () => {
    console.log(window.location.pathname);
}
// 触发时机:
// 点击浏览器前进、后退按钮
history.back() // 后退
history.forward() // 前进
history.go() // 前往历史栈索引
// 下面个方法不会触发popstate事件
history.pushState({},"title","anotherpage.html"); // 添加
history.replaceState({},"title","anotherpage.htm"); // 更新最后一条记录
代码实操
// cmd 中安装一个vue-router
npm add vue-router
// pages/Foo.vue
<template>
  <div>Foo</div>
</template>
<script>
export default {
  beforeRouteEnter(to, from, next) {
    console.log("foo::beforeRouteEnter");
    next();
  },
  beforeRouteUpdate(to, from, next) {
    console.log("foo::beforeRouteUpdate");
    next();
  },
  beforeRouteLeave(to, from, next) {
    console.log("foo::beforeRouteLeave");
    next();
  }
};
</script>
// pages/Bar.vue
<template>
<div>Bar</div>
</template>
<script>
export default {
beforeRouteEnter(to, from, next) {
console.log("Bar::beforeRouteEnter");
next();
},
beforeRouteUpdate(to, from, next) {
console.log("Bar::beforeRouteUpdate");
next();
},
beforeRouteLeave(to, from, next) {
console.log("Bar::beforeRouteLeave");
next();
}
};
</script>// router.js
import Vue from "vue";
// import Router from "vue-router";
import Router from "./router/routers";
import Foo from "./pages/Foo";
import Bar from "./pages/Bar";
Vue.use(Router);
//暴露一下Router实例
export default new Router({
routes: [
{ path: '/foo', component: Foo },
{ path: '/bar', component: Bar }
]
})// main.js
import Vue from "vue";
import App from "./App.vue";
import router from "./router"; // 目标是替换掉vue-router
Vue.config.productionTip = false;
new Vue({
router, // 在Vue的单页应用中加上router
render: h => h(App)
}).$mount("#app");// App.vue
<template>
<div id="app">
<img
alt="Vue logo"
width="500px"
src="http://edu-image.nosdn.127.net/e4ebc486f7454d22870e0b79b824fdf1.png?imageView&quality=100
"
>
<router-link to="/foo">foo</router-link>
<router-link to="/bar">bar</router-link>
<router-view></router-view>
</div>
</template>
<script>
export default {
name: "App"
};
</script>
<style>
#app {
font-family: Avenir, Helvetica, Arial, sans-serif;
-webkit-font-smoothing: antialiased;
-moz-osx-font-smoothing: grayscale;
text-align: center;
color: #2c3e50;
margin-top: 60px;
}
</style>目标是替换掉原版的vue-router
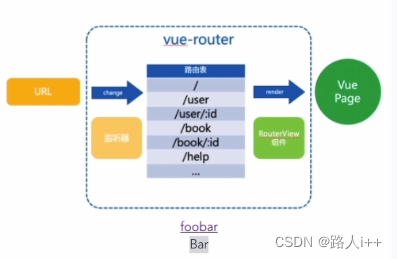
设计图
// router/router.js
// 路由表参数构建
import Vue from 'vue'
import RouterView from './components/RouterView'
import RouterLink from './components/RouterLink'
//注册RouterView组件
Vue.component("RouterView", RouterView)
Vue.component("RouterLink", RouterLink)
class RouterTable {
    constructor( routes ) {
      this._pathMap = new Map()
      this.init(routes)
    }
    // 初始化函数
    init(routes) {
        const addRoute = (route) => {
            this._pathMap.set(route.path,route)
            if(route.children) {
                // 遍历
                route.children.forEach(cRoute => addRoute(cRoute) );
            }
        }
        routes.forEach(route => addRoute(route) );
    }
    // 找一下path是否存在
    match(path) {
        let find;
        // 获取所有的路径this._pathMap.keys()
        for(const key of this._pathMap.keys()) {
            if(path === key) {
                find = key;
                break;
            }
        }
        return this._pathMap.get(find)
    }
}
import Html5Mode from './history/html5';
// 创建一个构造路由的类
export default class Router {
    constructor({ routes = [] }) {
      this.routerTable = new RouterTable(routes);   // 路由表
      this.history = new Html5Mode(this);
    }
    init(app) { // vue单页应用
        const {history} = this;// 解构出history
        history.listen(route => {
            //_route是响应式的
             app._route = route;
        })
        // 第一次渲染
        history.transitionTo(history.getCurrentLocation());
    }
    push(to) {
        this.history.push();
    }
}

Router.install = function() {
    Vue.mixin({
        beforeCreate() {
            if(this.$options.router !== undefined) {// 存在router
               this._routerRoot = this;// this指Vue实例
               this._router = this.$options.router;
               this._router.init(this);
               // this._route的路由信息,响应式的,初始值
               Vue.util.defineReactive(this, "_route", this._route.history.current);
            }
        }
    })
}
// /router/history/base.js
// 监听器【两种Mode都包含的监听器】
export default class BaseHistory {
    constructor({routeTable}) {// 依赖反转把routeTable注入进来
        this.routeTable = routeTable;
    }
    // 注册监听cb函数
    listen(cb) {
         this.cb = cb;
    }
    // 跳转函数
    transitionTo(target) {
        const route = this.routerTable.match(target);
        // 如果我们的路由配置上找到了这个地址
        this.current = route;
        // 钩子函数cb
        this.cb(this.current)
    }
}
// /router/history/hash.js
// 监听器【hash Mode的监听器】
import BaseHistory from './base'
export default class HashHistory extends BaseHistory {
constructor(options) {
super(options)
push(to) {
location.hash = to
}
}
}// /router/history/html5.js
// 监听器【html5 Mode的监听器】
import BaseHistory from './base'
// 子分类Html5History-继承->父分类 BaseHistory
export default class Html5History extends BaseHistory {
constructor(options) {// 构造函数 options透传
// super()调用父类方法,并重写>>>>>>减少代码量(Square类实现)
// 它允许您在子类中调用超类的方法。 这种情况的主要用例是扩展继承方法的功能。 (cube类实现)
super(options)
// 初始化事件监听
this.initListener();
initListener() {
window.addEventListener("popstate", () => {
// transitionTo跳转函数->继承自BaseHistory
this.transitionTo(this.getCurrentLocation());
})
}
// 获取当前地址,H5 Mode和hash Mode,当前地址是不同的
getCurrentLocation() {
// 解码URI
let path = decodeURI(window.location.pathname) || '/';
return path + window.location.search + window.location.hash;
}
// 路由跳转实现push方法
push(target) {
this.transitionTo(target);
window.history.pushState({key: +new Date()}, "", target)// 第二个参数页面title
}
}
}
// router/components/RouterView.vue
// RouterView组件-渲染页面组件
<script>
export default {
    name: 'RouterView',
    render() {
        const route = this._routerRoot._route;
        if(!route) {
          return 404;
        }
        const {component} = route;
        return <component />;
    }
}
</script>
// router/components/RouterLink.vue
// RouterLink组件 跳转页面组件
<template>
<a @click="jump">
<!-- 渲染内容 -->
<slot> </slot>
</a>
</template>
<script>
export default {
props: {
to:{
type: String,
required: true
}
},
methods: {
jump() {
const router = this._routerRoot._router;
router.push(this.to)
}
}
}
</script>小结
- 路由表
- HashMode 【兼容性更好,但是hash带’#‘多了个字符,可读性没有那么美观】
- HTML5Mode【兼容性没有hashMode那么好,html5Mode需要后端对我们的路由一一映射,以保证用户在第一次访问页面时,能正确的进入到我们的页面】


 850
850

 被折叠的 条评论
为什么被折叠?
被折叠的 条评论
为什么被折叠?
 到【灌水乐园】发言


