


文章目录
提示:以下是本篇文章正文内容,下面案例可供参考

一、概念
1.1 WSGI
Web服务器网关接口(Python Web Server Gateway Interface,缩写为WSGI)是为Python语言定义的Web服务器和Web应用程序或框架之间的一种简单而通用的接口.使用python manage.py runserver 通常只在开发和测试环境中使用。开发结束后,需要在高效稳定的环境中运行,这时可以使用WSGI
 uwsgi 替代runserver
1.2 uWSGI
uWSGI是一个Web服务器,它实现了WSGI协议、uwsgi、http等协议。Nginx中HttpUwsgiModule的作用是与uWSGI服务器进行交换。
要注意 WSGI / uwsgi / uWSGI 这三个概念的区分。
WSGI,是一种通信协议。uwsgi同WSGI一样是一种通信协议。 而uWSGI是实现了uwsgi和WSGI两种协议的Web服务器。
uwsgi协议是一个uWSGI服务器自有的协议,它用于定义传输信息的类型(type of information), 每一个uwsgipacket前4byte为传输信息类型描述,它与WSGI相比是两样东西。替代runserver
为什么有了uWSGI为什么还需要nginx?因为nginx具备优秀的静态内容处理能力,然后将动态内容转发给uWSGI服务器,这样可以达到很好的客户端响应。
uWSGI主要学习已配置为主
二、使用步骤
使用docker安装请参考
https://blog.csdn.net/qq_35911309/article/details/116132738
2.1 安装python
openssl版本最低为1.0.2查看openssh版本命令
ssh -V
查看openssl版本命令
openssl version
系统是centos7,里面的python版本是2.7。官网下载所需版本。
tar -xvf Python-3.8.5.tar.xz
cd Python-3.8.5/
./configure --prefix=/usr
make && make install
将该软件安装在 /usr 下面,执行文件就会安装在 /usr/bin (而不是默认的 /usr/local/bin),资源文件就会安装在/usr/share(而不是默认的/usr/local/share)。同时一些软件的配置文件
你可以通过指定 --sys-config=参数进行设定。有一些软件还可以加上 --with、–enable、–without、–disable 等等参数对编译加以控制,可以通过允许 ./configure --help 察看详细的说明帮助
比如下面就是指定安装目录/usr/local/python3。 mkdir /usr/local/python3
如果没有用这个选项,安装过程结束后,该软件所需的软件被复制到不同的系统目录下,比较混乱。
删除旧的python的软连接,创建新的python2和python3的软连接,添加pip软链接
rm -f python2
ln -s python3.8 python
ln -s pip3.8 pip
python -V
[root@localhost ~]# python -V
Python 3.8.5
或
 mkdir /usr/local/python3
./configure --enable-optimizations --prefix=/usr/local/python3
 make && make altinstall
# 删除一些临时文件(删除源代码(C\C++ code)生成的执行文件和所有的中间目标文件)
make clean
ln -s /usr/local/python3/bin/python3 /usr/bin/python3
ln -s /usr/local/python3/bin/pip3 /usr/bin/pip3
将python修改为系统最原始的那个版本。这是因为yum用的是原来2.7的版本。
(1).yum
vim /usr/bin/yum
(2).urlgrabber-ext-down
vim /usr/libexec/urlgrabber-ext-down
(3).firewalld
vim /usr/sbin/firewalld
(4).firewall-cm
vim /usr/bin/firewall-cm
把最顶部的#!/usr/bin/python改为:#!/usr/bin/python2.7
wq 保存,已经是的无须更改
安装virtualenv ,建议大家都安装一个virtualenv,方便不同版本项目管理
pip3 install virtualenv --user -i https://mirrors.aliyun.com/pypi/simple/
附:查找文件
[root@localhost bin]# whereis virtualenv
virtualenv:[root@localhost bin]# find / -name virtualenv
/root/.local/lib/python3.8/site-packages/virtualenv
/root/.local/bin/virtualenv
.英文点号表示这是个隐藏文件
2.2 pycharm 下远程Linux 同步
pip freeze > requirements.txt

cd testdj # 切换到我们创建的项目
$ python manage.py runserver 0.0.0.0:8000
#centos7查看防火墙所有信息
firewall-cmd --list-all
#centos7查看防火墙开放的端口信息
firewall-cmd --list-ports
systemctl restart firewalld.service //重启防火墙
firewall-cmd --zone=public --add-port=8080/tcp --permanent //开启8080端口
firewall-cmd --reload //重新载入配置

三、
3.1 uWSGI 安装
https://docs.djangoproject.com/en/3.2/howto/deployment/wsgi/uwsgi/

python -m pip install uwsgi
find / -name uwsgi
ln -s /usr/local/python3/bin/uwsgi /usr/bin/
基础测试
# test.py
def application(env, start_response):
start_response('200 OK', [('Content-Type','text/html')])
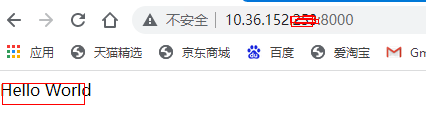
return [b"Hello World"] # python3
运行uWSGI:
uwsgi --http :8000 --wsgi-file test.py

3.2 uwsgi启动django项目
收集静态资源 setting.py
# 静态资源访问的起始url
STATIC_URL = '/static/'
# 指定静态资源所在的目录
STATICFILES_DIRS = [
    os.path.join(BASE_DIR, 'static')
]
# 设置收集静态资源的路径(部署时使用)
STATIC_ROOT = os.path.join(BASE_DIR, 'collect_static/')
python manage.py collectstatic
配置uwsgi
[uwsgi]

#socket=127.0.0.1:8000
http=0.0.0.0:8000

chdir=/tmp/Activty

static-map=/static/=/tmp/Activty/static

#module = Activty.wsgi:application
wsgi-file=/tmp/Activty/Activity/wsgi.py

master=True

processes=4

vacuum= true

pidfile=uwsgi.pid

daemonize=uwsgi.log
3.启动项目
uwsgi --ini uwsgi.ini
# 停止
uwsgi --stop uwsgi.pid
pkill -f uwsgi -9


3.3 Nginx 配置
修改uwsgi.ini 文件(略)
vim /etc/yum.repos.d/nginx.repo
[nginx]
name=nginx ropo
baseurl =http://nginx.org/packages/centos/7/$basearch/
gpgcheck=0
enabled=1
yum -y install nginx
vim /etc/nginx/nginx.cof 增加
server {
        listen     80;
        server_name 10.36.152.***;
        charset UTF-8;
        access_log       /var/log/nginx/access.log;
        error_log         /var/log/nginx/error.log;

        location / {

                include uwsgi_params;

                uwsgi_pass 127.0.0.1:8000;
            }

      location /static {
            alias /tmp/Activty/static/;
        }
     }
验证nginx配置文件是否正确
进入nginx安装目录/usr/sbin下,输入命令./nginx -t
重启 nginx ./nginx -s reload

四、bug
问题一
Could not fetch URL https://pypi.python.org/simple/....
然后就是:问题二
Could not find a version that satisfies the requirement tensorflow
答:
加上–trusted-host ,换成了国内的pip源
pip install 安装包名字 -i http://pypi.doubanio.com/simple/ --trusted-host pypi.doubanio.com
问:
ERROR: Could not install packages due to an EnvironmentError: [Errno 28] No space left on device
答:
# 查看磁盘占有空间
df -h
# 查看哪个文件
du -h -x --max-depth=1
# 显示隐藏目录或隐藏文件的占用空间
du -sh .[!.]*
# 排序
du -sh .[!.]* * | sort -hr
问:
configure: error: no acceptable C compiler found in $PATH See config.log' for more details
答:
原因是缺少gcc编译环境
安装即可:yum install -y gcc
问:
-bash: make: command not found
答:
因为安装系统的时候使用的是最小化mini安装,
系统没有安装make、vim等常用命令,直接yum安装下即可。
yum -y install gcc automake autoconf libtool make
问:
zipimport.ZipImportError: can't decompress data; zlib not available
答:
centos系统中,zlib的开发链接库软件包是“zlib-devel”,
yum -y install zlib-devel
问:
WARNING: pip is configured with locations that require TLS/SSL, however the ssl module in Python is not available. Could not fetch URL https://pypi.org/simple/pip/: There was a problem confirming the ssl certificate: HTTPSConnectionPool(host='pypi.org', port=443): Max retries exceeded with url: /simple/pip/ (Caused by SSLError("Can't connect to HTTPS URL because the SSL module is not available.")) - skipping
答:
查看你当前环境默认使用的 index-url 即 pip 源地址
pip install --help | grep -A 4 '\--index-url <url>'
-i, --index-url Base URL of the Python Package Index
(default
https://pypi.org/simple). This should point to a
repository compliant with PEP 503 (the simple
repository API) or a local directory laid out in
the same format.
单次指定 index-url 为国内源
pip install {library_name} -i {index_url}
pip install -r requirements.txt -i http://pypi.douban.com/simple --trusted-host pypi.douban.com
修改pip安装源加快python模块安装
mkdir ~/.pip
创建pip.conf文件填写:
[global]
trusted-host=mirrors.aliyun.com
index-url=http://mirrors.aliyun.com/pypi/simple/
问:
Add correct host key in /root/.ssh/known_hosts to get rid of this message. Offending RSA key in /root/.ssh/known_hosts:2 RSA host key for [127.0.0.1]:2222 has changed and you have requested strict checking. Host key verification failed.
答:
openssh会把你每个你访问过计算机的公钥(public key)都记录在~/.ssh/known_hosts
vi ~/.ssh/known_hosts
删除对应ip的相关rsa信息
问:
出现Could not import runpy module“
SystemError: <built-in function compile> returned NULL without setting an error generate-posix-vars failed make[1]: *** [pybuilddir.txt] Error 1 make[1]: Leaving directory /usr/local/src/Python-3.8.0 make: *** [profile-opt] Error 2
答:
导致原因:
在低版本的gcc中带有–enable-optimizations参数
解决方法(不推荐使用方法1):
1、升级gcc至高版本,gcc 8.1.0已修复此问题
2、./configure参数中去掉–enable-optimizations
问:
Pycharm报错连接linux服务器报错:Could not verifyssh-rsahost key with fingerprint
答:
是本地,不是服务器上的。我的在C:/User/Administor/.ssh/known_hosts 。
问:
Invalid HTTP_HOST header: '10.36.152.2:8000'. You may need to add '10.36.152.2' to ALLOWED_HOSTS
答:
将ALLOWED_HOSTS = []改为ALLOWED_HOSTS = [’*’]
问:
Caused by SSLError("Can't connect to HTTPS URL because the SSL module is not available.")
答:
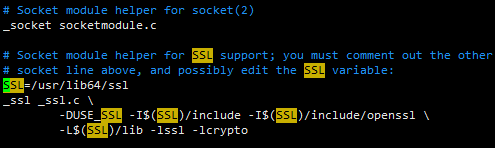
修改python配置文件,并重新编译安装:
(1)vi Python-3.8.5/Modules/Setup

设置SSL路径,但是这个SSL的安装路径在哪里
whereis openssl

问:
./Modules/_ssl.c:64:25: 致命错误:openssl/rsa.h:没有那个文件或目录
答:
yum install openssl-devel
问:
ModuleNotFoundError: No module named '_ctypes' --Python3
答:
yum install libffi-devel -y
make
make altinstall
问:
pip install uwsgi 之后,运行uwsgi 报错:[uwsgi: command not found]
答:
建立软链接
ln -s /usr/local/python3/bin/uwsgi /usr/bin/uwsgi
问:
Error response from daemon: conflict: unable to delete a2f2e369e78e (cannot be forced) - image has dependent child images
答:

问:
docker run -it -p 2222:22 -p 8000:8000 c6b614076583
iptables问题---docker: Error response from daemon: driver failed programming external conne...
答:
systemctl restart docker(重新启动docker
问:
bash: service: command not found
答:
yum install initscripts -y
问:
Docker容器使用问题:Failed to get D-Bus connection: Operation not permitted
答:
#创建容器:
 docker run -d -name centos7 --privileged=true centos:7 /usr/sbin/init
# 进入容器:
docker exec -it centos7 /bin/bash
这样可以使用systemctl启动服务了。
问:
bash: rpm: command not found
答:
apt-get update
apt-get install rpm
问:
bash: yum: command not found
答:
第一步: 到这个网站去下载如下RPM包 :https://mirrors.aliyun.com/centos/7/os/x86_64/Packages/
python-urlgrabber-3.9.1-11.el6.noarch.rpm
yum-cron-3.2.29-81.el6.centos.noarch.rpm
yum-3.2.29-81.el6.centos.noarch.rpm
yum-metadata-parser-1.1.2-16.el6.x86_64.rpm
yum-plugin-fastestmirror-1.1.30-41.el6.noarch.rpm

rpm -ivh --force --nodeps  python-urlgrabber-3.9.1-11.el6.noarch.rpm
..........
远程连接docker容器里的mysql
一、将3306端口暴露在接口
docker run -d -p 80:80 -p 3306:3306 --restart="always" images
二、查看容器外服务器本地的3306
netstat -an | grep 3306
进入mysql,然后编辑/etc/mysql/mysql.conf.d/mysqld.cnf
bind-address 0.0.0.0
然后重启mysql
以上问题附下:
阿里源配置 阿里云镜像加速解决unexpectedEOF错误
sudo mkdir -p /etc/docker
sudo tee /etc/docker/daemon.json <<-'EOF'
{
  "registry-mirrors": ["https://*.mirror.aliyuncs.com"]
}
EOF
sudo systemctl daemon-reload
sudo systemctl restart docker

docker pull centos:7
启动centos容器
docker run -it centos:7
cp CentOS-Base.repo到容器
docker cp /etc/yum.repos.d/CentOS-Base.repo 5785c23a1f9d:/opt
cd /etc/yum.repos.d/
mv CentOS-Base.repo CentOS-Base.repo.bak
mv /opt/CentOS-Base.repo /etc/yum.repos.d/
安装passwd
yum install passwd -y
修改Centos root密码
passwd (325511  vi ~/.ssh/known_hosts
删除对应ip的相关rsa信息)
安装openssh
yum install openssh-server -y
生成容器的公钥、私钥
cat  /etc/ssh/sshd_config
生成三个HostKey的命令如下:
ssh-keygen -t rsa -f /etc/ssh/ssh_host_rsa_key
ssh-keygen -t rsa -f /etc/ssh/ssh_host_ecdsa_key
ssh-keygen -t rsa -f /etc/ssh/ssh_host_ed25519_key

将sshd添加系统自启动
systemctl enable sshd
启动sshd服务
/usr/sbin/sshd
查询容器sshd 状态
ps -ef  ps -a

将容器commit为一个新的镜像

docker commit 04cf0b2947c9 centos:ssh
启动容器
docker run -it -p 2222:22 centos:ssh
#后台运行
docker run -itd --name zwzx -p 2222:22 centos:ssh

启动sshd服务
/usr/sbin/sshd
测试使用ssh访问容器
ssh root@127.0.0.1 -p 2222


docker start d413207ccc7f
docker exec -it d4 /bin/bash


官网镜像安装:

yum -y install zlib-devel
yum install -y openssl-devel
yum install libffi-devel -y
yum install initscripts -y
yum install wget -y
yum install vim -y
yum install iproute -y
yum -y install gcc automake autoconf libtool make


----python 3.6.15
wget https://www.python.org/ftp/python/3.6.15/Python-3.6.15.tar.xz
tar -xvf Python-3.6.15.tar.xz
mkdir /usr/local/python3
./configure  --prefix=/usr/local/python3
make && make altinstall


ln -s /usr/local/python3/bin/python3.6  /usr/bin/python3
ln -s /usr/local//python3/bin/pip3.6   /usr/bin/pip3
cd /usr/bin
rm -rf python
ln -s python3 python
ln -s pip3 pip
python -V

(1).yum
vim /usr/bin/yum
(2).urlgrabber-ext-down
vim /usr/libexec/urlgrabber-ext-down
(3).firewalld
vim /usr/sbin/firewalld
(4).firewall-cm
vim /usr/bin/firewall-cm
把最顶部的#!/usr/bin/python改为:#!/usr/bin/python2.7

pip install --upgrade pip
pip 安装mysqlclient 时遇到报错 mysql_config not found
yum install mysql-devel -y
查看你当前环境默认使用的 index-url 即 pip 源地址
pip install --help | grep -A 4 '\--index-url <url>'

修改pip安装源
mkdir ~/.pip
创建pip.conf文件填写:
[global]
trusted-host=mirrors.aliyun.com
index-url=http://mirrors.aliyun.com/pypi/simple/


cd /usr/local/
tar -xvf node-v16.13.1-linux-x64.tar.xz
ln -s node-v16.13.1-linux-x64 nodejs
# 建立软连接,变为全局
ln -s /usr/local/nodejs/bin/npm /usr/bin/
ln -s /usr/local/nodejs/bin/node /usr/bin/
#在Linux命令行node -v 命令会显示nodejs版本
node -v


wget https://nginx.org/download/nginx-1.20.2.tar.gz
mkdir /usr/local/nginx
./configure  --prefix=/usr/local/nginx  --with-http_stub_status_module --with-http_ssl_module
make&&make install
/usr/local/nginx/sbin/nginx -t
/usr/local/nginx/sbin/nginx stop

yum clean all
yum makecache
阿里源配置 阿里云镜像加速解决unexpectedEOF错误
sudo mkdir -p /etc/docker
sudo tee /etc/docker/daemon.json <<-'EOF'
{
  "registry-mirrors": ["https://*.mirror.aliyuncs.com"]
}
EOF
sudo systemctl daemon-reload
sudo systemctl restart docker

docker pull centos:7
启动centos容器
docker run -it centos:7
cp CentOS-Base.repo到容器
docker cp /etc/yum.repos.d/CentOS-Base.repo 5785c23a1f9d:/opt
cd /etc/yum.repos.d/
mv CentOS-Base.repo CentOS-Base.repo.bak
mv /opt/CentOS-Base.repo /etc/yum.repos.d/
安装passwd
yum install passwd -y
修改Centos root密码
passwd (325511  vi ~/.ssh/known_hosts
删除对应ip的相关rsa信息)
安装openssh
yum install openssh-server -y
生成容器的公钥、私钥
cat  /etc/ssh/sshd_config
生成三个HostKey的命令如下:
ssh-keygen -t rsa -f /etc/ssh/ssh_host_rsa_key
ssh-keygen -t rsa -f /etc/ssh/ssh_host_ecdsa_key
ssh-keygen -t rsa -f /etc/ssh/ssh_host_ed25519_key

将sshd添加系统自启动
systemctl enable sshd
启动sshd服务
/usr/sbin/sshd
查询容器sshd 状态
ps -ef  ps -a

将容器commit为一个新的镜像

docker commit 04cf0b2947c9 centos:ssh
启动容器
docker run -it -p 2222:22 centos:ssh
#后台运行
docker run -itd --name zwzx -p 2222:22 centos:ssh

启动sshd服务
/usr/sbin/sshd
测试使用ssh访问容器
ssh root@127.0.0.1 -p 2222


docker start d413207ccc7f
docker exec -it d4 /bin/bash


官网镜像安装:

yum -y install zlib-devel
yum install -y openssl-devel
yum install libffi-devel -y
yum install initscripts -y
yum install wget -y
yum install vim -y
yum install iproute -y
yum -y install gcc automake autoconf libtool make


----python 3.6.15
wget https://www.python.org/ftp/python/3.6.15/Python-3.6.15.tar.xz
tar -xvf Python-3.6.15.tar.xz
mkdir /usr/local/python3
./configure  --prefix=/usr/local/python3
make && make altinstall


ln -s /usr/local/python3/bin/python3.6  /usr/bin/python3
ln -s /usr/local/python3/bin/pip3.6   /usr/bin/pip3
cd /usr/bin
rm -rf python
ln -s python3 python
ln -s pip3 pip
python -V

(1).yum
vim /usr/bin/yum
(2).urlgrabber-ext-down
vim /usr/libexec/urlgrabber-ext-down
(3).firewalld
vim /usr/sbin/firewalld
(4).firewall-cm
vim /usr/bin/firewall-cm
把最顶部的#!/usr/bin/python改为:#!/usr/bin/python2.7

pip install --upgrade pip
pip 安装mysqlclient 时遇到报错 mysql_config not found
yum install mysql-devel -y
查看你当前环境默认使用的 index-url 即 pip 源地址
pip install --help | grep -A 4 '\--index-url <url>'

修改pip安装源
mkdir ~/.pip
创建pip.conf文件填写:
[global]
trusted-host=mirrors.aliyun.com
index-url=http://mirrors.aliyun.com/pypi/simple/


cd /usr/local/
tar -xvf node-v16.13.1-linux-x64.tar.xz
ln -s node-v16.13.1-linux-x64 nodejs
# 建立软连接,变为全局
ln -s /usr/local/nodejs/bin/npm /usr/bin/
ln -s /usr/local/nodejs/bin/node /usr/bin/
#在Linux命令行node -v 命令会显示nodejs版本
node -v

wget https://nginx.org/download/nginx-1.20.2.tar.gz
mkdir /usr/local/nginx
./configure  --prefix=/usr/local/nginx  --with-http_stub_status_module --with-http_ssl_module
make&&make install
/usr/local/nginx/sbin/nginx -t
/usr/local/nginx/sbin/nginx stop


 1826
1826


 被折叠的 条评论
为什么被折叠?
被折叠的 条评论
为什么被折叠?
 到【灌水乐园】发言


