


RPC 协议基本介绍
-
RPC全称 remote procedure call,即远程过程调用。借助 RPC 可以做到像本地调用一样调用远程服务。
-
RPC基本原理是基于传输协议和网络 IO 来实现,其中传输协议比较出名的有 TCP、UDP 等,TCP、UDP 都是基于
Socket概念上为某类应用场景而扩展出来的传输协议。
Dubbo RPC 使用演示
首先来回忆下之前使用 Dubbo RPC 框架时是怎么使用的
- 服务提供方:服务提供方需要实现接口方法,并且将实现接口暴露出去
然后在 zk 中,可以看到相关的节点文件:

- 消费方:可以通过
ZK找到对应的服务提供者,然后调用远程接口
过程就是这么一个过程,但是要知道这两个服务都是在不同地方的,所以肯定需要通过网络传输进行数据交流,服务端和客户端需要进行交流肯定要有一定规范或者协议才可以通信,这个规范就是 RPC 协议,实现数据传输当然是 Socket 套接层。
总结出来 Dubbo RPC 框架有这么三个步骤:
- 定义公共接口
- 服务端实现接口方法
- 客户端发送请求调用远程接口
共享数据都注册到了中间件 zk 上面,比如各自所在的 IP 地址都存放到 zk。
RPC 通信实现原理
一个完整的 RPC 架构里面包含了四个核心的组件,分别是:
Client:客户端(Client),服务的调用方Client Handler:可以获取到服务端地址信息,然后按照一定规范和编码将请求打包成网络数据,通过底层 Socket 发送给服务端Server:服务端(Server),真正的服务提供者Server Handler:用来接收客户端发送的数据包,将其进行解码并处理,然后根据解码信息调用本地对应方法
注意:Handler 是一条链式操作,都是用 pipeline 进行管理,是责任链模式的完美体现。
使用 Netty 实现 RPC 远程调用
1、定义公共接口和实体
public interface UserService {
    String hello (UserEntity user);
}

@Data
public class UserEntity implements Serializable {
    private String userName;
    private int password;

    public UserEntity(String userName, int password) {
        this.userName = userName;
        this.password = password;
    }
}
2、服务端实现 UserService 接口方法
public class UserServiceImpl implements UserService {
    @Override
    public String hello(UserEntity user) {
        System.out.println("【服务端说】我是 UserService 接口的具体处理类 UserServiceImpl");
        return "你真的好帅!!!";
    }
}
3、实现 Server 服务端启动,类似启动 Tomcat 服务,为提供者运行做载体,代码如下
public class ServerBootStrap {
    public void start() {
        EventLoopGroup bossLoopGroup = new NioEventLoopGroup(1);

        EventLoopGroup wokerLoopGroup = new NioEventLoopGroup(4);
        try {

            ServerBootstrap bootstrap = new ServerBootstrap();
            bootstrap.group(bossLoopGroup, wokerLoopGroup)  // 设置两个线程组
                    .channel(NioServerSocketChannel.class) // 使用 NioServerSocketChannel 作为服务器的通道实现
                    .childHandler(new ChannelInitializer<SocketChannel>() {
                        @Override
                        protected void initChannel(SocketChannel channel) {
                            ChannelPipeline pipeline = channel.pipeline();
                            //pipeline.addLast(new StringDecoder());
                            //pipeline.addLast(new StringEncoder());
                            pipeline.addLast(new UserEntityDecoder()); // 自定义解码器
                            pipeline.addLast(new StringEncoder()); // Netty 提供的字符串编码器
                            pipeline.addLast(new NettyServerHandler());
                        }
                    });
            ChannelFuture future = bootstrap.bind(9897).sync();
            System.out.println("服务端提供者已启动成功...");
            future.channel().closeFuture().sync();
        } catch (Exception e) {
            e.printStackTrace();
        } finally {
            bossLoopGroup.shutdownGracefully();
            wokerLoopGroup.shutdownGracefully();
        }
    }
}
4、实现 ServerHandler 操作,主要是用来接受客户端发送过来的消息,底层过来的都是字节码文件,需进行解码成自己定义的文件格式。这里我们主要是接受到了接口的请求参数,要解码成我们自己的实体,代码如下:
public class UserEntityDecoder extends ByteToMessageDecoder {

    @Override
    protected void decode(ChannelHandlerContext ctx, ByteBuf in, List<Object> out) throws Exception {
        int password = in.readInt();
        byte[] content = new byte[in.readableBytes()];
        in.readBytes(content);
        String userName = new String(content, CharsetUtil.UTF_8);
        System.out.println("【解码 Handler】服务端正在【解码】操作,解码出 userName="+userName+",password="+password);
        out.add(new UserEntity(userName, password));
    }
}
5、第4步主要是将客户端传送过来的数据解码操作,具体业务处理放到了下一个 handler 进行处理,如下所示:
public class NettyServerHandler extends SimpleChannelInboundHandler<UserEntity> {

    @Override
    protected void channelRead0(ChannelHandlerContext ctx, UserEntity user) throws Exception {
        System.out.println("【读取 Handler】服务端接收到的消息 userName=" + user.getUserName()+",password="+user.getPassword());
        System.out.println("【读取 Handler】服务端开始执行 hello() 方法");
        String result = new UserServiceImpl().hello(user);
        System.out.println("【读取 Handler】服务端开始执行完 hello() 方法, 然后返回结果是 result="+result);
        ctx.writeAndFlush(result);
    }

    @Override
    public void exceptionCaught(ChannelHandlerContext ctx, Throwable cause) throws Exception {
        ctx.close();
    }
}
上述继承 SimpleChannelInboundHandler 也可以替换成 ChannelInboundHandlerAdapter,这个 handler 根据解码出来的请求参数,开始调用服务端的方法,然后将结果以字符串的格式进行返回,因为网络层都是以字节码的方式传输,所以这里又要讲字符串编码,然后才能发送给客户端,不过 Netty 已经帮我们做好了字符串相关的编码StringEncoder和解码StringDecoder,拿过直接使用即可。
上面就是关于服务提供者的编写,接下来就是编写客户端请求了。
6、编写客户端代码,客户端首先需要知道服务端的 IP 地址,并且客户端现在只有 UserService 接口和实体,没有实现体,所以客户端应该怎么调用接口的方法呢?直接掉肯定是不行的,这里提供了 JDK 代理的方式进行调用,这个代理里面的 InvocationHandler 其实就是 UserService 的实现,而 InvocationHandler 这里面对操作也就是去解析服务端返回的结果,然后将结果包装到 UserService 接口的的返回值中,这样就完成了客户端访问远程接口。
public class NettyClient {
    private static NettyClientHandler clientHandler;

    private static ExecutorService executor = Executors.newFixedThreadPool(2);

    public Object getBean(final Class<?> serviceClass,UserEntity user) {

        return Proxy.newProxyInstance(Thread.currentThread().getContextClassLoader(),
                new Class<?>[]{serviceClass}, (obj, method, params) -> {
                    if (Objects.isNull(clientHandler))
                        initClient();

                    clientHandler.setParam(user);
                    System.out.println("【客户端】开始执行提交操作...");
                    return executor.submit(clientHandler).get();
                });
    }

	// 客户端和服务端建立连接操作,获取 IP + Port
    public static void initClient() {
        try {
            clientHandler = new NettyClientHandler();

            NioEventLoopGroup clientGroup = new NioEventLoopGroup();
            Bootstrap bootstrap = new Bootstrap();
            bootstrap.group(clientGroup)
                    .channel(NioSocketChannel.class)
                    .option(ChannelOption.TCP_NODELAY, true)
                    .handler(new ChannelInitializer<SocketChannel>() {
                        @Override
                        protected void initChannel(SocketChannel ch) throws Exception {
                            ChannelPipeline pipeline = ch.pipeline();
                            //pipeline.addLast(new StringDecoder());
                            //pipeline.addLast(new StringEncoder());
                            pipeline.addLast(new UserEntityEncoder());
                            pipeline.addLast(new StringDecoder());
                            pipeline.addLast(clientHandler);
                        }
                    });

            System.out.println("【客户端】消费者已经启动成功....");

            ChannelFuture future = bootstrap.connect("127.0.0.1", 9897).sync();
            // 这里暂时先不要关闭,否则直接没有返回

        } catch (Exception e) {
            e.printStackTrace();
        }
    }
}
7、客户端开始通过 Netty 自带的解码器 StringDecoder 解析服务端传回来数据包,然后解码完成之后,传播个下一个真正执行业务的 handler,代码如下:
public class NettyClientHandler extends SimpleChannelInboundHandler<String> implements Callable {

    private String response;
    private UserEntity param;
    private ChannelHandlerContext context;

    // 与服务器建连联系就会执行该方法,该方法是第1个被执行的
    @Override
    public void channelActive(ChannelHandlerContext ctx) throws Exception {
        context = ctx;
    }

	// 收到服务端写的数据就会触发
    @Override
    protected synchronized void channelRead0(ChannelHandlerContext ctx, String result) throws Exception {

        response = result;
        System.out.println("【客户端】接受到服务端的返回消息是 resp = " + response);

        notify();
    }

    // 被代理对象调用,发送数据给服务器 -> wait(发送完数据立即被阻塞) -> 等待被唤醒(messageReceived() 方法可以唤醒) —> 返回结果
    // 在这里发送请求给服务端,发送完之后,因为中间是需要时间的,不能直接返回,否则客户端还没有读取到信息
    // 所以这里采用了一个等待唤醒机制的方式,先把请求发送过去,然后等待服务端写数据回来在唤醒把结果返回
    // 要知道实现 Callable 接口,调用 get() 会阻塞在这个方法哦
    @Override
    public synchronized Object call() throws Exception {
        context.writeAndFlush(param);
        wait(); // 等待 ChannelRead 方法获取到服务器结果后,唤醒
        return response;
    }

    @Override
    public void exceptionCaught(ChannelHandlerContext ctx, Throwable cause) throws Exception {
        ctx.close();
    }
	// 外部用来封装请求参数的方法
    public void setParam(UserEntity param) {
        this.param = param;
    }
}
8、启动服务端代码如下:
public class NettyServer {
    public static void main(String[] args) {
        new ServerBootStrap().start();
    }
}
运行结果如下:
【客户端】消费者已经启动成功....
【客户端】开始执行提交操作...
【客户端】正在将 userName=小明,帅吗?,password=666666 进行编码发送给服务端
【客户端】接受到服务端的返回消息是 resp = 你真的好帅!!!
【客户端】执行完 hello() 方法,最终的返回结果是 result = 你真的好帅!!!
9、启动客户端代码如下:
public class ClientBootStrap {
    public static void main(String[] args) {
        NettyClient customer = new NettyClient();
        UserEntity param = new UserEntity("小明,帅吗?", 666666);
        UserService userService = (UserService)customer.getBean(UserService.class,param);


        String result = userService.hello(param);

        System.out.println("【客户端】执行完 hello() 方法,最终的返回结果是 result = " + result);
    }
}
执行结果如下:
服务端提供者已启动成功...
【解码 Handler】服务端正在【解码】操作,解码出 userName=小明,帅吗?,password=666666
【读取 Handler】服务端接收到的消息 userName=小明,帅吗?,password=666666
【读取 Handler】服务端开始执行 hello() 方法
【服务端说】我是 UserService 接口的具体处理类 UserServiceImpl
【读取 Handler】服务端开始执行完 hello() 方法, 然后返回结果是 result=你真的好帅!!!
以上就是通过 Netty 实现简单的 RPC 框架原理。这里有必要注意的是,因为 Socket 在传输过程中会存在粘包和拆包的问题,所以在读取数据点时候需要注意这个问题。
TCP 传输中粘包和拆包问题
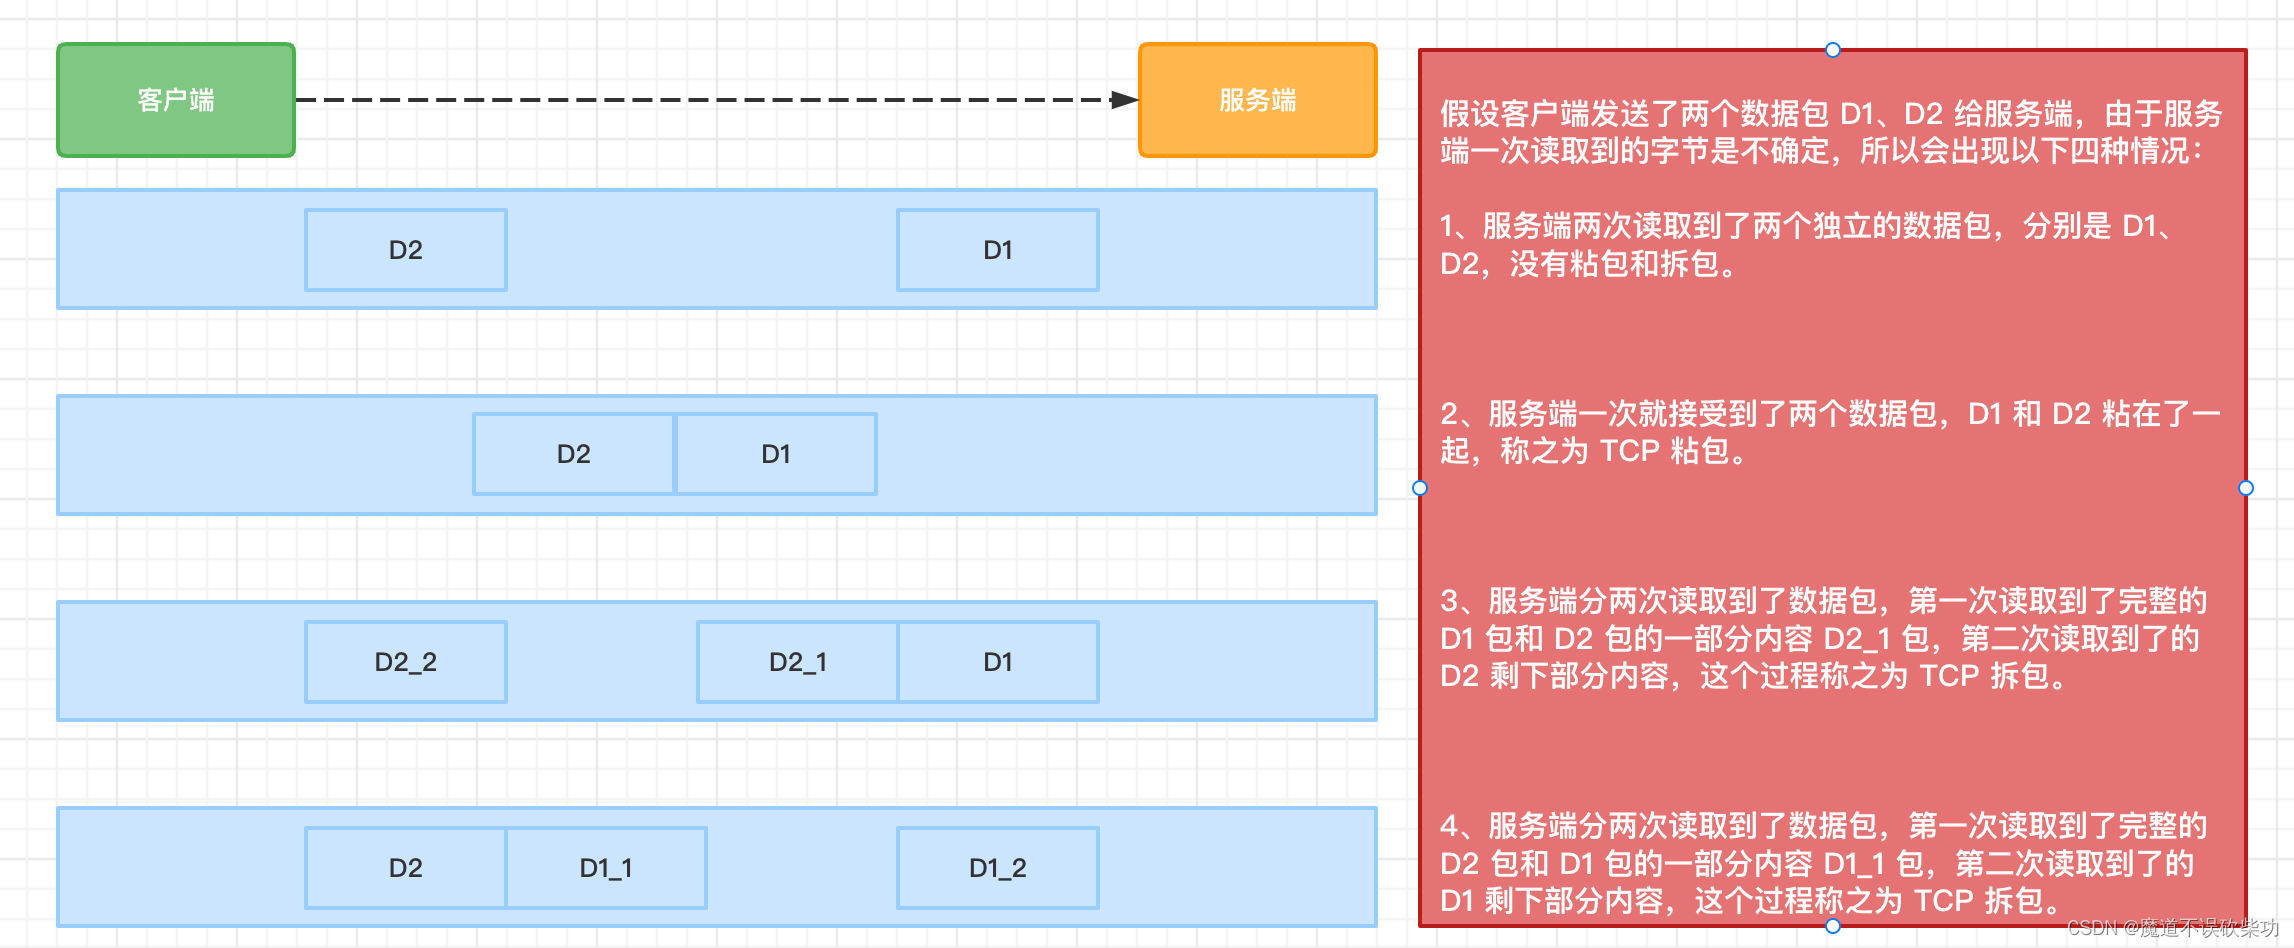
- TCP 是面向连接,面向流的,提供高可靠性服务,收发两端都要有成对的
Socket,因此,发送端为了将多个发给接受的包,更有效的发给对方,使用了优化方法(Nagle 算法),将多次间隔较小且数据量小的数据,合并成一个大的数据块,然后封包,这样虽然提高了效率,但是接受端就很难分辨出完整的数据包,因为面向流的通信是无消息保护边界的 - 由于 TCP 无消息保护边界,需要再接受端处理边界问题,也就是我们所说的粘包和拆包问题
如下示意图:
然后通过代码演示这个粘包和拆包问题,代码如下:
服务端代码如下:
public class MyServer {
    public static void main(String[] args) throws InterruptedException {

        EventLoopGroup bossLoopGroup = new NioEventLoopGroup(1);

        EventLoopGroup wokerLoopGroup = new NioEventLoopGroup(4);

        ServerBootstrap bootstrap = new ServerBootstrap();
        ChannelFuture future = bootstrap
                .group(bossLoopGroup, wokerLoopGroup)  // 设置两个线程组
                .channel(NioServerSocketChannel.class) // 使用 NioServerSocketChannel 作为服务器的通道实现
                .option(ChannelOption.SO_BACKLOG, 128)  // 线程队列得到连接个数
                .childOption(ChannelOption.SO_KEEPALIVE, true) // 设置保持活动连接状态
                .childHandler(new ChannelInitializer<SocketChannel>() {
                    @Override
                    protected void initChannel(SocketChannel channel) throws Exception {
                        ChannelPipeline pipeline = channel.pipeline();
                        pipeline.addLast(new MyServerHandler());
                    }
                })
                .bind(8989)
                .sync();

        System.out.println("server is ready...");

        future.channel().closeFuture().sync();
        System.out.println("shutdonw....");

        bossLoopGroup.shutdownGracefully();
        wokerLoopGroup.shutdownGracefully();
    }
}
服务端接受客户端 handler 代码如下:
public class MyServerHandler extends SimpleChannelInboundHandler<ByteBuf> {
    private int count;

    @Override
    protected void channelRead0(ChannelHandlerContext channelHandlerContext, ByteBuf msg) throws Exception {
        byte[] buff = new byte[msg.readableBytes()];
        msg.readBytes(buff);
        System.out.println("服务器"+(++count)+"次接受到消息是:"+new String(buff, CharsetUtil.UTF_8));
    }
}
客户端代码如下:
public class MyClient {
    public static void main(String[] args) throws InterruptedException {
        NioEventLoopGroup clientGroup = new NioEventLoopGroup();
        Bootstrap bootstrap = new Bootstrap();
        bootstrap.group(clientGroup)
                .channel(NioSocketChannel.class)
                .handler(new ChannelInitializer<SocketChannel>() {
                    @Override
                    protected void initChannel(SocketChannel ch) throws Exception {
                        ch.pipeline().addLast(new MyClientHandler());
                    }
                });

        System.out.println("客户端 IS ok....");

        ChannelFuture future = bootstrap.connect("127.0.0.1", 8989).sync();
        future.channel().closeFuture().sync();
        System.out.println("shutdonw98867568....");

        clientGroup.shutdownGracefully();
    }
}
客户端发送数据 handler 代码如下:
public class MyClientHandler extends SimpleChannelInboundHandler<ByteBuf> {

    @Override
    public void channelActive(ChannelHandlerContext ctx) throws Exception {
        System.out.println("cccccc");
        for (int i = 0; i < 10; i++) {
            ctx.writeAndFlush(Unpooled.copiedBuffer("hello server,I am client!", CharsetUtil.UTF_8));
        }
    }

    @Override
    protected void channelRead0(ChannelHandlerContext ctx, ByteBuf msg) throws Exception {
        // doSomething...
    }
}
可以看到客户端循环发送10次数据给服务端,但是服务端不确定接受几次,是一次性接收完,还是分成多次接受这10条数据呢?看运行结果,多运行几次会有不同的结果。
运行结果1如下:
server is ready...
服务器1次接受到消息是:hello server,I am client!hello server,I am client!hello server,I am client!hello server,I am client!hello server,I am client!hello server,I am client!hello server,I am client!hello server,I am client!hello server,I am client!hello server,I am client!
发现服务端一次性就读取完了客户端分10次发送过来的数据包。
运行结果2如下:
server is ready...
服务器1次接受到消息是:hello server,I am client!hello server,I am client!hello server,I am client!
服务器2次接受到消息是:hello server,I am client!hello server,I am client!hello server,I am client!
服务器3次接受到消息是:hello server,I am client!hello server,I am client!hello server,I am client!hello server,I am client!
发现服务端分成了3次进行接受客户端分10次发送过来的数据包。
运行结果3如下:
server is ready...
服务器1次接受到消息是:hello server,I am client!
服务器2次接受到消息是:hello server,I am client!hello server,I am client!hello server,I am client!hello server,I am client!
服务器3次接受到消息是:hello server,I am client!hello server,I am client!
服务器4次接受到消息是:hello server,I am client!hello server,I am client!
服务器5次接受到消息是:hello server,I am client!
发现服务端分成了5次进行接受客户端分10次发送过来的数据包,运行结果都是不确定的,因为存在粘包和拆包问题,服务端不知道什么时候才算读取到一个完整的数据包,进而不能正常处理业务,所以应该怎么解决这个问题呢?
我们会发现我们每次读取的时候因为不知道字节长度,如果客户端告诉服务端多少个长度就算一个完整的数据包,那么服务端就可以根据这个长度进行读取,这样就可以解决服务端读取边界问题了。

那么这里就要根据我们自定义一个协议或者规范了,需要定义长度和内容,这个长度是用来告诉服务端需要读取的长度,代码如下:
1、先定义规范协议
@Data
public class MyProtocol {
    private int len;  // 定义一次性读取的长度
    private byte[] content; // 具体的内容以字节形式传送
2、编写客户端,代码如下:
public class MyClient {
    public static void main(String[] args) throws InterruptedException {
        NioEventLoopGroup clientGroup = new NioEventLoopGroup();
        Bootstrap bootstrap = new Bootstrap();
        bootstrap.group(clientGroup)
                .channel(NioSocketChannel.class)
                .handler(new ChannelInitializer<SocketChannel>() {
                    @Override
                    protected void initChannel(SocketChannel ch) throws Exception {
                        ch.pipeline().addLast(new MyPotolDecodeHandler());
                        ch.pipeline().addLast(new MyProtolEncoderHandler());
                        ch.pipeline().addLast(new MyClientHandler());
                    }
                });

        System.out.println("客户端 IS ok....");

        ChannelFuture future = bootstrap.connect("127.0.0.1", 8787).sync();
        future.channel().closeFuture().sync();
        System.out.println("shutdonw98867568....");

        clientGroup.shutdownGracefully();
    }
}
3、编写客户端发送数据 handler,代码如下:
public class MyClientHandler extends SimpleChannelInboundHandler<MyProtocol> {
    private int count;
    @Override
    public void channelActive(ChannelHandlerContext ctx) throws Exception {
        for (int i = 0; i < 5; i++) {
            String msg = "今天大口吃肉,吃火锅!";
            byte[] content = msg.getBytes(CharsetUtil.UTF_8);
            int length = msg.getBytes(CharsetUtil.UTF_8).length;

            MyProtocol myProtocol = new MyProtocol();
            myProtocol.setContent(content);
            myProtocol.setLen(length);

            ctx.writeAndFlush(myProtocol);
        }
    }

    @Override
    protected void channelRead0(ChannelHandlerContext ctx, MyProtocol msg) throws Exception {
        int len = msg.getLen();
        byte[] content = msg.getContent();
        System.out.println("客户端第"+(++count)+"次收到服务端的响应消息:len="+len+",content="+new String(content,CharsetUtil.UTF_8));
    }
}
客户端轮询发了5次数据给服务端,现在就是要验证服务端是否能够按照5次接受,并且内容还是和发送的内容一样,这样就解决了 TCP 的粘包和拆包问题。
4、编写协议头编码器,代码如下:
public class MyProtolEncoderHandler extends MessageToByteEncoder<MyProtocol> {

    @Override
    protected void encode(ChannelHandlerContext ctx, MyProtocol msg, ByteBuf out) throws Exception {
        System.out.println("客户端先编码在发送--.....");
        out.writeInt(msg.getLen());
        out.writeBytes(msg.getContent());
    }
}
直接将 MyProtocol 协议转成字节写出去即可。
5、编写服务端解码器,代码如下:
public class MyPotolDecodeHandler extends ByteToMessageDecoder {

    @Override
    protected void decode(ChannelHandlerContext ctx, ByteBuf in, List<Object> out) throws Exception {
        System.out.println("服务器端开始解码操作...");
        // 读取自己定义的长度,按照这个长度读取字节数据
        // 这样就相当于固定长度读取字节了,从而解决了粘包和拆包问题
        int len = in.readInt();
        byte[] content = new byte[len];
        in.readBytes(content);

        MyProtocol myProtocol = new MyProtocol();
        myProtocol.setLen(len);
        myProtocol.setContent(content);

        out.add(myProtocol);
    }
}
直接将客户端传输过来的字节数据编码成 MyProtocol 协议。
6、编写服务端接受数据 handler,代码如下:
public class MyServerHandler extends SimpleChannelInboundHandler<MyProtocol> {
    private int count;

    @Override
    protected void channelRead0(ChannelHandlerContext ctx, MyProtocol msg) throws Exception {
        int len = msg.getLen();
        byte[] content = msg.getContent();
        System.out.println("服务器端"+(++count)+"次收到消息是:len="+len +",content="+new String(content, CharsetUtil.UTF_8));

        String response = UUID.randomUUID().toString();
        byte[] bytes = response.getBytes("utf-8");
        int length = response.getBytes("utf-8").length;
        MyProtocol myProtocol = new MyProtocol();
        myProtocol.setLen(length);
        myProtocol.setContent(bytes);
        ctx.writeAndFlush(myProtocol);
    }
}
我们接受完客户端数据之后,然后同时也给客户端返回了一条数据,这样一来一回合作愉快。
7、编写服务端,并启动服务端,代码如下:
public class MyServer {


    public static void main(String[] args) throws InterruptedException {

        EventLoopGroup bossLoopGroup = new NioEventLoopGroup(1);

        EventLoopGroup wokerLoopGroup = new NioEventLoopGroup(4);

        ServerBootstrap bootstrap = new ServerBootstrap();
        ChannelFuture future = bootstrap
                .group(bossLoopGroup, wokerLoopGroup)  // 设置两个线程组
                .channel(NioServerSocketChannel.class) // 使用 NioServerSocketChannel 作为服务器的通道实现
                .option(ChannelOption.SO_BACKLOG, 128)  // 线程队列得到连接个数
                .childOption(ChannelOption.SO_KEEPALIVE, true) // 设置保持活动连接状态
                .childHandler(new ChannelInitializer<SocketChannel>() {
                    @Override
                    protected void initChannel(SocketChannel channel) throws Exception {
                        ChannelPipeline pipeline = channel.pipeline();
                        pipeline.addLast(new MyPotolDecodeHandler());
                        pipeline.addLast(new MyProtolEncoderHandler());
                        pipeline.addLast(new MyServerHandler());
                    }
                })
                .bind(8787)
                .sync();

        System.out.println("server is ready...");
        future.channel().closeFuture().sync();
        System.out.println("shutdonw....");
        bossLoopGroup.shutdownGracefully();
        wokerLoopGroup.shutdownGracefully();
    }
}
服务端运行结果如下:
server is ready...
服务器端开始解码操作...
服务器端1次收到消息是:len=31,content=今天大口吃肉,吃火锅!
客户端先编码在发送--.....
服务器端开始解码操作...
服务器端2次收到消息是:len=31,content=今天大口吃肉,吃火锅!
客户端先编码在发送--.....
服务器端开始解码操作...
服务器端3次收到消息是:len=31,content=今天大口吃肉,吃火锅!
客户端先编码在发送--.....
服务器端开始解码操作...
服务器端4次收到消息是:len=31,content=今天大口吃肉,吃火锅!
客户端先编码在发送--.....
服务器端开始解码操作...
服务器端5次收到消息是:len=31,content=今天大口吃肉,吃火锅!
客户端先编码在发送--.....
客户端运行结果如下:
客户端 IS ok....
客户端先编码在发送--.....
客户端先编码在发送--.....
客户端先编码在发送--.....
客户端先编码在发送--.....
客户端先编码在发送--.....
服务器端开始解码操作...
客户端第1次收到服务端的响应消息:len=36,content=1a26fc96-fc0e-4108-8cd7-e420508edbbe
服务器端开始解码操作...
客户端第2次收到服务端的响应消息:len=36,content=429131d7-6643-460b-b1e2-a3bea3c9c3d9
服务器端开始解码操作...
客户端第3次收到服务端的响应消息:len=36,content=2786509f-cef8-48f7-85e3-455d3e7754ac
服务器端开始解码操作...
客户端第4次收到服务端的响应消息:len=36,content=0b9b9edf-b810-458b-88e4-468dc918da89
服务器端开始解码操作...
客户端第5次收到服务端的响应消息:len=36,content=fe1976ef-b781-4a1c-a817-fcb18bd36891
发现客户端给服务端发了5次数据,服务端也是按照正常的方式接受到了数据,并且还给客户端一一应答了,这就是固定长度解决 TCP 粘包和拆包的一种方式 (FixedLengthFrameDecoder(固定消息长度解码器)),Netty 还提供了很多解决这个问题的方法:对应明确消息边界的分隔符拆包器 DelimiterBasedFrameDecoder、对应消息头消息体的基于数据包长度的解码器 LengthFieldBasedFrameDecoder 等。


 912
912


 被折叠的 条评论
为什么被折叠?
被折叠的 条评论
为什么被折叠?
 到【灌水乐园】发言


