


 本文详细介绍了Swing布局管理器FlowLayout的使用方法,包括其构造函数、常用方法,并通过实例演示了不同对齐方式和间距设置的效果。
一、简介
FlowLayout应该是Swing布局管理器学习中最简单、最基础的一个。所谓流式,就是内部控件像水流一样,从前到后按顺序水平排列,直到达到容器的宽度时跳转到第二行。既然是水平排列,那么就存在三种基本的对齐方式:居中对齐(CENTER )、左对齐(LEFT )和右对齐(RIGHT )。然而,FlowLayout还提供两种对齐方式:LEADING,表示控件与容器方向开始边对应;TRAILING,控件与容器方向结束边对应。setAlignment(int align)用于设置对齐方式。在一般情况下,LEADING就是左对齐,TRAILING就是右对齐。除此之外,FlowLayout还可以对内部控件之间、内部控件与容器之间的间距进行设置,setHgap(int hgap)用于指定水平间距;setVgap(int vgap)用于指定垂直间距。
二、构造函数
1. FlowLayout()
构造一个新的 FlowLayout,它是默认居中对齐的,默认的水平和垂直间隙是5个像素
2. FlowLayout(int align)
构造一个新的 FlowLayout,它具有指定的对齐方式,默认的水平和垂直间隙是 5 个像素
五个参数值及含义如下:
0或FlowLayout.lEFT,控件左对齐
1或FlowLayout.CENTER,居中对齐
2或FlowLayout.RIGHT,右对齐
3或FlowLayout.LEADING,控件与容器方向开始边对应
4或FlowLayout.TRAILING,控件与容器方向结束边对应
如果是0、1、2、3、4之外的整数,则为左对齐
3. FlowLayout(int align, int hgap, int vgap)
创建一个新的流布局管理器,它具有指定的对齐方式以及指定的水平和垂直间隙。
三、常用方法
void setAlignment(int align):设置此布局的对齐方式。
void setHgap(int hgap):设置组件之间以及组件与 Container 的边之间的水平间隙。
void setVgap(int vgap):设置组件之间以及组件与 Container 的边之间的垂直间隙
四、举例
import java.awt.*;
import javax.swing.*;
public class TestFlowLayout01 extends JFrame{
public static void main(String[] args) {
new TestFlowLayout01();
}
private static final long serialVersionUID = 1L;
public TestFlowLayout01(){
initFrame();
}
private void initFrame(){
this.setTitle("流式布局测试");
this.setDefaultCloseOperation(JFrame.EXIT_ON_CLOSE);
addComponents();
this.setSize(600, 400);
this.setLocationRelativeTo(null);
this.setVisible(true);
}
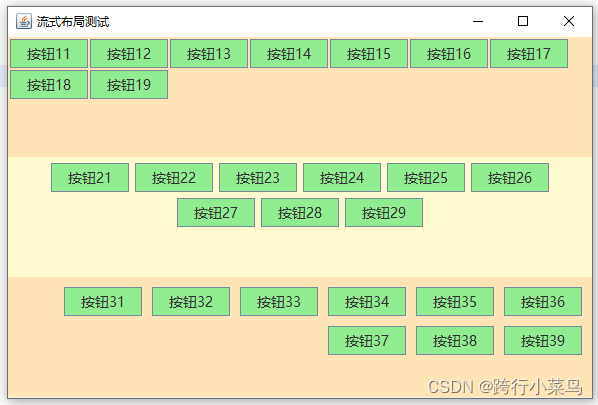
private void addComponents(){
this.setLayout(new GridLayout(3, 1));
JPanel panel01 = new JPanel(new FlowLayout(FlowLayout.LEADING, 2, 2));
panel01.setBackground(new Color(255, 228, 181));
this.add(panel01);
JPanel panel02 = new JPanel(new FlowLayout(FlowLayout.CENTER, 6, 6));
panel02.setBackground(new Color(255, 250, 205));
this.add(panel02);
JPanel panel03 = new JPanel(new FlowLayout(FlowLayout.TRAILING, 10, 10));
panel03.setBackground(new Color(255, 228, 181));
this.add(panel03);
List<JButton> btns = new ArrayList<>();
JButton btn = null;
for(int i=1;i<=9;i++){
btn = new JButton("按钮1" + i);
panel01.add(btn);
btns.add(btn);
}
for(int i=1;i<=9;i++){
btn = new JButton("按钮2" + i);
panel02.add(btn);
btns.add(btn);
}
for(int i=1;i<=9;i++){
btn = new JButton("按钮3" + i);
panel03.add(btn);
btns.add(btn);
}
for (JButton jButton : btns) {
jButton.setFocusPainted(false);
jButton.setOpaque(true);
jButton.setBackground(new Color(144, 238, 144));
jButton.setFont(new Font("微软雅黑", Font.PLAIN, 14));
}
}
}


 7万+
7万+

 被折叠的 条评论
为什么被折叠?
被折叠的 条评论
为什么被折叠?
 到【灌水乐园】发言


