


Spring之IoC容器和依赖注入(1)
4. IoC容器:创建容器三种方式
BeanFactory容器的类结构

方式一:类路径配置文件建容器
方式二:本地配置文件方式创建容器
方式三:注解的方式创建容器
代码
package com.it.test;

import com.it.service.CustomerService;
import com.it.service.impl.CustomerServiceImpl;
import org.junit.Test;
import org.springframework.context.annotation.AnnotationConfigApplicationContext;
import org.springframework.context.support.ClassPathXmlApplicationContext;
import org.springframework.context.support.FileSystemXmlApplicationContext;

public class TestCustomer {

    /**
     * 1.在类路径下读取配置文件,创建容器
     */
    @Test
    public void testCustomer() {
        //1.创建Spring容器,参数:指定spring的配置文件
        ClassPathXmlApplicationContext context = new ClassPathXmlApplicationContext("applicationContext.xml");
        //2.从容器中获取对象
        CustomerService customerService = (CustomerService) context.getBean("customerService");
        //3.调用对象的方法
        customerService.saveCustomer();
        //4.关闭容器
        context.close();
    }


    /**
     * 2. 从文件的绝对路径中获取配置文件,来创建容器
     */
    @Test
    public void testFileSystem() {
        //1.创建Spring容器,参数:指定spring的配置文件
        FileSystemXmlApplicationContext context = new FileSystemXmlApplicationContext("D:\\Spring\\src\\main\\resources\\applicationContext.xml");
        //2.从容器中获取对象
        CustomerService customerService = (CustomerService) context.getBean("customerService");
        //3.调用对象的方法
        customerService.saveCustomer();
        //4.关闭容器
        context.close();
    }

    /**
     * 3.读取注解的配置文件创建容器
     */
    @Test
    public void testAnnotationConfig() {
        //1.创建Spring容器,参数:类配置文件,通过注解去配置Spring
        AnnotationConfigApplicationContext context = new AnnotationConfigApplicationContext(CustomerServiceImpl.class);
        System.out.println(context);
    }
}
5. bean标签的配置细节
bean标签的属性说明
| 属性 | 说明 |
|---|---|
| id | 容器中唯一的标识 |
| name | 还可以有多个名字,使用逗号,空格,分号隔开都可以 |
| class | 指定类全名,指定的是实现类,不是接口 |
| scope | 指定bean在容器中作用范围 singleton:默认值,表示这个是单例对象,整个容器中只会创建一个对象 prototype:这是多例对象,每次获取一个新的对象 request:用于请求域 session:用于会话域 application: 用于上下文域 globalsession:用于全局的会话,用在分布式开发中 |
| init-method | 创建对象时,执行的初始化的方法 |
| destroy-method | 销毁对象时,执行的方法 |
| lazy-init | 是否使用延迟加载,默认是不使用 |
6. bean的生命周期
bean的作用范围和生命周期的说明
| scope取值 | 作用范围 | 生命周期 |
|---|---|---|
| singleton 单例对象 | 容器一创建就创建这个对象,只要容器不销毁就一直存在 | 出生:容器创建就出生 活着:只要容器没有销毁就一直存在 死亡:容器关闭的时候 |
| prototype 多例对象 | 每次获取对象就创建一个新的对象,使用完毕会被GC回收 | 出生:获取对象的时候 活着:使用过程中 死亡:由GC去回收 |
单例的延迟加载
- 未设置延迟加载,创建容器,不获取对象,也会实例化
- 使用lazy-init设置为true,在得到对象的时候才实例化
7. 依赖注入:构造函数
依赖注入介绍
依赖注入(Dependency Injection,简称DI)。当某个Java对象(调用者)需要调用另一个Java对象(被调用者,即被依赖对象)时,以前调用者通常采用"new 被调用者"的代码方式来创建对象,这种方式会导致调用者与被调用者之间的耦合性增加,不利于后期项目的升级和维护
使用Spring框架之后,对象的实例不再由调用者来创建,而是由Spring容器来创建,由容器控制程序之间的关系,而不是由调用者的程序代码直接控制。由容器负责将被依赖对象赋值给调用者的成员变量,相当于为调用者注入了它的依赖的实例,这就是Spring的依赖注入。

简单理解:依赖注入就是由Spring创建对象,并且给成员变量赋值。
构造方法注入
开发步骤
-
创建项目
-
编写类Customer
-
包含属性( int id; String name;boolean male;Date birthday;)
-
编写无参的构造方法
-
添加全参的构造方法
-
-
生成toString()方法,不用创建set和get方法
-
配置applicationContext.xml
-
使用bean的constructor-arg子元素
-
编号属性使用index指定值
-
名字属性使用name和type指定
-
性别使用name属性指定
-
日期使用ref引用另一个日期对象,日期使用bean在容器中声明为java.util.Date对象
-
-
在测试类中得到客户对象,输出客户对象
代码
Customer
package com.it.entity;

import java.util.Date;

/**
 * 客户对象
 */
public class Customer {

    private int id;
    private String name;
    private boolean male;
    private Date birthday;

    public Customer() {
    }

    public Customer(int id, String name, boolean male, Date birthday) {
        this.id = id;
        this.name = name;
        this.male = male;
        this.birthday = birthday;
    }

    @Override
    public String toString() {
        return "Customer{" +
                "id=" + id +
                ", name='" + name + '\'' +
                ", male=" + male +
                ", birthday=" + birthday +
                '}';
    }
}
applicationContext.xml
<!--
1. 使用构造方法注入
子元素:constructor-arg 构造方法注入
    index:每几个位置,从0开始
    name:指定形参的名字
    type:指定参数的类型
    value:简单类型的值:8种基本类型+String类型
    ref:赋值引用类型,指定对象的id
 -->
<bean class="com.it.entity.Customer" id="customer">
    <constructor-arg name="id" value="100"/>
    <constructor-arg name="name" value="白骨精"/>
    <constructor-arg name="male" value="true"/>
    <constructor-arg name="birthday" ref="birthday" type="java.util.Date"/>
</bean>

<!-- 引用类型:现在的时间 -->
<bean class="java.util.Date" id="birthday"/>| constructor-arg标签的属性 | 描述 |
|---|---|
| index | 构造方法参数的位置 |
| name | 参数名 |
| type | 指定参数的类型 |
| value | 赋值简单类型=基本类型+String类型 |
| ref | 赋值引用类型 |
8. 依赖注入:set方法
就是通过类中的set方法,给成员变量赋值
步骤
-
给Customer添加set注入
-
配置applicationContext.xml,通过property元素给所有的属性赋值
-
运行测试类,输出customer对象
代码
1、Customer
package com.it.entity;

import java.util.Date;

/**
 * 客户对象
 */
public class Customer {

    private int id;
    private String name;
    private boolean male;
    private Date birthday;

    public Customer() {
    }

    public Customer(int id, String name, boolean male, Date birthday) {
        this.id = id;
        this.name = name;
        this.male = male;
        this.birthday = birthday;
    }

    public void setId(int id) {
        this.id = id;
    }

    public void setName(String name) {
        this.name = name;
    }

    public void setMale(boolean male) {
        this.male = male;
    }

    public void setBirthday(Date birthday) {
        this.birthday = birthday;
    }

    @Override
    public String toString() {
        return "Customer{" +
                "id=" + id +
                ", name='" + name + '\'' +
                ", male=" + male +
                ", birthday=" + birthday +
                '}';
    }
}
2、applicationContext.xml
<!-- 2.使用set方法注入 -->
<bean class="com.it.entity.Customer" id="customer">
    <!-- 属性名:为id value为200 -->
    <property name="id" value="200"/>
    <property name="name" value="猪八戒"/>
    <property name="male" value="true"/>
    <property name="birthday" ref="birthday"/>
</bean>

<!-- 引用类型:现在的时间 -->
<bean class="java.util.Date" id="birthday"/>
9、依赖注入:p命名空间
概述
注:先要在xml中导入p命名空间,本质仍然是调用类中的set方法实现注入功能。
步骤
-
配置applicationContext.xml
-
导入p命名空间(xmlns:p="http://www.springframework.org/schema/p")
-
通过"p:属性名"或者"p:属性名-ref"注入属性
-
-
测试类,从容器中得到客户对象输出
代码
applicationContext.xml
<?xml version="1.0" encoding="UTF-8"?>
<beans xmlns="http://www.springframework.org/schema/beans"
       xmlns:xsi="http://www.w3.org/2001/XMLSchema-instance"
       xmlns:p="http://www.springframework.org/schema/p"
       xsi:schemaLocation="http://www.springframework.org/schema/beans
       http://www.springframework.org/schema/beans/spring-beans.xsd">

    <!-- 使用p命名空间注入,本质上还是set注入
      1. 导入p命名空间
      2. 简单类型的格式:p:属性名="值"
         引用类型的格式:p:属性名-ref="id"
       -->
    <bean class="com.it.entity.Customer" id="customer" p:id="300" p:name="孙悟空" p:male="false" p:birthday-ref="birthday"/>

    <!-- 引用类型:现在的时间 -->
    <bean class="java.util.Date" id="birthday"/>
</beans>
10. 集合属性的注入
创建实体类
package com.it.entity;

import java.util.*;

public class Person {

    //字符串数组
    private String[] array;
    //字符串类型的List集合
    private List<String> list;
    //字符串类型的Set集合
    private Set<String> set;
    //字符串的键和值Map集合
    private Map<String, String> map;
    //Properties属性集合
    private Properties prop;

    public String[] getArray() {
        return array;
    }

    public void setArray(String[] array) {
        this.array = array;
    }

    public List<String> getList() {
        return list;
    }

    public void setList(List<String> list) {
        this.list = list;
    }

    public Set<String> getSet() {
        return set;
    }

    public void setSet(Set<String> set) {
        this.set = set;
    }

    public Map<String, String> getMap() {
        return map;
    }

    public void setMap(Map<String, String> map) {
        this.map = map;
    }

    public Properties getProp() {
        return prop;
    }

    public void setProp(Properties prop) {
        this.prop = prop;
    }

    @Override
    public String toString() {
        return "Person{" +
                "array=" + Arrays.toString(array) +
                ", list=" + list +
                ", set=" + set +
                ", map=" + map +
                ", prop=" + prop +
                '}';
    }
}
配置applicationContext.xml
-
标签使用说明:
-
单列集合:使用标签 array/list/set
-
双列集合:使用标签 map/prop
-
只要数据结构相同,标签可以互用
-
-
使用set注入,给所有的属性使用相应的标签赋值
-
数组:array,每个元素是value或ref
-
List集合:list,每个元素是value或ref
-
set集合:set,每个元素是value或ref
-
map集合:map,其中每个元素是entry,entry再指定key和value
-
prop集合:props,其中每个元素是prop,包含key属性,没有value属性,标签体的内容是值
-
<!--  注入属性集合:所有的单列集合可以通用,只是语义上区别 -->
<bean class="com.itheima.entity.Person" id="person">
    <!--数组类型-->
    <property name="array">
        <array>
            <value>孙悟空</value>
            <value>猪八戒</value>
            <value>白骨精</value>
        </array>
    </property>

    <!-- list类型 -->
    <property name="list">
        <list>
            <value>张飞</value>
            <value>关羽</value>
            <value>刘备</value>
        </list>
    </property>

    <!-- set类型 -->
    <property name="set">
        <set>
            <value>贾宝玉</value>
            <value>林黛玉</value>
            <value>薛宝钗</value>
        </set>
    </property>

    <!-- map集合,所有的双引集合也是可以通用的 -->
    <property name="map">
        <map>
            <entry key="cn" value="中国"/>
            <entry key="usa" value="美国"/>
            <entry key="jp" value="日本"/>
        </map>
    </property>

    <!-- property集合 -->
    <property name="prop">
        <props>
            <prop key="gz">广州</prop>
            <prop key="sh">上海</prop>
            <prop key="bj">北京</prop>
        </props>
    </property>
</bean>
11. @Component注解
关于IoC配置说明
注解配置和 xml 配置要实现的目的是一样的,都是要降低程序间的耦合。只是配置的形式不一样。关于实际的开发中到底使用 xml 还是注解,每家公司有不同的习惯。
注意:SpringIoC容器中XML配置与注解可以混合使用。即:如果Dao用注解创建的对象;service用xml创建的对象一样可以注入DAO。
步骤
-
创建项目:添加依赖spring-context
-
创建实体类,使用@Component注解。
-
在applicationContext.xml 配置中开启注解扫描的基包
-
在测试类中得到Account类并且输出
Account实体类
package com.it.entity;

import org.springframework.stereotype.Component;
import org.springframework.stereotype.Controller;
import org.springframework.stereotype.Repository;
import org.springframework.stereotype.Service;

/**
 * 被扫描到以后,由Spring创建这个对象放到容器中去,默认是类名首字母小写做为名字
 * 也可以指定value属性,就是它的名字
    @Component:用于普通的类
    @Service:用于业务层的类
    @Repository:用于持久层
    @Controller:用于控制器
    注:以上四个注解的功能一样,只是语义上区别
 */
@Component
public class Account {

    private Integer id;
    private String name;
    private Double money;

    public Account() {
    }

    public Account(Integer id, String name, Double money) {
        this.id = id;
        this.name = name;
        this.money = money;
    }

    @Override
    public String toString() {
        return "Account{" +
                "id=" + id +
                ", name='" + name + '\'' +
                ", money=" + money +
                '}';
    }
}
applicationContext.xml
-
使用context命名空间
-
配置扫描哪个基包
<?xml version="1.0" encoding="UTF-8"?>
<beans xmlns="http://www.springframework.org/schema/beans"
       xmlns:xsi="http://www.w3.org/2001/XMLSchema-instance"
       xmlns:context="http://www.springframework.org/schema/context"
       xsi:schemaLocation="http://www.springframework.org/schema/beans
       http://www.springframework.org/schema/beans/spring-beans.xsd
       http://www.springframework.org/schema/context
       https://www.springframework.org/schema/context/spring-context.xsd">

    <!-- 扫描哪个包下所有的类,指定基包的名字,使用context命名空间 -->
    <context:component-scan base-package="com.it"/>
</beans>
测试类
package com.it.test;

import com.it.entity.Account;
import org.junit.Test;
import org.springframework.context.support.ClassPathXmlApplicationContext;

public class TestAccount {

    @Test
    public void testAccount() {
        ClassPathXmlApplicationContext context = new ClassPathXmlApplicationContext("applicationContext.xml");
        //从容器中获取对象
        Account account = (Account) context.getBean("account");
        System.out.println(account);
    }
}
12. @Autowired注解
@Autowired介绍
-
位置: 用于成员变量和成员方法上
-
作用: 将属性注入相应的值
-
按类型匹配的方式从容器中去查找对应的值注入
-
如果有多个匹配的类型,按名字匹配的方式注入
-
如果找不到匹配的名字,就会抛出异常
-
@Autowired的属性required
作用:默认为true,这个属性是否必须,如果为false,则在容器中找不到这个属性匹配的类型,也不抛出异常,属性值为空
@Autowired修饰属性

@Autowired修饰方法
代码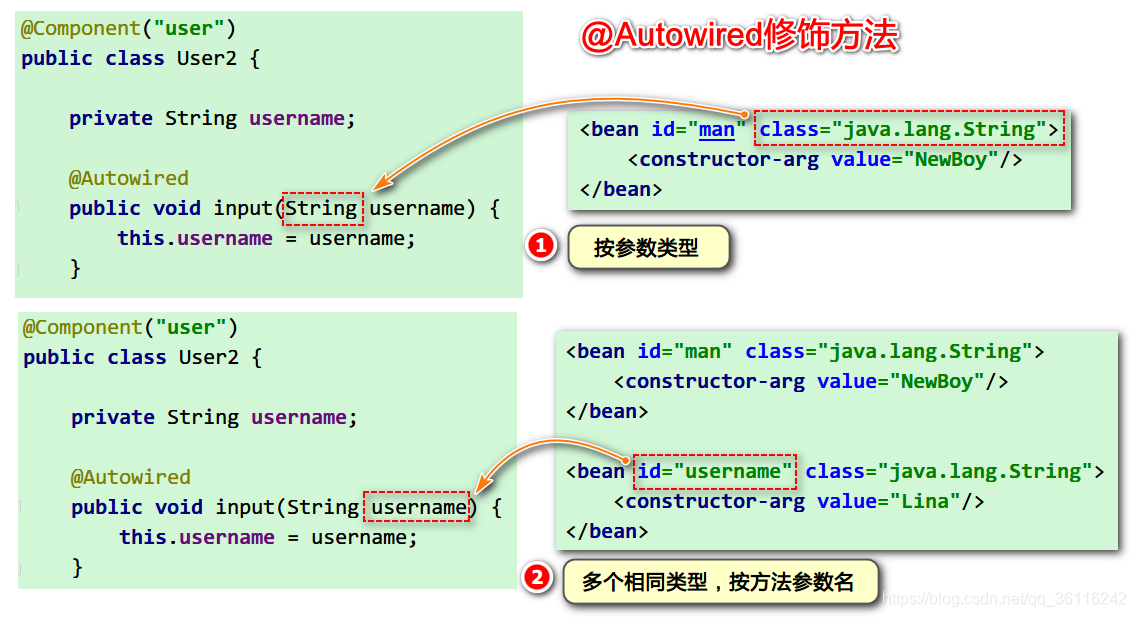
package com.it.entity;

import org.springframework.beans.factory.annotation.Autowired;
import org.springframework.stereotype.Component;

@Component("user")
public class User1 {

    private String username;

    /**
     * 在默认的情况下:@Autowired的值必须要注入,否则抛出异常
     * 属性:required 默认是true,设置为false表示这个属性不是必须注入的
     */
    @Autowired(required = false)
    private void inputUsername(String username) {
        this.username = username;
    }

    @Override
    public String toString() {
        return "User{" +
                "username='" + username + '\'' +
                '}';
    }
}
applicationContext.xml
<?xml version="1.0" encoding="UTF-8"?>
<beans xmlns="http://www.springframework.org/schema/beans"
       xmlns:xsi="http://www.w3.org/2001/XMLSchema-instance"
       xmlns:context="http://www.springframework.org/schema/context"
       xsi:schemaLocation="http://www.springframework.org/schema/beans
       http://www.springframework.org/schema/beans/spring-beans.xsd
       http://www.springframework.org/schema/context
       https://www.springframework.org/schema/context/spring-context.xsd">

    <!-- 扫描哪个包下所有的类,指定基包的名字,使用context命名空间 -->
    <context:component-scan base-package="com.it"/>

    <!-- 有一个字符串类型要注入 -->
    <bean class="java.lang.String" id="man">
        <!-- 相当于 new String("Boy") -->
        <constructor-arg value="Boy"/>
    </bean>


</beans>
13. @Qualifier注解
作用
-
必须与@Autowired配置使用,不能单独使用
-
位置: 放在成员变量或成员方法上
-
作用: 按名字匹配的方式注入
-
属性: value指定要注入的名字名

14. @Value注解
作用
用于一些简单类型的注入,也可以注入日期类型
以后主要用于从Java属性文件中读取键,将值注入到成员变量


 445
445

 被折叠的 条评论
为什么被折叠?
被折叠的 条评论
为什么被折叠?
 到【灌水乐园】发言


