


springboot + vue开发环境搭建
一、vue开发环境搭建
二、springboot项目搭建
我使用 eclipse+maven开发工具,springboot版本号为:2.1.4.RELEASE
POM文件如下所示:
<parent>
	<groupId>org.springframework.boot</groupId>
	<artifactId>spring-boot-starter-parent</artifactId>
	<version>2.1.4.RELEASE</version>
</parent>

<dependencies>
	<dependency>
		<groupId>org.springframework.boot</groupId>
		<artifactId>spring-boot-starter-web</artifactId>
	</dependency>
	<dependency>
		<groupId>org.springframework.boot</groupId>
		<artifactId>spring-boot-starter-test</artifactId>
		<scope>test</scope>
	</dependency>
	<!-- 数据库操作  hibernate -->
	<dependency>
		<groupId>org.springframework.boot</groupId>
		<artifactId>spring-boot-starter-data-jpa</artifactId>
	</dependency>
	<dependency>
		<groupId>mysql</groupId>
		<artifactId>mysql-connector-java</artifactId>
	</dependency>


</dependencies>

<build>
	<plugins>
		<plugin>
			<groupId>org.springframework.boot</groupId>
			<artifactId>spring-boot-maven-plugin</artifactId>

		</plugin>
	</plugins>
</build>
说明:我采用内嵌Tomcat,jar方式启动项目
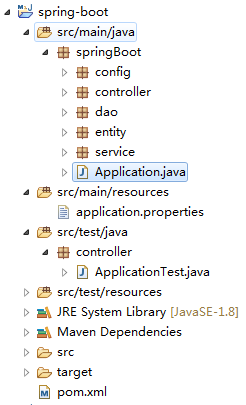
项目结构如下图:
在项目根包下面创建项目启动类:Application.class
@SpringBootApplication
public class Application {

	public static void main(String[] args) {
		SpringApplication.run(Application.class, args);

		System.out.println("spring boot Application started");
	}
}
controller层代码:
@RestController
public class ApplicationController {

	private static final Logger LOGGER = LoggerFactory.getLogger(ApplicationController.class);

	@Autowired
	private IUserService userService;

	@GetMapping("test")
	public String test() {
		return "test success";
	}
}
启动项目测试,运行Appliction.class中的main方法,测试结果如下:

配置hibernate:
-
POM文件中添加依赖:
spring-boot-starter-data-jpa和
mysql-connector-java,如上述POM文件所示。 -
配置
application.properties文件
在src/main/resources下创建application.properties文件:
 #datasource config
spring.datasource.url=jdbc:mysql://localhost/springboottest?serverTimezone=UTC
spring.datasource.username=root
spring.datasource.password=123456
spring.datasource.driver-class-name=com.mysql.cj.jdbc.Driver

spring.jpa.show-sql = true
说明:serverTimezone=UTC是为了解决数据库时区问题,在数据库中设置也可以。
实体:
@Entity(name = "t_user")
public class User {

	@Id
	@GeneratedValue(strategy = GenerationType.IDENTITY)
	private int id;
	@NotNull(message = "username can not be null")
	private String username;
	@NotNull(message = "password can not be null")
	private String password;
因为数据库中设置了主键自增,所以这里设置实体主键ID为GenerationType.IDENTITY,否则会报错:

Dao:
import org.springframework.data.jpa.repository.JpaRepository;
import org.springframework.stereotype.Repository;

import springBoot.entity.User;

@Repository
public interface UserDao extends JpaRepository<User, Integer> {

	User findByUsername(String username);
}
单元测试
@RunWith(SpringJUnit4ClassRunner.class)
@SpringBootTest(classes = { Application.class })
public class ApplicationTest {

	@Autowired
	private IUserService userService;
	@Autowired
	private IPersonService personService;


	@Test
	public void startTest() {
		System.out.println("test success");
	}

	 @Test
	 public void saveUserTest() {
	 User user = new User();
	 user.setUsername("zsandf");
	 user.setPassword("123456");
	 userService.save(user);
	 System.out.println("save success");
	 }
 }
三、springboot+vue测试
- 前端配置代理,指向后端服务器:localhost:8080
在config目录下的index.js中配置proxyTable:
module.exports = {
  dev: {

    // Paths
    assetsSubDirectory: 'static',
    assetsPublicPath: '/',
    proxyTable: {
            '/api': {
            target: 'http://localhost:8080',
            ws: true,
            changeOrigin: true,
            pathRewrite: {
                '^/api': ''
            },
        }
    },
- 后端解决跨域
在springboot/config下新增CorsConfig.class文件:
@Configuration
public class CorsConfig {

	 private CorsConfiguration buildConfig() {
	        CorsConfiguration corsConfiguration = new CorsConfiguration();
	        corsConfiguration.addAllowedOrigin("*"); // 1
	        corsConfiguration.addAllowedHeader("*"); // 2
	        corsConfiguration.addAllowedMethod("*"); // 3
	        return corsConfiguration;
	    }

	    @Bean
	    public CorsFilter corsFilter() {
	        UrlBasedCorsConfigurationSource source = new UrlBasedCorsConfigurationSource();
	        source.registerCorsConfiguration("/**", buildConfig()); // 4
	        return new CorsFilter(source);
	    }
}
-
部分主要代码
前端vue代码
 //登录组件
<template>
	<div id="log">
		<label>请输入用户名</label><input type="text" name="username" v-model="username">
		<label>请输入密码</label><input type="text" name="password" v-model="password">
		<br>

		<button @click.prevent="doLogin">登录</button><br>
		<h5>{{ loginMessage }}</h5>
	</div>
</template>

<script>
	export default {
		name: 'login',
		data() {
			return{
				loginMessage: null,
				username: null,
				password: null
			};
		},

		methods: {
			doLogin() {
				// console.log("调用了doLogin方法");
				// var parms = {
				// 	username: this.username,
				// 	password: this.password
				// };

				// this.axios.get('/api/login?username=' + parms.username).then(result => {
				// 	console.log(parms);
				// 	console.log(result.data);
				// 	this.loginMessage = result.data;
				// })

				this.axios.post('/api/login', {

					username: this.username,
					password: this.password

				})
				.then(result => {
					console.log(result.data);
					this.loginMessage = result.data;
				})
			}
		}

	}

</script>

<style>

</style>
后端controller代码
@RestController
public class ApplicationController {

	private static final Logger LOGGER = LoggerFactory.getLogger(ApplicationController.class);

	@Autowired
	private IUserService userService;

	@GetMapping("test")
	public String test() {
		return "test success";
	}

	@PostMapping("login")
	public String loginTest(@RequestBody @Valid User user) {
		LOGGER.info(user.getUsername());
		LOGGER.info(user.getPassword());
		if (userService.isLegaled(user)) {
			return "login success!";
		}
		return "logon failed!!!!";
	}
}
- 运行测试结果
分别启动前端、后端,然后访问:http://localhost:8090/


 1305
1305


 被折叠的 条评论
为什么被折叠?
被折叠的 条评论
为什么被折叠?
 到【灌水乐园】发言


