


Pytest入门
安装pytest
安装要求:python3.8+
1、在命令行输入以下命令
pip install pytest2、验证是否安装成功
pytest --version创建第一个测试
创建一个名为 的新文件test_sample.py,其中包含一个函数和一个测试
PS:在pycharm在代码窗口中直接用右键直接运行
import pytest

def func(x):
    return x + 1


def test_answer():
    assert func(3) == 5
测试结果
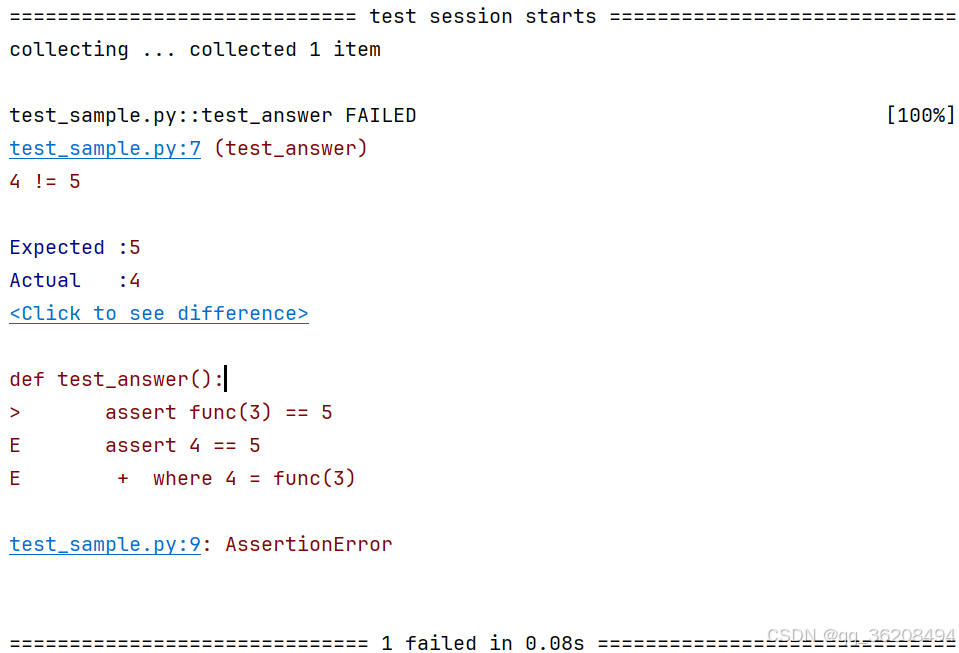
指[100%]的是运行所有测试用例的总体进度。完成后,pytest 会显示失败报告,因为func(3)没有返回5。
运行多个测试
pytest将在当前目录及其子目录中运行所有形式为 test_*.py 或 *_test.py 的文件
断言引发了某个异常
import pytest

#代码来源于 test_sysexit.py
def f():
    raise SystemExit(1)


def test_mytest():
    with pytest.raises(SystemExit):
        f()
解释
函数 f:
抛出一个 SystemExit 异常,参数为 1。这通常用于在程序中提前退出,状态码 1 表示异常退出。
函数 test_mytest:
使用 pytest.raises 上下文管理器来捕获 f 函数抛出的 SystemExit 异常。如果 f 正确抛出了 SystemExit 异常,测试通过;否则,测试失败。
用raise判断函数中是否包抛出了某个异常
import pytest

#代码来源于 test_exceptiongroup.py

def f():
    raise ExceptionGroup(
        "Group message",
        [
            RuntimeError(),
        ],
    )

def test_exception_in_group():
    with pytest.raises(ExceptionGroup) as excinfo:
        f()
    assert excinfo.group_contains(RuntimeError)
    assert not excinfo.group_contains(TypeError)
解释
函数 f:
抛出一个 ExceptionGroup 异常,包含一个 RuntimeError。
函数 test_exception_in_group:
使用 pytest.raises 捕获 f 函数抛出的 ExceptionGroup 异常。
断言捕获的异常组中包含 RuntimeError。
断言捕获的异常组中不包含 TypeError。
输出简单报告 使用参数:-q
pytest -q test_sysexit.py
将多个测试用例放到一个类中
在pytest中在类中声明的函数名称以test开头的函数,都会被识别为测试方法函数,在运行pytest时这些方法都会被执行,如果没有以test为前缀,执行时会跳过该函数。
import pytest
# 代码来源于 test_class.py

class TestClass:
    def test_one(self):
        x = "this"
        assert "h" in x

    def test_two(self):
        x = "hello"
        assert hasattr(x, "check")
解释
这段代码是一个使用 pytest 框架编写的测试类 TestClass,包含两个测试方法:
test_one:检查字符串 "this" 中是否包含字符 "h"。
test_two:检查字符串 "hello" 是否具有 check 属性。
Pytest执行
通常使用在命令窗口直接输入pytest命令,会执行当前工程根目录下所有前缀为Test_*.py的文件以及类和函数。
pytest框架提供了多种在命令中执行的方式
从.py文件中执行
import pytest

# 代码来源于 test_mod.py

class testsmod:
    def test_1(self):
        x = 1
        assert x == 1
pytest test_mod.py从目录中执行
执行指定目录下所有符合条件的文件,即前缀为Test
pytest cskf/pytesst通过关键字来执行 -k
import pytest

# 代码来源于 test_mod.py

class TestMod:
    def test_1(self):
        x = 1
        assert x == 1

    def joker(self):
        str= "joker"
        assert str == "joker"
pytest -k "TestMod and not joker"
PS:这段命令会执行包含给定字符串的.py文件,类,函数。会执行TestMod类下面的测试函数test_1,但不会执行joker。
通过集合运行测试
使用::号来区分,按层级执行指定想要执行的类和函数.
执行具体函数
import pytest

# 代码来源于 test_mod.py

def test_1():
    print("这是一个测试函数")


class TestMod:
    def test_1(self):
        x = 1
        assert x == 1

    def joker(self):
        str= "joker"
        assert str == "joker"
pytest test_mod.py::test_1
执行具体类
pytest test_mod.py::TestMod
执行类中的方法
pytest test_mod.py::TestMod::test_1
执行给定参数的用例
import pytest

# 代码来源于 test_mod.py

class TestMod:
    def test_1(self):
        x = 1
        assert x == 1

    def joker(self):
        str= "joker"
        assert str == "joker"

    @pytest.mark.parametrize("num",[1,2,3])
    def test_param(self,num):
        if num == 1:
            assert num == 1
        elif num == 2:
            assert num == 2
        elif num == 3:
            assert num == 3
        assert  num == 0
pytest test_mod.py::test_param[2]
解释
test_param函数会进入到第二个断言判断,也就是num ==2,因为命令行中给定的参数为[2]
PS:[]中给定的参数不能不符合既有的参数,[]中参数值只有123,你不能填4
通过标记表达式运行测试
用@pytest.mark.slow装饰器修饰的测试函数
import pytest

# 代码来源于 test_mod.py

def test_1():
    print("这是一个测试函数")


class TestMod:
    def test_1(self):
        x = 1
        assert x == 1

    def joker(self):
        str= "joker"
        assert str == "joker"

    @pytest.mark.parametrize("num",[1,2,3])
    def test_param(self,num):
        if num == 1:
            assert num == 1
        elif num == 2:
            assert num == 2
        elif num == 3:
            assert num == 3

    @pytest.mark.slow
    def test_slow(self):
        assert True
pytest -m slow
当执行标记时,可能会出现以下异常,我们在参数上面加上 -p no:warnings 即可

pytest -p no:warnings -m slow如果你不知道你定义的标记是什么意思,可以在在pytest.ini文件下添加配置,我们定义了两个标记,他们有各自的描述。(可选)
[pytest]
markers =
  slow: 这是关于慢的测试
  fast: 这是关于快的测试
运行带注释的标记
pytest -m slow(phase=1)从包运行
这将导入pkg.testing,并使用文件系统位置来查找和导入测试
pytest -pyargs pkg.testing从文件读取参数(8.2版本)
pytest @test_to_run.txttest_to_run.txt文件配置如下:
cskf/pytest/test_mod.py
cskf/pytest/test_mode::test_1
cskf/pytest/test_mode::TestMod::test_1
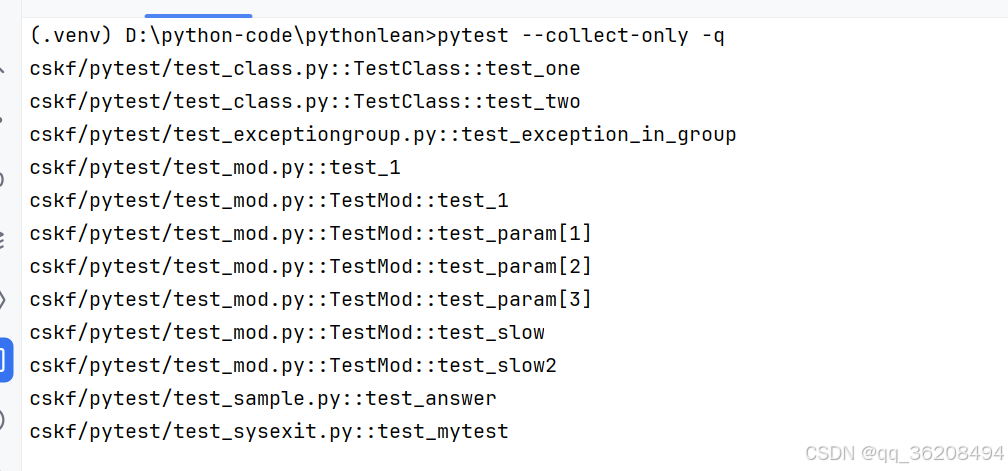
-m slow自动生成配置
pytest --collect-only -q
获取关于版本、选项名称、环境变量的帮助
pytest --version   # 显示pytest从何处导入
pytest --fixtures  # 显示可用的内置函数参数
pytest -h | --help # 显示命令行和配置文件选项的帮助
分析测试时长
要获取持续时间超过 1.0 秒的最慢的 10 个测试持续时间列表:
pytest --durations=10 --durations-min=1.0管理插件的加载
提前加载插件
您可以使用以下选项在命令行中明确地提前加载插件(内部和外部)-p:
pytest -p mypluginmodule该选项接收一个name参数,可以是:
-
完整的模块点名,例如
myproject.plugins。此点名必须是可导入的。 -
插件的入口点名称。这是
importlib插件注册时传递的名称。例如,要提前加载pytest-cov插件,您可以使用:
pytest -p pytest_cov
禁用插件
pytest -p no:pytest_cov
从 Python 代码调用
您可以pytest直接从 Python 代码调用:
retcode = pytest.main()这就像您从命令行调用“pytest”一样。它不会引发退出代码,SystemExit而是返回退出代码。如果您不向其传递任何参数,main则会从进程的命令行参数(sys.argv)中读取参数,这可能是不可取的。您可以明确传入选项和参数:
retcode = pytest.main(["-x", "mytestdir"])# 代码来源于 myinvoke.py
import sys
import pytest
class MyPlugin:
def pytest_sessionfinish(self):
return "pytest_cov"
if __name__ == "__main__":
sys.exit(pytest.main(['test_class.py'],plugins=['no:pytest_cov']))#等同于 pytest -p no:pytest_cov test_class.py
断言
assert使用语句进行断言
pytest允许您使用标准 Python assert来验证 Python 测试中的期望和值。例如,您可以编写以下内容:
# 代码来源于 test_assert1.py
def f():
    return 3


def test_function():
    assert f() == 4
断言你的函数返回某个值。如果这个断言失败,你将看到函数调用的返回值:
$ pytest test_assert1.py
=========================== test session starts ============================
platform linux -- Python 3.x.y, pytest-8.x.y, pluggy-1.x.y
rootdir: /home/sweet/project
collected 1 item

test_assert1.py F                                                    [100%]

================================= FAILURES =================================
______________________________ test_function _______________________________

    def test_function():
>       assert f() == 4
E       assert 3 == 4
E        +  where 3 = f()

test_assert1.py:6: AssertionError
========================= short test summary info ==========================
FAILED test_assert1.py::test_function - assert 3 == 4
============================ 1 failed in 0.12s =============================
pytest支持显示最常见子表达式的值,包括调用、属性、比较以及二元和一元运算符。(请参阅使用 pytest 的 Python 故障报告演示)。这允许您使用惯用的 Python 构造而无需样板代码,同时不会丢失自省信息。
如果使用如下断言指定消息:
assert a % 2 == 0, "值是奇数,应该是偶数"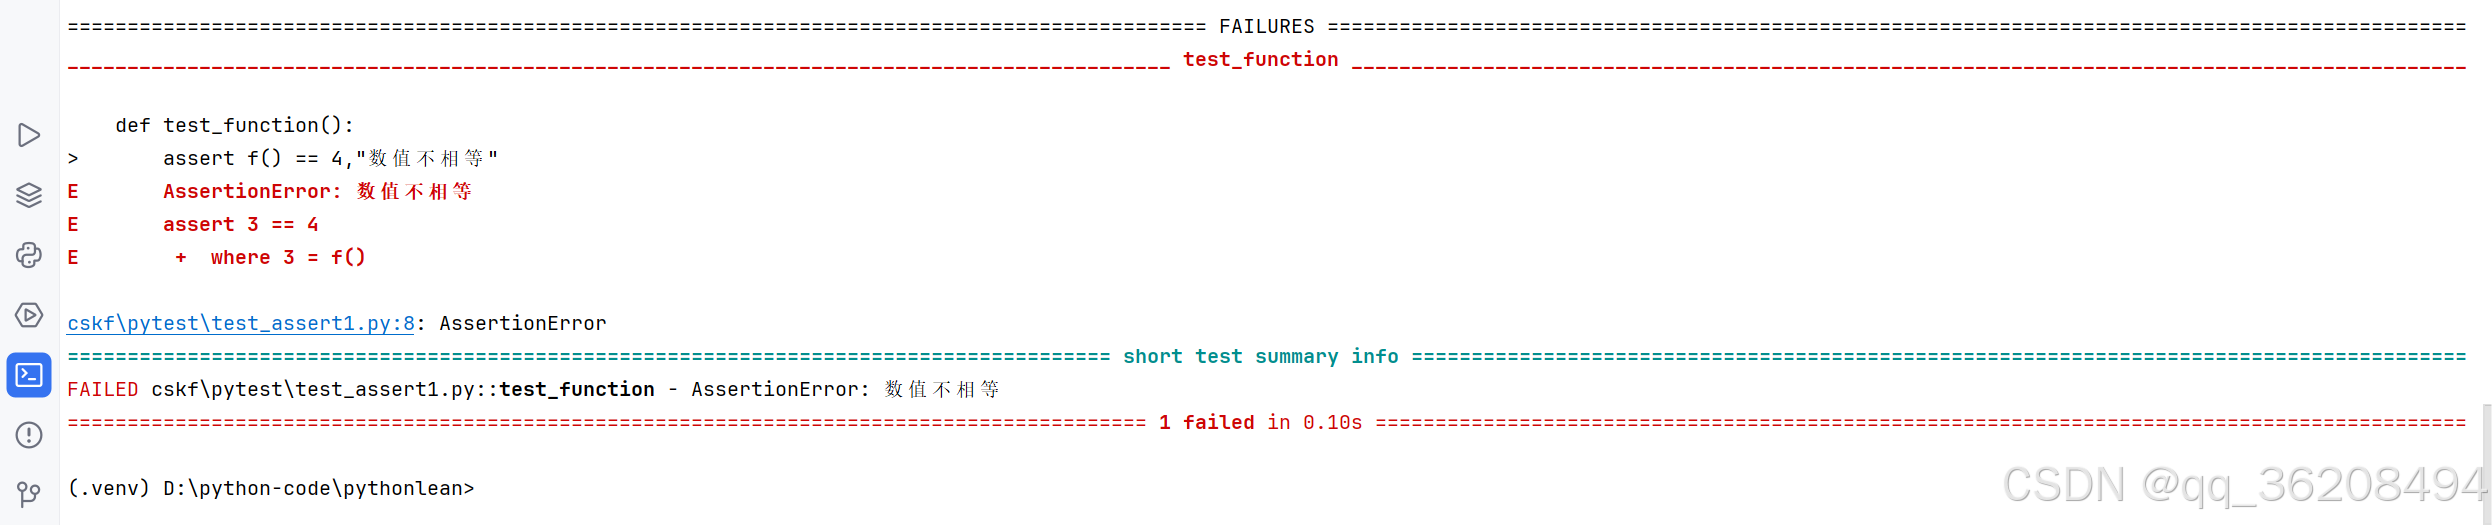
它与回溯中的断言自省一起打印。
有关断言自省的更多信息,请参阅断言自省细节。
关于异常信息的断言
为了编写关于引发的异常的断言,你可以使用 pytest.raises()这样的上下文管理器:
import pytest


def test_zero_division():
    with pytest.raises(ZeroDivisionError):
        1 / 0
如果您需要访问实际的异常信息,您可以使用:
def test_recursion_depth():
    with pytest.raises(RuntimeError) as excinfo:

        def f():
            f()

        f()
    assert "maximum recursion" in str(excinfo.value)
解释
使用 pytest.raises 上下文管理器捕获预期的 RuntimeError 异常。
定义一个递归函数 f,该函数调用自身,导致无限递归。
调用递归函数 f,触发递归深度超出限制的异常。
断言捕获的异常信息中包含 "maximum recursion" 字样,确保异常是由递归深度超出限制引起的。
匹配异常消息
您可以将match关键字参数传递给上下文管理器来测试正则表达式是否与异常的字符串表示匹配(类似于TestCase.assertRaisesRegex来自的方法unittest):
import pytest


def myfunc():
    raise ValueError("Exception 123 raised")


def test_match():
    with pytest.raises(ValueError, match=r".* 123 .*"):
        myfunc()
这段代码定义了两个函数:myfunc 和 test_match。
myfunc 函数:
抛出一个 ValueError 异常,异常信息为 "Exception 123 raised"。
test_match 函数:
使用 pytest.raises 上下文管理器来捕获 myfunc 函数抛出的 ValueError 异常。
检查异常信息是否匹配正则表达式 r".* 123 .*",确保异常信息中包含 "123"。
匹配异常组
还可以使用该excinfo.group_contains() 方法来测试作为以下部分返回的异常ExceptionGroup:
def test_exception_in_group():
    with pytest.raises(ExceptionGroup) as excinfo:
        raise ExceptionGroup(
            "Group message",
            [
                RuntimeError("Exception 123 raised"),
            ],
        )
    assert excinfo.group_contains(RuntimeError, match=r".* 123 .*")
    assert not excinfo.group_contains(TypeError)
这段代码定义了一个测试函数 test_exception_in_group,用于测试 ExceptionGroup 异常的捕获和检查。具体功能如下:
- 使用 pytest.raises 上下文管理器捕获 ExceptionGroup 异常,并将其存储在 excinfo 中。
- 抛出一个 ExceptionGroup 异常,其中包含一个 RuntimeError 异常,消息为 "Exception 123 raised"。
- 断言 excinfo 中包含一个 RuntimeError 异常,并且其消息中包含 "123"。
- 断言 excinfo 中不包含 TypeError 异常。
默认情况下,group_contains()将在任何嵌套实例级别上递归搜索匹配的异常。如果您只想匹配特定级别的异常, ExceptionGroup则可以指定关键字参数;直接包含在顶部的异常将匹配。depthExceptionGroupdepth=1
def test_exception_in_group_at_given_depth():
    with pytest.raises(ExceptionGroup) as excinfo:
        raise ExceptionGroup(
            "Group message",
            [
                RuntimeError(),
                ExceptionGroup(
                    "Nested group",
                    [
                        TypeError(),
                    ],
                ),
            ],
        )
    assert excinfo.group_contains(RuntimeError, depth=1)
    assert excinfo.group_contains(TypeError, depth=2)
    assert not excinfo.group_contains(RuntimeError, depth=2)
    assert not excinfo.group_contains(TypeError, depth=1)
解释
这段代码定义了一个测试函数 test_exception_in_group_at_given_depth,用于测试嵌套异常组在特定深度下的行为。具体功能如下:
- 使用 pytest.raises 捕获 ExceptionGroup 异常。
- 抛出一个包含 RuntimeError 和嵌套的 ExceptionGroup 的异常,嵌套的 ExceptionGroup 包含一个 TypeError。
- 断言捕获的异常组在深度为1时包含 RuntimeError。
- 断言捕获的异常组在深度为2时包含 TypeError。
- 断言捕获的异常组在深度为2时不包含 RuntimeError。
- 断言捕获的异常组在深度为1时不包含 TypeError。
xfail mark 和 pytest.raises
还可以为pytest.mark.xfailraises指定一个参数 ,它以比仅仅引发任何异常更具体的方式检查测试是否失败:
def f():
    raise IndexError()


@pytest.mark.xfail(raises=IndexError)
def test_f():
f()如果测试通过提升IndexError或子类化而失败,则只会“xfail”。
-
使用带有参数的pytest.mark.xfail
raises可能更适合记录未修复的错误(其中测试描述“应该”发生什么)或依赖项中的错误。 -
对于测试您自己的代码故意引发的异常的情况,使用pytest.raises()可能会更好,这是大多数情况。
利用上下文敏感的比较
pytest在遇到比较时,对提供上下文相关信息提供了丰富的支持。例如:
# 代码来源于 test_assert2.py
def test_set_comparison():
    set1 = set("1308")
    set2 = set("8035")
    assert set1 == set2
如果你运行这个模块:
针对多种情况进行了特殊比较:
-
比较长字符串:显示上下文差异
-
比较长序列:第一个失败的指标
-
比较字典:不同的条目
请参阅报告演示以获取更多示例。
定义自己对失败断言的解释
可以通过实现pytest_assertrepr_compare钩子来添加您自己的详细解释。
pytest_assertrepr_compare(配置,操作,左,右)[来源]
返回失败断言表达式比较的解释。
如果无自定义解释则返回 None,否则返回字符串列表。字符串将由换行符连接,但 字符串中的任何换行符都将被转义。请注意,除第一行之外的所有内容都将略微缩进,目的是让第一行成为摘要。
参数:
-
config ( Config ) – pytest 配置对象。
-
op ( str ) – 运算符,例如
"==","!=",。"not in" -
left(对象) – 左操作数。
-
right(对象) – 右操作数。
在 conftest 插件中使用
任何 conftest 文件都可以实现此钩子。对于给定项目,仅参考该项目目录及其父目录中的 conftest 文件。
例如,考虑在conftest.py 文件中添加以下钩子,它为对象提供了另一种解释Foo:
import pytest

# 代码来源于 conftest.py
from test_foocompare import Foo

def pytest_assertrepr_compare(op, left, right):
    if isinstance(left, Foo) and isinstance(right, Foo) and op == "==":
        return [
            "Comparing Foo instances:",
            f"   vals: {left.val} != {right.val}",
        ]
解释
- 开始:函数开始执行。
- 条件判断:检查 left 和 right 是否都是 Foo 类的实例。
- 如果不是,返回 None。
- 如果是,继续下一个条件判断。
- 条件判断:检查操作符 op 是否为 ==。
- 如果不是,返回 None。
- 如果是,返回自定义断言信息。
- 返回自定义断言信息:返回一个包含自定义断言信息的列表
您可以运行测试模块并获取conftest文件中定义的自定义输出:


 2444
2444

 被折叠的 条评论
为什么被折叠?
被折叠的 条评论
为什么被折叠?
 到【灌水乐园】发言


