Win10+tensorflow1.12.0+CUDA10.0+cudnn7.3.1

简介

垃圾电脑的垃圾CPU受够了,决心献出显卡,放GPU出来溜溜
下面介绍tensorflow的GPU版本安装与测试。

CUDA10.0安装配置

CUDA可直接百度,官网下载。若要寻找历史版本,在此提供CUDA历史版本链接。建议直接下载local版的安装文件,避免因为渣网在线安装失败的问题。如果遇到下载链接点开无效的,可尝试挂上梯子,将其代理模式切换至全局模式,再重新下载链接文件。
下载完成后点开安装文件,理论上设置好安装路径后按部就班安装即可。
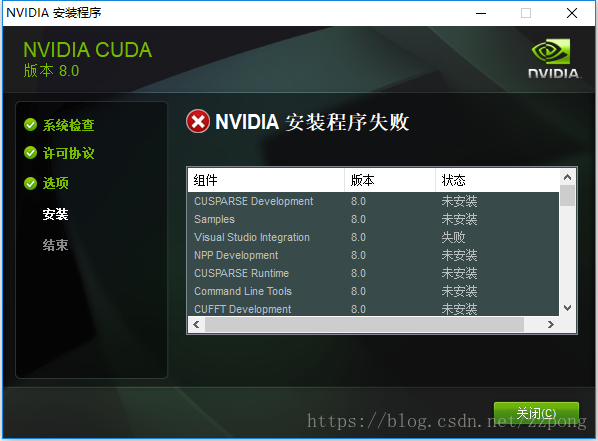
我在这里出现了如下错误。(图是盗的
Alt
这说明你的vs出问题了,网上说最佳方案是把vs卸载重装,解决一切问题。
在此我参考另一篇博文解决了该问题。方法如下:

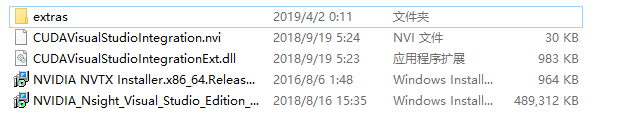
  1. 记录安装CUDA设置安装的路径 ,将路径下CUDAVisualStudioIntegration文件夹拷到其他位置保存,这里记作“dir\CUDAVisualStudioIntegration”,dir为你拷贝文件所在路径。该文件夹所含文件如下图:
    在这里插入图片描述
  2. 选择自定义安装,去除CUDA选项下Visual Studio Integration的勾号,点击下一步进行安装;
  3. 待安装无误后,将"dir\CUDAVisualStudioIntegration\extras\visual_studio_integration\MSBuildExtensions"中所有文件copy到"C:\Program Files (x86)\MSBuild\Microsoft.Cpp\v4.0\V140\BuildCustomizations"文件夹中;
  4. 运行vs,编译"C:\ProgramData\NVIDIA Corporation\CUDA Samples"下的sln工程,一般可正常编译。至此,CUDA程序已能正常运行;
  5. 虽然上述VS已可以正常编译,但毕竟不是完整安装CUDA,因此缺失了VS中“新建CUDA解决方案”的功能,若想进阶使用,参考如下博文

cudnn7.3.1安装配置

cudnn需要与对应CUDA版本匹配起来,在此仍旧提供历史版本链接。链接打不开可用前面的方法解决。下载完成后解压,将对应的文件分别拷贝到CUDA Toolkit中即可。对应的文件夹为:
在这里插入图片描述
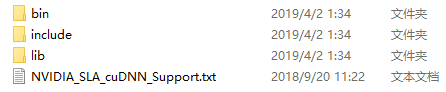
若为默认安装,则应将上图文件夹中文件分别拷贝到的文件夹如下:
C:\Program Files\NVIDIA GPU Computing Toolkit\CUDA\v10.0\bin
C:\Program Files\NVIDIA GPU Computing Toolkit\CUDA\v10.0\include
C:\Program Files\NVIDIA GPU Computing Toolkit\CUDA\v10.0\lib\x64

路径配置

万事皆宜,只欠东风。接下来设置环境变量

计算机上点右键,打开属性->高级系统设置->环境变量,可以看到系统中多了CUDA_PATH和CUDA_PATH_V10_0两个环境变量,接下来,还要在系统中添加以下几个环境变量:
CUDA_SDK_PATH = C:\ProgramData\NVIDIA Corporation\CUDA Samples\v10.0(这是默认安装位置的路径)
CUDA_LIB_PATH = %CUDA_PATH%\lib\x64
CUDA_BIN_PATH = %CUDA_PATH%\bin
CUDA_SDK_BIN_PATH = %CUDA_SDK_PATH%\bin\win64
CUDA_SDK_LIB_PATH = %CUDA_SDK_PATH%\common\lib\x64

然后:

在系统变量 PATH 的末尾添加:
%CUDA_LIB_PATH%;%CUDA_BIN_PATH%;%CUDA_SDK_LIB_PATH%;%CUDA_SDK_BIN_PATH%;
再添加如下4条(默认安装路径):
C:\Program Files\NVIDIA GPU Computing Toolkit\CUDA\v10.0\lib\x64;
C:\Program Files\NVIDIA GPU Computing Toolkit\CUDA\v10.0\bin;
C:\ProgramData\NVIDIA Corporation\CUDA Samples\v10.0\common\lib\x64;
C:\ProgramData\NVIDIA Corporation\CUDA Samples\v10.0\bin\win64;
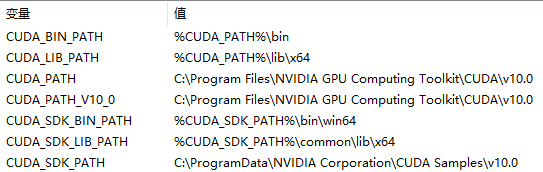
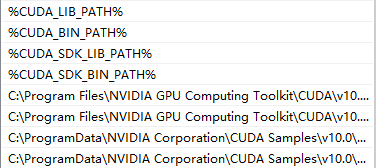
如果你选用了自定义路径,上述这些默认路径都应该相应替换为你的自定义路径,如下为我的环境变量和PATH的配置情况:
环境变量:
在这里插入图片描述
PATH:
在这里插入图片描述

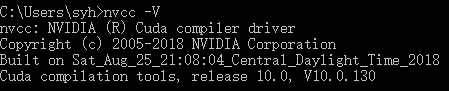
至此,理论上已配置好CUDA的全部环境。可在cmd中输入命令行进行测试。

nvcc -V

正确结果如下图:
在这里插入图片描述

安装tensorflow1.12.0

it’s easy,right?

  1. 下载tensorflow1.12.0的轮子

百度链接https://pan.baidu.com/s/1GEdR1z8L8hjWfFtuzqWaxQ
提取密码:ea5x

  1. 下载目录下cmd输入
pip install tensorflow-1.12.0rc0-cp36-cp36m-win_amd64.whl

稀里糊涂安装成功后,基本上宣布此次放GPU出来溜溜作战的胜利。

测试tensorflow-gpu

进入python环境,输入如下代码

>>>import tensorflow as tf
>>>sess = tf.Session(config=tf.ConfigProto(log_device_placement=True))

查看日志信息若包含GPU信息,就是使用了GPU。
自从tensorflow用上GPU以后,真的巨快巨爽,祝小伙伴们都能早日成功安装CUDA哦。
GPU一时爽,一直GPU一直爽!(不是

  • 0
    点赞
  • 2
    收藏
    觉得还不错? 一键收藏
  • 0
    评论
自编译tensorflow: 1.python3.5,tensorflow1.12; 2.支持cuda10.0,cudnn7.3.1,TensorRT-5.0.2.6-cuda10.0-cudnn7.3; 3.支持mkl,无MPI; 软硬件硬件环境:Ubuntu16.04,GeForce GTX 1080 配置信息: hp@dla:~/work/ts_compile/tensorflow$ ./configure WARNING: --batch mode is deprecated. Please instead explicitly shut down your Bazel server using the command "bazel shutdown". You have bazel 0.19.1 installed. Please specify the location of python. [Default is /usr/bin/python]: /usr/bin/python3 Found possible Python library paths: /usr/local/lib/python3.5/dist-packages /usr/lib/python3/dist-packages Please input the desired Python library path to use. Default is [/usr/local/lib/python3.5/dist-packages] Do you wish to build TensorFlow with XLA JIT support? [Y/n]: XLA JIT support will be enabled for TensorFlow. Do you wish to build TensorFlow with OpenCL SYCL support? [y/N]: No OpenCL SYCL support will be enabled for TensorFlow. Do you wish to build TensorFlow with ROCm support? [y/N]: No ROCm support will be enabled for TensorFlow. Do you wish to build TensorFlow with CUDA support? [y/N]: y CUDA support will be enabled for TensorFlow. Please specify the CUDA SDK version you want to use. [Leave empty to default to CUDA 10.0]: Please specify the location where CUDA 10.0 toolkit is installed. Refer to README.md for more details. [Default is /usr/local/cuda]: /usr/local/cuda-10.0 Please specify the cuDNN version you want to use. [Leave empty to default to cuDNN 7]: 7.3.1 Please specify the location where cuDNN 7 library is installed. Refer to README.md for more details. [Default is /usr/local/cuda-10.0]: Do you wish to build TensorFlow with TensorRT support? [y/N]: y TensorRT support will be enabled for TensorFlow. Please specify the location where TensorRT is installed. [Default is /usr/lib/x86_64-linux-gnu]:/home/hp/bin/TensorRT-5.0.2.6-cuda10.0-cudnn7.3/targets/x86_64-linux-gnu Please specify the locally installed NCCL version you want to use. [Default is to use https://github.com/nvidia/nccl]: Please specify a list of comma-separated Cuda compute capabilities you want to build with. You can find the compute capability of your device at: https://developer.nvidia.com/cuda-gpus. Please note that each additional compute capability significantly increases your build time and binary size. [Default is: 6.1,6.1,6.1]: Do you want to use clang as CUDA compiler? [y/N]: nvcc will be used as CUDA compiler. Please specify which gcc should be used by nvcc as the host compiler. [Default is /usr/bin/gcc]: Do you wish to build TensorFlow with MPI support? [y/N]: No MPI support will be enabled for TensorFlow. Please specify optimization flags to use during compilation when bazel option "--config=opt" is specified [Default is -march=native -Wno-sign-compare]: Would you like to interactively configure ./WORKSPACE for Android builds? [y/N]: Not configuring the WORKSPACE for Android builds. Preconfigured Bazel build configs. You can use any of the below by adding "--config=" to your build command. See .bazelrc for more details. --config=mkl # Build with MKL support. --config=monolithic # Config for mostly static monolithic build. --config=gdr # Build with GDR support. --config=verbs # Build with libverbs support. --config=ngraph # Build with Intel nGraph support. --config=dynamic_kernels # (Experimental) Build kernels into separate shared objects. Preconfigured Bazel build configs to DISABLE default on features: --config=noaws # Disable AWS S3 filesystem support. --config=nogcp # Disable GCP support. --config=nohdfs # Disable HDFS support. --config=noignite # Disable Apacha Ignite support. --config=nokafka # Disable Apache Kafka support. --config=nonccl # Disable NVIDIA NCCL support. Configuration finished 编译: hp@dla:~/work/ts_compile/tensorflow$ bazel build --config=opt --config=mkl --verbose_failures //tensorflow/tools/pip_package:build_pip_package 卸载已有tensorflow: hp@dla:~/temp$ sudo pip3 uninstall tensorflow 安装自己编译的成果: hp@dla:~/temp$ sudo pip3 install tensorflow-1.12.0-cp35-cp35m-linux_x86_64.whl

“相关推荐”对你有帮助么?

  • 非常没帮助
  • 没帮助
  • 一般
  • 有帮助
  • 非常有帮助
提交
评论
添加红包

请填写红包祝福语或标题

红包个数最小为10个

红包金额最低5元

当前余额3.43前往充值 >
需支付:10.00
成就一亿技术人!
领取后你会自动成为博主和红包主的粉丝 规则
hope_wisdom
发出的红包
实付
使用余额支付
点击重新获取
扫码支付
钱包余额 0

抵扣说明:

1.余额是钱包充值的虚拟货币,按照1:1的比例进行支付金额的抵扣。
2.余额无法直接购买下载,可以购买VIP、付费专栏及课程。

余额充值