【swagger】spring security中 swagger和knife4j集成 无法访问 返回结果没有内容

作为一个强迫症重度的程序猿 不想多导一个jar包

本文创作背景是鉴于网上大多数是旧版本swagger2的教程,且没有针对2和3区别描述,话不多说 直接步入正题。

导包正确方式

如果只需要knife4j文档 导这一个包就够了 这里以3.0+版本举例
(对springboot比较熟悉的同学应该清楚 starter目的就是将其它包并入一个包 旨在开箱即用 一个正确的stater 会把其它杂七杂八的包 都包含在里面)

		<!-- 如果只需要knife4j文档 导这一个包就够了 -->
        <dependency>
            <groupId>com.github.xiaoymin</groupId>
            <artifactId>knife4j-spring-boot-starter</artifactId>
            <version>3.0.3</version>
        </dependency>

如果还想同时使用swagger界面 那么需要额外一个包:

        <!--可选,引入后,原/swagger-ui.html提供的页面仍可正常使用-->
        <dependency>
            <groupId>io.springfox</groupId>
            <artifactId>springfox-swagger-ui</artifactId>
            <version>3.0.0</version>
        </dependency>

如果不想用knife4j 只想用swagger 不需要上面的包 那么只需要下面这个包:

        <dependency>
            <groupId>io.springfox</groupId>
            <artifactId>springfox-boot-starter</artifactId>
            <version>3.0.0</version>
        </dependency>

本文是基于security环境 security的jar包


        <dependency>
            <groupId>org.springframework.boot</groupId>
            <artifactId>spring-boot-starter-security</artifactId>
        </dependency>

swagger2在security中放行

在swagger2中,根据大部分教程 我们的放行姿势 是经典的四件套:

/webjars/**
/swagger-resources/**
/v2/**
/swagger-ui/**

代码示例如下:

@Configuration
public class SecuritySecureConfig extends WebSecurityConfigurerAdapter {

    /** WebSecurity 不走过滤链的放行  即不通过security 完全对外的/最大级别的放行 **/
    @Override
    public void configure(WebSecurity web) throws Exception {
          // test直接放行了  如果是login接口 必须通过HttpSecurity 走过滤链 因为登录涉及 SecurityContextHolder
        web.ignoring().antMatchers("/test/**");
    }

    @Override
    protected void configure(HttpSecurity http) throws Exception {
        // 登录成功处理类
        SavedRequestAwareAuthenticationSuccessHandler successHandler = new SavedRequestAwareAuthenticationSuccessHandler();
        successHandler.setTargetUrlParameter("redirectTo");

        http.authorizeRequests()
                //静态文件允许访问
                .antMatchers("/assets/**").permitAll()
                .antMatchers("/webjars/**").permitAll()
                .antMatchers("/swagger-resources/**").permitAll()
                .antMatchers("/v2/**").permitAll()
                
                .antMatchers(  "/swagger-ui/**").permitAll()
                // 放行
                .antMatchers( "/login","css/**","/js/**","/image/*").permitAll()
                //其他所有请求需要登录, anyRequest 不能配置在 antMatchers 前面
                .anyRequest().authenticated()
                .and()
                //登录页面配置,用于替换security默认页面
//                .formLogin().loginPage(  "/login").successHandler(successHandler).and()
                //登出页面配置,用于替换security默认页面
//                .logout().logoutUrl( "/logout").and()
                .httpBasic();

    }
}

这段代码基本正确,但是有个隐患 : /v2/**
如果有同学遇到v2版本的开发, 且将接口以/v2开头 将造成严重后果
所以博主推荐 不要为了省事那么写 最好写全: /v2/api-docs


swagger3在security中放行

当某一天 我们版本迭代升级 更新到swagger3的时候,用上面配置 会发现swagger、knife都无法访问 这这这为什么呢?

下面提一下博主的分析思路:

knife4j放行失败原因分析:

其它配置未改变 只是starter版本升级 导致的放行失败 一般可以推测是两个原因:

  1. security 机制改变 正确放行姿势 不再是

             http.authorizeRequests()
             .antMatchers("/xxx/**").permitAll()
    

    但是我们应该明白 swagger只是一个额外的文档工具 它不应该去改变security的机制 所以这点我们可以排除

  2. 放行失败 说明url被拦截,url被拦截 那就意味着升级后 文档地址可能发生了改变

  3. 所以我们可以先将security的jar包先去除,观察knife4j文档页面:
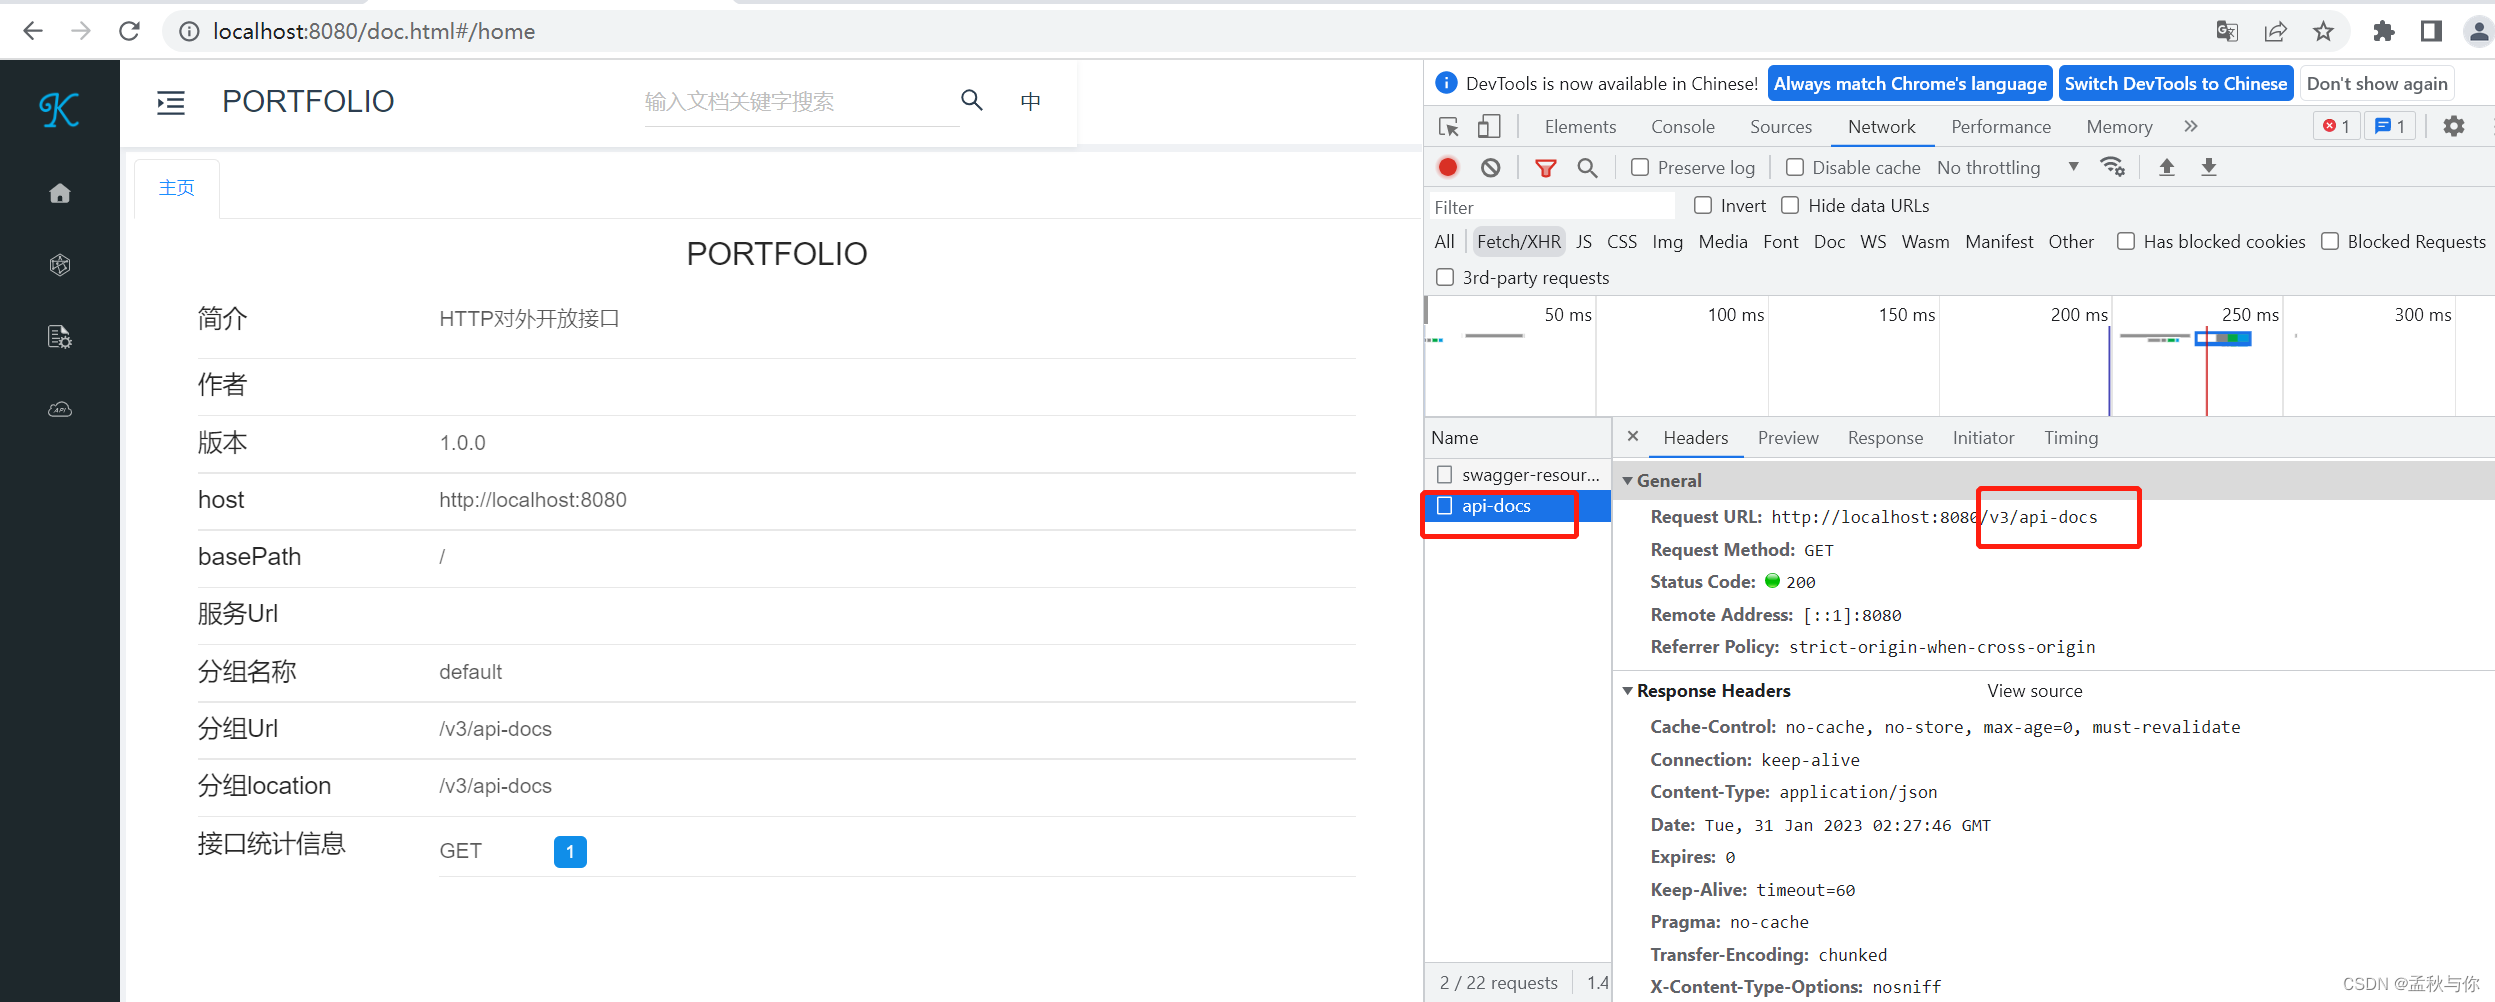
    在这里插入图片描述

由此我们可知 需要新增一行放行代码:

      .antMatchers("/v3/api-docs").permitAll()

再将security包 重新加回项目中

swagger访问失败原因分析:

knife4j是因为url的变更 那swagger有没有也是这种可能呢?

我们之前(swagger2)的访问url是

localhost:8080/swagger-ui.html

这个地址是怎么来的呢?

在这里插入图片描述
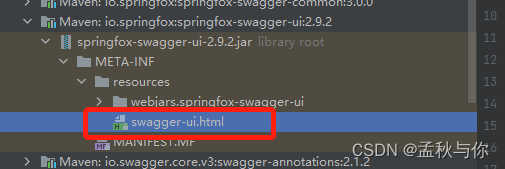
html是在swagger-ui jar包中

那再看看swagger3中 它变成了什么:
在这里插入图片描述

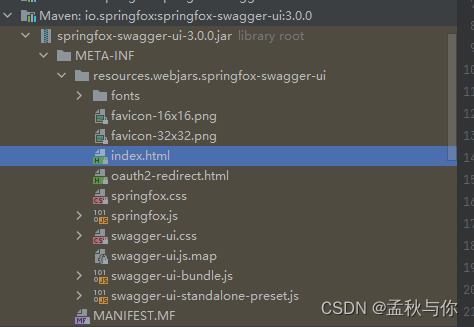
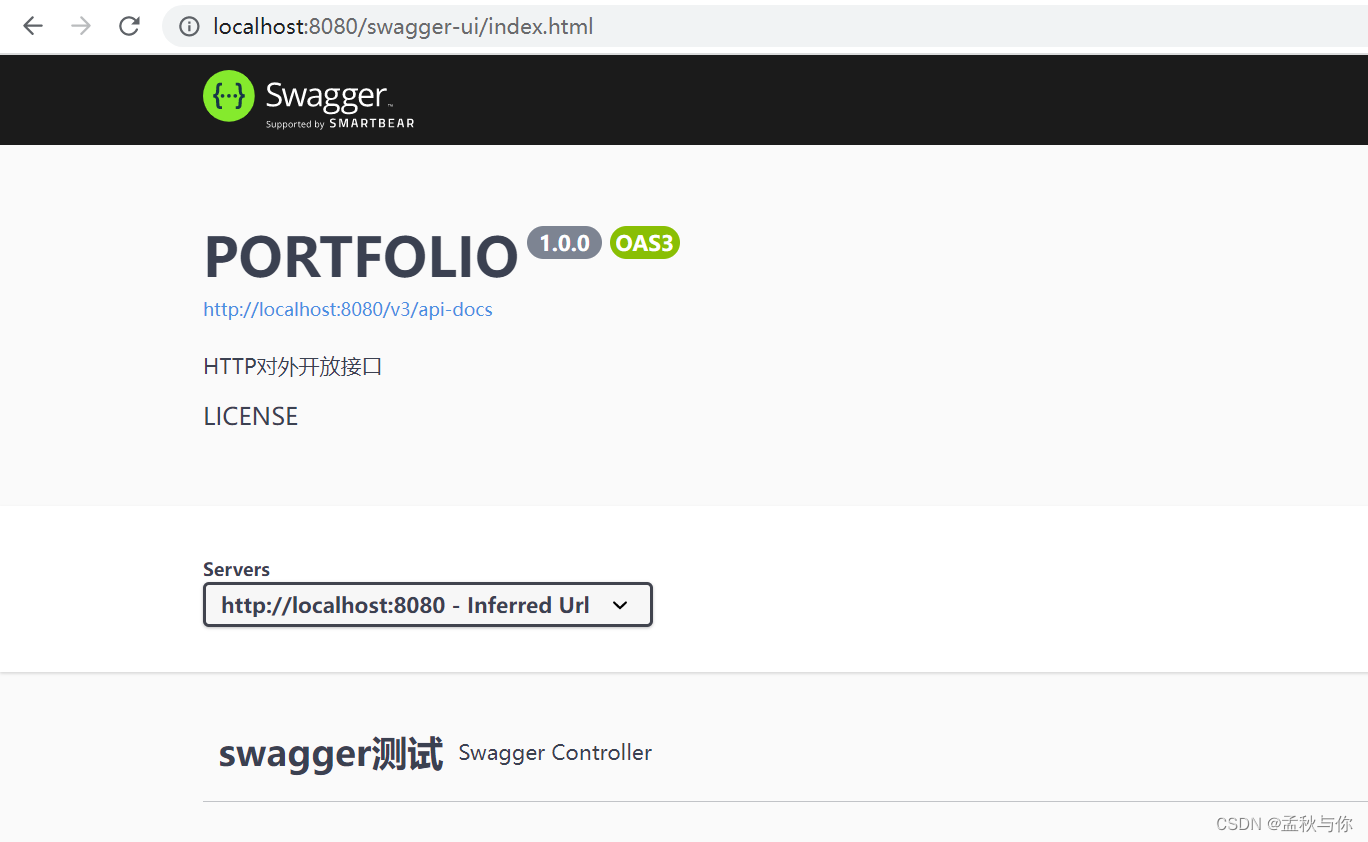
没错 名字发生了改变,我们在swagger3中的正确访问url为:

localhost:8080/swagger-ui/index.html

在这里插入图片描述

响应结果没有内容问题

例如我们封装了一个Result类 作为统一的返回结果类,需要补全泛型,如:

public Result<People> getPeopleList(){
	return new Result(xxxx)
}
  • 1
    点赞
  • 5
    收藏
    觉得还不错? 一键收藏
  • 打赏
    打赏
  • 0
    评论
### 回答1: 可以使用 Springfox 来集成 SwaggerKnife4jSpringfox 是一个用于构建 Swagger UIKnife4j UI 的库。可以通过简单的配置,将 SwaggerKnife4j 集成Spring Boot 项目。 ### 回答2: Spring Boot 集成 SwaggerKnife4j 的步骤如下: 1. 在项目的 pom.xml 文件添加相关依赖: ```xml <!-- Swagger2 依赖 --> <dependency> <groupId>io.springfox</groupId> <artifactId>springfox-boot-starter</artifactId> <version>3.0.0</version> </dependency> <!-- Knife4j 依赖 --> <dependency> <groupId>com.github.xiaoymin</groupId> <artifactId>knife4j-spring-boot-starter</artifactId> <version>3.0.1</version> </dependency> ``` 2. 在项目的启动类上增加注解 `@EnableSwagger2`。 ```java @SpringBootApplication @EnableSwagger2 public class Application { public static void main(String[] args) { SpringApplication.run(Application.class, args); } } ``` 3. 配置 Swagger 相关参数,创建一个配置类(如 SwaggerConfig)。 ```java @Configuration public class SwaggerConfig { @Bean public Docket api() { return new Docket(DocumentationType.SWAGGER_2) .apiInfo(apiInfo()) .select() .apis(RequestHandlerSelectors.basePackage("com.example.demo")) .paths(PathSelectors.any()) .build(); } private ApiInfo apiInfo() { return new ApiInfoBuilder() .title("API 文档") .description("示例项目的API文档") .version("1.0.0") .build(); } } ``` 4. 在浏览器访问 Swagger 文档,URL 一般为 `http://localhost:8080/swagger-ui.html`,通过 Swagger 可以查看和测试 API 接口。 5. 如需使用 Knife4j 的增强功能,修改 Swagger 配置类的 `Docket` 为 `Knife4jDocket`。 ```java @Configuration public class SwaggerConfig { @Bean public Knife4jDocket knife4jDocket() { return new Knife4jDocket(DocumentationType.SWAGGER_2) .apiInfo(apiInfo()) .select() .apis(RequestHandlerSelectors.basePackage("com.example.demo")) .paths(PathSelectors.any()) .build(); } private ApiInfo apiInfo() { return new ApiInfoBuilder() .title("API 文档") .description("示例项目的API文档") .version("1.0.0") .build(); } } ``` 经过以上步骤,就可以成功集成 SwaggerKnife4j,通过 Swagger 可以方便地查看和测试 API 接口文档,同时 Knife4j 提供了更多的增强功能,可以更好地管理和展示 API 接口文档。 ### 回答3: 在Spring Boot集成SwaggerKnife4j的步骤如下: 1. 添加依赖: 在Maven的pom.xml文件,添加以下依赖: ```xml <dependency> <groupId>io.springfox</groupId> <artifactId>springfox-swagger2</artifactId> <version>2.9.2</version> </dependency> <dependency> <groupId>io.springfox</groupId> <artifactId>springfox-swagger-ui</artifactId> <version>2.9.2</version> </dependency> <dependency> <groupId>com.github.xiaoymin</groupId> <artifactId>knife4j-spring-boot-starter</artifactId> <version>2.0.2</version> </dependency> ``` 2. 创建Swagger配置类: 创建一个Swagger配置类,用于配置Swagger的相关参数。可以参考以下示例代码: ```java import org.springframework.context.annotation.Bean; import org.springframework.context.annotation.Configuration; import springfox.documentation.builders.ApiInfoBuilder; import springfox.documentation.builders.PathSelectors; import springfox.documentation.builders.RequestHandlerSelectors; import springfox.documentation.service.ApiInfo; import springfox.documentation.spi.DocumentationType; import springfox.documentation.spring.web.plugins.Docket; import springfox.documentation.swagger2.annotations.EnableSwagger2; @Configuration @EnableSwagger2 public class SwaggerConfig { @Bean public Docket api() { return new Docket(DocumentationType.SWAGGER_2) .apiInfo(apiInfo()) .select() .apis(RequestHandlerSelectors.basePackage("com.example.controller")) .paths(PathSelectors.any()) .build(); } private ApiInfo apiInfo() { return new ApiInfoBuilder() .title("API文档") .description("API文档") .version("1.0") .build(); } } ``` 3. 配置Knife4j的扩展设置: 创建一个Knife4j配置类,用于配置Knife4j的相关参数。可以参考以下示例代码: ```java import org.springframework.context.annotation.Bean; import org.springframework.context.annotation.Configuration; import org.springframework.web.servlet.config.annotation.ResourceHandlerRegistry; import org.springframework.web.servlet.config.annotation.WebMvcConfigurer; import springfox.documentation.swagger2.annotations.EnableSwagger2WebMvc; @Configuration @EnableSwagger2WebMvc public class Knife4jConfig implements WebMvcConfigurer { @Override public void addResourceHandlers(ResourceHandlerRegistry registry) { registry.addResourceHandler("doc.html") .addResourceLocations("classpath:/META-INF/resources/"); registry.addResourceHandler("/webjars/**") .addResourceLocations("classpath:/META-INF/resources/webjars/"); } @Bean public Knife4jProperties knife4jProperties() { Knife4jProperties properties = new Knife4jProperties(); properties.setEnableKnife4j(true); return properties; } } ``` 4. 启动应用程序: 启动Spring Boot应用程序,并访问"http://localhost:8080/swagger-ui.html",即可查看生成的Swagger API文档。 总结: 通过添加相关的依赖和配置类,我们可以很容易地在Spring Boot集成SwaggerKnife4jSwagger用于生成API文档,而Knife4j是对Swagger的扩展,提供了更丰富的功能和界面。集成后,我们可以方便地查看和测试接口文档。

“相关推荐”对你有帮助么?

  • 非常没帮助
  • 没帮助
  • 一般
  • 有帮助
  • 非常有帮助
提交
评论
添加红包

请填写红包祝福语或标题

红包个数最小为10个

红包金额最低5元

当前余额3.43前往充值 >
需支付:10.00
成就一亿技术人!
领取后你会自动成为博主和红包主的粉丝 规则
hope_wisdom
发出的红包

打赏作者

孟秋与你

你的鼓励将是我创作的最大动力

¥1 ¥2 ¥4 ¥6 ¥10 ¥20
扫码支付:¥1
获取中
扫码支付

您的余额不足,请更换扫码支付或充值

打赏作者

实付
使用余额支付
点击重新获取
扫码支付
钱包余额 0

抵扣说明:

1.余额是钱包充值的虚拟货币,按照1:1的比例进行支付金额的抵扣。
2.余额无法直接购买下载,可以购买VIP、付费专栏及课程。

余额充值