


文章目录
前言
对于小白,第一次搭建SSM + Dubbo是有许多不清楚的地方。在网上找了好多教程,发现有些存在很多问题。因此,想做个笔记,方便以后搭建此类框架,也为其他小白提供素材
实例代码入口如下
提示:以下是本篇文章正文内容,下面案例可供参考
一、基本架构
此实例项目由单体SSM系统改造过来。因此,为了方便实现生产者+消费者,我把service层作为生产者,controller层作为消费者。bean层等作为接口包。
生产者与消费者,二者之间的通信靠ZooKeeper完成。
先来看下模块架构图
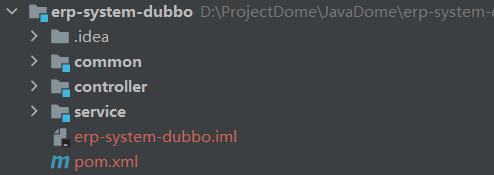
只需要三个模块:其中
- common提供Bean与接口,打包方式为jar
- service是生产者,打包方式为war
- controller是消费者,打包方式为war
接下来是介绍完整搭建整个项目
二、搭建项目
1.开启ZooKeeper
这一步非常简单,网上的教程到处都是.不愿寻找的可以查看此篇博客windows-安装zookeeper+dubbo-admin管理控制台
2.构建common模块
maven新建一个spring项目即可

该模块为provider与consumer提供依赖,service接口和bean类,截取部分代码如下
service接口:
package shop.service;

import shop.bean.Sh;
import java.util.List;

public interface ShService {
	int  ck(Sh sh);
	int cksh(Sh sh);
	int jj(int id);
	List  cc(int sh);
	List bb();
	List  hws(String hw);
	Sh hwss(int id);
	List bbs();
}
bean类:(需要实现Serializable接口)
package shop.bean;

import java.io.Serializable;
import java.util.Date;

public class Sh implements Serializable {
	private static final long serialVersionUID = 1L;
	private int  id;
	private String  hw;//货物名称
	private String name;//客户名称
	private String money;//进货价格
	private String jg;//出货价格
	private String lr;//利润
	private String phone;//客户联系方式
	private int sh;
	private Date date;
	private int sl;
	private String zrr;
	public String getZrr() {
		return zrr;
	}
	public void setZrr(String zrr) {
		this.zrr = zrr;
	}
	public int getSl() {
		return sl;
	}
	public void setSl(int sl) {
		this.sl = sl;
	}
	public Date getDate() {
		return date;
	}
	public void setDate(Date date) {
		this.date = date;
	}
	public int getSh() {
		return sh;
	}
	public void setSh(int sh) {
		this.sh = sh;
	}
	public int getId() {
		return id;
	}
	public void setId(int id) {
		this.id = id;
	}
	public String getHw() {
		return hw;
	}
	public void setHw(String hw) {
		this.hw = hw;
	}
	public String getName() {
		return name;
	}
	public void setName(String name) {
		this.name = name;
	}
	public String getMoney() {
		return money;
	}
	public void setMoney(String money) {
		this.money = money;
	}
	public String getJg() {
		return jg;
	}
	public void setJg(String jg) {
		this.jg = jg;
	}
	public String getLr() {
		return lr;
	}
	public void setLr(String lr) {
		this.lr = lr;
	}
	public String getPhone() {
		return phone;
	}
	public void setPhone(String phone) {
		this.phone = phone;
	}

	@Override
	public String toString() {
		return "Sh{" +
				"id=" + id +
				", hw='" + hw + '\'' +
				", name='" + name + '\'' +
				", money='" + money + '\'' +
				", jg='" + jg + '\'' +
				", lr='" + lr + '\'' +
				", phone='" + phone + '\'' +
				", sh=" + sh +
				", date=" + date +
				", sl=" + sl +
				", zrr='" + zrr + '\'' +
				'}';
	}
}
3. 构建service模块
结构图如下

1. Service
这是实现类,也是生产者主要负责生产的Bean。这里有两个值得注意的地方, 想少走弯路的话,还请注意一下这些细节:
- 注解@Service引用的是
import org.springframework.stereotype.Service;而非Dubbo提供的那个@Service - 该类实现了BeanNameAware, BeanFactoryAware, InitializingBean,主要目的是为了知道该类是否已经被加载成Bean了。如果启动日志中没有那些输出语句,那说明生产者端出了问题。
package shop.service.impl;

import org.springframework.beans.factory.annotation.Autowired;
import org.springframework.stereotype.Service;
import shop.bean.Hw;
import shop.dao.HwDao;
import shop.service.HwService;
import java.util.List;

@Service
public class HwServiceImpl implements HwService {

	@Autowired
	private HwDao hd;

	@Override
	public List sp(Hw hw) {
		// TODO Auto-generated method stub
		return hd.sp(hw);
	}

	@Override
	public int spxj(Hw hw) {
		// TODO Auto-generated method stub
		return hd.spxj(hw);
	}

	@Override
	public int xjrk(Hw hw) {
		// TODO Auto-generated method stub
		return hd.xjrk(hw);
	}

	public Hw dy(int id) {
		// TODO Auto-generated method stub
		return hd.dy(id);
	}

	@Override
	public int ckkk(Hw hw) {
		// TODO Auto-generated method stub
		return hd.ckkk(hw);
	}

	@Override
	public Hw dys(String name) {
		// TODO Auto-generated method stub
		return hd.dys(name);
	}

	@Override
	public int jj(int id) {
		// TODO Auto-generated method stub
		return hd.jj(id);
	}

	@Override
	public int updateHw(Hw hw) {
		// TODO Auto-generated method stub
		return hd.updateHw(hw);
	}
}
2. spring-dubbo.xml
<?xml version="1.0" encoding="UTF-8"?>
<beans xmlns="http://www.springframework.org/schema/beans"
xmlns:xsi="http://www.w3.org/2001/XMLSchema-instance" xmlns:dubbo="http://code.alibabatech.com/schema/dubbo"
xsi:schemaLocation="http://www.springframework.org/schema/beans http://www.springframework.org/schema/beans/spring-beans.xsd http://code.alibabatech.com/schema/dubbo http://code.alibabatech.com/schema/dubbo/dubbo.xsd">
<!-- 提供方应用信息,用于计算依赖关系 -->
<dubbo:application name="service" organization="dubbox"/>
<!-- 使用zookeeper注册中心暴露服务地址 -->
<dubbo:registry address="zookeeper://127.0.0.1:2181" check="false"/>
<!-- 用dubbo协议在20880端口暴露服务 -->
<dubbo:protocol name="dubbo" port="20880" />
<dubbo:consumer check="false"/>
<dubbo:annotation package="shop.service.impl" />
<!-- 声明需要暴露的服务接口 -->
<dubbo:service interface="shop.service.HwService" ref="hwService"/>
<dubbo:service interface="shop.service.ShService" ref="shService"/>
<dubbo:service interface="shop.service.UserService" ref="userService"/>
<!-- <!– 具体的实现bean –>-->
<bean id="hwService" class="shop.service.impl.HwServiceImpl"/>
<bean id="shService" class="shop.service.impl.ShServiceImpl"/>
<bean id="userService" class="shop.service.impl.UserServiceImpl"/>
</beans>
3. applicationContext.xml
<?xml version="1.0" encoding="UTF-8"?>
<beans xmlns="http://www.springframework.org/schema/beans"
       xmlns:xsi="http://www.w3.org/2001/XMLSchema-instance"
       xmlns:context="http://www.springframework.org/schema/context"
       xmlns:aop="http://www.springframework.org/schema/aop" xmlns:tx="http://www.springframework.org/schema/tx"
       xsi:schemaLocation="http://www.springframework.org/schema/beans http://www.springframework.org/schema/beans/spring-beans.xsd
        http://www.springframework.org/schema/context http://www.springframework.org/schema/context/spring-context.xsd
        http://www.springframework.org/schema/aop http://www.springframework.org/schema/aop/spring-aop.xsd
        http://www.springframework.org/schema/mvc http://www.springframework.org/schema/mvc/spring-mvc.xsd
        http://www.springframework.org/schema/jee http://www.springframework.org/schema/jee/spring-jee.xsd
        http://www.springframework.org/schema/tx http://www.springframework.org/schema/tx/spring-tx.xsd">

    <!-- 1.配置jdbc文件 -->
    <bean id="propertyConfigurer" class="org.springframework.beans.factory.config.PropertyPlaceholderConfigurer">
        <property name="locations" value="classpath:dbConfig.properties"/>
    </bean>

    <!--使用注解驱动Spring IoC-->
    <context:annotation-config/>

    <!--xmlns:context="http://www.springframework.org/schema/context"-->
    <!--除了控制器都扫描,和SpringMVC相反-->
    <context:component-scan base-package="shop">
        <context:exclude-filter type="annotation" expression="org.springframework.stereotype.Controller"/>
    </context:component-scan>

    <!--6 容器自动扫描IOC组件  -->
    <import resource="spring-mybatis.xml"/>
    <import resource="spring-dubbo.xml"/>
    <!--   -->

    <!--开启基于注解的事务,使用xml配置形式的事务(必要主要的都是使用配置式)-->
    <aop:config>
        <!--切入点表达式-->
        <aop:pointcut expression="execution(* shop.service..*(..))" id="txPoint" />
        <!--配置事务增强-->
        <aop:advisor advice-ref="txAdvice" pointcut-ref="txPoint" />
    </aop:config>

    <!--配置事务增强,事务如何切入-->
    <tx:advice id="txAdvice" transaction-manager="transactionManager">
        <tx:attributes>
            <!--所有方法都是事务方法-->
            <tx:method name="*"/>
            <!--以get开始的所有方法-->
            <tx:method name="get" read-only="true"/>
        </tx:attributes>
    </tx:advice>
    <!--    -->
</beans>
4. mybatis-config.xml
<?xml version="1.0" encoding="utf-8" ?>
<!DOCTYPE configuration
        PUBLIC "-//mybatis.org//DTD Config 3.0//EN"
        "http://mybatis.org/dtd/mybatis-3-config.dtd">
<configuration>
    <settings>
        <setting name="mapUnderscoreToCamelCase" value="true"/>
        <setting name="logImpl" value="LOG4J"/>
    </settings>

    <typeAliases>
        <package name="shop.bean" />
    </typeAliases>

    <!--分页插件-->
    <plugins>
        <plugin interceptor="com.github.pagehelper.PageInterceptor"/>
    </plugins>
</configuration>
5. log4j.properties
项目中使用xml配置,都可以
log4j.rootLogger=DEBUG , stdout
log4j.logger.org.mybatis=DEBUG
log4j.appender.stdout=org.apache.log4j.ConsoleAppender
log4j.appender.stdout.layout=org.apache.log4j.PatternLayout
log4j.appender.stdout.layout.ConversionPattern=%5p %d %C: %m%n
6. web.xml
注意细节:别忘了Spring IoC容器的启动语句!!!!
<!DOCTYPE web-app PUBLIC
        "-//Sun Microsystems, Inc.//DTD Web Application 2.3//EN"
        "http://java.sun.com/dtd/web-app_2_3.dtd" >
<web-app xmlns:xsi="http://www.w3.org/2001/XMLSchema-instance" xmlns="http://java.sun.com/xml/ns/javaee"
         xsi:schemaLocation="http://java.sun.com/xml/ns/javaee http://java.sun.com/xml/ns/javaee/web-app_3_0.xsd"
         version="3.0">
    <display-name>Archetype Created Web Application</display-name>


    <!-- log4j配置文件地址 -->
    <context-param>
        <param-name>log4jConfigLocation</param-name>
        <param-value>classpath:log4j2.xml</param-value>
    </context-param>
    <!-- Spring IoC配置文件地址,同时也是Spring AOP的配置地址. -->
    <!--  因为Spring IoC和Spring AOP都是Spring的组件,所以这个也可以看成Spring的配置地址-->
    <context-param>
        <param-name>contextConfigLocation</param-name>
        <param-value>classpath:applicationContext.xml</param-value>
    </context-param>
    <!-- Log4j的监听器要放在spring监听器前面 -->
    <listener>
        <listener-class>org.apache.logging.log4j.web.Log4jServletContextListener</listener-class>
    </listener>
    <filter>
        <filter-name>log4jServletFilter</filter-name>
        <filter-class>org.apache.logging.log4j.web.Log4jServletFilter</filter-class>
    </filter>
    <filter-mapping>
        <filter-name>log4jServletFilter</filter-name>
        <url-pattern>/*</url-pattern>
        <dispatcher>REQUEST</dispatcher>
        <dispatcher>FORWARD</dispatcher>
        <dispatcher>INCLUDE</dispatcher>
        <dispatcher>ERROR</dispatcher>
    </filter-mapping>
    <listener>
        <listener-class>org.springframework.web.context.ContextLoaderListener</listener-class>
    </listener>
</web-app>
4. 构建controller模块
结构图如下

消费者端比较简单,只要生产者端OK了,这边也不太可能会出问题。
1. Controller
注意:这里使用的注解是@Resource,而非@Autowired
package shop.controller;

import net.sf.json.JSONArray;
import net.sf.json.JSONObject;
import org.springframework.stereotype.Controller;
import org.springframework.ui.Model;
import org.springframework.web.bind.annotation.RequestMapping;
import org.springframework.web.bind.annotation.ResponseBody;
import shop.bean.Hw;
import shop.bean.Sh;
import shop.bean.User;
import shop.service.HwService;
import shop.service.ShService;
import shop.service.UserService;

import javax.annotation.Resource;
import javax.servlet.http.HttpSession;
import java.math.BigDecimal;
import java.sql.Date;
import java.text.ParseException;
import java.text.SimpleDateFormat;
import java.util.ArrayList;
import java.util.HashMap;
import java.util.List;
import java.util.Map;


@Controller
@RequestMapping("/user/")
public class UserController {

	@Resource
	private UserService u;
	@Resource
	private HwService h;
	@Resource
	private ShService s;

	// login
	@RequestMapping("tzlogin")
	public String tzlogin() {
		return "redirect:/";
	}

	// 登录验证
	@ResponseBody
	@RequestMapping("login")
	public String login(User user, HttpSession session, String requestDate) {
		Map map = new HashMap();
		JSONObject requestJson = JSONObject.fromObject(requestDate);
		System.out.println("login =========》》》" + requestDate);
		map.put("name", requestJson.getString("name"));
		map.put("password", requestJson.getString("password"));
		user.setName(requestJson.getString("name"));
		user.setPassword(requestJson.getString("password"));
		System.out.println("login =========》》》" + user);
		User user2 = u.login(user);
		if (user2 == null) {
			Map reMap = new HashMap();
			reMap.put("succ", "false");
			JSONObject jsonObject = JSONObject.fromObject(reMap);
			return jsonObject.toString();
		} else {

			if(user2.getT2() == 1){
				Map reMap = new HashMap();
				reMap.put("succ", "no_auth");
				JSONObject jsonObject = JSONObject.fromObject(reMap);
				return jsonObject.toString();
			}

			session.setAttribute("t2", user2.getT2());
			session.setAttribute("id", user2.getId());
			System.out.println("user2" + user2);
			session.setAttribute("name", user2.getName());
			session.setAttribute("user", user2);
			session.setAttribute("t1", user2.getT1());
			Map reMap = new HashMap();
			reMap.put("succ", "true");
			JSONObject jsonObject = JSONObject.fromObject(reMap);
			return jsonObject.toString();
		}

	}

	@RequestMapping("sy")
	public String denglu(HttpSession session, String t2, Model model, String name, User user) {
		int qx = (int) session.getAttribute("t1");
		// model.addAttribute("list", u.findall());
		if (qx == 0) {
			model.addAttribute("list", u.findall(user));
			return "gly/yh";
		} else if (qx == 1) {
			model.addAttribute("list", u.findall(user));
			return "gly/yh";
		} else if (qx == 2) {
			return "redirect:tzckxs";
		} else if (qx == 3) {
			return "redirect:tzkccg";
		}
		return "redirect:/";
	}
	//...............................
}
2. spring-dubbo.xml
<?xml version="1.0" encoding="UTF-8"?>
<beans xmlns="http://www.springframework.org/schema/beans"
       xmlns:xsi="http://www.w3.org/2001/XMLSchema-instance"
       xmlns:context="http://www.springframework.org/schema/context"
       xmlns:dubbo="http://code.alibabatech.com/schema/dubbo"
       xsi:schemaLocation="http://www.springframework.org/schema/beans http://www.springframework.org/schema/beans/spring-beans.xsd http://www.springframework.org/schema/context http://www.springframework.org/schema/context/spring-context.xsd http://code.alibabatech.com/schema/dubbo http://code.alibabatech.com/schema/dubbo/dubbo.xsd">

    <dubbo:application name="controller" owner="user" organization="dubbox"/>
    <!--向 zookeeper 订阅 provider 的地址,由 zookeeper 定时推送-->
    <dubbo:registry address="zookeeper://127.0.0.1:2181"/>
    <!--使用 dubbo 协议调用定义好的 api.PermissionService 接口-->
    <dubbo:reference id="userService" interface="shop.service.UserService"/>
    <dubbo:reference id="hwService" interface="shop.service.HwService"/>
    <dubbo:reference id="shService" interface="shop.service.ShService"/>
    <!--注解扫描 扫描的是dubbo的 @Reference注解-->
    <dubbo:annotation package="shop.controller"/>

    <!--spring的扫描包,扫描的是spring的注解-->
    <context:component-scan base-package="shop.controller"/>

</beans>
3. spring-mvc.xml
<?xml version="1.0" encoding="UTF-8"?>
<beans xmlns="http://www.springframework.org/schema/beans"
	xmlns:xsi="http://www.w3.org/2001/XMLSchema-instance"
	xmlns:context="http://www.springframework.org/schema/context"
	xmlns:mvc="http://www.springframework.org/schema/mvc"
	xsi:schemaLocation="http://www.springframework.org/schema/mvc http://www.springframework.org/schema/mvc/spring-mvc-4.3.xsd
		http://www.springframework.org/schema/beans http://www.springframework.org/schema/beans/spring-beans-3.2.xsd
		http://www.springframework.org/schema/context http://www.springframework.org/schema/context/spring-context-4.3.xsd">
    <!--SpringMVC的配置,包含网站跳转逻辑的控制配置-->
    <context:component-scan base-package="shop.controller" use-default-filters="false">
        <!--只扫描控制器-->
        <context:include-filter type="annotation" expression="org.springframework.stereotype.Controller"/>
    </context:component-scan>

    <!--配置视图解析器,方便页面返回-->
    <bean class="org.springframework.web.servlet.view.InternalResourceViewResolver">
        <property name="prefix" value="/WEB-INF/views/"/>
        <property name="suffix" value=".jsp"/>
    </bean>

    <!--两个标准配置-->
    <!--将springmvc不能处理的请求交给tomcat-->
    <mvc:default-servlet-handler />
    <!--能支持springMVC的更高级的一些功能,JSP303校验,快捷的ajax。。映射动态请求-->
    <mvc:annotation-driven />

    <!-- 文件上传配置 -->
    <bean name="multipartResolver" class="org.springframework.web.multipart.commons.CommonsMultipartResolver">
        <!-- 默认编码 -->
        <property name="defaultEncoding" value="UTF-8"/>
        <!-- 上传文件大小限制为31M,31*1024*1024 -->
        <property name="maxUploadSize" value="32505856"/>
        <!-- 内存中的最大值 -->
        <property name="maxInMemorySize" value="4096"/>
    </bean>

</beans>
4. applicationContext.xml
<?xml version="1.0" encoding="UTF-8"?>
<beans xmlns="http://www.springframework.org/schema/beans"
       xmlns:xsi="http://www.w3.org/2001/XMLSchema-instance"
       xsi:schemaLocation="http://www.springframework.org/schema/beans http://www.springframework.org/schema/beans/spring-beans.xsd">

    <!--6 容器自动扫描IOC组件  -->
    <import resource="spring-dubbo.xml"/>
</beans>
3. 配置tomcat启动服务
总结
以上就是今天要讲的内容,本文仅仅简单介绍了如何搭建一个SSM + Dubbo框架,如果还有遇到其他具体的问题,可以留言讨论!


 727
727


 被折叠的 条评论
为什么被折叠?
被折叠的 条评论
为什么被折叠?
 到【灌水乐园】发言


